
1. Concept
What is iptables
Iptables is a user-space utility program that allows the configuration of Netfilter filtering functions. Netfilter itself is the true security framework of the firewall, residing in the kernel space. Iptables is essentially a command-line tool situated in user space that we use to interact with the actual framework. Iptables handles packets based on rules defined in terms of actions like accept, reject, and drop.
For instance, when a client accesses a server’s web service, the client sends packets to the network card. The TCP/IP protocol stack is part of the kernel, thus client information is transferred through the kernel’s TCP protocol to the web service in user space. At this point, the client’s packet destination is the socket (IP:Port) which the web service monitors. When the web service needs to respond to a client request, the response packet’s target destination is the client. Here, the IP and port monitored by the web service become the origin point. As mentioned, Netfilter is the real firewall, being part of the kernel. Therefore, to achieve the “fire prevention” objective of a firewall, checkpoints need to be set up in the kernel, verifying all incoming and outgoing packets. Only those meeting clearance criteria can pass through, and those meeting obstruction criteria must be blocked.
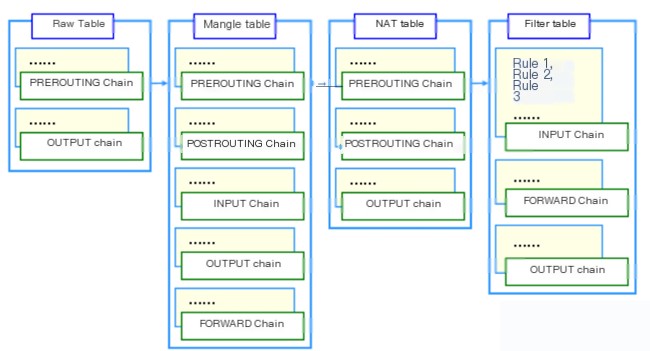
Four Tables and Five Chains
Iptables comprises four tables and five chains. Tables are distinguished by their operations on packets (e.g., filtering, NAT), while chains are differentiated by various hook points. Tables and chains are essentially two dimensions of Netfilter.
The four tables of iptables are filter, mangle, nat, and raw, with the default table being filter.
- Filter Table: Used for packet filtering. Specific rules determine how to process packets.
- NAT Table: Primarily used for modifying a packet’s IP address and port information.
- Mangle Table: Mainly used for setting packet type of service, time to live, marking packets, enabling traffic shaping, policy routing, etc.
- Raw Table: Primarily used to decide whether packets should undergo state tracking.
The five chains of iptables are PREROUTING, INPUT, FORWARD, OUTPUT, and POSTROUTING.
- INPUT Chain: Applied to packets addressed to the local machine.
- OUTPUT Chain: Applied to packets being sent out by the local machine.
- FORWARD Chain: Applied to packets that need to be forwarded to another address. Note: To enable forwarding, the ip_forward feature in the Linux kernel must be activated.
- PREROUTING Chain: Applied to packets before routing decisions are made.
- POSTROUTING Chain: Applied to packets after routing decisions are made.
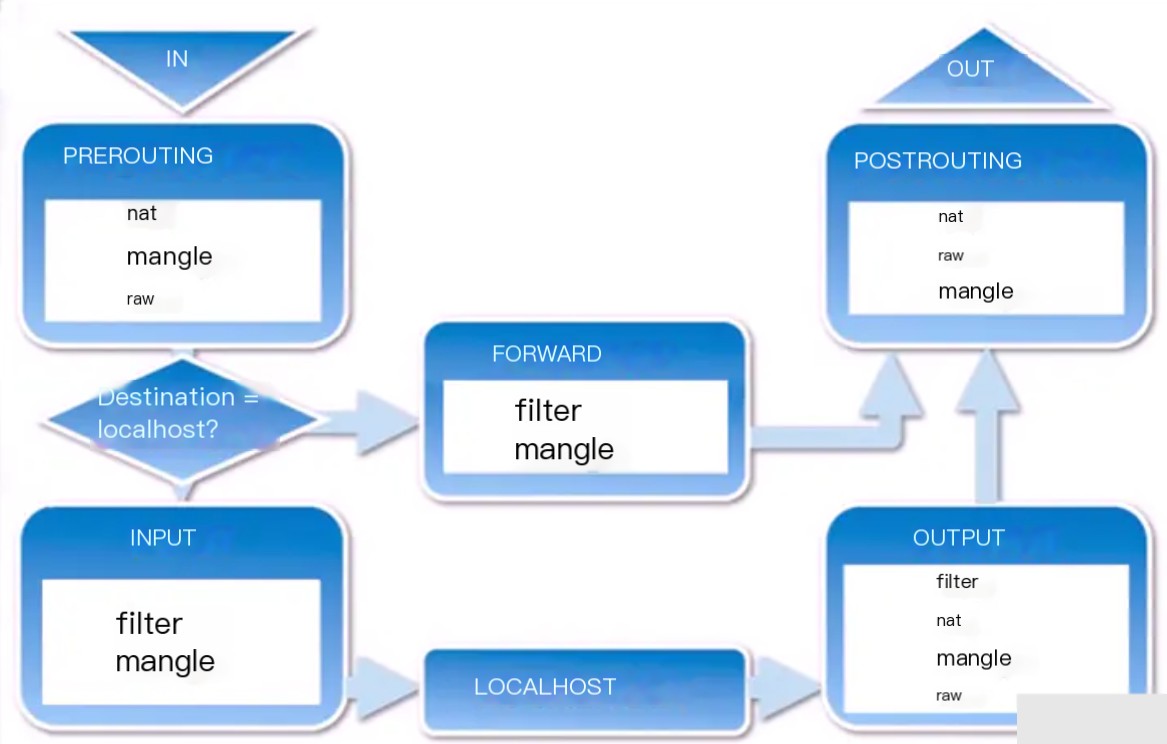
Packet Flow
- Packets to a local process: PREROUTING –> INPUT.
- Packets forwarded by the local machine: PREROUTING –> FORWARD –> POSTROUTING.
- Packets sent out by a process on the local machine (usually response packets): OUTPUT –> POSTROUTING.
2. How to Use
Check Rules
- -t: Table name
- -n: Do not resolve IP addresses
- -v: Display counter information, including packet count and size
- -x: Option to display exact counter values
- –line-numbers: Display rule numbers (abbreviated as –line)
- -L: Chain name
 root@mirrors:~# iptables -t filter -nvxL DOCKER --line
Chain DOCKER (1 references)
num      pkts      bytes target     prot opt in     out     source               destination
1        5076   321478 ACCEPT     tcp  --  !docker0 docker0  0.0.0.0/0            172.17.0.2           tcp dpt:8443
2       37233 54082508 ACCEPT     tcp  --  !docker0 docker0  0.0.0.0/0            172.17.0.2           tcp dpt:22
3        1712   255195 ACCEPT     tcp  --  !docker0 docker0  0.0.0.0/0            172.17.0.3           tcp dpt:9000
4           0        0 ACCEPT     tcp  --  !docker0 docker0  0.0.0.0/0            172.17.0.3           tcp dpt:8000
5       40224  6343104 ACCEPT     tcp  --  !docker0 docker0  0.0.0.0/0            172.17.0.4           tcp dpt:3443
6       21034  2227009 ACCEPT     tcp  --  !docker0 docker0  0.0.0.0/0            172.17.0.5           tcp dpt:3306
7          58     5459 ACCEPT     tcp  --  !docker0 docker0  0.0.0.0/0            172.17.0.6           tcp dpt:80
8         826    70081 ACCEPT     tcp  --  !docker0 docker0  0.0.0.0/0            172.17.0.6           tcp dpt:443
9    10306905 1063612492 ACCEPT     tcp  --  !docker0 docker0  0.0.0.0/0            172.17.0.9           tcp dpt:3306
10     159775 12297727 ACCEPT     tcp  --  !docker0 docker0  0.0.0.0/0            172.17.0.7           tcp dpt:11111
Add Rules
Add a rule at the end of a specified chain in a specific table. The -A option indicates appending a rule to the end of the respective chain. Omitting the -t option operates on rules in the default filter table:
 #Command Syntax: iptables -t tablename -A chainname match-condition -j action
root@mirrors:~# iptables -t filter -A INPUT -s 192.168.1.146 -j DROP
Add a rule at the beginning of a specified chain in a specific table. The -I option indicates inserting a rule at the beginning of the chain:
 #Command Syntax: iptables -t tablename -I chainname match-condition -j action
root@mirrors:~# iptables -t filter -I INPUT -s 192.168.1.146 -j ACCEPT
Add a rule at a specific position in a specified chain of a specific table:
 #Command Syntax: iptables -t tablename -I chainname rule-number match-condition -j action
root@mirrors:~# iptables -t filter -I INPUT 5 -s 192.168.1.146 -j REJECT
Delete Rules
Delete a rule based on its sequence number in the specified chain of a specific table. The -D option indicates deletion of the respective rule in the chain. Example shows deleting rule number 3 in the INPUT chain of the filter table:
 #Command Syntax: iptables -t tablename -D chainname rule-number
root@mirrors:~# iptables -t filter -D INPUT 3
Delete a rule based on specific match conditions and actions in a specified chain of a specific table. Example demonstrates deleting a rule in the INPUT chain of the filter table with a source address of 192.168.1.146 and action DROP:
 #Command Syntax: iptables -t tablename -D chainname match-condition -j action
root@mirrors:~# iptables -t filter -D INPUT -s 192.168.1.146 -j DROP
Delete all rules in a specified chain of a specific table. The -F option indicates clearing the rules in the respective chain:
 #Command Syntax: iptables -t tablename -F chainname
root@mirrors:~# iptables -t filter -F INPUT
Modify Rules
Modify a specific rule in a specified chain of a specific table. The -R option indicates modification of the rule in the chain. When using the -R option, you must specify the respective chain and rule number, and the original match condition must not be omitted. Example shows modifying the third rule in the INPUT chain of the filter table to change the action to ACCEPT, with -s 192.168.1.146 being the original match condition. Omitting this condition may change the source address in the modified rule to 0.0.0.0/0:
 #Command Syntax: iptables -t tablename -R chainname rule-number original-match-condition -j action
root@mirrors:~# iptables -t filter -R INPUT 3 -s 192.168.1.146 -j ACCEPT
Set the default policy (default action) for a specified chain in a specific table:
 #Command Syntax: iptables -t tablename -P chainname action
root@mirrors:~# iptables -t filter -P FORWARD ACCEPT
Save Rules
Method One
After modifying the rules, to make the changes permanent, you must use the following command to save the rules:
root@mirrors:~# service iptables saveOf course, if you mistakenly modify the rules but haven’t saved them, you can use the service iptables restart command to restart iptables, and the rules will revert to the last saved state in the /etc/sysconfig/iptables file.
In CentOS 7, the use of init-style scripts to start services has been replaced by unit files. As a result, commands like `service iptables start` can no longer be used, meaning `service iptables save` cannot be executed either. Additionally, in CentOS 7, the firewall service has replaced the old iptables service. However, there’s no need to worry, as you can install iptables and iptables-services via the yum repository. While iptables is typically installed by default, iptables-services is usually not installed by default in CentOS 7. Once iptables-services is installed in CentOS 7, you can save rules as you did in CentOS 6 using the `service iptables save` command. The rules will still be saved in the /etc/sysconfig/iptables file. Here are the steps to configure iptables-service in CentOS 7:
Configuration Steps:
bash
# After configuring the yum repository, install iptables-service.
root@mirrors:~# yum install -y iptables-services
# Stop firewalld.
root@mirrors:~# systemctl stop firewalld
# Disable firewalld from starting automatically.
root@mirrors:~# systemctl disable firewalld
# Start iptables.
root@mirrors:~# systemctl start iptables
# Enable iptables to start on boot.
root@mirrors:~# systemctl enable iptables
The above configuration process only needs to be done once. Afterwards, you can use the `service iptables save` command to save iptables rules in CentOS 7.
Alternative Method
You can also use another method to save iptables rules, which is by using the `iptables-save` command. The `iptables-save` command can’t directly save the current iptables rules but can output these rules in a “saved format” on the screen.
We can use the `iptables-save` command and redirect the output to the /etc/sysconfig/iptables file:
bash
root@mirrors:~# iptables-save > /etc/sysconfig/iptables
Loading Rules
We can also reload the rules from the /etc/sysconfig/iptables file into the current iptables rules. However, note that any changes not saved to the /etc/sysconfig/iptables file will be lost or overwritten.
To reload rules from a specified file, we use the `iptables-restore` command, as shown below:
bash
root@mirrors:~# iptables-restore < /etc/sysconfig/iptables Matching Conditions **When multiple matching conditions exist in a rule, they are by default in an “AND” relationship, meaning a packet must meet all conditions to be matched by the rule.** – `-s` is used to match the source address of the packet. Multiple source addresses can be specified, separated by commas, or a network segment can be specified. bash # Examples: root@mirrors:~# iptables -t filter -I INPUT -s 192.168.1.111,192.168.1.118 -j DROP root@mirrors:~# iptables -t filter -I INPUT -s 192.168.1.0/24 -j ACCEPT root@mirrors:~# iptables -t filter -I INPUT ! -s 192.168.1.0/24 -j ACCEPT – `-d` is used to match the destination address of the packet. Multiple destination addresses can be specified, separated by commas, or a network segment can be specified. bash # Examples: root@mirrors:~# iptables -t filter -I OUTPUT -d 192.168.1.111,192.168.1.118 -j DROP root@mirrors:~# iptables -t filter -I INPUT -d 192.168.1.0/24 -j ACCEPT root@mirrors:~# iptables -t filter -I INPUT ! -d 192.168.1.0/24 -j ACCEPT – `-p` is used to match the protocol type of the packet. It can match protocol types such as TCP, UDP, UDPLite, ICMP, ESP, AH, SCTP, etc. (In CentOS 7, it also supports ICMPv6 and MH). bash # Examples: root@mirrors:~# iptables -t filter -I INPUT -p tcp -s 192.168.1.146 -j ACCEPT root@mirrors:~# iptables -t filter -I INPUT ! -p udp -s 192.168.1.146 -j ACCEPT – `-i` is used to match the network interface from which the packet enters the machine. This option cannot be used in the OUTPUT or POSTROUTING chains as it only matches packets entering through a specific network interface. bash # Examples: root@mirrors:~# iptables -t filter -I INPUT -p icmp -i eth4 -j DROP root@mirrors:~# iptables -t filter -I INPUT -p icmp ! -i eth4 -j DROP – `-o` is used to match the network interface from which the packet exits the machine. This option cannot be used in the INPUT or PREROUTING chains as it only matches packets exiting through a specific network interface. bash # Examples: root@mirrors:~# iptables -t filter -I OUTPUT -p icmp -o eth4 -j DROP root@mirrors:~# iptables -t filter -I OUTPUT -p icmp ! -o eth4 -j DROP Extension Matching Conditions # TCP Extension Module Common extension matching conditions include: – `–sport`: Matches the source port for TCP protocol packets. A continuous range can be specified with a colon. – `–dport`: Matches the destination port for TCP protocol packets. A continuous range can be specified with a colon. – `–tcp-flags`: Matches the flags in the TCP header of the packet. – `–syn`: Matches packets requesting a new TCP connection, equivalent to using `–tcp-flags SYN,RST,ACK,FIN SYN`. Note, `-p tcp` and `-m tcp` do not conflict. `-p` is used to match the packet’s protocol, and `-m` specifies the name of the extension module, which in this case is also called TCP. bash # Examples: root@mirrors:~# iptables -t filter -I OUTPUT -d 192.168.1.146 -p tcp -m tcp –sport 22 -j REJECT root@mirrors:~# iptables -t filter -I INPUT -s 192.168.1.146 -p tcp -m tcp –dport 22:25 -j REJECT root@mirrors:~# iptables -t filter -I INPUT -s 192.168.1.146 -p tcp -m tcp –dport :22 -j REJECT root@mirrors:~# iptables -t filter -I INPUT -s 192.168.1.146 -p tcp -m tcp –dport 80: -j REJECT root@mirrors:~# iptables -t filter -I OUTPUT -d 192.168.1.146 -p tcp -m tcp ! –sport 22 -j ACCEPT root@mirrors:~# iptables -t filter -I INPUT -p tcp -m tcp –dport 22 –tcp-flags SYN,ACK,FIN,RST,URG,PSH SYN -j REJECT root@mirrors:~# iptables -t filter -I OUTPUT -p tcp -m tcp –sport 22 –tcp-flags SYN,ACK,FIN,RST,URG,PSH SYN,ACK -j REJECT root@mirrors:~# iptables -t filter -I INPUT -p tcp -m tcp –dport 22 –tcp-flags ALL SYN -j REJECT root@mirrors:~# iptables -t filter -I OUTPUT -p tcp -m tcp –sport 22 –tcp-flags ALL SYN,ACK -j REJECT root@mirrors:~# iptables -t filter -I INPUT -p tcp -m tcp –dport 22 –syn -j REJECT # UDP Extension Module Common extension matching conditions include: – `–sport`: Matches the source port of UDP packets. – `–dport`: Matches the destination port of UDP packets. bash # Examples: root@mirrors:~# iptables -t filter -I INPUT -p udp -m udp –dport 137 -j ACCEPT root@mirrors:~# iptables -t filter -I INPUT -p udp -m udp –dport 137:157 -j ACCEPT # ICMP Extension Module Common extension matching condition includes: – `–icmp-type`: Matches the specific type of ICMP packets. bash # Examples: root@mirrors:~# iptables -t filter -I INPUT -p icmp -m icmp –icmp-type 8/0 -j REJECT root@mirrors:~# iptables -t filter -I INPUT -p icmp –icmp-type 8 -j REJECT root@mirrors:~# iptables -t filter -I OUTPUT -p icmp -m icmp –icmp-type 0/0 -j REJECT root@mirrors:~# iptables -t filter -I OUTPUT -p icmp –icmp-type 0 -j REJECT root@mirrors:~# iptables -t filter -I INPUT -p icmp –icmp-type “echo-request” -j REJECT # Multiport Extension Module Common extension matching conditions include: – `-p tcp -m multiport –sports`: Matches source ports of packets; can specify multiple discrete port numbers separated by commas. – `-p udp -m multiport –dports`: Matches destination ports of packets; can specify multiple discrete port numbers separated by commas.
 #Example below
root@mirrors:~# iptables -t filter -I OUTPUT -d 192.168.1.146 -p udp -m multiport --sports 137,138 -j REJECT
root@mirrors:~# iptables -t filter -I INPUT -s 192.168.1.146 -p tcp -m multiport --dports 22,80 -j REJECT
root@mirrors:~# iptables -t filter -I INPUT -s 192.168.1.146 -p tcp -m multiport ! --dports 22,80 -j REJECT
iptables -t filter -I INPUT -s 192.168.1.146 -p tcp -m multiport --dports 80:88 -j REJECT
root@mirrors:~# iptables -t filter -I INPUT -s 192.168.1.146 -p tcp -m multiport --dports 22,80:88 -j REJECT
iprange module
The extended match conditions are as follows:
- –src-range: Specifies a continuous range of source addresses.
- –dst-range: Specifies a continuous range of target addresses.
 #Example
root@mirrors:~# iptables -t filter -I INPUT -m iprange --src-range 192.168.1.127-192.168.1.146 -j DROP
root@mirrors:~# iptables -t filter -I OUTPUT -m iprange --dst-range 192.168.1.127-192.168.1.146 -j DROP
root@mirrors:~# iptables -t filter -I INPUT -m iprange ! --src-range 192.168.1.127-192.168.1.146 -j DROP
string module
Common extended match conditions include:
- –algo: Specifies the matching algorithm, available options are bm, kmp. This option is mandatory.
- –string: Specifies the string to match.
Our goal is to reject any packets entering the machine if they contain the “hello” string:
 #Example
root@mirrors:~# iptables -t filter -I INPUT -m string --algo bm --string "hello" -j REJECT
time module
Common extended match conditions include:
- –timestart: Used to specify the start time of a time range, cannot be inverted.
- –timestop: Used to specify the end time of a time range, cannot be inverted.
- –weekdays: Used to specify weekdays, can be inverted.
- –monthdays: Used to specify specific days of the month, can be inverted.
- –datestart: Used to specify the start date of a date range, cannot be inverted.
- –datestop: Used to specify the end date of a date range, cannot be inverted.
 #Example
root@mirrors:~# iptables -t filter -I OUTPUT -p tcp --dport 80 -m time --timestart 09:00:00 --timestop 19:00:00 -j REJECT
root@mirrors:~# iptables -t filter -I OUTPUT -p tcp --dport 443 -m time --timestart 09:00:00 --timestop 19:00:00 -j REJECT
root@mirrors:~# iptables -t filter -I OUTPUT -p tcp --dport 80 -m time --weekdays 6,7 -j REJECT
root@mirrors:~# iptables -t filter -I OUTPUT -p tcp --dport 80 -m time --monthdays 22,23 -j REJECT
root@mirrors:~# iptables -t filter -I OUTPUT -p tcp --dport 80 -m time ! --monthdays 22,23 -j REJECT
root@mirrors:~# iptables -t filter -I OUTPUT -p tcp --dport 80 -m time --timestart 09:00:00 --timestop 18:00:00 --weekdays 6,7 -j REJECT
root@mirrors:~# iptables -t filter -I OUTPUT -p tcp --dport 80 -m time --weekdays 5 --monthdays 22,23,24,25,26,27,28 -j REJECT
root@mirrors:~# iptables -t filter -I OUTPUT -p tcp --dport 80 -m time --datestart 2017-12-24 --datestop 2017-12-27 -j REJECT
connlimit module
Common extended match conditions include:
- –connlimit-above: Indicates a limit on the number of connections for each IP when used alone.
- –connlimit-mask: This option cannot be used alone and must be used with –connlimit-above to limit the number of connections for a specific IP range. Refer to the previous explanation for clarification.
 #Example
root@mirrors:~# iptables -I INPUT -p tcp --dport 22 -m connlimit --connlimit-above 2 -j REJECT
root@mirrors:~# iptables -I INPUT -p tcp --dport 22 -m connlimit --connlimit-above 20 --connlimit-mask 24 -j REJECT
root@mirrors:~# iptables -I INPUT -p tcp --dport 22 -m connlimit --connlimit-above 10 --connlimit-mask 27 -j REJECT
limit module
While the connlimit module limits the number of connections, the limit module controls the “rate of packet arrival.” In simpler terms, if you need to restrict the number of packets flowing into the host within a specific timeframe, you can use the limit module. You can set restrictions by the second, minute, hour, or day. Common extended match conditions include:
- –limit-burst: Analogous to the “token bucket” algorithm, this option specifies the maximum number of tokens in the bucket.
- –limit: Analogous to the “token bucket” algorithm, this option specifies the rate of token generation, available in second, minute, hour, and day time units.
The example below limits external hosts to ping the local machine, allowing at most one ping packet every six seconds:
 #Example, note that the following two rules must be used together
#The token bucket can hold up to 3 tokens and generates 10 tokens per minute (meaning one token every 6 seconds).
root@mirrors:~# iptables -t filter -I INPUT -p icmp -m limit --limit-burst 3 --limit 10/minute -j ACCEPT
#Default action is to reject icmp packets
root@mirrors:~# iptables -t filter -A INPUT -p icmp -j REJECT
state extension module
When accessing a webpage via an HTTP URL, the client initiates a request to the server’s port 80, and the server responds through port 80. Therefore, as clients, we should allow port 80 to ensure that the server’s response can reach our client host. Similarly, when using SSH to remotely connect to a server, the client requests the server’s port 22, and the server responds through port 22, so we allow all port 22 traffic to ensure that the remote host’s response can pass through our firewall. However, if the client hasn’t actively made any requests to ports 80 or 22, should we receive data sent to us through these ports by other hosts? Technically, yes, because we’ve already allowed ports 80 and 22 to receive HTTP and SSH responses, meaning both “responses” to our requests and unsolicited data can pass through these ports. But, is this practice secure? This is where the state extension module comes into play.
According to the state module, a “connection” can have packets in five states:
- NEW: The state of the first packet in a connection is NEW, meaning the first packet of a new connection.
- ESTABLISHED: Subsequent packets following the NEW state packet have the ESTABLISHED state, indicating the connection is established.
- RELATED: This is further explained with an example. For instance, in FTP services, the server creates two processes: a command process responsible for command transfers, and a data process for data transfers. The command process controls what data is transferred, so packets in the “data connection” are RELATED to those in the “command connection.” Thus, these packets might have the RELATED state because they relate to the “command connection.” (Note: To track FTP connections, load the nf_conntrack_ftp kernel module and configure /etc/sysconfig/iptables-config for automatic loading.)
- INVALID: If a packet can’t be identified or has no state, it’s classified as INVALID. We can proactively filter out these INVALID packets.
- UNTRACKED: Indicates that packets are untracked, meaning the connection is not found when the status is Untracked.
To solve the previously mentioned issue, use the state extension module to allow only packets with the ESTABLISHED state, which ensures only response packets to our requests pass through the firewall, preventing unsolicited packets from doing so:
root@mirrors:~# iptables -t filter -I INPUT -m state --state ESTABLISHED -j ACCEPTmangle table
The primary function of the mangle table is to modify certain packet flags based on rules, allowing other rules or programs to filter or perform policy routing on these packets. The mangle table’s main operations involve:
- TOS: Used to set or change the Type of Service field of a packet. This is often used to determine how packets are routed through the network, among other policies. Keep in mind that this operation isn’t perfect and can sometimes lead to unexpected results. It’s not yet usable on the Internet, and many routers disregard this field value. In other words, don’t set it for Internet-bound packets unless you plan on relying on TOS for routing, such as using iproute2.
TTL: Used to change the Time to Live field of the packet, allowing all packets to have a specific TTL. There’s a good reason for its existence, as it enables us to deceive some ISPs. Why deceive them? Because they might oppose us sharing a connection. These ISPs often check if a single computer uses different TTLs and use it as an indicator of connection sharing.
MARK: Used to set a special mark on packets. iproute2 can recognize these marks and decide different routing paths based on the marks (or lack thereof). With these marks, we can implement bandwidth restrictions and request-based classification.
For example, if a client’s machine is connecting to the Internet through a Linux host, and there are two lines for the connection, as shown in the diagram. Suppose we’re tasked with implementing policy-based routing for the internal network: all packets using the TCP protocol to access port 80 should exit through the ChinaNet line, while all packets accessing port 53 via the UDP protocol should exit through the Cernet line.
This is a policy routing issue. To achieve our goal, we first need to mark packets based on their protocols and destination ports before routing them. To mark specific packets, we use the mangle table, which has five chains. Since marking is needed before routing, the PREROUTING chain should be used. Below are the specific commands:
plaintext
root@mirrors:~# iptables -t mangle -A PREROUTING -i eth0 -p tcp –dport 80 -j MARK –set-mark 1;
root@mirrors:~# iptables -t mangle -A PREROUTING -i eth0 -p udp –dport 53 -j MARK –set-mark 2;After passing through the PREROUTING chain, packets will enter the routing selection module. To conduct policy routing for them, execute the following commands to add the necessary rules:
plaintext
root@mirrors:~# ip rule add from all fwmark 1 table 10
root@mirrors:~# ip rule add from all fwmark 2 table 20These commands indicate that all packets marked as 1 will be routed using routing table 10, and all packets marked as 2 will use routing table 20. Routing tables 10 and 20 respectively use the gateways on the ChinaNet and Cernet lines as default gateways. The specific command settings are shown below:
plaintext
root@mirrors:~# ip route add default via 10.10.1.1 dev eth1 table 10
root@mirrors:~# ip route add default via 10.10.2.1 dev eth2 table 20These commands specify 10.10.1.1 and 10.10.2.1 as default gateways for routing tables 10 and 20, positioned on the ChinaNet and Cernet lines respectively. Thus, packets using routing table 10 will exit through the ChinaNet line, while those using routing table 20 will exit through the Cernet line.
Custom Chains
When the default chain has numerous rules, managing them can get cumbersome. Imagine the INPUT chain containing 200 rules, each catering to different services such as httpd, sshd, and private and public IPs. If you suddenly need to modify rules related to the httpd service, would you retrace all 200 rules to identify those that pertain to httpd services? This is evidently inefficient.
Therefore, in iptables, you can create custom chains to solve this issue. Suppose we create a custom chain named IN_WEB, where all inbound rules targeting port 80 are stored. Future modifications to web service-related rules would then involve solely altering the rules within the IN_WEB chain, alleviating concerns about the numerous rules in the default chain because we know all port 80 inbound rules reside in the IN_WEB chain.
Example of creating a custom chain:
plaintext
# Create IN_WEB custom chain in the filter table
root@mirrors:~# iptables -t filter -N IN_WEBLinking the custom chain:
plaintext
# Reference the newly created custom chain in the INPUT chain
root@mirrors:~# iptables -t filter -I INPUT -p tcp –dport 80 -j IN_WEBRenaming the custom chain:
plaintext
# Rename IN_WEB custom chain to WEB
root@mirrors:~# iptables -E IN_WEB WEBDeleting the custom chain requires two conditions to be met:
1. The custom chain is not referenced.
2. The custom chain has no rules.Example:
plaintext
# Step 1: Clear rules within the custom chain
root@mirrors:~# iptables -t filter -F WEB
# Step 2: Delete the custom chain
root@mirrors:~# iptables -t filter -X WEBLOG Action
The LOG action by default logs packet-related information in the /var/log/message file. However, you can configure it to record information in a specified file to prevent mingling with other log data. To do so, modify the /etc/rsyslog.conf (or /etc/syslog.conf) file, adding the following configuration:
plaintext
root@mirrors:~# echo ‘kern.warning /var/log/iptables.log’ >> /etc/rsyslog.confAfter completing the configuration, restart the rsyslog (or syslogd) service:
plaintext
root@mirrors:~# systemctl restart rsyslogThe LOG action also has its options, including:
– –log-level: Specifies the logging level which can be emerg, alert, crit, error, warning, notice, info, or debug.
– –log-prefix: Allows you to prefix logged information with a “tag,” aiding in differentiating various logged packet information, facilitating filtering during analysis. The log-prefix value cannot exceed 29 characters.For instance, if we wish to log all packets attempting to connect to port 22, assigning such logs the name “want-in-from-port-22,” use the following command:
plaintext
root@mirrors:~# iptables -I INPUT -p tcp –dport 22 -m state –state NEW -j LOG –log-prefix “want-in-from-port-22”After setting up, if I try to connect to the host mentioned in the example using the ssh tool from a client at IP address 141.94.73.57, and then check the corresponding log file (with logs set to /var/log/iptables.log), I will see:
As illustrated, the packet information of the ssh connection activity has been recorded in the iptables.log file, and includes the “tag”: want-in-from-port-22. If numerous log records exist, this “tag” allows easy filtering, aiding log review. Additionally, from this record, we can determine the source and destination IPs of the packet, source and destination ports, and other details. This particular log reveals that IP 141.94.73.57 attempted to connect to port 22 of 172.17.103.178 (the current host’s IP) at 20:51:35. The packet entered through the eth0 card, whose MAC address is 00:16:3e:2c:42:58, and the client’s card has a MAC address of ee:ff:ff:ff:ff:ff.