

This article references parts from:
https://www.wosign.com/faq/faq2016-0309-03.htm
https://www.wosign.com/faq/faq2016-0309-04.htm
http://blog.csdn.net/hherima/article/details/52469674
I. Introduction to Secure Sockets Layer (SSL)/TLS
What are SSL and TLS? In formal terms, SSL stands for Secure Sockets Layer, and TLS is its successor, known as Transport Layer Security. Simply put, it’s an additional encryption layer between plain text and the TCP layer, ensuring the security of information transmission at the upper layer. For example, HTTP is transferred in plain text, but with an SSL layer, it becomes HTTPS. Its sole purpose is to ensure communication security. It has evolved through various stages like a smartphone software upgrade, where each update adds or removes functionalities, such as introducing new encryption algorithms or altering handshake methods.
SSL1.0: Obsolete
SSL2.0: RFC6176, Obsolete
SSL3.0: RFC6101, Largely Obsolete
TLS1.0: RFC2246, Still Used by Some Legacy Servers
TLS1.1: RFC4346
TLS1.2: RFC5246, Widely Used Today
TLS1.3: RFC8446
Let’s dive into how TLS1.x ensures communication security.
II. Introduction to Certificate Authority, Secure Sockets Layer Server, and Secure Sockets Layer Client
How is security ensured? Is it secure just because you say it is? How is it really achieved? Is it absolutely secure?
Well, where there are people, there are challenges, and where there are challenges, there’s no absolute security. But SSL/TLS can significantly enhance information security. Below is an overview of the implementation process based on the SSL/TLS workflow.
2.1 Secure Sockets Layer (SSL)/TLS Workflow
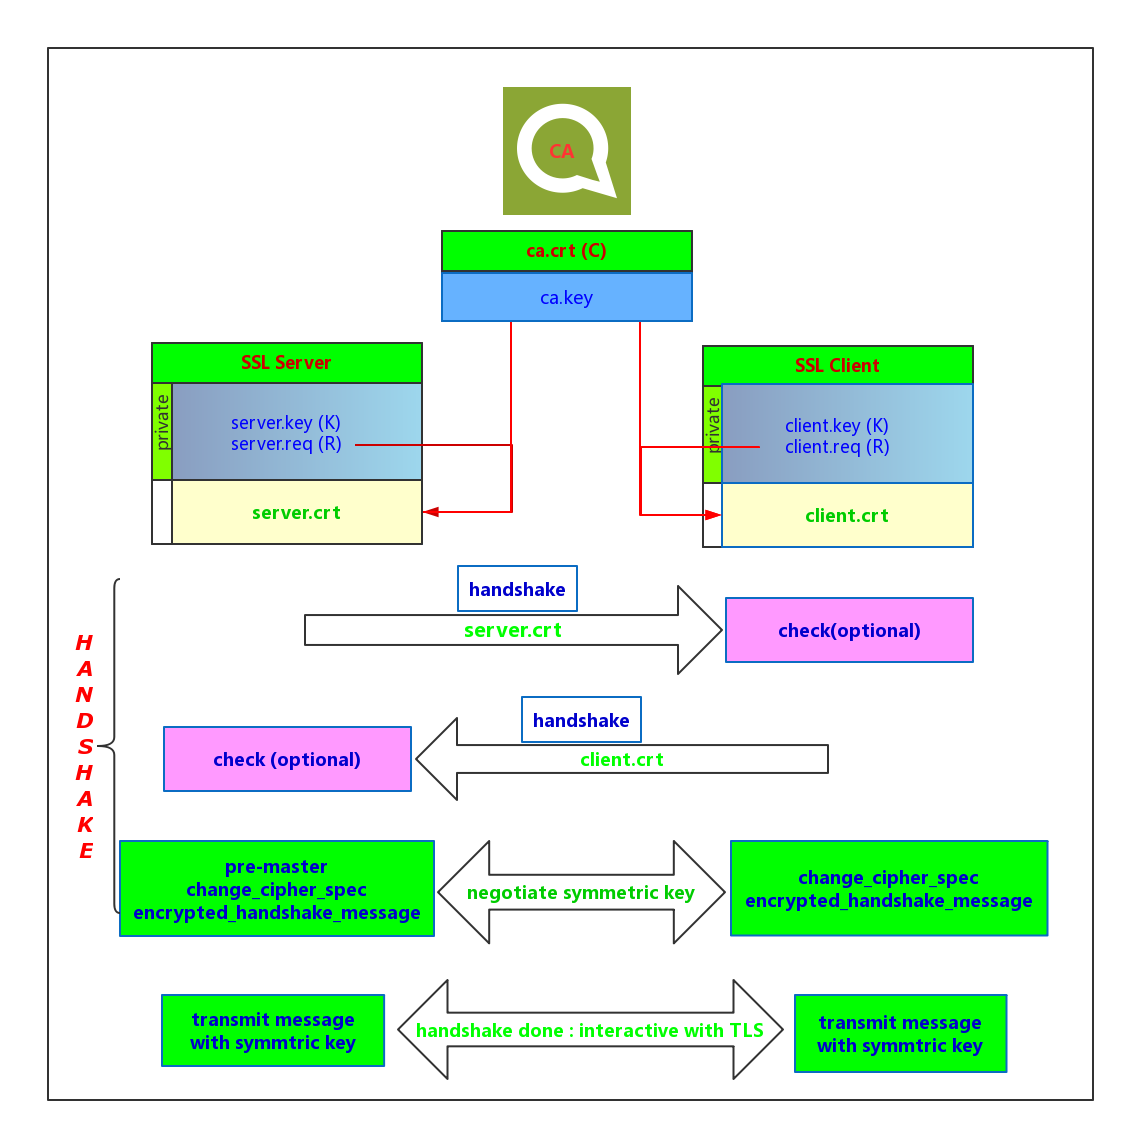
Figure 1: SSL/TLS Workflow
Q1: Introduction to Secure Sockets Layer and CA
CA: Certificate Authority
It is similar to a national immigration office issuing passports or a government commerce bureau issuing business licenses to companies.
CA has two main attributes:
- The CA itself is trusted (recognized internationally)
- It issues certificates to trusted applicants
Just like getting a passport, you need to prove your lawful identity and not be a criminal or dissident. Of course, you have to pay a protection fee, and the CA can revoke your certificate at any time.
Q2: What Does a CA Certificate Look Like?
Your computer actually contains a bunch of certificates. You can check them out:
- 360 Browser: Options/Settings -> Advanced Settings -> Privacy and Security -> Manage HTTPS/SSL Certificates -> Certificate Authorities
- Firefox: Preferences -> Advanced -> Certificates -> View Certificates -> Certificate Authorities
- Chrome: Settings -> Advanced -> Manage Certificates -> Certificate Authority
- Ubuntu: /etc/ssl/certs/xxx_CA.pem (or xxx_Certification_Authority.pem)
These are CA certificates!
Q3: What is the relationship between the CA certificate ca.crt and the SSL server certificate server.crt?
- The SSL server generates its own private/public key pair. server.key/server.pub // Private key encrypts, public key decrypts!
- server.pub generates a request file server.req. The request file contains some information about the server, such as domain name/applicant/public key, etc.
- The server submits the request file server.req to a CA, and after the CA verifies the identity, it uses ca.key to encrypt the request file to create server.crt
- Since ca.key and ca.crt are a pair, ca.crt can be used to verify server.crt
Explanation: To simplify the CA verification process, this article presents the most basic situation. In most practical situations:
- The certificate authority CA for the server and the authority CA for the client are usually different.
- The certificate can be a chain, where a series of higher authorities issue certificates.
- During certificate validation, CA can choose the depth of certificate chain verification, but the most basic situation is to only verify one level.
Q4: Secure Sockets Layer Explanation Example
If an SSL client wants to verify an SSL server, then the SSL server must provide its certificate server.crt to the client. The client then uses ca.crt to verify the legitimacy of server.crt. If the server is a phishing site, the CA will not issue a legitimate server.crt certificate, hence the client will fail the validation using ca.crt. For instance, if a browser, acting as an SSL client, seeks to access a legitimate Taobao site at https://www.taobao.com, but accidentally accesses https://wwww.jiataobao.com, the browser will detect the illegitimacy of this fake phishing site and warn users not to continue, thereby ensuring that all client HTTPS access is securely checked.
2.2 Secure Sockets Layer: Non-authentication, One-way Authentication, and Two-way Authentication
What are SSL/TLS one-way and two-way authentication?
One-way authentication: Only one party verifies the other party’s certificate for legitimacy. Generally, the client verifies the server’s legitimacy, for which the client needs a ca.crt, and the server needs server.crt and server.key
For example: Browsers verify the legitimacy of various HTTPS sites. A green padlock in the address bar indicates the site’s legitimacy; a red padlock suggests that the site’s certificate verification failed.
Alternatively, the server may verify the client’s legitimacy. In that case, the server needs a ca.crt while the client requires client.crt and client.key
For example: Amazon IoT platform (AWS IoT) issues certificates to each device. To connect to AWS, each device must use the client certificates it provides.
Two-way authentication: Mutual verification, where the server requires verification of each client’s certificate, and the client needs server certificate verification. The server requires server.key, server.crt, and ca.crt, whereas the client requires client.key, client.crt, and ca.crt.
Non-authentication: Indicates no mutual certificate verification, but a TLS connection is still used
Certificate verification is only a small part of the TLS connection process and thus optional.
2.3 Secure Sockets Layer Detailed Certificate Workflow
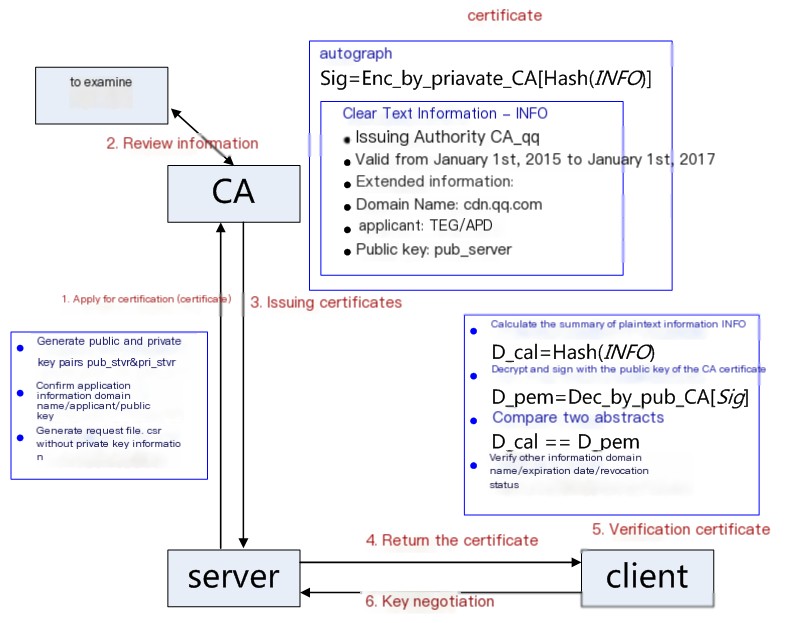
Figure 2: Detailed Certificate Workflow
1) Application for Certification: The server needs to generate a public/private key pair itself, pub_svr and pri_svr, and then create a request file csr based on pub_svr, submitting it to the CA. The csr includes the public key, organization information, personal information (domain name), etc. (In Figure 1, server.req is the csr request file.)
2) Information Review: CA verifies the authenticity of the applicant’s information using various online and offline methods, such as confirming the existence of the organization, legality of the enterprise, and domain ownership.
3) Certificate Issuance: If the information is verified and approved, the CA issues a certificate to the applicant. The certificate includes the applicant’s public key, the organization’s information, CA’s information, validity period, certificate serial number in plain text, and a signature. The signature generation algorithm: First, the hash function calculates the digest of the publicly available information; then the CA’s private key encrypts this digest – the encrypted content is the signature. (In Figure 1, server.crt is generated.)
4) Returning the Certificate: If the client requests server verification, the server must return the certificate file. (In Figure 1, handshake transmits server.crt.)
5) Client Certificate Verification: The client reads the certificate’s relevant plain text information and uses the same hash function to generate a digest. It then uses the CA’s public key to decrypt the signature data and checks it against the certificate digest. If they match, the certificate’s authenticity is confirmed, verifying the public key. The client then checks the certificate’s domain information, validity period, revocation status, etc. The client pre-loads trusted CA’s certificate information (including the public key), and if the CA is not trusted, the certificate cannot be found, and it would be considered invalid. (In Figure 1, check is optional; you can choose not to verify the server certificate’s validity.)
6) Key Negotiation: After verification, the server and client will engage in key negotiation. Subsequently, the server and client will use symmetric key encryption (more efficient for time performance during symmetric encryption.) (pre-master/change_cipher_spec/encrypted_handshake_message processes in Figure 1)
7) Data Transmission: SSL server and SSL client use symmetric key encryption and decryption for data.
2.4 Secure Sockets Layer (SSL)/TLS One-Way Authentication Process
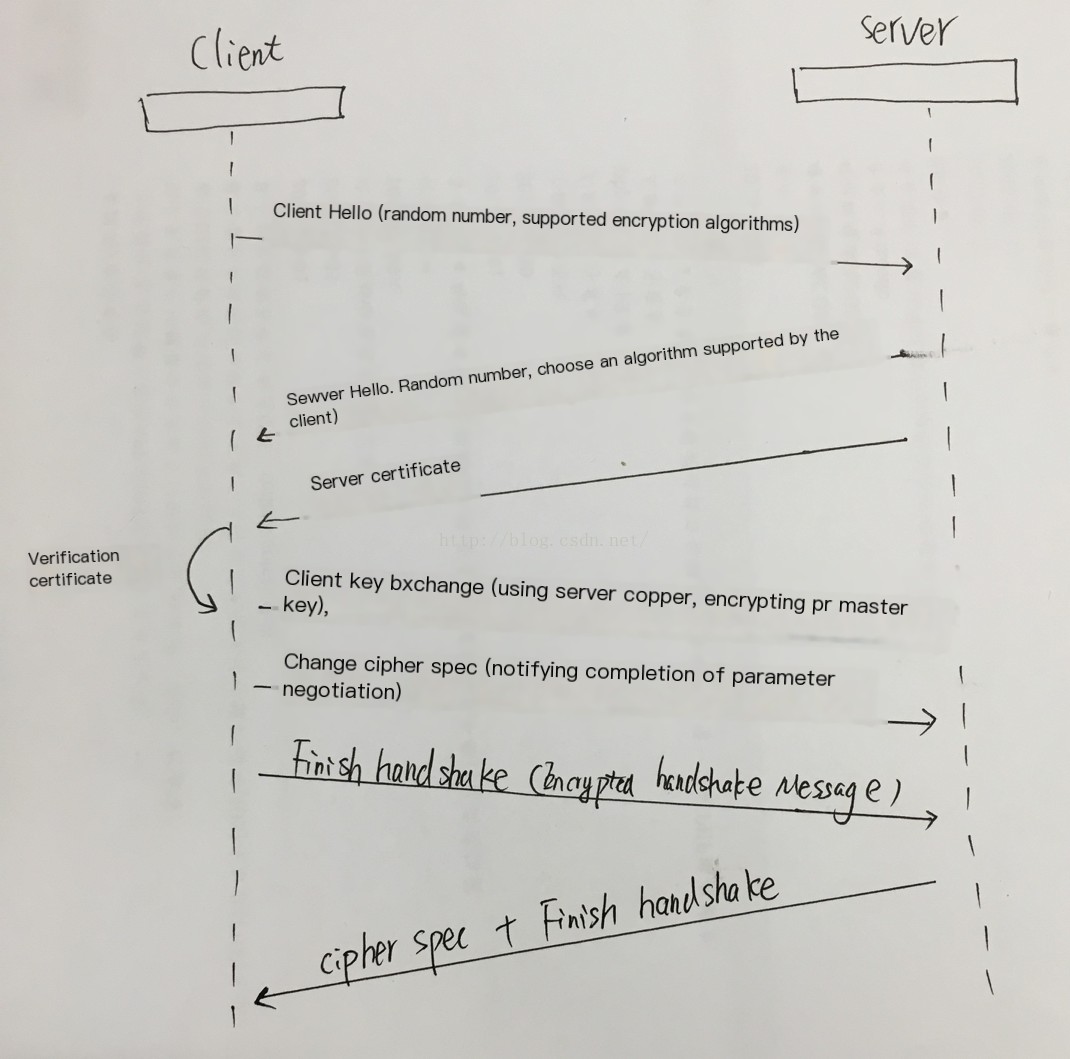
(1) client_hello
The client initiates a request and transmits request information in plaintext, including version information, list of cipher suites candidates, compression algorithm candidates, random numbers, extensions, etc. Related information is as follows:
- The highest version of the TLS protocol supported: version, ranging from SSLv2, SSLv3, TLSv1, TLSv1.1, to TLSv1.2. Currently, versions below TLSv1 are generally not used.
- List of cipher suites supported by the client: Each cipher suite corresponds to a combination of four functions mentioned in the TLS principles:
- Authentication Algorithm: Au (Identity Verification)
- Key Exchange Algorithm: KeyExchange (Key Agreement)
- Symmetric Encryption Algorithm: Enc (Information Encryption)
- Message Digest: Mac (Integrity Verification)
- List of supported compression methods for subsequent compressed information transmission
- Random Number: random_C, used for generating subsequent keys
- Extensions, including protocol and algorithm parameters and other auxiliary information; a common extension is SNI, which we will discuss separately later.
(2) server_hello + server_certificate + server_hello_done
- server_hello: The server returns the agreed information, including the selected protocol version, cipher suite, compression algorithm, random number random_S, etc., where the random number is used for key agreement
- server_certificates: The server-side sets up the corresponding certificate chain for identity verification and key exchange
- server_hello_done: Notifies the client that the server_hello information has been sent
(3) Certificate Verification
- Certificate/Certificate chain’s trustworthiness: trusted certificate path, as mentioned earlier
- Certificate Revocation: Using offline CRL or online OCSP, different clients behave differently
- Expiry Date: Whether the certificate is within the valid time range
- Domain: Verifying whether the domain in the certificate matches the current access domain (CN field)
Certificate verification is not a mandatory process, so strict or loose verification is usually configurable and is determined by the verifier.
(4) client_key_exchange + change_cipher_spec + encrypted_handshake_message
- client_key_exchange: After legitimate verification, the client generates a random number pre-master and encrypts it with the certificate public key, then sends it to the server
- Now the client has obtained all the information needed to calculate the agreed keys: two plaintext random numbers random_C and random_S and the pre-master it generated itself, calculated to obtain the agreed keys
enc_key=Fuc(random_C, random_S, pre-master) - change_cipher_spec: The client notifies the server that subsequent communications will be encrypted with the negotiated communication key and algorithm;
- encrypted_handshake_message: Combines the hash value of all previously communicated parameters and other related information into a data block, then encrypts it using the negotiated key session secret and algorithm before sending it to the server for data and handshake verification
(5) change_cipher_spec + encrypted_handshake_message
- The server decrypts the encrypted pre-master data using its private key, calculates using the two exchanged plaintext random numbers random_C and random_S to obtain the agreed key: enc_key=Fuc(random_C, random_S, pre-master);
- Computes hashes of all previously received information, decrypts the encrypted_handshake_message sent by the client, and verifies the data and key validity;
- change_cipher_spec: After verification, the server also sends a change_cipher_spec to inform the client that subsequent communications will use the agreed keys and algorithms for encryption;
- encrypted_handshake_message: The server also combines all the current communication parameter information into a data block, encrypts it using the negotiated session secret and algorithm, and sends it to the client;
(6) Handshake Complete
The client calculates the hash value of all received information and uses the negotiated key to decrypt the encrypted_handshake_message, verifying the data and key sent by the server. If verified, the handshake is complete.
(7) Encrypted Communication
Begin encrypted communication using negotiated keys and algorithms.
2.5 Practical Wireshark Analysis
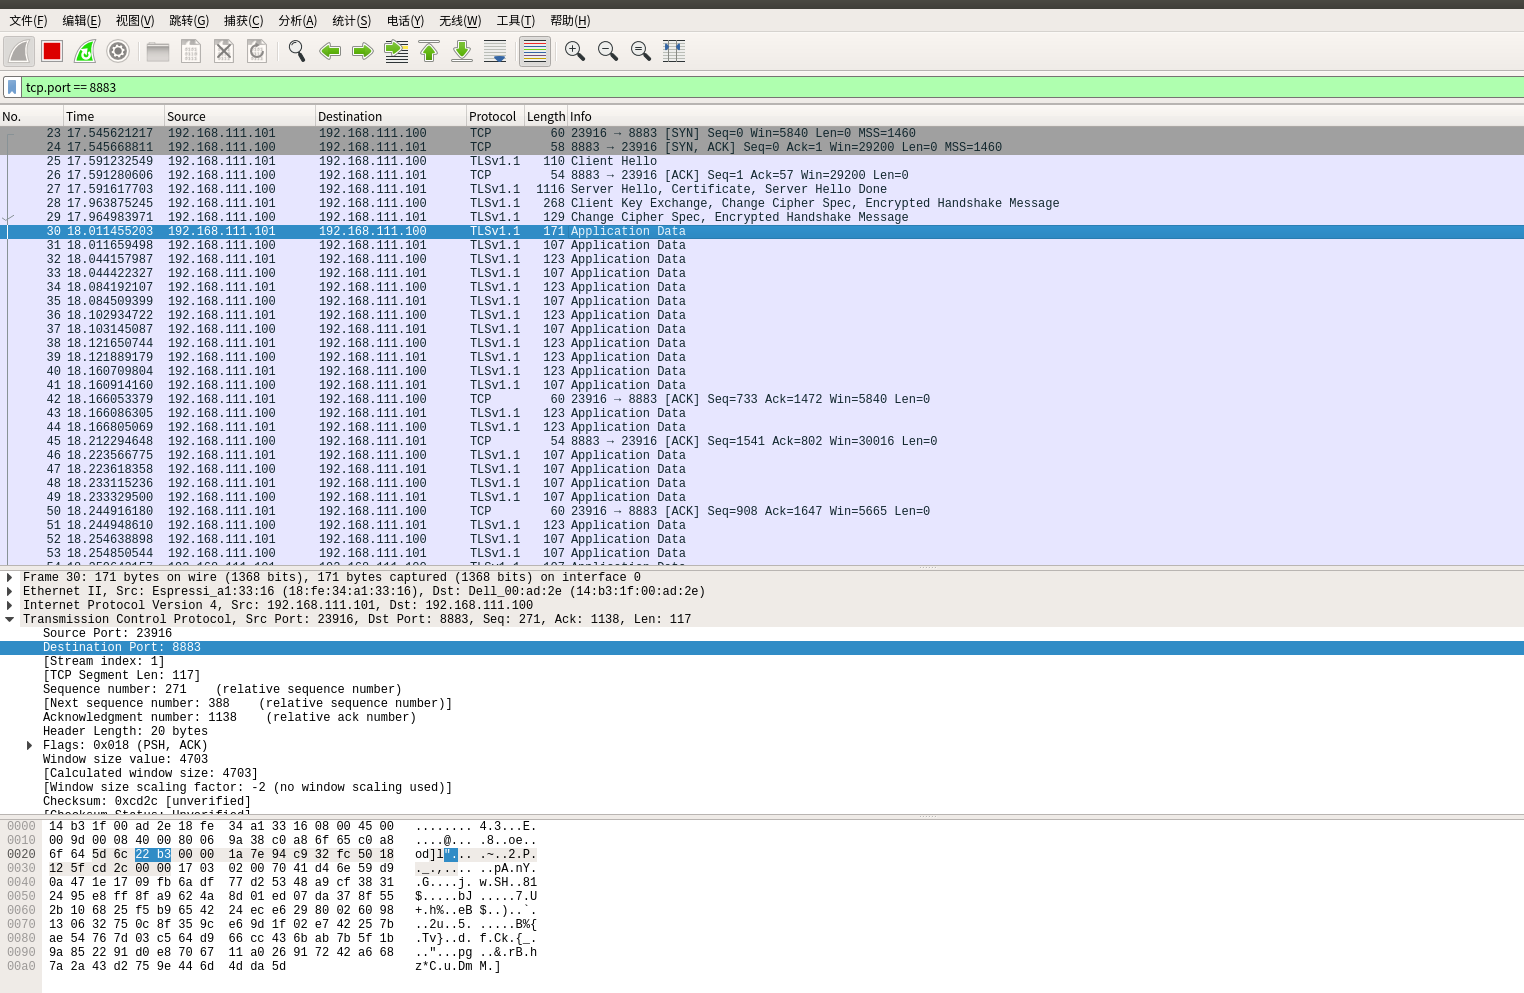
We have set up an SSL/TLS server at 192.168.111.100, and the client is 192.168.111.101. The client needs to verify the server’s legitimacy. We will only examine the TLSv1.1 packets:
First packet (No. 25) Client Hello packet, which is the SSL/TLS one-way authentication process’s (1)
Second packet (No. 27) Server Hello packet, containing the server’s certificate, etc. This corresponds to the SSL/TLS one-way authentication process’s (2)
Third packet (No. 28) The server certificate verification is complete, and it sends client key exchange+change cipher spec + encrypted handshake message, representing the SSL/TLS one-way authentication process’s (4)
Fourth packet (No. 29) Key agreement: change cipher spec + encrypted handshake message. Representing the SSL/TLS one-way authentication process’s (5)
Fifth packet (No. 30) Handshake complete. Start upper layer data transmission. SSL/TLS one-way authentication process’s (7)
2.6 SSL/TLS Two-Way Authentication Process
Almost the same as one-way authentication, except that after the client verifies the server’s certificate, the client will transmit its certificate client.crt to the server. The server verifies it and then begins key negotiation.
Practical Wireshark Analysis:
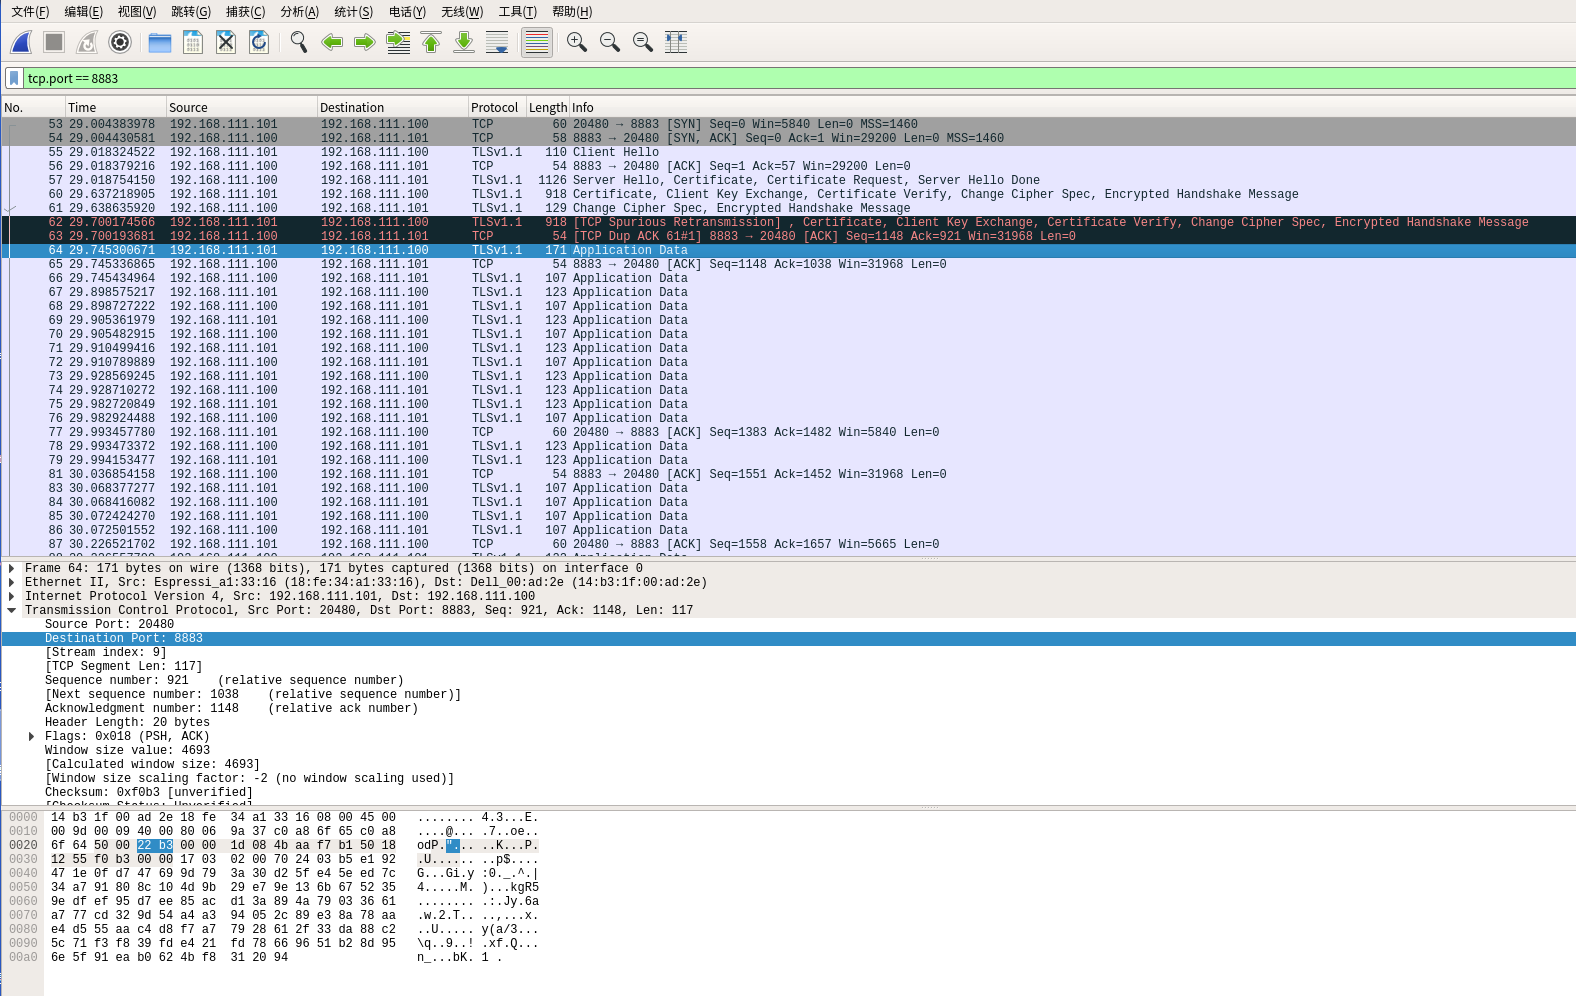
Similar to the one-way authentication:
Our SSL/TLS server is 192.168.111.100, and the client is 192.168.111.101. The client needs to verify the server’s legitimacy, and the server also needs to verify the client’s legitimacy
We will only examine the TLSv1.1 packets:
First packet (No. 55) Client Hello packet, consistent with the SSL/TLS one-way authentication process’s (1)
Second packet (No. 57) Server Hello packet, containing the server’s certificate, consistent with the SSL/TLS one-way authentication process’s (2)
Third packet (No. 60) The server certificate verification is complete, simultaneously sending the client’s certificate client.crt and containing client key exchange+change cipher spec + encrypted handshake message, consistent with the SSL/TLS one-way authentication process’s (4)
Fourth packet (No. 61) **The server validates the legitimacy of the client’s certificate.** After passing, key negotiation is conducted: change cipher spec + encrypted handshake message, consistent with the SSL/TLS one-way authentication process’s (5)
Retransmission packet (No. 62) Due to network reasons, TCP retransmits packet No. 60.
Fifth packet (No. 64) Handshake complete, beginning upper-layer data transmission. SSL/TLS one-way authentication process’s (7)
2.7 Explanation on Certificate and Other Formats
What do extensions like crt/key/req/csr/pem/der stand for?
.crt indicates a certificate, .key indicates a private key, .req signifies a request file, .csr also denotes a request file, .pem indicates PEM format, .der indicates DER format.
File extensions can be named freely simply for better understanding. However, the information within the file has a specific format, akin to .exe and PE formats.
Certificates have two formats: PEM and DER
Almost all certificates, private keys, etc., can be in either PEM or DER format, depending on the application’s requirements. PEM and DER formats are convertible:
openssl x509 -in ca.crt -outform DER -out ca.der  # PEM -> DER
openssl x509 -inform DER -in ca.der -out ca.pem   # DER -> PEM
PEM Format: An encrypted text file, generally starting and ending as follows:
	-----BEGIN RSA PRIVATE KEY-----
	-----END RSA PRIVATE KEY-----
	or:
   -----BEGIN CERTIFICATE REQUEST-----
   -----END CERTIFICATE REQUEST-----
	or:
   ----BEGIN CERTIFICATE-----
  -----END CERTIFICATE-----
DER Format: An encrypted binary file.
How to Examine What’s Inside a Certificate
A certificate contains the applicant’s public key, applicant’s organization information and personal information, CA’s information, validity period, certificate serial number in plain text, and a signature. For detailed information, for example, examine Baidu’s certificate:
a) First, Download the Baidu Certificate
Access https://www.baidu.com/ via Firefox browser, click the green lock on the top left, click the right arrow, select more information, click view certificate, go to the details tab, and export. You can now export Baidu’s certificate as baiducom.crt
b) Use a command to view detailed certificate information
openssl x509 -noout -text -in baiducom.crt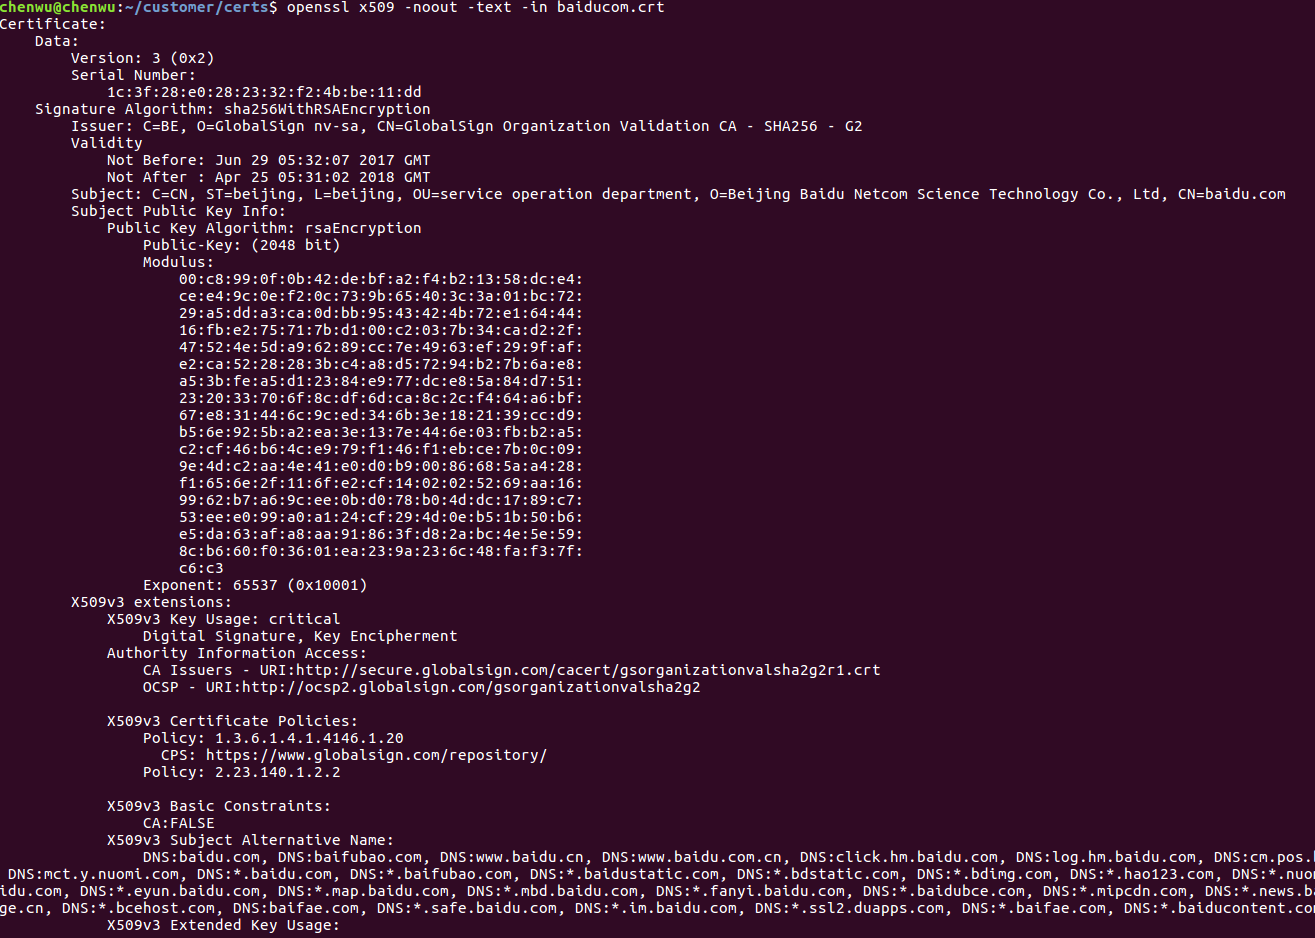
In the detailed information, there’s a field: X509v3 Basic Constraints: CA: FALSE
This field indicates whether the certificate is a CA certificate or a general non-CA certificate. For detailed descriptions, see RFC5280#section-4.2.1.9. RFC5280 also describes how certificates work in detail.
2.8 Relationship between SSL/TLS, OpenSSL, and mbedTLS
SSL/TLS is a working principle, whereas OpenSSL and mbedTLS are specific implementations of SSL/TLS, much like the relationship between the TCP/IP protocol and socket.
III. Locally Generate SSL Related Files
3.1 Certificate Generation Script
We utilize a makefile.sh script locally to establish a CA (ca.crt + ca.key) and use this CA to issue certificates to both server and client.
makefile.sh
# * Redistributions in binary form must reproduce the above copyright
# notice, this list of conditions and the following disclaimer in the
# documentation and/or other materials provided with the distribution.
# * Neither the name of the axTLS project nor the names of its
# contributors may be used to endorse or promote products derived
# from this software without specific prior written permission.
#
# THIS SOFTWARE IS PROVIDED BY THE COPYRIGHT HOLDERS AND CONTRIBUTORS
# "AS IS" AND ANY EXPRESS OR IMPLIED WARRANTIES, INCLUDING, BUT NOT
# LIMITED TO, THE IMPLIED WARRANTIES OF MERCHANTABILITY AND FITNESS FOR
# A PARTICULAR PURPOSE ARE DISCLAIMED. IN NO EVENT SHALL THE COPYRIGHT OWNER OR
# CONTRIBUTORS BE LIABLE FOR ANY DIRECT, INDIRECT, INCIDENTAL,
# SPECIAL, EXEMPLARY, OR CONSEQUENTIAL DAMAGES (INCLUDING, BUT NOT LIMITED
# TO, PROCUREMENT OF SUBSTITUTE GOODS OR SERVICES; LOSS OF USE,
# DATA, OR PROFITS; OR BUSINESS INTERRUPTION) HOWEVER CAUSED AND ON ANY THEORY
# OF LIABILITY, WHETHER IN CONTRACT, STRICT LIABILITY, OR TORT (INCLUDING
# NEGLIGENCE OR OTHERWISE) ARISING IN ANY WAY OUT OF THE USE OF
# THIS SOFTWARE, EVEN IF ADVISED OF THE POSSIBILITY OF SUCH DAMAGE.
#

#
# Generate the certificates and keys for testing.
#


PROJECT_NAME="TLS Project"

# Generate the openssl configuration files.
cat > ca_cert.conf << EOF
[ req ]
distinguished_name     = req_distinguished_name
prompt                 = no

[ req_distinguished_name ]
 O                      = $PROJECT_NAME Dodgy Certificate Authority
EOF

cat > server_cert.conf << EOF
[ req ]
distinguished_name     = req_distinguished_name
prompt                 = no

[ req_distinguished_name ]
 O                      = $PROJECT_NAME
 CN                     = 192.168.111.100
EOF

cat > client_cert.conf << EOF
[ req ]
distinguished_name     = req_distinguished_name
prompt                 = no

[ req_distinguished_name ]
 O                      = $PROJECT_NAME Device Certificate
 CN                     = 192.168.111.101
EOF

mkdir ca
mkdir server
mkdir client
mkdir certDER

# private key generation
openssl genrsa -out ca.key 2048
openssl genrsa -out server.key 2048
openssl genrsa -out client.key 2048

# cert requests
openssl req -out ca.req -key ca.key -new \
            -config ./ca_cert.conf
openssl req -out server.req -key server.key -new \
            -config ./server_cert.conf
openssl req -out client.req -key client.key -new \
            -config ./client_cert.conf

# generate the actual certs.
openssl x509 -req -in ca.req -out ca.crt \
            -sha1 -days 5000 -signkey ca.key
openssl x509 -req -in server.req -out server.crt \
            -sha1 -CAcreateserial -days 5000 \
            -CA ca.crt -CAkey ca.key
openssl x509 -req -in client.req -out client.crt \
            -sha1 -CAcreateserial -days 5000 \
            -CA ca.crt -CAkey ca.key

openssl x509 -in ca.crt -outform DER -out ca.der
openssl x509 -in server.crt -outform DER -out server.der
openssl x509 -in client.crt -outform DER -out client.der

mv ca.crt ca.key ca/
mv server.crt server.key server/
mv client.crt client.key client/

mv ca.der server.der client.der certDER/

rm *.conf
rm *.req
rm *.srl
Save the above code as makefile.sh. Perform the following modifications and then execute it in the terminal.
– Modify the IP address in the CN field to match your host/device’s IP address– [Optional] Change 2048 to your desired encryption bit length if needed
You will see:
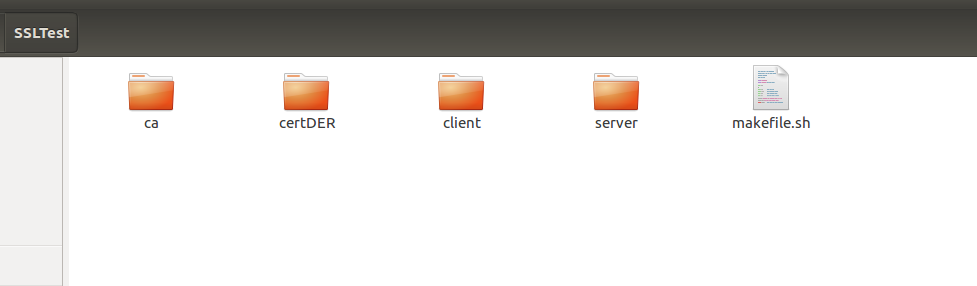
ca directory: Contains the private key ca.key and certificate ca.crt
certDER directory: Saves the certificates as binary files ca.der, client.der, server.der
client directory: client.crt, client.key
server directory: server.crt, server.key
3.2 Deletion Script
rmfile.sh
rm ca/ -rf
rm certDER/ -rf
rm client/ -rf
rm server/ -rf
Save the above code as rmfile.sh, and execute it in the terminal to delete the generated directories and files:
./rmfile.sh3.3 CA Certificate Testing
Locally, we can use the CA certificate to verify the self-issued server certificate server.crt and client certificate client.crt
$ openssl verify -CAfile ca/ca.crt server/server.crt$ openssl verify -CAfile ca/ca.crt client/client.crthttps://ask.qcloudimg.com/http-save/yehe-8223537/0ad8cc04662dbe0d2707f546a595f200.png
Publisher: Full-stack Programmer Stack Leader, please indicate the source when reprinting: https://javaforall.cn/139781.html Original link: https://javaforall.cn