
1. DNS2TCP Experiment Overview
1.1 Description of the DNS2TCP Experiment
This experiment leans heavily toward theoretical knowledge. It aims to explain the principle of using DNS2TCP to maintain a TCP connection within DNS streams, as described in the experimental documentation. The course primarily explains what DNS2TCP is, its usage, and the meaning of its parameters. The experiment environment is based on Ubuntu 14.04, provided by a cloud lab. Ubuntu 14.04 serves as the host machine, hosting two virtual machines.
The two virtual machines are Kali Linux and Metasploitable2. Most actions in this experiment are carried out on Kali Linux. The experiment involves limited hands-on practice and focuses primarily on understanding the principles of DNS tunneling technology and protocols like TCP and UDP. These theoretical concepts are explained in detail throughout the experiment.
Note: Due to high configuration costs, the cloud host used for the experiment limits the number of attempts to no more than 6 per experiment.
2. Key Concepts of DNS2TCP
2.1 Key Knowledge Concepts of DNS2TCP
The practical portion of the experiment is conducted on a Kali virtual machine. Understanding DNS tunneling technology begins with learning what DNS is and the applications of DNS tunneling. The experiment highlights key tools for implementing DNS tunneling technology, focusing on DNS2TCP for maintaining TCP connections within DNS streams. The critical knowledge points include the following:
- Basic concepts of DNS
- The definitions and differences between TCP and UDP
- TCP’s three-way handshake process
- Available tools for implementing DNS tunneling
3. DNS Basics
3.1 Basic Concepts of DNS
The Domain Name System (DNS) is a service that functions as a distributed database to map domain names to IP addresses, making it easier for users to access the internet. DNS uses TCP and UDP port 53. Currently, the maximum length of a single-level domain name is 63 characters, and the total domain name length cannot exceed 253 characters.
Two key protocols related to DNS operations are TCP and UDP. A clear understanding of these protocols aids in successfully realizing the experiment, which focuses on leveraging DNS2TCP to maintain TCP connections in DNS streams.
3.2 Understanding TCP and UDP Protocols
Transmission Control Protocol (TCP) provides three key features:
- Reliable data transmission in an IP environment (ensures error-free data delivery to the destination, with acknowledgment packets increasing communication traffic). It also includes efficient flow control, full-duplex operation (data flows in both directions simultaneously), and multiplexing. TCP is a connection-oriented, end-to-end transmission protocol.
- Connection-oriented: A connection must be established between two parties before data transmission occurs. This setup pre-establishes a dedicated data channel before sending data.
- Application protocols supported by TCP include Telnet (remote login), FTP (file transfer protocol), and SMTP (simple mail transfer protocol). TCP is best suited for transferring large volumes of data where reliability is critical.
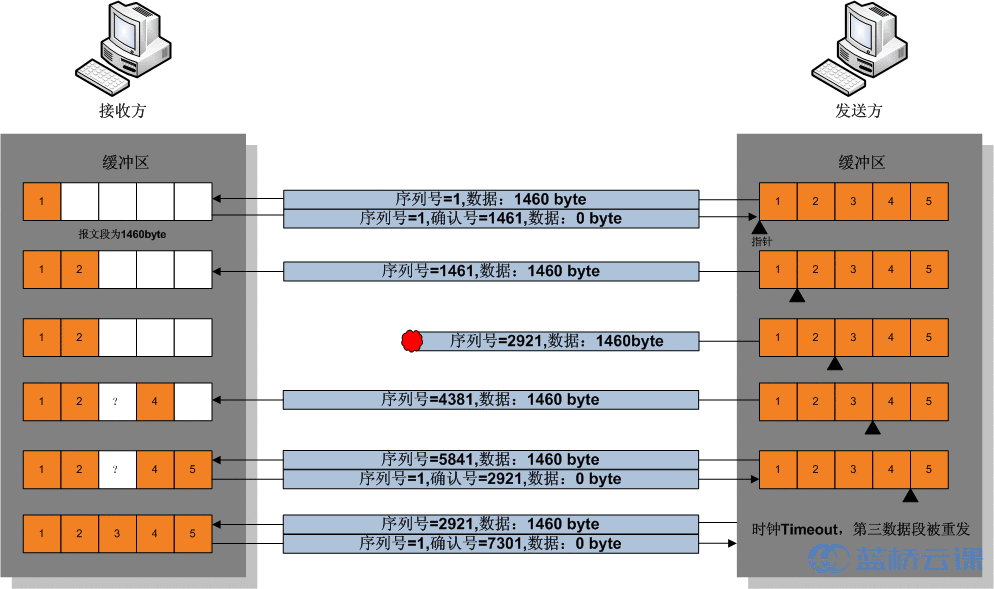
Image source: Wikipedia, Transmission Control Protocol
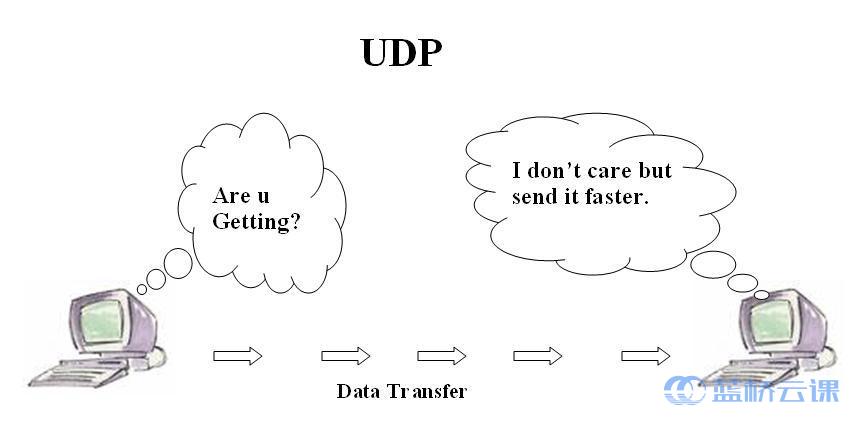
In contrast, the User Datagram Protocol (UDP) offers the following key traits:
- Connectionless with no guarantees of reliability, flow control, or error recovery. UDP is used for applications that transmit small amounts of data, prioritize speed, and require low overhead.
- Application protocols supported by UDP include NFS (Network File System), SNMP (Simple Network Management Protocol), DNS (Domain Name System), and TFTP (Trivial File Transfer Protocol).
A quick summary for TCP and UDP:
| Protocol Name | Key Characteristics |
|---|---|
| Transmission Control Protocol (TCP) | Connection-oriented, reliable data transfer (ensures data accuracy and order), suited for large data transfers (stream mode), slower due to connection setup and higher overhead (time and system resources). |
| User Datagram Protocol (UDP) | Connectionless, less reliable, suited for small data packets (datagram mode), and faster due to minimal setup. |
Partially referenced from Baidu Tips: http://jingyan.baidu.com/
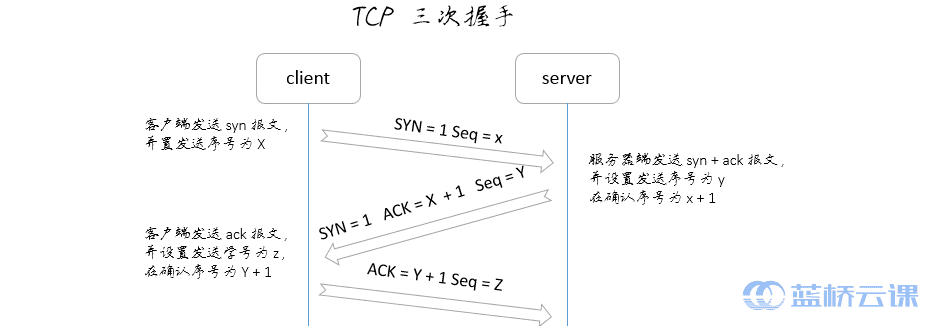
3.3 The Three-Way Handshake in TCP
After understanding the concepts of DNS, and the differences between TCP and UDP, we now examine the “three-way handshake” process essential to establishing a TCP connection during data transmission:
- First handshake: The client sends a SYN (synchronize) packet (SYN=j) to the server and enters the SYN_SEND state, awaiting acknowledgment.
- Second handshake: The server receives the SYN packet, acknowledges the client’s SYN (ACK=j+1), and sends its own SYN (SYN=k), combining them as a SYN+ACK packet. The server moves into the SYN_RECV state.
- Third handshake: The client receives the server’s SYN+ACK packet, sends an ACK packet (ACK=k+1) to the server, and both parties enter the ESTABLISHED state, completing the three-way handshake.
4. DNS Tunneling Technology
4.1 Introduction to DNS Tunneling
Previously, Section 3.1 introduced the concept of DNS. Here, we delve into DNS tunneling technology. Tunneling is a method of transmitting data between networks using the internet’s existing infrastructure. It encapsulates data frames or packets of one protocol and transmits them through a “tunnel” created over another protocol. The new header provides routing information, enabling data transit over the internet.
Common DNS tunneling tools include:
- OzymanDNS (written in Perl)
- Iodine (written in C)
- Tcp-over-dns (written in Java)
- Dns2tcp (written in C)
- heyoka (written in C)
Request: Query the Root Server to Check for the Domain’s Existence
There are several tools available for implementing tunneling techniques. Early tools such as NSTX and Ozymandns laid the foundation, while more modern and popular ones include Iodine, Dnscat2, and Dns2tcp, among others.
4.3 Introduction to DNS Tunneling Tool: DNS2TCP
The DNS2TCP tool is divided into two components: the server-side `dns2tcpd` and the client-side `dns2tcpc`. The server allows you to specify a resource list in its configuration files, where each resource corresponds to a local or remote service listening for TCP connections. The client listens on a predefined TCP port.
DNS2TCP leverages legitimate DNS servers to create a functional DNS tunnel. The primary mechanism involves using `dns2tcpc` (client) and `dns2tcpd` (server) to transmit data securely via TXT records, establishing an active data transfer connection.
1. DNS Domain Configuration
This experimental process is quite specialized and was conducted in a controlled Kali Linux training environment. The tutorial inherently focuses on teaching skills that could potentially be offensive. To prevent misuse or potential harm to platforms, the experiment was entirely carried out offline.
When understanding DNS tunneling principles, it is known that during DNS querying, if the queried domain is not found in the local DNS server’s cache, the DNS server will query the internet and return the resolved results.
For the successful communication between the DNS2TCP server and client, a DNS server acts as the bridge, facilitating data exchange. While this experiment involves external network and DNS resolution factors, it’s sufficient for users to understand the core principles and workflow of DNS tunneling techniques.
Step 1: Configure your domain (e.g., `shiyanlou.com`) by setting up a second-level domain.
– Create an NS type record for `a.shiyanlou.com` and point it to `b.shiyanlou.com`.
– For `b.shiyanlou.com`, create an A type record and point this to your server’s IP address.
plaintext
NS a Default b.shiyanlou.com
A b Default YourServerIPAddress
If you’re unsure about DNS resolution steps, contact your domain registrar’s customer service for guidance. Keep in mind that the interface for setting domain records varies across service providers.
2. DNS2TCP Server Setup
Next, use the help command to explore available options for the `dns2tcpd` server tool. Open the Kali Linux terminal and execute the command:
bash
dns2tcpd
# Example Help Output:

# Server Parameters:
The following table describes key parameters for the DNS2TCP server:
| Parameter | Description |
|||
| `-i` | Specifies the IP address to bind to. |
| `-F` | Keeps the `dns2tcp` server process running in the foreground. |
| `-f` | Loads the DNS2TCP server configuration file. |
| `-d` | Sets the debug level for verbose output. |
# Default Configuration File:
The server’s configuration file is typically located in `/etc/` as `dns2tcp.conf`. Below is an example configuration:
plaintext
# Your server’s IP address
listen = X.X.X.X
# Specify the port number (default 53 for DNS)
port = 53
# User running the service
user = nobody
# Root folder (temporary storage)
chroot = /tmp
# Domain for NS records
domain = XXXXXXXX
# Resources offered for the client
resources = ssh:127.0.0.1:22, socks:127.0.0.1:1082, http:127.0.0.1:3128
Here, `resources` specifies the server’s services/resources offered to the client. The server listens on particular ports and forwards data to the specified endpoints.
# Start the Server:
After configuring the file, run the following command to start the server:
bash
dns2tcpd -f /etc/dns2tcpd.conf
# Stop the Server:
To stop the server, use the kill command:
bash
kill all dns2tcpd
3. DNS2TCP Client Configuration
> Important Note: The client relies on successful DNS record propagation. Since the experimental conditions were offline, external DNS servers could not be accessed.
To understand the client implementation, follow these steps in the Kali terminal. Use the help command:
bash
dns2tcpc
# Example Help Output:

# Client Parameters:
The table below explains the client parameters:
| Parameter | Description |
|||
| `-c` | Enables data compression for the connection. |
| `-z
| `-r` | Specifies the resource name being accessed on the server. |
| `-T` | Sets the DNS request type (default is TXT). |
| `-l` | Specifies the local port for the client to listen on during connection. |
| `-d` | Sets the debug/logging level (values: 1, 2, or 3). |
# Example Command:
To connect to the server and use the SSH resource, run the command:
bash
dns2tcpc -r ssh -z a.shiyanlou.com X.X.X.X -l 8888 -d 2
This command opens port 8888 locally and connects to the remote SSH resource via tunneling.
5. Conclusion and Reflection
5.1 Summary:
This experiment demonstrates the core principles behind DNS2TCP in establishing TCP connections through DNS data streams. Discussions included server and client configurations, along with insights into the TCP vs. UDP protocol differences. Here’s a graphical knowledge diagram for reference:
[Insert graphical representation of knowledge structure with principles surrounding DNS2TCP here]
6. Homework and Further Reading:
6.1 Reading Assignment:
This experiment involves many conceptual topics, focusing on TCP and UDP characteristics, their distinctions, and their applications. The exercise showcases DNS tunneling tools, especially setting NS and A records for DNS resolution.
For additional context, refer to the following source:
> Programmer’s World: [http://www.voidcn.com/blog/god_7z1/article/p-4819727.html](http://www.voidcn.com/blog/god_7z1/article/p-4819727.html)
For information on how to use the tool, interested readers can also refer to the official English documentation: