
Connection Tracking (conntrack)
Connection tracking is fundamental to many network applications. For example, Kubernetes Service, ServiceMesh sidecar, software layer 4 load balancer LVS/IPVS, Docker network, OVS, iptables host firewall, and others all rely on connection tracking functionality.
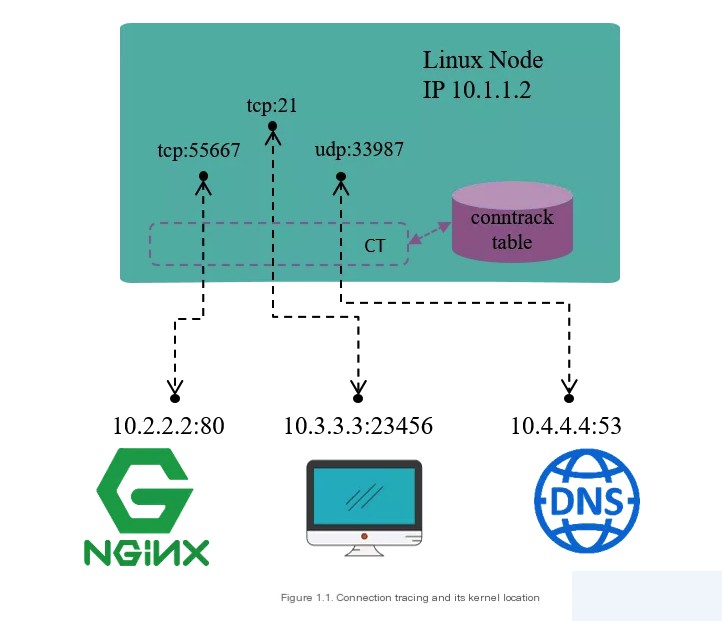
Connection tracking, as the name implies, involves tracking (and recording) the state of connections. For instance, Figure 1.1 shows a Linux machine with the IP address 10.1.1.2, where we can see three connections:
- The machine accessing an external HTTP service (destination port 80)
- An external connection accessing the machine’s FTP service (destination port 21)
- The machine accessing an external DNS service (destination port 53)
What connection tracking does is discover and track the state of these connections, specifically including:
- Extracting tuple information from packets to identify data flows and their corresponding connections.
- Maintaining a state database (conntrack table) for all connections, such as connection creation time, packet counts, byte counts, etc.
- Recycling expired connections (GC).
- Providing services for higher-level functionalities (e.g., NAT).
It is important to note that the term “connection” in connection tracking doesn’t exactly align with the TCP/IP protocol’s “connection-oriented” concept. Simply put:
- In the TCP/IP protocol, a connection is a Layer 4 concept. TCP is connection-oriented, requiring acknowledgment from the other side for sent packets, and has a retransmission mechanism. UDP is connectionless; sent packets don’t require acknowledgment from the other side, nor do they have a retransmission mechanism.
- In conntrack (CT), a data flow defined by a tuple represents a connection. We will see that even L3 protocols like UDP and ICMP have connection records in CT, but not all protocols will be tracked by connection tracking.
Netfilter
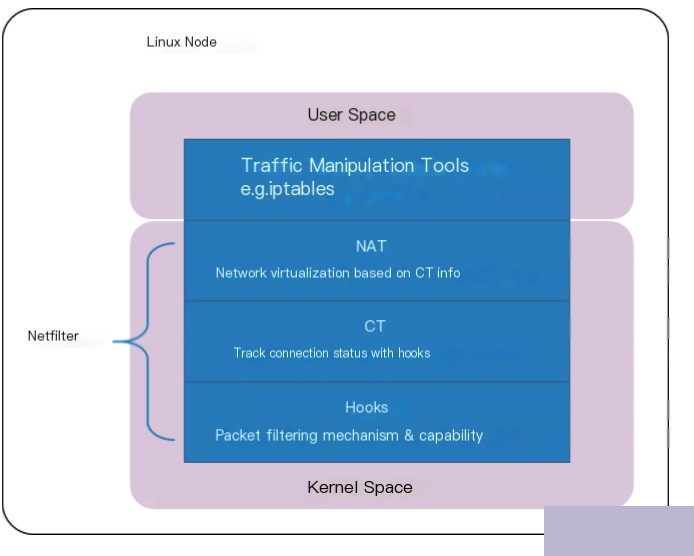
Linux connection tracking is implemented in Netfilter.
Netfilter is a framework in the Linux kernel for the manipulation and filtering of data packets. It sets up several hook points in the kernel protocol stack to intercept, filter, or otherwise manage data packets.
When connection tracking is mentioned, people may think of Netfilter first, but Netfilter is just one implementation of connection tracking within the Linux kernel. In other words, if you have the ability to hook, intercept every packet entering or leaving the host, you can independently implement a connection tracking system on this basis.
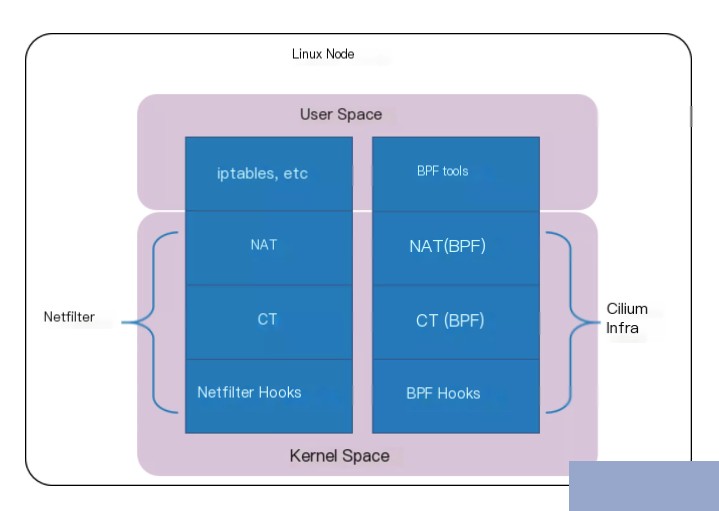
The cloud-native network solution Cilium in version 1.7.4+ has implemented such an independent connection tracking and NAT mechanism (complete functionality requires Kernel 4.19+). Its basic principles are:
- Implementing packet interception based on BPF hooks (equivalent to the hook mechanism in Netfilter).
- Building a whole new conntrack and NAT system on top of BPF hooks; thus, even if Netfilter is unloaded, Cilium’s support for Kubernetes ClusterIP, NodePort, ExternalIPs, and LoadBalancer functionalities remains unaffected. Since this connection tracking system is independent of Netfilter, its conntrack and NAT information is not stored in the kernel’s (i.e., Netfilter’s) conntrack table and NAT table. Therefore, conventional tools like conntrack/netstats/ss/lsof will not see it; you have to use Cilium’s commands, such as:
$ cilium bpf nat list
$ cilium bpf ct list global
Iptables
Iptables is a user-space tool for configuring Netfilter’s filtering functionality. Netfilter is the true security framework in the kernel space; iptables is essentially a command-line tool located in user space, used to operate on the real framework. Iptable processes packets based on rules, such as accept, reject, and drop.
For example, when a client accesses a server’s web service, the client sends packets to the network card, and since the TCP/IP stack is part of the kernel, the client’s information goes through the kernel’s TCP protocol to the web service in user space. Here, the client packets’ target is the web service’s listening socket (IP:Port). When the web service needs to respond to the client request, the response’s target is the client, turning the IP and port that the web service was listening on into the source. As we mentioned, Netfilter is the actual firewall as part of the kernel. If we want the firewall to fulfill its purpose, we need to set up checkpoints in the kernel through which all inbound and outbound packets must pass, getting checked to allow those that meet the pass condition and block those that meet the blocking condition.
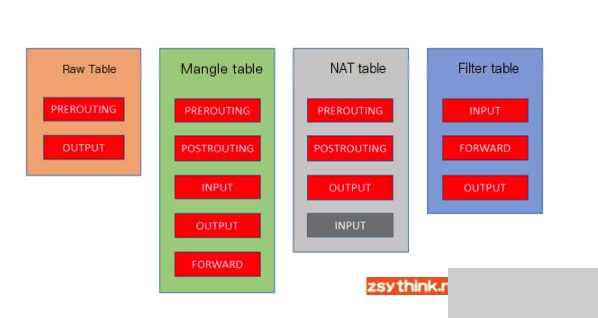
Iptables includes 4 tables and 5 chains. The tables are distinguished based on packet operations (such as filtering, NAT, etc.), and chains are distinguished based on different hook points; tables and chains are actually two dimensions of Netfilter.
The four iptables tables are filter, mangle, nat, raw, with filter being the default table:
- Filter table: Used to filter packets, where specific rules determine how to handle a packet.
- NAT table: Primarily modifies packet IP address and port information.
- Mangle table: Mainly modifies packet’s type of service, lifetime, marks data packets, and implements traffic shaping and policy routing.
- Raw table: Mainly decides whether to perform state tracking on packets.
The five iptables chains are PREROUTING, INPUT, FORWARD, OUTPUT, and POSTROUTING:
- Input chain: Applies rules when packets are received for the local machine’s address.
- Output chain: Applies rules when packets are sent out from the local machine.
- Forward chain: Applies rules when packets need to be forwarded to other addresses; note that enabling forwarding requires enabling ip_forward in the Linux kernel.
- Prerouting chain: Applies rules before making routing decisions on packets.
- Postrouting chain: Applies rules after making routing decisions on packets.
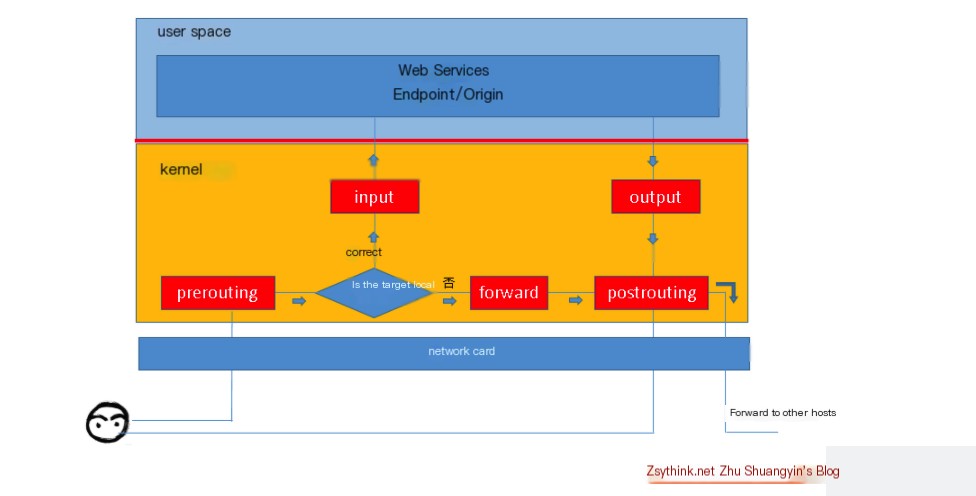
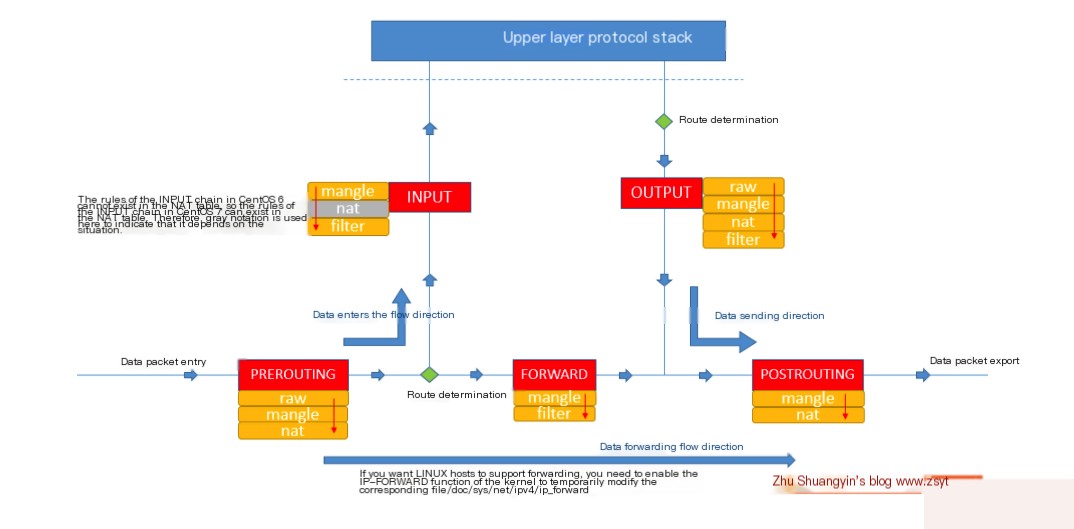
The relationship between tables and chains is shown in the diagram below:
We can imagine some common scenarios of message flow:
- Messages to a local process: PREROUTING –> INPUT.
- Messages forwarded by the local machine: PREROUTING –> FORWARD –> POSTROUTING.
- Messages sent by a local process (typically response messages): OUTPUT –> POSTROUTING.
We can summarize the flow of data packets through the firewall as the following diagram:
Querying Rules
- -t: table name
- -n: do not resolve IP addresses
- -v: shows counter information, including the number and size of packets
- -x: option to show exact values of counters
- –line-numbers: display rule sequence numbers (abbreviated as –line)
- -L: chain name
#iptables -t filter -nvxL DOCKER  --line
Chain DOCKER (1 references)
num      pkts      bytes target     prot opt in     out     source               destination
1        5076   321478 ACCEPT     tcp  --  !docker0 docker0  0.0.0.0/0            172.17.0.2           tcp dpt:8443
2       37233 54082508 ACCEPT     tcp  --  !docker0 docker0  0.0.0.0/0            172.17.0.2           tcp dpt:22
3        1712   255195 ACCEPT     tcp  --  !docker0 docker0  0.0.0.0/0            172.17.0.3           tcp dpt:9000
4           0        0 ACCEPT     tcp  --  !docker0 docker0  0.0.0.0/0            172.17.0.3           tcp dpt:8000
5       40224  6343104 ACCEPT     tcp  --  !docker0 docker0  0.0.0.0/0            172.17.0.4           tcp dpt:3443
6       21034  2227009 ACCEPT     tcp  --  !docker0 docker0  0.0.0.0/0            172.17.0.5           tcp dpt:3306
7          58     5459 ACCEPT     tcp  --  !docker0 docker0  0.0.0.0/0            172.17.0.6           tcp dpt:80
8         826    70081 ACCEPT     tcp  --  !docker0 docker0  0.0.0.0/0            172.17.0.6           tcp dpt:443
9    10306905 1063612492 ACCEPT     tcp  --  !docker0 docker0  0.0.0.0/0            172.17.0.9           tcp dpt:3306
10     159775 12297727 ACCEPT     tcp  --  !docker0 docker0  0.0.0.0/0            172.17.0.7           tcp dpt:11111
Adding Rules
To add a rule at the end of a specified chain in a specified table, use the -A option, which indicates adding a rule at the end of the corresponding chain. If the -t option is omitted, it means the rule is added to the default filter table:
Command syntax: iptables -t table-name -A chain-name match-conditions -j action
Example: iptables -t filter -A INPUT -s 192.168.1.146 -j DROP
To add a rule at the beginning of a specified chain in a specified table, use the -I option:
Command syntax: iptables -t table-name -I chain-name match-conditions -j action
Example: iptables -t filter -I INPUT -s 192.168.1.146 -j ACCEPT
To add a rule at a specified position in a specified chain in a specified table:
Command syntax: iptables -t table-name -I chain-name rule-sequence-number match-conditions -j action
Example: iptables -t filter -I INPUT 5 -s 192.168.1.146 -j REJECT
Deleting Rules
To delete rules based on rule sequence number, use the -D option, indicating deletion of the corresponding rule in the chain. The example deletes the rule with sequence number 3 in the INPUT chain of the filter table:
Command syntax: iptables -t table-name -D chain-name rule-sequence-number
Example: iptables -t filter -D INPUT 3
To delete rules based on specific match conditions and actions, delete specified rules in the table’s specified chain. The example deletes the rule in the INPUT chain of the filter table with source address 192.168.1.146 and action DROP:
Command syntax: iptables -t table-name -D chain-name match-conditions -j action
Example: iptables -t filter -D INPUT -s 192.168.1.146 -j DROP
To delete all rules in a specified chain of a specified table, use the -F option, indicating clearing of the corresponding chain’s rules:
Command syntax: iptables -t table-name -F chain-name
Example: iptables -t filter -F INPUT
Modifying Rules
To modify a specified rule in a specified chain of a specified table, use the -R option, which indicates modifying the corresponding chain’s rule. When using the -R option, you must specify both the corresponding chain and the rule’s sequence number, and the original match conditions cannot be omitted. The example modifies the third rule of the INPUT chain in the filter table, changing its action to ACCEPT, with -s 192.168.1.146 as the original match condition of the rule. Omitting this match condition might result in the source address in the modified rule becoming 0.0.0.0/0:
Command syntax: iptables -t table-name -R chain-name rule-sequence-number original-rule's-match-conditions -j action
Example: iptables -t filter -R INPUT 3 -s 192.168.1.146 -j ACCEPT
To set the default policy (default action) for a specified chain in a specified table:
Command syntax: iptables -t table-name -P chain-name action
Example: iptables -t filter -P FORWARD ACCEPT
Saving Rules
Method One
If we want the changes we made to the rules to take effect permanently, we must use the command below to save the rules:
service iptables save
Of course, if you have mistakenly operated on the rules but have not saved them, then using service iptables restart will cause the rules to revert to how they were when the /etc/sysconfig/iptables file was last saved.
In CentOS 7, the init-style scripts are no longer used for starting services, and unit files are used instead. So, commands like service iptables start are no longer executable, nor is service iptables save. Moreover, in CentOS 7, firewall replaced the original iptables service. However, you don’t need to worry. We can install iptables and iptables-services via the yum repository (iptables is usually installed by default, but iptables-services usually is not). After installing iptables-services in CentOS 7, you can use the service iptables save command to save rules as in CentOS 6, and the rules will still be saved in the /etc/sysconfig/iptables file. Here’s how to configure iptables-service in CentOS 7:
# After configuring the yum source, install iptables-service
yum install -y iptables-services
# Stop firewalld
systemctl stop firewalld
# Disable automatic startup of firewalld
systemctl disable firewalld
# Start iptables
systemctl start iptables
# Set iptables to start automatically on boot, and you can control the iptables service through iptables-service
systemctl enable iptables
You only need to go through the above configuration process once. After that, you can save iptables rules in CentOS 7 using service iptables save.
Method Two
Another way to save iptables rules is by using the iptables-save command. The iptables-save command does not save the current iptables rules but can output the current iptables rules in a “saved format” to the screen.
We can therefore use the iptables-save command in conjunction with redirection to redirect the rules into the /etc/sysconfig/iptables file:
iptables-save > /etc/sysconfig/iptables
Loading Rules
We can also reload rules in /etc/sysconfig/iptables as the current iptables rules, but note that unsaved changes to the /etc/sysconfig/iptables file will be lost or overwritten.
The iptables-restore command can reload rules from a specified file, as shown in the example below:
iptables-restore < /etc/sysconfig/iptables