Introduction to IDS/IPS Systems
Snort is an open-source network intrusion detection and prevention system (IDS/IPS). Snort is a lightweight network intrusion detection system based on libpcap. It runs on a “sensor” host and listens to network data. By performing pattern matching between network data and rule sets, Snort can detect potential intrusion attempts. Alternatively, using the SPADE plugin, it can use statistical methods to perform anomaly detection on network data.
This experiment is demonstrated on Ubuntu. If you need to perform it on other Linux versions, you can refer to this article and adapt the commands to different operating systems with the help of a large model.
Installing Snort
1. Update the apt sources
sudo apt update
2. Install the relevant dependencies. In Linux systems, especially those based on Debian (such as Ubuntu), you can install multiple packages at once using the apt install command. These packages are separated by spaces. Installing multiple packages this way saves time because you don’t need to run a command for each package individually. Additionally, it ensures that all related dependencies are updated to compatible versions simultaneously, avoiding potential version conflicts.
sudo apt install build-essential libpcap-dev libpcre3-dev libnet1-dev zlib1g-dev luajit hwloc libdnet-dev libdumbnet-dev bison flex liblzma-dev openssl libssl-dev pkg-config libhwloc-dev cmake cpputest libsqlite3-dev uuid-dev libcmocka-dev libnetfilter-queue-dev libmnl-dev autotools-dev libluajit-5.1-dev libunwind-dev
This command includes quite a few dependencies, so here are brief explanations of the relevant packages:
build-essential: This is a fundamental package for a compilation environment that includes compilers (like gcc), build tools (like make), and necessary libraries. It’s essential for compiling most source code packages. libpcap-dev: libpcap (Packet CAPture) is a library for capturing network traffic. Snort needs it to analyze network packets.libpcre3-dev: PCRE (Perl Compatible Regular Expressions) is a library for handling regular expressions. Snort uses PCRE to match patterns in rules.libnet1-dev: libnet is a library for constructing and sending network packets. Although Snort itself does not directly send packets, it might rely on this library to handle or parse network data.zlib1g-dev: zlib is a library for data compression. Snort might use zlib to compress or decompress log data.luajit: LuaJIT is a high-performance Lua interpreter. Snort might use Lua scripts to extend its functionality or handle rules.hwloc, libhwloc-dev: hwloc (Hardware Locality) is a library for detecting and exploiting hardware topology information. Snort might use hwloc to optimize performance or resource allocation.libdnet-dev, libdumbnet-dev: These libraries provide functions and interfaces for network programming. Snort might use them to process network packets or perform network operations.bison, flex: Bison is a parser generator, and Flex is a lexical analyzer generator. They are typically used for compiler development but might also be used by Snort to parse configuration files or rules.liblzma-dev: LZMA is a compression algorithm, and liblzma provides the library interface for this algorithm. Snort might use it for data compression.openssl, libssl-dev: OpenSSL is a robust encryption library providing SSL and TLS protocol implementations. Snort might use OpenSSL to encrypt or decrypt network data.pkg-config: pkg-config is a tool that helps compilers and linkers find library files. It simplifies the management of library dependencies.cmake: CMake is a cross-platform automated build system. Although Snort itself might not use CMake for building, some dependencies might.cpputest: CppUTest is a unit testing framework for C/C++. While Snort’s installation command includes it, Snort itself might not directly use it for unit testing. It could be for developing or testing other components related to Snort.libsqlite3-dev: SQLite is a lightweight embedded relational database management system. Snort might use SQLite to store log data or configuration information.uuid-dev: The UUID (Universally Unique Identifier) library provides functionality for generating globally unique identifiers. Snort might use UUIDs to identify log entries or sessions.libcmocka-dev: cmocka is a lightweight unit testing framework for C. Like CppUTest, it might be used for testing components related to Snort.libnetfilter-queue-dev, libmnl-dev: These libraries provide interfaces for interacting with the Linux kernel netfilter framework. Snort might use them to implement advanced network filtering or processing functions.autotools-dev: This is a set of tools and libraries for automating build and test processes. They might be used to build some of Snort’s dependencies.libluajit-5.1-dev: This is the development library for LuaJIT 5.1. Like luajit, it supports executing Lua scripts.libunwind-dev: libunwind is a library for stack trace and debugging. Snort might use it for error reporting or debugging information.
3. Install Snort DAQ (Data Acquisition Library)
When installing Snort on Ubuntu, installing the DAQ (Data Acquisition Library) is an important step.
DAQ is a component of Snort that provides an abstraction layer for calling various packet capture libraries.This abstraction layer allows Snort to flexibly handle packets from different network interfaces.
 # Create a directory to store sources
mkdir snortSourceFiles
cd snortSourceFiles
 # Download DAQ source from GitHub
git clone https://github.com/snort3/libdaq.git
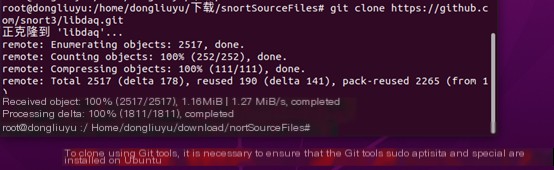
In the current folder (snortSourceFiles), you should see the daq folder 
# Navigate to the libdaq directory
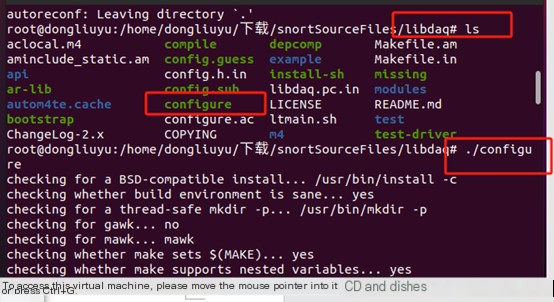
cd libdaq/
# Compile and install
./bootstrap
./configure
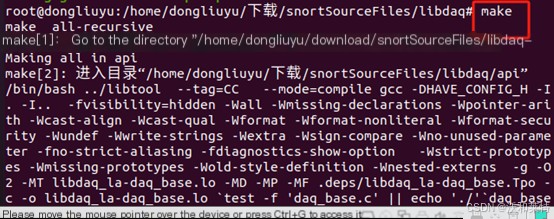
make
sudo make installEnter the libdaq folder to compile and install 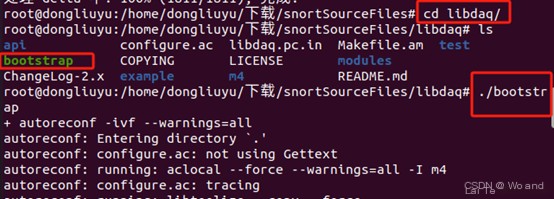
Then run sudo make install 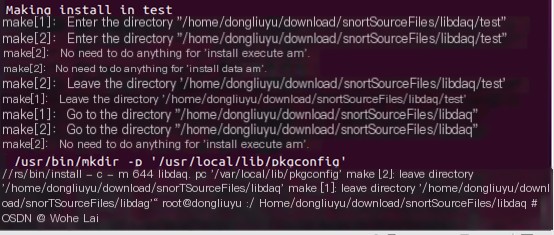 Since make and make install are used in many experiments, here’s a brief explanation of the two:
The make command is primarily responsible for compiling source code, while the make install command installs the compiled software to the specified location.These two commands are usually used consecutively in software development and deployment,first running the make command to compile, then running the make install command to install.Note that,before running make and make install, you typically need to run a configuration script (like ./configure) to generate the Makefile,and configure necessary parameters and options for the compilation and installation process. Moreover,running the make install command usually requires root permissions because the installation process writes files to the system.This is why running make install without sudo sometimes results in errors.
4. Install Google's thread-caching malloc: TCMalloc, which provides efficient multi-threaded memory management, replacing the OS’s memory allocation functions. It reduces memory fragmentation, supports multicore, and offers better parallelism. Additionally, TCMalloc leverages thread-local storage (TLS) to cache small memory allocations, reducing lock contention and improving multi-threaded allocation performance.
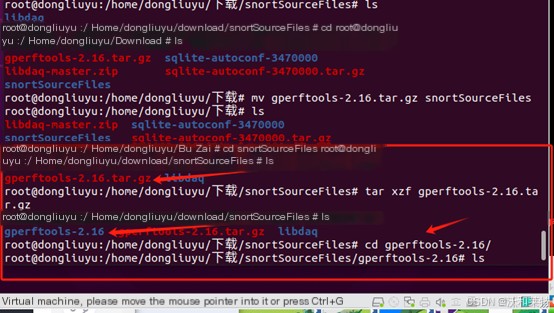
cd snortSourceFiles
wget https://github.com/gperftools/gperftools/releases/download/gperftools-2.8/gperftools-2.8.tar.gz
tar xzf gperftools-2.8.tar.gz
cd gperftools-2.8/
./configure
make
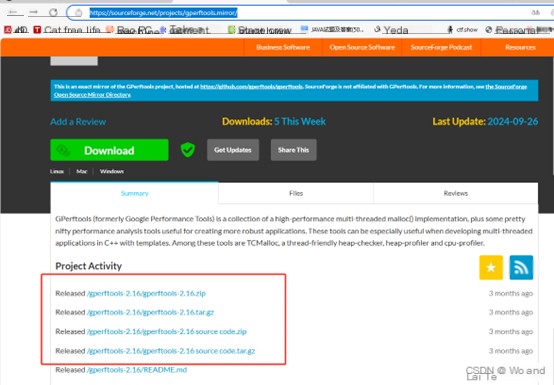
sudo make installIf you can’t download the package using wget on Ubuntu (e.g., due to request timeouts), you can directly access the URL below in your browser, download the gperftools tarball, and then upload it to the snortSourceFiles directory on Ubuntu for extraction. GPerftools download site
You can view the files under geperftoos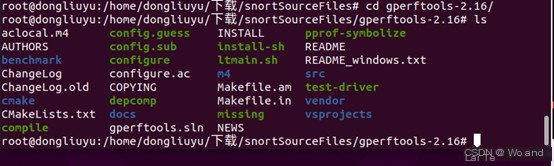 In the gperftools directory, compile and install
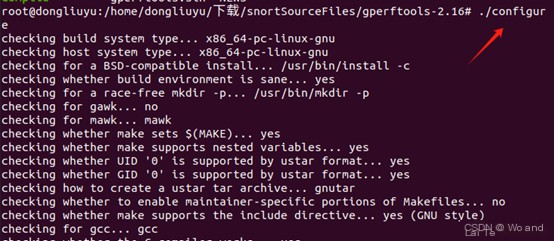
Then run make to compile, this process may take some time, so just wait. After successful compilation, use sudo make install to install
5. Compile snort from source
 cd snortSourceFiles
git clone https://github.com/snort3/snort3.git
cd snort3/
sudo ./configure_cmake.sh --prefix=/usr/local --enable-tcmalloc
cd build/
# Compilation takes a long time make makeinstall
6. Update shared libraries Shared libraries typically contain many commonly used functions and code, which can be shared by multiple programs to reduce memory usage and improve system performance.
sudo ldconfig
7. Check the snort version
snort -VThe source-compiled version is generally the latest snort version. If you prefer to use apt for installation, you can install it directly with sudo apt install snort if related dependencies are already installed.
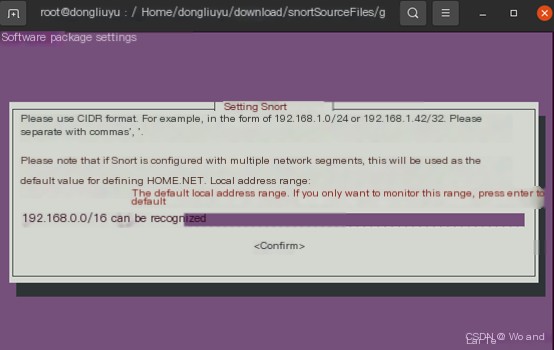
If the system indicates that snort is not installed, follow the prompts to install snort. During installation, a configuration option will appear; press Enter to confirm (I pressed Enter to keep the default settings. One of the options requires the network interface name, default is eth0, I used the default as my network card is named ens33, and it didn’t affect anything. If there’s an issue, use your network card name, which can be checked with ifconfig)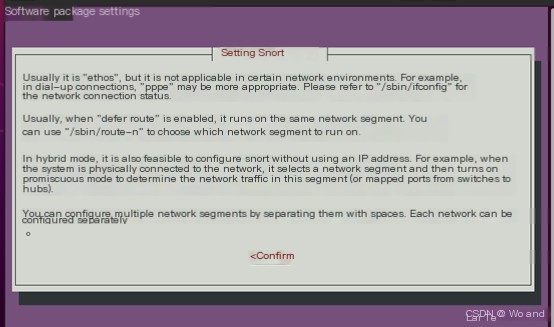
Now use snort -v to check if the installation was successful. If a version number appears, the installation was successful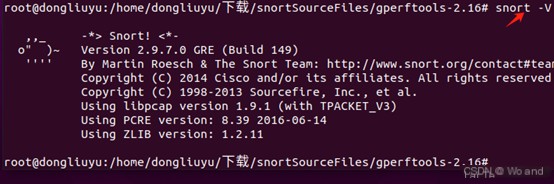 At this point, snort installation is successful. Next, I’ll introduce a simple experiment, the goal of the experiment is to use snort on Ubuntu to detect and defend against data packets larger than 800 bytes used for ping attacks from external networks.
Simple Experiment
1. Configure rules The snort rules configuration file is generally stored in /etc/snort/rules, you can navigate to the directory to view the rules file Enter the command
vi /etc/snort/rules
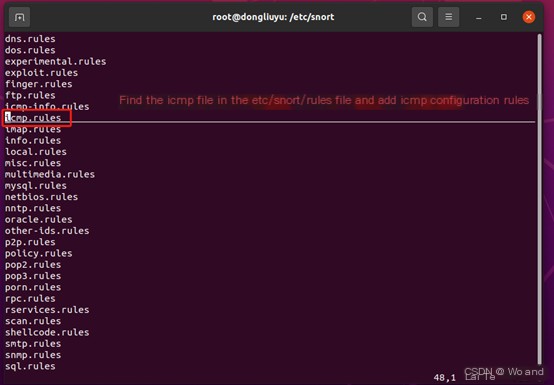
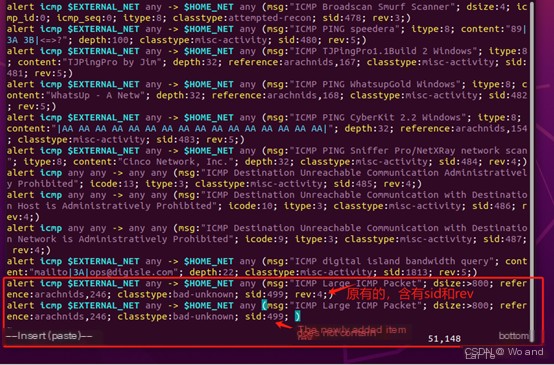
Since we are configuring ICMP, find the ICMP configuration file in the rules file, then enter and add the following rules:
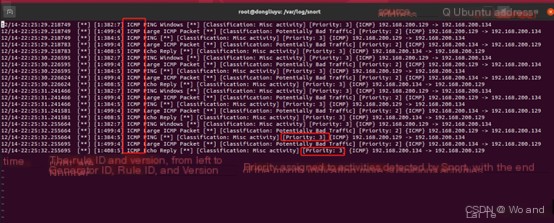
alert icmp $EXTERNAL_NET any -> $HOME_NET any (msg:"ICMP Large ICMP Packet"; dsize:> 800; reference:arachnids,246; classtype:bad-unknown; sid:499;)A brief explanation of the rule:
alert: This field specifies the action type of the rule. Here, alert means Snort will generate an alert when the rule matches traffic.icmp: This field specifies the protocol type to be inspected. Here, icmp stands for Internet Control Message Protocol, commonly used for ping operations, error reporting, etc.
$EXTERNAL_NET any -> $HOME_NET any: This defines the action scope and direction of the rule. $EXTERNAL_NET is a variable typically representing the external network’s IP address range. any indicates any port. -> denotes traffic direction from left to right. $HOME_NET is another variable usually representing the protected network’s IP address range. The second any similarly indicates any port. Overall, this part specifies any ICMP traffic from the external network to the protected network.
(msg:"ICMP Large ICMP Packet"; dsize:> 800; reference:arachnids,246; classtype:bad-unknown; sid:499; ): This part includes the rule’s detection conditions and additional information. msg:”ICMP Large ICMP Packet”: This is a descriptive message, Snort includes this message in the alert when the rule triggers. dsize:> 800: This specifies the condition for data packet size. Here, it means data packet size greater than 800 bytes. ICMP packets are typically small, so ICMP packets larger than 800 bytes are unusual and may require further investigation. reference:arachnids,246: This reference field provides additional information sources regarding the rule or detected activity. Here, it likely points to a security database or article explaining why such ICMP packets are considered suspicious. classtype:bad-unknown: This specifies the classification type of the rule. Here, bad-unknown indicates the detected activity is bad and unknown, which usually means it deviates from known good behavior patterns but lacks sufficient information to determine the attack type. sid:499: This is the rule’s unique identifier (signature ID). Each Snort rule has a unique SID for identifying the rule in alerts.
Save and exit
Note, when you first enter the icmp.rules file, you’ll see many existing rules. Below is a brief explanation of the difference between the added rule and existing ones.
In Snort,
sid (security identifier) is a number used to uniquely identify each rule.When Snort processes rules, it differentiates them based on sid.rev (revision) indicates the version of the rule, allowing you to update the rule while keeping the sid unchanged.If the rev field is not specified when adding a new rule, Snort treats it as revision 0 by default (or another default value depending on Snort’s version and configuration, but usually 0). This does not conflict with existing rules with the same sid specified with rev:1,because the combination of sid and rev is the unique identifier.
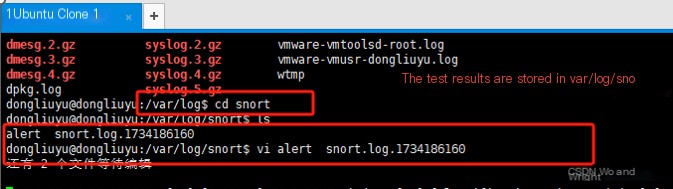
2. Create a snort log detection storage directory
mkdir /var/log/snort

Usually, the snort log detection file is created by default during snort installation. If the file already exists, there’s no need to create it.
3. Set the path in snort rules to the rules under snort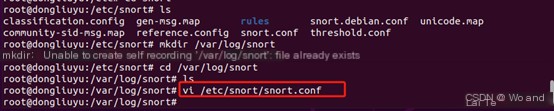
If after opening the snort.conf file, you find that RULES_PATH has been correctly set to the desired Snort rules path ( RULES_PATH= points to the rules folder under the snort directory), then Snort is already configured to load rule files from that path and no changes are needed. Exit and save.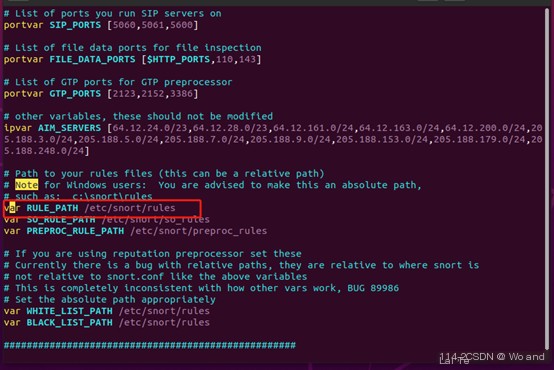
4. Use snort rules to detect traffic and log the results to the corresponding log file (replace ens33 with your network interface, you can check it with ifconfig)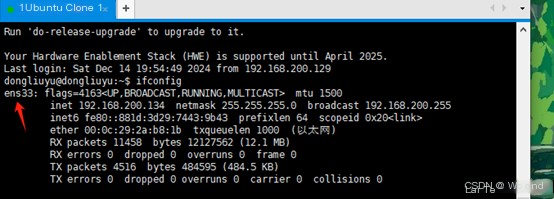 Enter the command
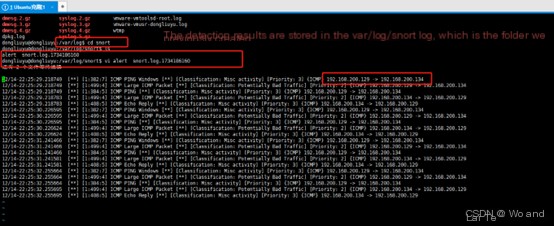
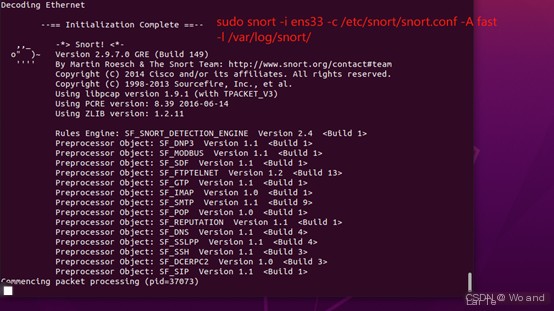
sudo snort -i ens33 -c /etc/snort/snort.conf -A fast -l /var/log/snort/
At this point, you can use snort on Ubuntu for detection, proceed to step 5. If you want to test the rules, you can follow the commands below:
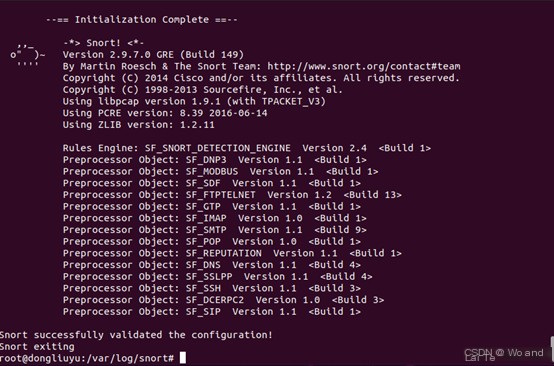
 (Optional) First check if snort configurations are correct:
sudo snort -T -c /etc/snort/snort.conf

(Optional) Test rules (the output in the following image means the detection was successfully started):
sudo snort -T -c /etc/snort/snort.conf -i ens33
Found that using ens0 also works:
sudo snort -T -c /etc/snort/snort.conf -i ens0
5. Start detection Use the same command as in step 4
sudo snort -i ens33 -c /etc/snort/snort.conf -A fast -l /var/log/snort/
At this point, do not perform any operations on Ubuntu. Use a host within the local network to launch >800 attacks on Ubuntu 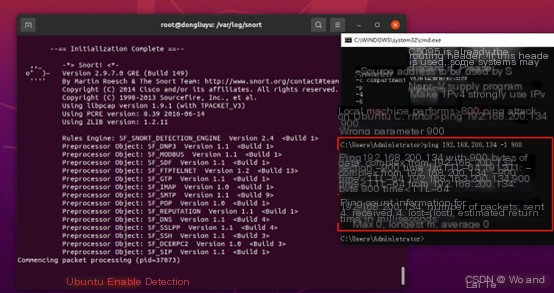
Then you can use ctrl+z on Ubuntu to exit the detection page. Next, view the detection results.
6. Check detection logs Open the log storage file we previously created (or the default created log file). You can see an alert file in the logs folder. Open this file to view the log information.
 cd /var/log/snort
vi alert file