
This is a real-world issue I recently encountered. While working on machine learning projects that require model training, my professor agreed to let me use a server in the lab. However, I couldn’t bring the server back to my dorm. Our university has a unique setup where the dormitory area has public IP access, but the teaching area does not. Having public IP access would make things much easier. Then I thought, why not use my Raspberry Pi to connect to the public IP and enable NAT traversal with an frp setup? What a great idea!
Although there are articles online about using Raspberry Pi with frp for NAT traversal, the scenario here is slightly different. Most online examples involve the Raspberry Pi being in a private network as an frp client, using a VPS on the public network to map the Raspberry Pi’s services to the public network for traversal.
What is NAT Traversal?
NAT traversal, also known as network address translation traversal, is a term used in networking. When a computer is inside a private network, external and internal nodes often need to communicate, but sometimes NAT traversal is not supported.
Why Do You Need NAT Traversal?
Accessing your private devices from the public network has always been a challenging task. Devices like personal servers, NAS, etc., are often behind a router or lack a public IP address due to ISP limitations. If we want to directly access these devices (e.g., remote desktop, file sharing, SSH), we usually need the help of forwarding or P2P networking software.
For example, if I have a computer in a complex private network and want to enable remote desktop and file access, the current network environment makes it difficult to expose it to the public network via simple port forwarding. Here are a few methods:
- Using TeamViewer for remote desktop. It works, but the accessing device also needs TeamViewer installed, which is inconvenient. Additionally, TeamViewer doesn’t easily support remote file access.
- Using a VPN software like Pugongying for networking. It works, but the free version has very slow network speeds, making it almost unusable.
- Using DDNS software like Peanut Shell for dynamic DNS resolution. It works, but like the second option, the free version has bandwidth limitations, making it impractical.
- Setting up an frp server for NAT traversal. This is highly recommended as it provides good speeds and can theoretically open any desired port, enabling functionalities far beyond just remote desktop or file sharing.
What is frp?
Simply put, frp is a reverse proxy software. It is lightweight yet powerful, allowing devices behind NAT or firewalls to provide services to the external network. It supports various protocols, including HTTP, TCP, and UDP.
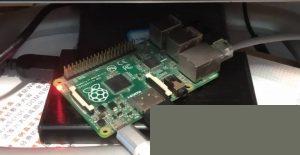
Since my dorm network already has a public IP provided by China Unicom, I set up my Raspberry Pi as the frp server to provide NAT traversal for other machines in the campus private network. Although I have several cloud servers, I ultimately chose the Raspberry Pi.
The main reason is latency. The public IP provided by China Unicom and the school’s network are in the same local network, which means the latency between the Raspberry Pi and the machines requiring NAT traversal is negligible. The only latency left is between the remote connection and the network where the Raspberry Pi resides.
Since frp is an open-source project on GitHub, you can find the official documentation here, which is very detailed.
frp Documentation in Chinese
Setting Up the frp Server
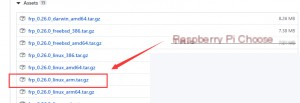
Since I’m using a Raspberry Pi as the server, I first downloaded the version compatible with Raspberry Pi. As of now, the latest version of frp is v0.26.0.
If you’re using a VPS, connect to the VPS via SSH and run the following command to check the processor architecture. Based on the architecture, download the appropriate version of frp:arch
Check the result. If it’s “X86_64,” choose “amd64.”
https://github.com/fatedier/frp/releases
Now, SSH into your Raspberry Pi. I directly used `su root` to execute commands as root. If you don’t have root access, prepend `sudo` to each command.
wget https://github.com/fatedier/frp/releases/download/v0.26.0/frp_0.26.0_linux_arm.tar.gz
tar xvf frp_0.26.0_linux_arm.tar.gz
cd frp_0.26.0_linux_arm

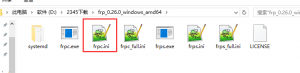
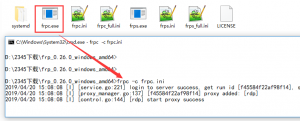
Focus on the following files:
- frps
- frps_full.ini
- frps.ini
These files (with “s” at the end) are the server program and configuration files, while files ending in “c” are for the client program and configuration.
Edit the server configuration file using:
vim frps.ini
[common]
bind_port = 7000
dashboard_port = 7500
token = 12345678
dashboard_user = admin
dashboard_pwd = admin
- “bind_port” specifies the port for client-server connections. This port will be used when configuring the client.
- “dashboard_port” is the port for the server dashboard. If set to 7500, you can access the dashboard at `x.x.x.x:7500` (where `x.x.x.x` is the VPS IP) after configuration and startup.
- “token” is the password for client-server connections. Set and record it for later use.
- “dashboard_user” and “dashboard_pwd” are the username and password for logging into the dashboard. Set these as desired.
To run the server, execute:
./frps -c frps.ini

If you see output like this, the server is running correctly. If there are errors, check the steps above.
If you want to save time, you can use the default port values and modify the “token,” “user,” and “password” fields in the pre-configured `frps_full.ini` file. Then run:
./frps -c frps_full.ini
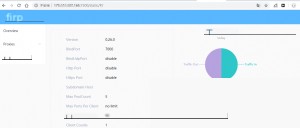
Now, visit `your-ip:7500` and log in with your username and password to view the dashboard.
Running frps in the Background
Currently, the server runs in the foreground. If you press Ctrl+C or close the SSH window, frps will stop running. To keep it running in the background, use the `screen` command. Since I’m using a Raspberry Pi:
apt install screen
screen -S frps # Create a new screen session named “frps”
Now, inside the screen session, execute:
./frps -c frps.ini
Even if you close the SSH window, frps will continue running. The frp server setup is now complete.
Configuring the frp Client
The frp client is the device we actually want to access. In most cases, it should be a Windows host, so this article uses a Windows host as an example; the Linux configuration method is similar.
Similarly, select the corresponding frp program to download according to the client device situation
Open frpc.ini with a text editor. Similar to the server, the content is as follows.
[common]
server_addr = xxxx
server_port = 7000
token = 12345678
[rdp]
type = tcp
local_ip = 127.0.0.1
local_port = 3389
remote_port = 7001
Because I am demonstrating with remote desktop here, I did not add other protocols. Please refer to the configuration in frps_full.ini for details.
Open the cmd window in the current directory and change the background to white.
Execute frpc -c frpc.ini
Do not close the command line window. At this time, you can use the corresponding program to access xxxx:xxxx (IP is the IP of the VPS, and the port is the custom remote_port) outside the LAN to access the corresponding service.
At this time, we conduct a remote desktop connection test on another machine.
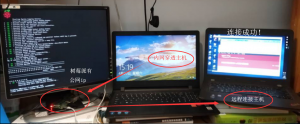
This is a demonstration I made in my dormitory. The host on the far right successfully connected to the intranet host in the middle using the public IP and port of the Raspberry Pi, thus achieving intranet penetration.