We walked through a very basic packet capture in Chapter 3. Unicorn offers quite a few more capture options in the Capture Options dialog. To open this dialog, Choose “analysis” tab of ribbon section and click the “Start” button to show “Capture Option” window.
The Capture Options dialog has more bells and whistles than you can shake a stick at, all designed to give you more flexibility while capturing packets. It’s divided into General, Adapter and Packet Filters settings, which we’ll examine separately.
General Settings
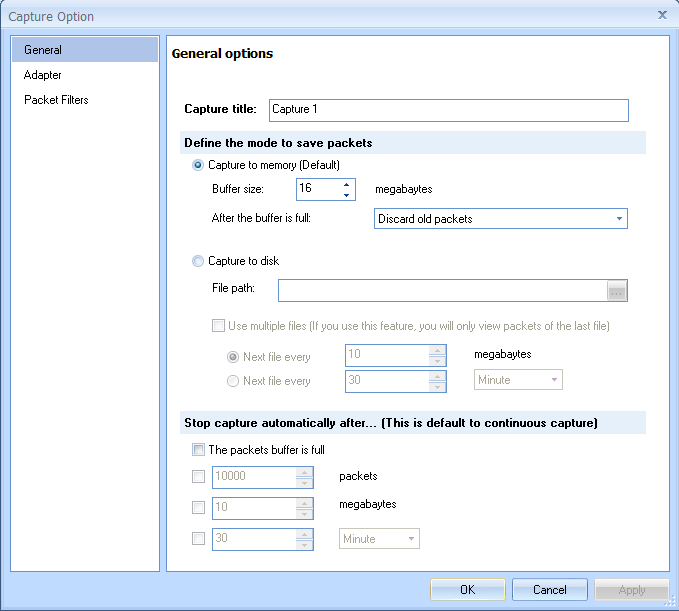
The section allow you to define title of project, saving mode and triggers to stop capture. Unicorn offers two saving mode, the default mode is to save packets to memory. You can also automatically store capture packets in a file, rather than capturing them first and then saving the file. Doing so offers you a great deal more flexibility in managing how packets are saved. You can choose to save them as a single file or a file set. To enable this option, check the Capture to disk option and enter a complete file path and name in the File text box.
When capturing a large amount of traffic or performing long-term captures, file sets can prove particularly useful. A file set is a grouping of multiple files separated by a particular condition. To save to a file set, check the Use Multiple Files option here.
Unicorn uses various triggers to manage saving to file sets based upon a file size or time condition. To enable these options, place a check mark next to the Next File Every option (the top one for file-size triggers and the one beneath that for time-based triggers), and then specify the value and unit on which to trigger. For instance, you can create a trigger that creates a new file after every 1MB of traffic captured, or after every minute of traffic captured, A file set created by Unicorn at one-minute intervals.
Figure 4-10: Capture General Option
The Stop Capture section lets you stop the running capture after certain triggers are met. As with multiple file sets, you can trigger based on file size and time interval, as well as number of packets. These options can be used with the multiple file options previously discussed.
Adapter
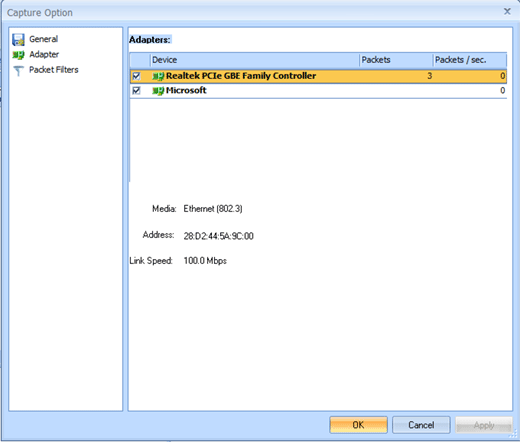
The section lets you chose adapter which is use to capture packets. All available adapters are listed in adapters list, please figure below. You can chose multiple adapters. When you click a adapter, the detail of the adapter is displayed, including media, address and link speed.
Figure 4-11: Chose adapter
Capture Filters
Filters allow you to specify exactly which packets you have available for analysis. Simply stated, a filter is an expression that defines criteria for the inclusion or exclusion of packets. If there are packets you don’t want to see, you can write a filter that gets rid of them. If there are packets you want to see exclusively, you can write a filter that shows only those packets.
Unicorn offers two main types of filters:
1. Capture filters are specified when packets are being captured and will capture only those packets that are specified for inclusion/exclusion in the given expression.
2. Display filters are applied to an existing set of captured packets in order to hide unwanted packets or show desired packets based on the specified expression.
Let’s look at capture filters first.
Capture Filters
Capture filters are used during the actual packet-capturing process. One primary reason for using a capture filter is performance. If you know that you do not need to analyze a particular form of traffic, you can simply filter it out with a capture filter and save the processing power that would typically be used in capturing those packets.
The ability to create custom capture filters comes in handy when dealing with large amounts of data. The analysis process can be sped up by ensuring that you are looking at only the packet relevant to the issue at hand. A simple example of when you might use a capture filter is when capturing traffic on a server with multiple roles. Suppose you are troubleshooting an issue with a service running on port 81. If the server you are analyzing runs several different services on a variety of ports, finding and analyzing only the traffic on port 81 can be quite a job in itself. To capture only the port 81 traffic, you can use a capture filter. To do so, you can use the Capture Options dialog, discussed earlier in this chapter, as follows:
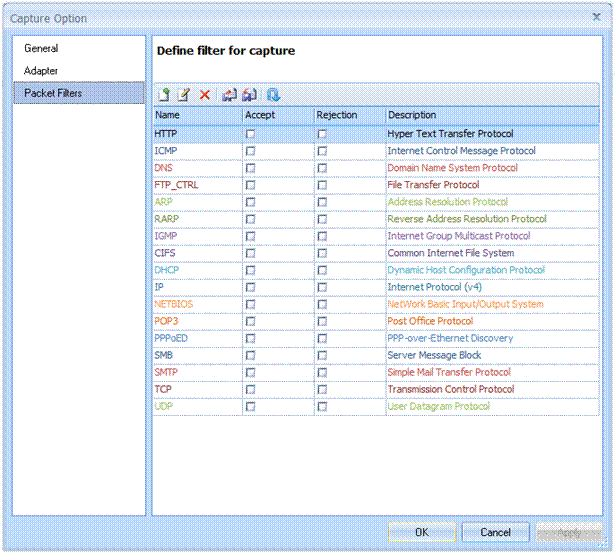
1. Click filter item in left pan to switch to filter list pane, see figure below:
Figure 4-12: Filter List
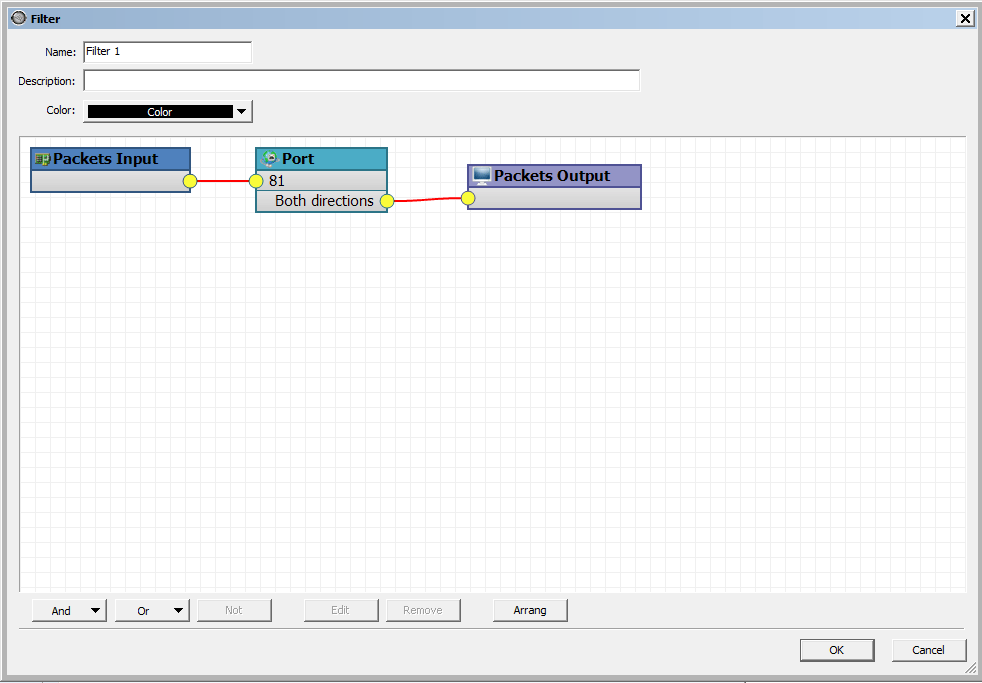
2. Click the icon to create a new filter and the filter settings window will be displayed. See figure below:
Figure 4-13: Custom Filter
3. We want our filter to show only traffic inbound and outbound to port 81, so we enter port 81, as shown in Figure 4-13.
4. Once you have set your filter and select it in filter list, click Start to begin the capture.
After collecting an adequate sample, you should now see only the port 81 traffic and be able to more efficiently analyze this particular data.


