
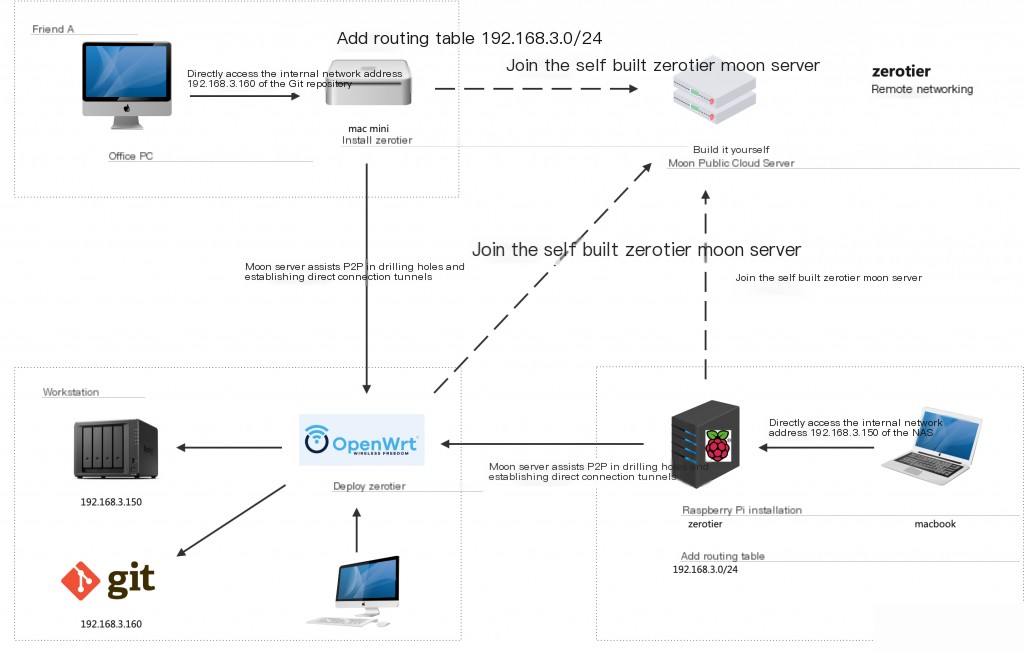
Collaborating with friends on development requires enabling mutual access between our local networks, so we considered a VPN collaboration scenario. Initially, we thought of implementing frp+openvpn. frp would handle point-to-point penetration, and openvpn would manage the network. However, this setup seemed cumbersome as both parties needed to deploy frp and openvpn, which wasn’t very user-friendly.
After exploring various solutions, we finally chose Zerotier, a VPN with built-in P2P hole punching that meets our needs. You only need to set up a moon server with a public IP to efficiently achieve hole punching between Zerotier nodes.
Register Zerotier
https://my.zerotier.com/network

After creating a network, note down the network ID. Other Zerotier clients will need to join this ID to enter the VPN network.
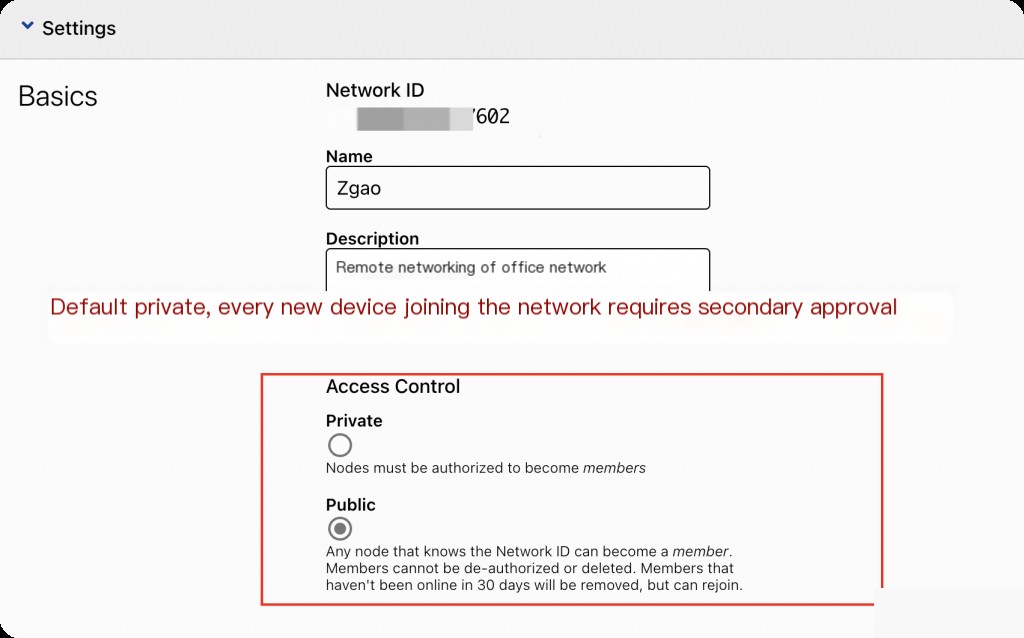
You can modify it as needed; otherwise, you will have to log in to the official website to agree each time.
Deploy Zerotier Moon Server
Since Zerotier’s official root servers are located abroad, without a self-built Moon server, the efficiency of P2P hole punching will be very low. Here, you can deploy the Zerotier Moon service on any cloud server with a public IP.
 # Installation
curl -s https://install.zerotier.com | sudo bash

# Start the service
sudo systemctl start zerotier-one
sudo systemctl enable zerotier-one

# Generate random root identity token
sudo zerotier-idtool generate identity.secret identity.public
Configure the controller
 # Create configuration directory
sudo mkdir -p /var/lib/zerotier-one/controller.d

# Configure identity information
sudo cp identity.secret /var/lib/zerotier-one/
sudo cp identity.public /var/lib/zerotier-one/

# Enable controller functionality
echo '{"settings":{"primaryPort":9993},"controller":true}' | sudo tee /var/lib/zerotier-one/local.conf

# Restart the service
sudo systemctl restart zerotier-one
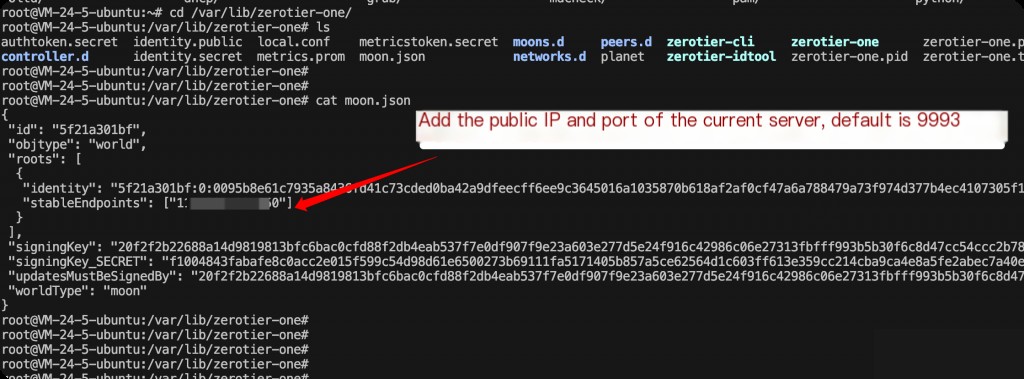
Create Moon configuration
 cd /var/lib/zerotier-one
sudo zerotier-idtool initmoon identity.public >  moon.json
Edit the moon.json file generated in the previous step, adding the public IP and port information of the current cloud server to the roots.stableEndpoints section.
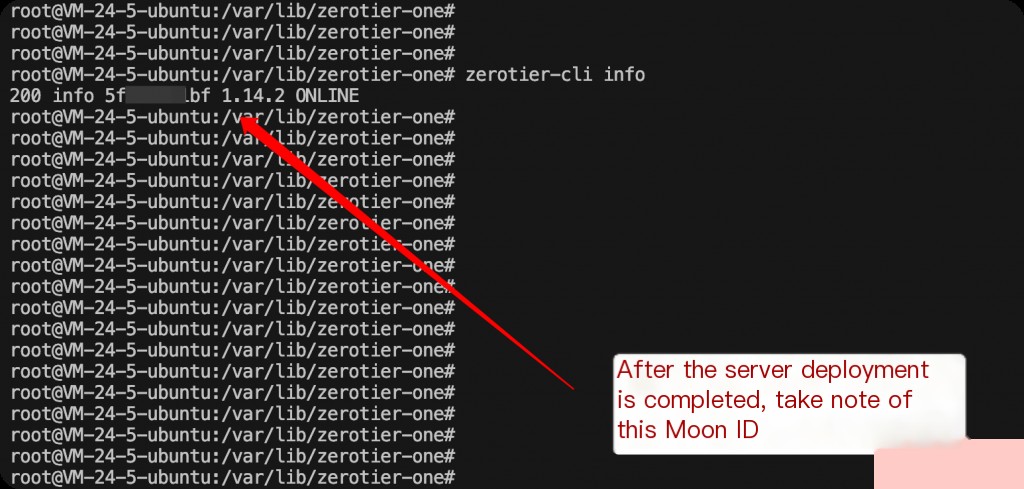
 sudo zerotier-idtool genmoon moon.json
sudo mkdir moons.d
sudo mv *.moon moons.d/
systemctl restart zerotier-one
zerotier-cli info
Note: Zerotier uses port 9993 by default, so you need to allow this port in the cloud console.
Client Joining Zerotier Network and Connecting to Moon
For example, using the Linux / MacOS command line. First, get the 16-digit network ID from the ZeroTier website and join the network.
zerotier-cli join <16-digit network ID>
Connect the client to our self-built moon server. Using the Moon ID twice is correct here.
zerotier-cli orbit
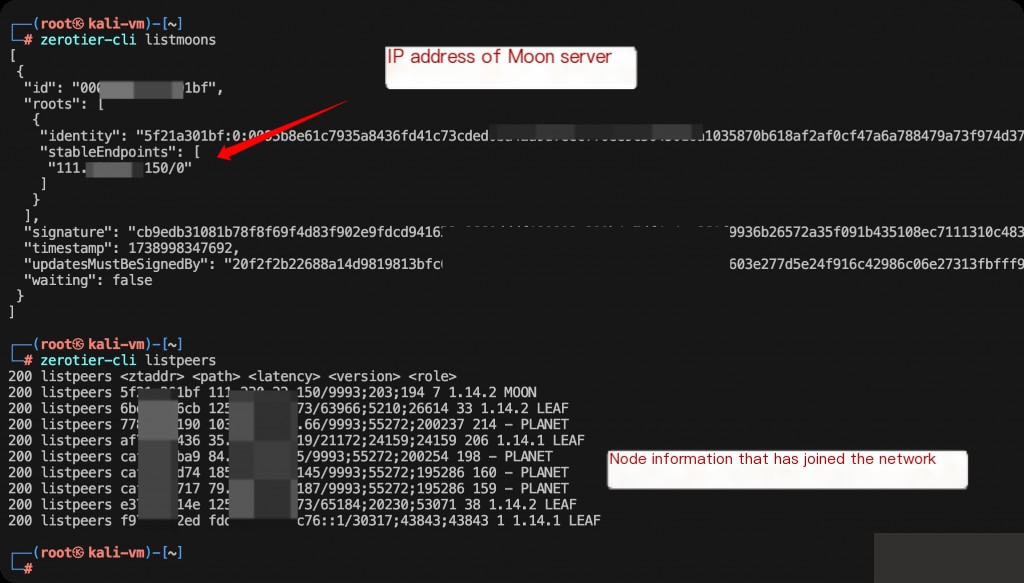
How to determine if the connection was successful? Wait about 10 seconds and execute the command.
 zerotier-cli listmoons
zerotier-cli listpeers
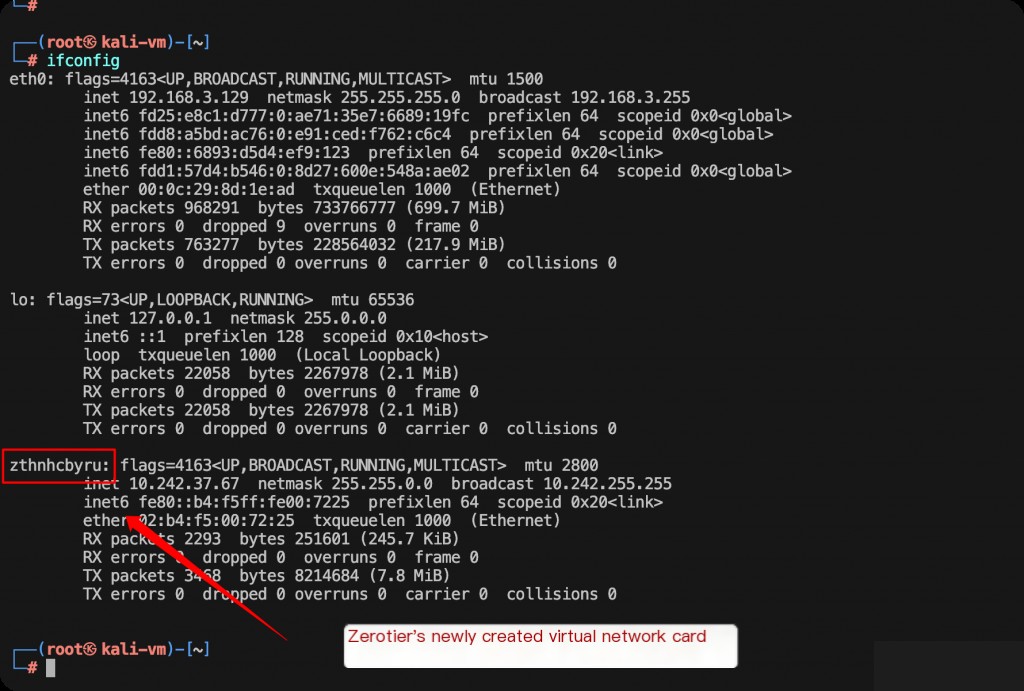
ifconfig
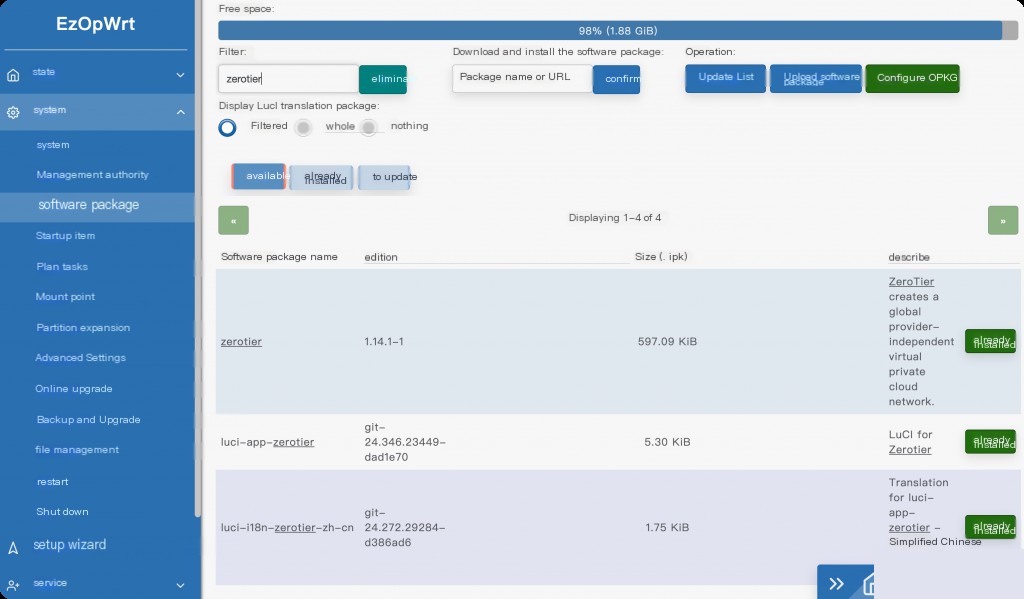
Advanced Play: Installing Zerotier on Openwrt
Installing Zerotier on a single host only allows communication between nodes in two remote LANs. How can we enable all hosts in two LANs to communicate with each other?
Then enter the previous network ID in the interface, but the interface does not support adding MoonID.
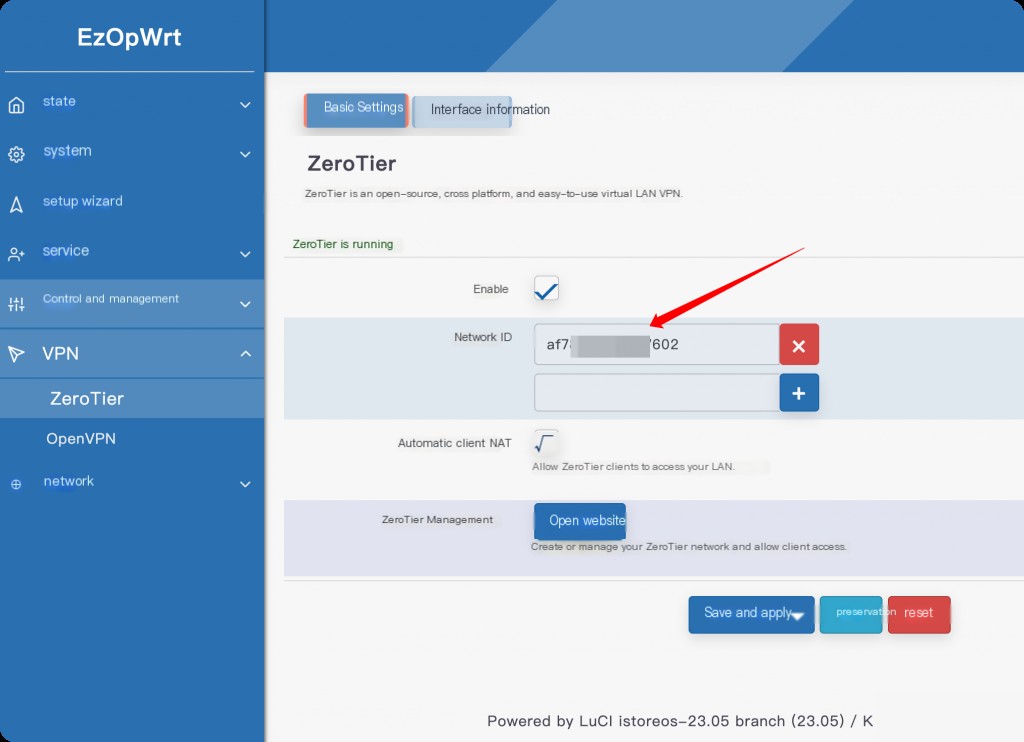
You need to open OpenWrt’s SSH and add it via the command line.
zerotier-cli orbit
Configuring ZeroTier Network Routing on OpenWrt
First, enable IP forwarding (OpenWrt is enabled by default).
cat /proc/sys/net/ipv4/ip_forward
If the output is 1, it means it is enabled. Add the correct firewall zones and forwarding rules.
 # Add ZeroTier zone
uci add firewall zone
uci set firewall.@zone[-1].name='zt_network'
uci set firewall.@zone[-1].network='zthnhcbyru'
uci set firewall.@zone[-1].input='ACCEPT'
uci set firewall.@zone[-1].output='ACCEPT'
uci set firewall.@zone[-1].forward='ACCEPT'
uci set firewall.@zone[-1].masq='1'

# Add forwarding rules
uci add firewall forwarding
uci set firewall.@forwarding[-1].src='zt_network'
uci set firewall.@forwarding[-1].dest='lan'

uci add firewall forwarding
uci set firewall.@forwarding[-1].src='lan'
uci set firewall.@forwarding[-1].dest='zt_network'

# Commit changes
uci commit firewall

# Restart firewall
/etc/init.d/firewall restart
Check firewall status and view current nftables rules.
 /etc/init.d/firewall status
nft list ruleset
Configuring Routing in ZeroTier Management Interface
In “Managed Routes,” add a route:
- Destination: 192.168.3.0/24
- Via: 10.242.250.229 (ZeroTier IP of OpenWrt)
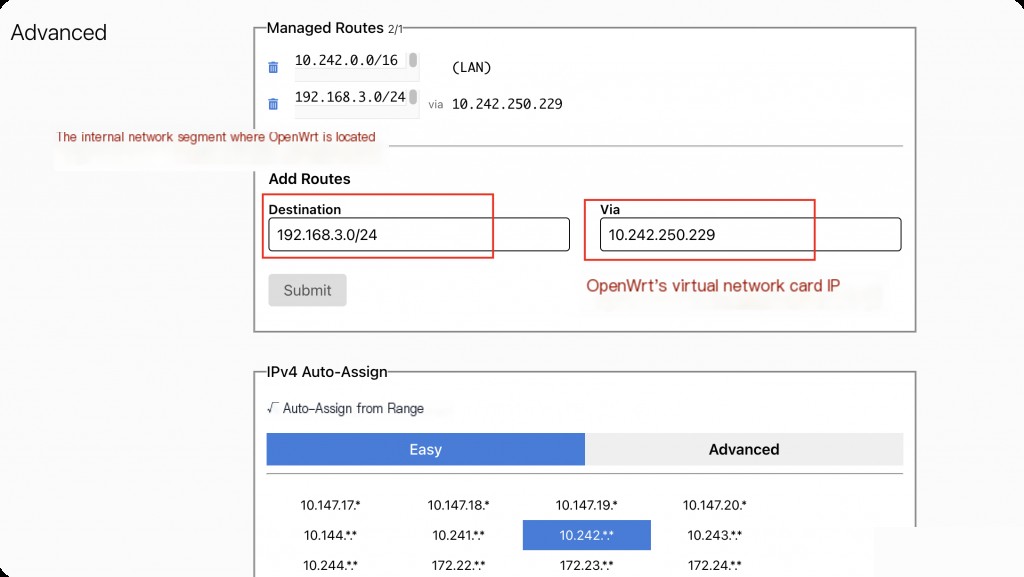
 # Try pinging the LAN IP of OpenWrt from other ZeroTier devices
ping 192.168.3.199
After configuring the routing rules on both OpenWrt and the ZeroTier website, you can access all IP resources in the current LAN from the remote LAN, rather than just point-to-point access between nodes.
Implement LAN Routing on Devices Without ZeroTier Installed
In the image at the beginning of the article, I used a Raspberry Pi at home with ZeroTier installed as a relay device instead of installing ZeroTier on my MacBook. Theoretically, only the Raspberry Pi can access the remote LAN, while my MacBook cannot.
However, it can be achieved by configuring IP forwarding and firewall rules on the Raspberry Pi to make it act as a gateway to forward traffic.
Enable IP forwarding on the Raspberry Pi
 # Temporarily enable
echo 1 > /proc/sys/net/ipv4/ip_forward

# Permanently enable, edit /etc/sysctl.conf and add
net.ipv4.ip_forward=1

# Apply changes
sysctl -p
Add iptables rules on the Raspberry Pi.
 # Allow forwarding from the local network to the ZeroTier network
iptables -A FORWARD -i eth0 -o zthnhcbyru -j ACCEPT

# Allow traffic from the ZeroTier network back to the local network
iptables -A FORWARD -i zthnhcbyru -o eth0 -m state --state RELATED,ESTABLISHED -j ACCEPT

# Enable NAT
iptables -t nat -A POSTROUTING -o zthnhcbyru -j MASQUERADE
Save the iptables rules so they persist after a reboot.
 apt-get install iptables-persistent
netfilter-persistent save
Add a route on the MacBook (requires administrator privileges).
sudo route add -net 192.168.3.0/24 10.242.36.70
After this configuration, the MacBook can access the 192.168.3.0/24 subnet on the other end through the Raspberry Pi.
Advantages and Disadvantages of ZeroTier
Although ZeroTier is commercially charged, free users can only create three networks and ten device nodes. However, with advanced configuration, you can install ZeroTier on just one device in each LAN and configure routing rules. This way, you can actually achieve interconnection between ten LANs. For ordinary users, this is more than sufficient.
The main advantage is the extremely low latency of P2P direct communication, providing an excellent experience. Testing shows that the direct communication latency between Chengdu and Shenzhen is only 30ms, which is much better than deploying a VPN on the cloud where all traffic is relayed through a server, significantly improving both latency and bandwidth.