
Hello everyone, it’s nice to see you again. I am your friend, Full Stack Jun. Today, we’re discussing Free firewall software.
Understanding the Use of Iptables Firewall Rules
Iptables is the package filtering firewall for the Linux platform. Like most Linux software, this package filtering firewall is free, and it can replace expensive commercial firewall solutions to perform packet filtering, packet redirection, and Network Address Translation (NAT). In routine Linux operational management, iptables firewall rules are frequently configured to enhance service security. Below is a summarized overview of the use of iptables rules:
First, what you need to understand about iptables:
1) The Concept of Rules
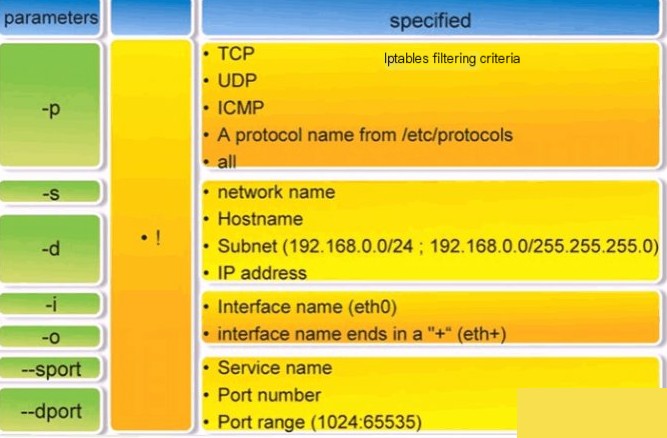
Rules are essentially predefined conditions set by network administrators, generally defined as “if the packet header meets such conditions, then process the packet in this way.” Rules are stored in packet filtering tables in the kernel space, which specify criteria such as source address, destination address, transport protocol (e.g., TCP, UDP, ICMP), and service type (e.g., HTTP, FTP, SMTP).
When a packet matches a rule, iptables processes it according to the rule-defined methods, such as accept, reject, or drop. The main task in configuring a firewall is adding, modifying, and deleting rules.
Some key terms:
– Match: Meets the specified conditions, such as specified IP address and port.
– Drop: When a packet arrives, it is simply discarded without further processing.
– Accept: Opposite of drop, the packet is accepted and allowed to pass.
– Reject: Similar to drop, but it will send an error message back to the source host that sent the packet. The error message can be specified or automatically generated.
– Target: The specified action indicating how to handle a packet, like drop, accept, or reject.
– Jump: Similar to target, but it specifies another chain, indicating a jump to that chain.
– Rule: One or more matches and their corresponding targets.
2) The Relation between iptables and netfilter:
The relationship between iptables and netfilter can be confusing. Many people know iptables but are unaware of netfilter. In reality, iptables is just a tool for managing the Linux firewall, located at /sbin/iptables. The true implementation of firewall functionality is netfilter, which is the internal structure in the Linux kernel for packet filtering.
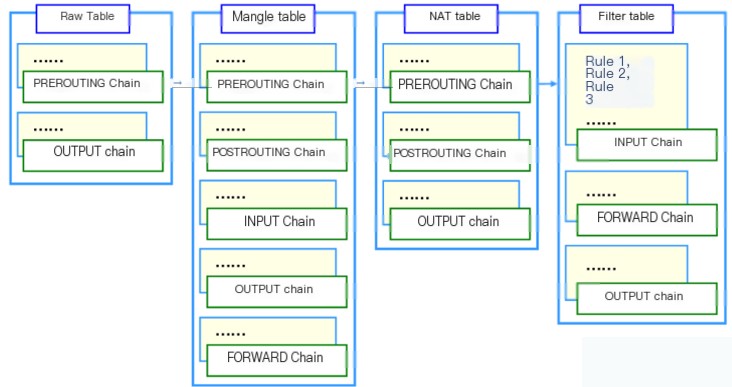
3) iptables’ Rule Tables and Chains
Tables: Provide specific functionalities. Iptables has four built-in tables: filter, nat, mangle, and raw, used for packet filtering, network address translation, packet modification, and connection tracking processing, respectively.
Chains: These are pathways for data packet propagation. Each chain is essentially a checklist among numerous rules. A chain can contain one or more rules. When a packet arrives at a chain, iptables checks from the first rule to see if the packet meets the conditions defined by that rule. If it does, the system processes the packet according to the method specified by that rule; otherwise, iptables continues to check the next rule. If the packet does not meet any rule in the chain, iptables handles it based on the chain’s predefined default policy.
Iptables uses a layered structure of “tables” and “chains.” In Linux, there are currently four tables and five chains. Below is a listing of these four tables and five chains (note the relationship and role of these tables and chains).
Rule Tables:
1) Filter Table — Three Chains: INPUT, FORWARD, OUTPUT
Function: Packet filtering Kernel Module: iptables_filter
2) NAT Table — Three Chains: PREROUTING, POSTROUTING, OUTPUT
Function: Network Address Translation (IP, Port) Kernel Module: iptable_nat
3) Mangle Table — Five Chains: PREROUTING, POSTROUTING, INPUT, OUTPUT, FORWARD
Function: Modify packet’s service type, TTL, configure routing for QoS Kernel Module: iptable_mangle (Despite its complexity, this table is rarely used in policy setting)
4) Raw Table — Two Chains: OUTPUT, PREROUTING
Function: Determine whether packets are processed by connection tracking mechanism Kernel Module: iptable_raw
Rule Chains:
1) INPUT — Incoming packets apply the policies in this rule chain
2) OUTPUT — Outgoing packets apply the policies in this rule chain
3) FORWARD — When forwarding packets, apply the policies in this rule chain
4) PREROUTING — Apply rules from this chain before making routing decisions for packets
(Remember! All incoming packets are first handled by this chain)
5) POSTROUTING — Apply rules from this chain after making routing decisions for packets
(All outgoing packets are first handled by this chain)
Managing and configuring iptables rules:
4) The Process of Packet Transmission by iptables
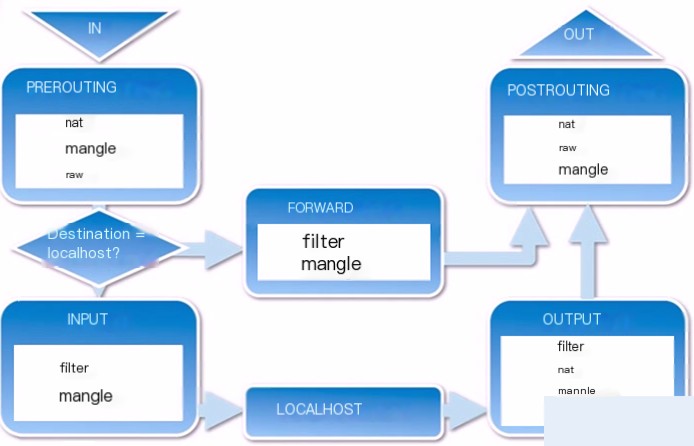
1) When a packet enters the network card, it first goes into the PREROUTING chain. The kernel decides whether to forward based on the packet’s destination IP.
2) If the packet is for the local machine, it moves downward in the diagram to reach the INPUT chain. Once the packet reaches the INPUT chain, any process can receive it. Programs running on the local machine can send packets, which will pass through the OUTPUT chain and then output to the POSTROUTING chain.
3) If the packet is to be forwarded and the kernel allows forwarding, the packet moves right as shown in the diagram, passing through the FORWARD chain and then output to the POSTROUTING chain.
If you still do not understand the basic flow of packets through iptables, please look at the more detailed flowchart below:
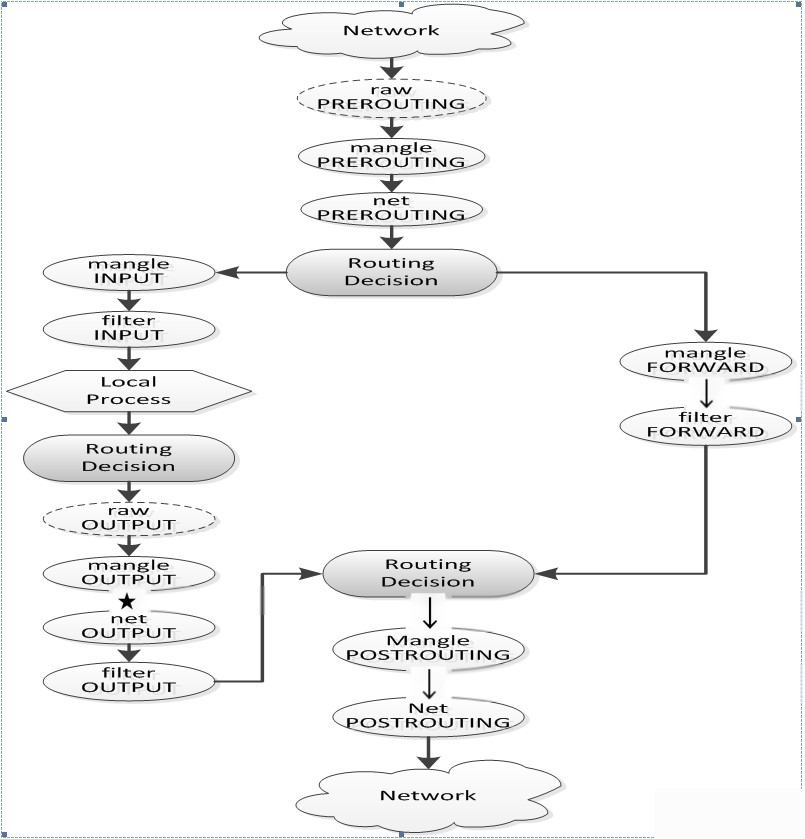
From the image, you can divide the iptables packet processing process into three types:
1) Packets with the local machine as the destination
When the packet is destined for the local address, the process through iptables is:
1. From network to network card
2. After the network card receives the packet, it enters the raw table’s PREROUTING chain. The purpose of this chain is to handle packets before connection tracking, allowing you to set a connection that won’t be handled by connection tracking. (Note: Do not add other rules in the raw table)
3. If connection tracking is set, process in this connection.
4. After raw processing, enter the mangle table’s PREROUTING chain. This chain is mainly used to modify the packet’s TOS, TTL, and set a special MARK on the packet. (Note: Generally, mangle table mainly sets MARK, avoid filtering/NAT/spoofing in this table)
5. Enter the nat table’s PREROUTING chain. This chain mainly handles DNAT, avoid filtering on this chain to prevent some packets from being lost. (Note: It only completes source/destination address conversion)
6. The packet then undergoes routing decision processing, i.e., determining whether the packet stays on the local machine or forwards elsewhere. (Note: Assume the packet is handled by the local machine)
7. Enter the mangle table’s INPUT chain. We can modify the packet again before actually sending it to the local machine after routing.
8. Enter the filter table’s INPUT chain, where we filter all packets sent to the local machine. Note that all received packets with destination address as the local machine will go through this chain, regardless of which interface they come from or where they are going.
9. After rules filtering, hand over the packet to local process or application for processing, such as server or client programs.
2) Packets sent by the local host
When a packet is sent by the local machine, its process through iptables is:
1. Local process or application (such as server or client program) sends a data packet.
2. Route selection, including which source address and interface it goes out from, and other necessary information.
3. Enter the raw table’s OUTPUT chain, where packets can be processed before connection tracking takes effect, marking certain connections not to be handled by connection tracking.
4. Connection tracking processes local packets.
5. Enter the mangle table’s OUTPUT chain, where we can modify data packets, but should avoid filtering to prevent side effects.
6. Enter the nat table’s OUTPUT chain, where we can perform destination NAT (DNAT) on the firewall’s own outgoing data.
7. Enter the filter table’s OUTPUT chain, where we can filter outgoing data packets from the local machine.
8. Conduct routing decision again, as previous mangle and nat tables might have altered packet routing information.
9. Enter the mangle table’s POSTROUTING chain, which traverses two types of packets—forwarded and those generated by the local machine.
10. Enter the nat table’s POSTROUTING chain, generally used for SNAT; avoid filtering here to prevent side effects. Even if you set a default policy, some packets might slip through.
11. Enter the outgoing network interface.
3) Forwarded Packets
The process of packets through iptables when being forwarded is as follows:
1. From network to network card
2. After the network card receives the packet, enter the raw table’s PREROUTING chain. This chain’s purpose is to handle packets before connection tracking, allowing a connection that won’t be handled by connection tracking. (Note: Don’t add other rules in the raw table)
3. If connection tracking is set, process it on this connection.
4. After raw processing, enter the mangle table’s PREROUTING chain. This chain primarily modifies packet’s TOS, TTL, and assigns a special MARK to packets. (Note: Generally, mangle table focuses on setting MARK, avoid filtering/NAT/spoofing in this table)
5. Enter the nat table’s PREROUTING chain. This chain mainly handles DNAT, avoid filtering to prevent some packets from being skipped. (Note: It only performs source/destination address conversion)
6. The packet then undergoes routing decision processing, i.e., determining if the packet is for the local machine or should be forwarded elsewhere. (Note: Assume the packet is forwarded)
7. Enter the mangle table’s FORWARD chain, which is unique because it occurs after the first routing decision but before final routing decision, allowing further modifications on the packet.
8. Enter the filter table’s FORWARD chain, where we filter all forwarding packets. Note: The packets processed here are forwarded and are bidirectional.
9. Enter the mangle table’s POSTROUTING chain, where all routing decisions have been completed, but the packet remains on the local host, allowing further modifications.
10. Enter the nat table’s POSTROUTING chain, typically for SNAT; avoid filtering here due to side effects.
11. Enter the outgoing network interface.
Next, let’s discuss the usage of setting iptables rules
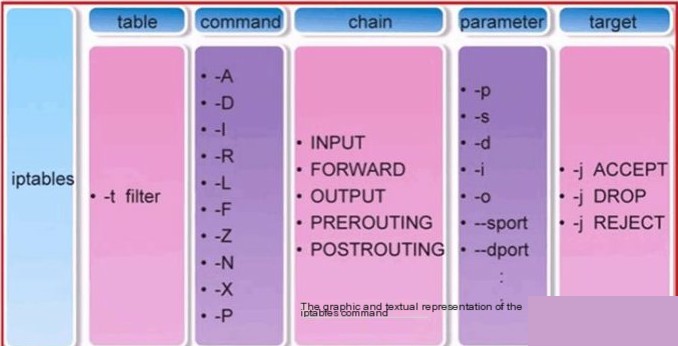
1) Basic Syntax Format of iptables
iptables [-t table] command option [chain] [condition match] [-j target action or jump]
Explanation:
– Table and Chain: Specify the table and chain iptables commands operate on;
– Command Option: Specifies the way to manage iptables rules (e.g., insert, add, delete, view, etc.);
– Condition Match: Specifies the criteria for processing packets;
– Target Action or Jump: Specifies how to handle packets (e.g., allow, reject, drop,2) Management and Control Options of iptables Command
-A Append a new rule to the end of the specified chain
-D Delete a specific rule in the specified chain, which can be done by rule number or content
-I Insert a new rule in the specified chain, default is at the beginning
-R Modify or replace a specific rule in the specified chain, which can be done by rule number or content
-L List all rules in the specified chain for review (default is filter table; to list rules in nat table, add -t, e.g., `iptables -t nat -L`)
-E Rename a user-defined chain without altering the chain itself
-F Flush all rules
-N Create a new user-defined chain
-X Delete user-defined chains in the specified table
-P Set the default policy for the specified chain
-Z Zero all packet and byte counters in all chains
-n Use numeric output of IP addresses and ports
-v Verbose mode to provide detailed information on rules
-V Display version information
-h Display help information
3) Four Methods of Data Packet Handling by Firewalls
ACCEPT Allow the packet to pass
DROP Discard the packet without sending any response
REJECT Refuse the packet and, if necessary, send a response to the origin
LOG Log the information in /var/log/messages file and pass the packet to the next rule
4) Saving and Restoring iptables Firewall Rules
`iptables-save` saves the rules to a file, then scripts under the `rc.d` directory (`/etc/rc.d/init.d/iptables`) automatically load them
Use `iptables-save` command to save rules. Generally used as:`iptables-save > /etc/sysconfig/iptables`
It generates a file `/etc/sysconfig/iptables` to save the rules, or you can use:
`service iptables save`
This automatically saves the rules to `/etc/sysconfig/iptables`.
When the computer starts, scripts under `rc.d` will use `iptables-restore` to call this file, thus automatically restoring the rules.
5) Common iptables Firewall Policies
Setting default chain policies
The filter table in iptables has three chains: INPUT, FORWARD, and OUTPUT.
The default chain policy is ACCEPT, which can be set to DROP with commands like:
`iptables -P INPUT DROP`
`iptables -P FORWARD DROP`
`iptables -P OUTPUT DROP`
In fact, the most commonly used rules in operations are the whitelist rules and NAT forwarding rules:
1) Whitelist Rules
When operating in the Linux terminal command line, if not the default filter table, you need to specify the table;
If setting in the `/etc/sysconfig/iptables` file, set within the corresponding table’s configuration area;
The effect of the above two settings is the same!
For example, to open port 22 for this machine and allow access from 192.168.1.0 network segment (the -t filter table configuration can be omitted, as this is the default table configuration)
[root@linux-node1 ~]# iptables -A INPUT -s 192.168.1.0/24 -p tcp -m state –state NEW -m tcp –dport 22 -j ACCEPT
or
[root@linux-node1 ~]# iptables -t filter -A INPUT -s 192.168.1.0/24 -p tcp -m state –state NEW -m tcp –dport 22 -j ACCEPT
To open port 80, allowing only the 192.168.1.150 machine to access (a 32-bit mask indicates a single machine, which can be omitted for single machine specification)
[root@linux-node1 ~]# iptables -t filter -A INPUT -s 192.168.1.150/32 -p tcp -m state –state NEW -m tcp –dport 80 -j ACCEPT
Then save the rules and restart iptables
[root@linux-node1 ~]# service iptables save
[root@linux-node1 ~]# service iptables restart
Alternatively, set in the `/etc/sysconfig/iptables` file as follows (note that settings done in the terminal and saved and restarted will automatically save rules to this file):
[root@bastion-IDC ~]# cat /etc/sysconfig/iptables
……
*filter
:INPUT ACCEPT [442620:173026884]
:FORWARD ACCEPT [118911:23993940]
:OUTPUT ACCEPT [8215384:539509656]
-A INPUT -m state –state RELATED,ESTABLISHED -j ACCEPT
-A INPUT -p icmp -j ACCEPT
-A INPUT -i lo -j ACCEPT
-A INPUT -s 192.168.1.0/24 -p tcp -m state –state NEW -m tcp –dport 22 -j ACCEPT
-A INPUT -s 192.168.1.150/32 -p tcp -m state –state NEW -m tcp –dport 80 -j ACCEPT
[root@bastion-IDC ~]# service iptables restart
2) NAT Forwarding Settings
For instance, forwarding access to this machine (192.168.1.7) on port 8088 to port 80 on 192.168.1.160; forwarding access to port 33066 on this machine to port 3306 on 192.168.1.161
Preparations:
Enable the ip_forword routing forwarding functionality on this machine; the internal network gateway of 192.168.1.160/161 should be consistent with this machine’s gateway! If not, set the internal network gateway to this machine’s IP and disable the firewall (if the firewall is enabled, set the corresponding port to allow access from this machine)
[root@kvm-server conf]# iptables -t nat -A PREROUTING -p tcp -m tcp –dport 8088 -j DNAT –to-destination 192.168.1.160:80
[root@kvm-server conf]# iptables -t nat -A POSTROUTING -d 192.168.1.160/32 -p tcp -m tcp –sport 80 -j SNAT –to-source 192.168.1.7
[root@kvm-server conf]# iptables -t filter -A INPUT -p tcp -m state –state NEW -m tcp –dport 8088 -j ACCEPT
[root@kvm-server conf]# iptables -t nat -A PREROUTING -p tcp -m tcp –dport 33066 -j DNAT –to-destination 192.168.1.161:3306
[root@kvm-server conf]# iptables -t nat -A POSTROUTING -d 192.168.1.161/32 -p tcp -m tcp –sport 3306 -j SNAT –to-source 192.168.1.7
[root@kvm-server conf]# iptables -t filter -A INPUT -p tcp -m state –state NEW -m tcp –dport 33066 -j ACCEPT
[root@kvm-server conf]# service iptables save
[root@kvm-server conf]# service iptables restart
Alternatively, set in the `/etc/sysconfig/iptables` file as follows
[root@bastion-IDC ~]# cat /etc/sysconfig/iptables
……
*nat
:PREROUTING ACCEPT [60:4250]
:INPUT ACCEPT [31:1973]
:OUTPUT ACCEPT [3:220]
:POSTROUTING ACCEPT [3:220]
-A PREROUTING -p tcp -m tcp –dport 8088 -j DNAT –to-destination 192.168.1.160:80 // Place PREROUTING rules above
-A PREROUTING -p tcp -m tcp –dport 33066 -j DNAT –to-destination 192.168.1.161:3306
-A POSTROUTING -d 192.168.1.160/32 -p tcp -m tcp –sport 80 -j SNAT –to-source 192.168.1.7 // Place POSTROUTING rules below
-A POSTROUTING -d 192.168.1.161/32 -p tcp -m tcp –sport 3306 -j SNAT –to-source 192.168.1.7
…..
*filter
:INPUT ACCEPT [16:7159]
:FORWARD ACCEPT [0:0]
:OUTPUT ACCEPT [715:147195]
-A INPUT -m state –state RELATED,ESTABLISHED -j ACCEPT
-A INPUT -p icmp -j ACCEPT
-A INPUT -i lo -j ACCEPT
-A INPUT -p tcp -m state –state NEW -m tcp –dport 8088 -j ACCEPT
-A INPUT -p tcp -m state –state NEW -m tcp –dport 33066 -j ACCEPT
…..
[root@bastion-IDC ~]# service iptables restart
[root@bastion-IDC ~]# iptables -L // List rules, default is the filter table
[root@bastion-IDC ~]# iptables -L -t nat // To list rules in the nat table, add -t parameter
Delete the first rule in the INPUT chain
iptables -D INPUT 1
Reject all ICMP protocol packets entering the firewall
iptables -I INPUT -p icmp -j REJECT
Allow the firewall to forward all packets except those using the ICMP protocol
iptables -A FORWARD -p ! icmp -j ACCEPT
Explanation: Using “!” negates the condition
Reject forwarding of packets from host 192.168.1.10 and allow forwarding from 192.168.0.0/24 network segment
iptables -A FORWARD -s 192.168.1.11 -j REJECT
iptables -A FORWARD -s 192.168.0.0/24 -j ACCEPT
Explanation: Be sure to place the REJECT rule first, or it will not take effect!
Discard packets entering the firewall with private network source addresses from an external network interface (eth1)
iptables -A INPUT -i eth1 -s 192.168.0.0/16 -j DROP
iptables -A INPUT -i eth1 -s 172.16.0.0/12 -j DROP
iptables -A INPUT -i eth1 -s 10.0.0.0/8 -j DROP
Block a network segment (192.168.1.0/24) and unblock it after two hours
# iptables -I INPUT -s 10.20.30.0/24 -j DROP
# iptables -I FORWARD -s 10.20.30.0/24 -j DROP
# at now 2 hours
at> iptables -D INPUT 1
at>
Explanation: This strategy can be effectively implemented using the cron scheduling tasks, which is highly beneficial.
Allow only the administrator from the 202.13.0.0/16 subnet to use SSH for remote login to the firewall host
iptables -A INPUT -s 202.13.0.0/16 -p tcp -m tcp -m state –state NEW –dport 22 -j ACCEPT
Explanation: This usage is suitable for remote management of devices, for example, when an SQL server located in a branch office needs to be managed by an administrator from the head office.
Usually on a server, access to specific service ports is restricted using a whitelist, for example (with other port settings being consistent as below):
Running services that access the local machine’s port 3306 (MySQL service)
iptables -A INPUT -p tcp -m tcp -m state –state NEW –dport 3306 -j ACCEPT
Or only allow machines from the 192.168.1.0/24 subnet to access the local machine’s port 3306
iptables -A INPUT -s 192.168.1.0/24 -p tcp -m tcp -m state –state NEW –dport 3306 -j ACCEPT
Allow this machine to provide application services through TCP ports 20-1024
iptables -A INPUT -p tcp -m tcp -m state –state NEW –dport 20:1024 -j ACCEPT
Allow forwarding of DNS resolution request packets from the 192.168.0.0/24 local area network segment
iptables -A FORWARD -s 192.168.0.0/24 -p udp –dport 53 -j ACCEPT
iptables -A FORWARD -d 192.168.0.0/24 -p udp –sport 53 -j ACCEPT
Block a specified IP address: The following rules will block the IP address specified by BLOCK_THIS_IP from accessing the local host: BLOCK_THIS_IP=”x.x.x.x”
iptables -A INPUT -i eth0 -s “BLOCK_THIS_IP” -j DROP
Block loopback access
iptables -A INPUT -i lo -j DROP
iptables -A OUTPUT -o lo -j DROP
Block ping from external sources, i.e., prevent external machines from pinging this machine
iptables -A INPUT -p icmp –icmp-type echo-request -j DROP
iptables -A OUTPUT -p icmp –icmp-type echo-reply -j DROP
Block the local machine from pinging external hosts, prevent this machine from pinging external machines
iptables -A OUTPUT -p icmp –icmp-type echo-request -j DROP
iptables -A INPUT -p icmp –icmp-type echo-reply -j DROP
Prevent other hosts from pinging this machine, but allow this machine to ping other hosts
iptables -I INPUT -p icmp –icmp-type echo-request -j DROP
iptables -I INPUT -p icmp –icmp-type echo-reply -j ACCEPT
iptables -I INPUT -p icmp –icmp-type destination-Unreachable -j ACCEPT
Disable forwarding of packets from a host with MAC address 00:0C:29:27:55:3F
iptables -A FORWARD -m mac –mac-source 00:0c:29:27:55:3F -j DROP
Explanation: In iptables, use “-m module keyword” to invoke specific match criteria. In this case, “-m mac –mac-source” specifies the source MAC address of the packets.
Allow the firewall host to externally open TCP ports 20, 21, 25, 110, and passive mode FTP ports 1250-1280
iptables -A INPUT -p tcp -m multiport –dport 20,21,25,110,1250:1280 -j ACCEPT
Note: “-m multiport –dport” is used here to specify multiple destination ports.
iptables -A INPUT -p tcp -m tcp -m multiport –dports 22,80,443,1250-1280 -m state –state NEW -j ACCEPT
You can also set these ports in separate lines:
iptables -A INPUT -p tcp -m tcp -m state –state NEW –dport 22 -j ACCEPT
iptables -A INPUT -p tcp -m tcp -m state –state NEW –dport 80 -j ACCEPT
iptables -A INPUT -p tcp -m tcp -m state –state NEW –dport 443 -j ACCEPT
iptables -A INPUT -p tcp -m tcp -m state –state NEW –dport 1250:1280 -j ACCEPT
Prevent forwarding of TCP packets from source IP addresses in the range 192.168.1.20-192.168.1.99
iptables -A FORWARD -p tcp -m iprange –src-range 192.168.1.20-192.168.1.99 -j DROP
Explanation:
Here, “-m iprange –src-range” specifies the IP range.
1) Filter source address range:
iptables -A INPUT -m iprange –src-range 192.168.1.2-192.168.1.7 -j DROP
2) Filter destination address range:
iptables -A INPUT -m iprange –dst-range 192.168.1.2-192.168.1.7 -j DROP
3) Filter for port access. Below indicates that only IPs from 192.168.1.5-192.168.1.10 can access the target machine 192.168.1.67’s port 80, while other IPs cannot!
iptables -A INPUT -d 192.168.1.67 -p tcp –dport 80 -m iprange –src-range 192.168.1.5-192.168.1.10 -j ACCEPT
Prevent forwarding of non–syn request packets unrelated to legitimate TCP connections
iptables -A FORWARD -m state –state NEW -p tcp ! –syn -j DROP
Explanation: “-m state” indicates the connection state of the packet, “NEW” indicates packets not associated with any existing connection.
Reject access to incoming new packets on the firewall, but allow response packets or packets related to existing connections
iptables -A INPUT -p tcp -m state –state NEW -j DROP
iptables -A INPUT -p tcp -m state –state ESTABLISHED,RELATED -j ACCEPT
Explanation: “ESTABLISHED” indicates packets that are responding to requests or already part of an established connection. “RELATED” indicates packets related to an established connection, such as FTP data connections.
Prevent DoS attacks
iptables -A INPUT -p tcp –dport 80 -m limit –limit 25/minute –limit-burst 100 -j ACCEPT
-m limit: Enable the limit extension to restrict rate.
–limit 25/minute: Allow a maximum of 25 connections per minute.
–limit-burst 100: The rule takes effect only after 100 connections have been established.
–icmp-type 8 refers to Echo request——ping request. The following sets a rate limit when the local machine pings host 192.168.1.109:
iptables -I INPUT -d 192.168.1.109 -p icmp –icmp-type 8 -m limit –limit 3/minute –limit-burst 5 -j ACCEPT
Allow routing
If the local host has two network cards, one connected to the internal network (eth0) and the other to the external network (eth1), the following rule can be used to route data from eth0 to eth1:
iptables -A FORWARD -i eth0 -o eth1 -j ACCEPT</>
IPtables can be used flexibly to perform various NAT (Network Address Translation) operations
There are two main types of network address translation: SNAT and DNAT
1) SNAT stands for source network address translation. For example, multiple PCs use an ADSL router to share internet access, each PC is configured with an internal IP. When a PC accesses the external network, the router replaces the source address in the packet header with the router’s IP address. When an external server, such as a website server, receives the access request, its logs record the router’s IP address, not the PC’s internal IP. This is called SNAT, source address-based translation.
2) DNAT stands for destination network address translation. A typical application is having a web server placed within an internal network configured with an internal IP, while a firewall with a public IP is configured in front. Internet visitors access this website using a public IP. When accessed, the client sends a data packet with the firewall’s public IP written as the target address in the packet header. The firewall rewrites this packet header, changing the target address to the web server’s internal IP before sending the packet to the internal web server. As such, the packet penetrates the firewall and transforms from an external public IP address access to an internal address access, known as DNAT, target-based network address translation.
The following rule will forward traffic from port 422 on the local machine 192.168.1.17 to port 22, which means SSH connection requests from port 422 are equivalent to requests from port 22.
1) Enable DNAT forwarding
iptables -t nat -A PREROUTING -p tcp -d 192.168.1.17 –dport 422 -j DNAT –to-destination 192.168.1.17:22
2) Allow requests to connect to port 422
iptables -t filter -A INPUT -p tcp -m tcp -m state –state NEW –dport 422 -j ACCEPT
3) Save the rules
# service iptables save
# service iptables restart
Suppose now that the local machine’s external network gateway is 58.68.250.1, to forward HTTP requests to an internal server at IP 192.168.1.20 on port 8888, the rule is as follows:
iptables -t nat -A PREROUTING -p tcp -i eth0 -d 58.68.250.1 –dport 8888 -j DNAT –to 192.168.1.20:80
iptables -A FORWARD -p tcp -i eth0 -d 192.168.0.2 –dport 80 -j ACCEPT
iptables -t filter -A INPUT -p tcp -m state –state NEW -m tcp –dport 80 -j ACCEPT
service iptables save
service iptables restart
If your local internal network IP is 192.168.1.10, you can forward HTTP requests to an internal server at 192.168.1.20 on port 8888 with the following rules:
Preparations: Enable IP forwarding on your local machine; ensure the internal gateway of 192.168.1.20 is the same as yours! If there’s no internal gateway, set the gateway address to your local network IP and disable the firewall (if the firewall is enabled, configure it to allow access to the corresponding ports from your machine).
iptables -t nat -A PREROUTING -p tcp -m tcp –dport 20022 -j DNAT –to-destination 192.168.1.150:22
iptables -t nat -A POSTROUTING -d 192.168.1.150/32 -p tcp -m tcp –sport 22 -j SNAT –to-source 192.168.1.8
iptables -t filter -A INPUT -p tcp -m state –state NEW -m tcp –dport 20022 -j ACCEPT
service iptables save
service iptables restart
**MASQUERADE**, address spoofing, has effects similar to SNAT in iptables but with some differences:
1) When using SNAT, the range of outgoing IP addresses can be one or more, for instance:
a) The command below indicates SNAT for all packets in the 10.8.0.0 net segment to the IP address 192.168.5.3 before sending them out
iptables -t nat -A POSTROUTING -s 10.8.0.0/255.255.255.0 -o eth0 -j SNAT –to-source 192.168.5.3
b) This command indicates SNAT for all packets in the 10.8.0.0 net segment to several IPs such as 192.168.5.3/192.168.5.4/192.168.5.5, then sending them out
iptables -t nat -A POSTROUTING -s 10.8.0.0/255.255.255.0 -o eth0 -j SNAT –to-source 192.168.5.3-192.168.5.5
This illustrates the use of SNAT, which can NAT to one or multiple addresses. However, for SNAT, regardless of the number of addresses, you must explicitly specify the IPs to SNAT! If your system uses ADSL dynamic dialing, the outgoing IP 192.168.5.3 will change each time, often not necessarily within the range 192.168.5.3 to 192.168.5.5. Configuring iptables this way can cause issues, because after each dial, the server address changes, but the IP in the iptables rules does not automatically update; you must manually change the iptables, modifying the fixed IP to the new one, which is inefficient!
2) **MASQUERADE** was designed for such scenarios; its function is to automatically obtain the current IP from the server’s NIC for NAT.
Example command:
iptables -t nat -A POSTROUTING -s 10.8.0.0/255.255.255.0 -o eth0 -j MASQUERADE
Configuring like this means there is no need to specify the target IP for SNAT. Regardless of the dynamic IP acquired by eth0 now, MASQUERADE will automatically read the current IP address of eth0 and perform SNAT outwards. This achieves efficient dynamic SNAT address translation.
Let’s review some operation examples:
1) Restrict the local web server from being accessed on Monday;
The new request rate cannot exceed 100 requests per second;
Web pages containing the “admin” string are not allowed to be accessed;
The web server is only allowed to send response packets off the machine;
Configuration:
– No access on Monday:
iptables -A INPUT -p tcp –dport 80 -m time ! –weekdays Mon -j ACCEPT
iptables -A OUTPUT -p tcp –dport 80 -m state –state ESTABLISHED -j ACCEPT
– New request rate cannot exceed 100 per second:
iptables -A INPUT -p tcp –dport 80 -m limit –limit 100/s -j ACCEPT
– Web pages containing “admin” string are not allowed, source port: dport
iptables -A INPUT -p tcp –dport 80 -m string –algo bm –string ‘admin’ -j REJECT
– Web server only allows response packets off the host, allowing target ports: sport
iptables -A OUTPUT -p tcp –dport 80 -m state –state ESTABLISHED -j ACCEPT
2) During working hours, i.e., Monday to Friday from 8:30 AM to 6:00 PM, open the local FTP service for access by hosts in the 192.168.1.0 network;
The frequency of data download requests must not exceed 5 per minute;
Configuration:
iptables -A INPUT -p tcp –dport 21 -s 192.168.1.0/24 -m time ! –weekdays 6,7 -m time –timestart 8:30 –timestop 18:00 -m connlimit –connlimit-above 5 -j ACCEPT
3) Open the local SSH service for hosts in the range 192.168.1.1-192.168.1.100;
The rate of establishing new requests should not exceed 2 per minute;
Only allow response packets to depart the machine through its service port;
Configuration:
iptables -A INPUT -p tcp –dport 22 -m iprange –src-range 192.168.1.1-192.168.1.100 -m limit –limit 2/m -j ACCEPT
iptables -A OUTPUT -p tcp –sport 22 -m iprange –dst-range 192.168.1.1-192.168.1.100 -m state –state ESTABLISHED -j ACCEPT
4) Reject packets with all TCP flags set to 1 or 0 from accessing the machine;
iptables -A INPUT -p tcp –tcp-flags ALL ALL -j DROP
5) Allow the machine to ping other hosts; Do not allow other hosts to ping the machine;
iptables -I INPUT -p icmp –icmp-type echo-request -j DROP
iptables -I INPUT -p icmp –icmp-type echo-reply -j ACCEPT
iptables -I INPUT -p icmp –icmp-type destination-unreachable -j ACCEPT
Or the below action to disable ping:
echo 1 > /proc/sys/net/ipv4/icmp_echo_ignore_all
When you find that your talent cannot support your ambition, please quietly learn
Published by: Full Stack Engineer Stack Lead, please indicate the source for reprint: [Original Link](https://javaforall.cn/140804.html)