

It’s easy to perform this on a local area network, which might surprise you with how insecure HTTP actually is. By using Wireshark network capture, you can try this method on dormitory networks, work networks, or even campus networks. However, for campus networks, you’ll need to ensure that broadcast traffic is allowed and your LAN card is set to promiscuous mode.
Let’s experiment with this method on a simple website. In this experiment, I conducted it on the same computer. In practice, you can do this between a virtual and a physical machine.
Note that some routers do not support broadcast traffic, so this may fail on such routers.
You can run Wireshark on Kali Linux using the following steps:
Application > Kali Linux > Top 10 Security Tools > Wireshark
In Wireshark, click on Capture > Interface options in sequence, and then select the applicable network card interface. In my case, I used a USB wireless card, so I selected wlan0.
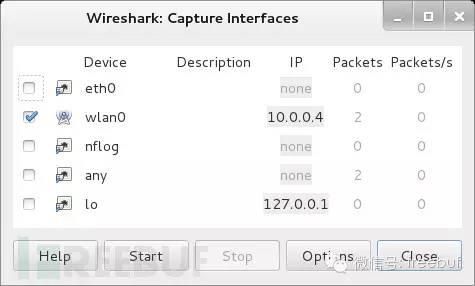
If everything goes smoothly, you can then press the start button, and Wireshark will begin capturing traffic. If you missed this step, you can start capturing traffic by going back to Capture > Interface > Start.

At this point, Wireshark starts monitoring and capturing all network traffic. Then I open the browser and log into a website using my username and password. Once the authentication process is complete and logged in successfully, return and stop Wireshark’s traffic capture.
Usually, a lot of traffic data will be captured, but we are only interested in POST data. Why POST data?
To filter and extract POST data, you can input the following command in the Filter box:
http.request.method== “POST”
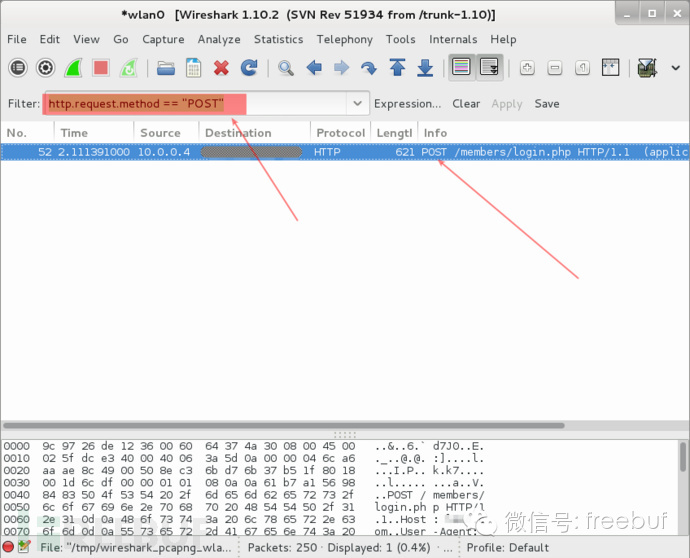
Next, click on the row of the POST event, and then right-click and select “Follow TCP Stream”.
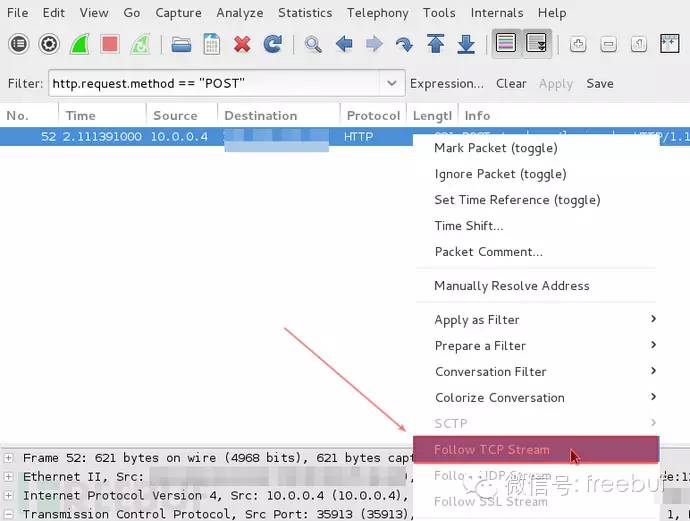
At this point, a new window will open containing content similar to the following:
HTTP/1.1 302 Found
Date: Mon, 10 Nov 2014 23:52:21 GMT
Server: Apache/2.2.15 (CentOS)
X-Powered-By: PHP/5.3.3
P3P: CP=”NOI ADM DEV PSAi COM NAV OUR OTRo STP IND DEM”
Set-Cookie: non=non; expires=Thu, 07-Nov-2024 23:52:21 GMT; path=/
Set-Cookie: password=e4b7c855be6e3d4307b8d6ba4cd4ab91; expires=Thu, 07-Nov-2024 23:52:21 GMT; path=/
Set-Cookie: scifuser=sampleuser; expires=Thu, 07-Nov-2024 23:52:21 GMT; path=/
Location: loggedin.php
Content-Length: 0
Connection: close
Content-Type: text/html; charset=UTF-8
1. Username: sampleuser
2. Password: e4b7c855be6e3d4307b8d6ba4cd4ab91
From the password value above, we can infer that “e4b7c855be6e3d4307b8d6ba4cd4ab91” certainly isn’t the real password value, but should be a hash value.
It is important to note that some websites that do not pay attention to security do not hash the password value sent by the user but send the password in plain text to the server. For such websites, you can obtain the username and password information by this step. In the example I analyzed, we need to go further, that is, to identify the password value corresponding to the hash value.
In this step, I will use the hash-identifier tool to determine what type of hash that password hash is. Open a terminal, then type “hash-identifier” and paste the hash value above into the terminal, press enter and the hash-identifier will provide possible matching values.
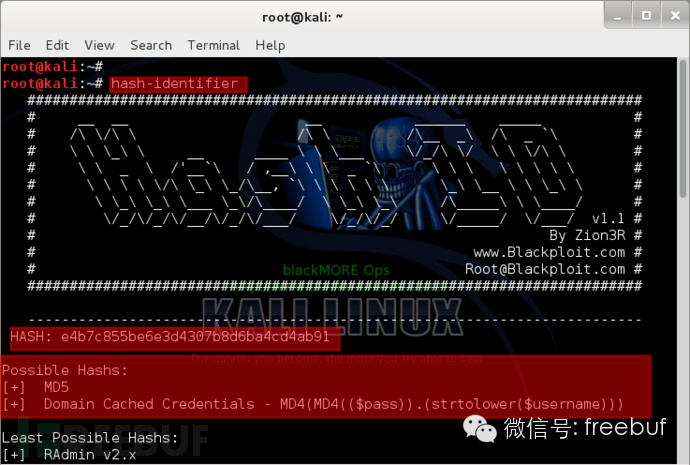
Since one thing is certain, the hash value above is not a Domain Cached Credential, so it must be an MD5 hash value. Then, you can use hashcat or cudahashcat to crack this MD5 hash value.
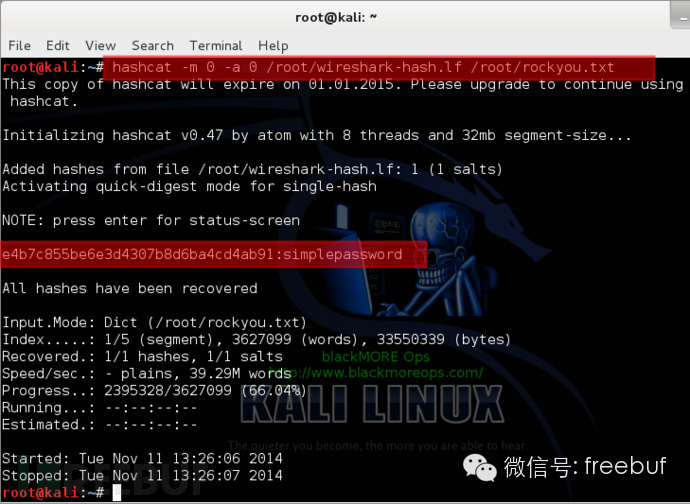
It is easy to crack this password using hashcat or similar tools.
root@kali:~# hashcat -m 0 -a 0 /root/wireshark-hash.lf /root/rockyou.txt
(or)
root@kali:~# cudahashcat -m 0 -a 0 /root/wireshark-hash.lf /root/rockyou.txt
(or)
root@kali:~# cudahashcat32 -m 0 -a 0 /root/wireshark-hash.lf /root/rockyou.txt
(or)
root@kali:~# cudahashcat64 -m 0 -a 0 /root/wireshark-hash.lf /root/rockyou.txt
Because the password I tested is in my password dictionary, hashcat can easily crack it.
In fact, it is impossible to ensure that every website uses SSL to secure passwords because using SSL for each URL costs money. However, site owners (any publicly registerable site) should at least perform hashing operations during the login phase, so that at least an additional barrier is set when attackers crack the website password.