
Recently, I finished some competitions and returned to my usual routine of vulnerability research. Today, I initially planned to reproduce a WebLogic vulnerability that was disclosed a few days ago. However, setting up the environment is always a headache. After spending a lot of time, I still encountered various issues. Suddenly, I remembered Vulhub, a vulnerability testing lab I learned about last semester. Although I hadn’t explored it deeply before, I tried it today and found it incredibly useful. Highly recommended!
Vulhub is a collection of vulnerability environments based on docker and docker-compose. By navigating to the corresponding directory and executing a single command, you can start a brand-new vulnerability environment. This makes vulnerability reproduction much simpler and allows security researchers to focus more on the vulnerability principles themselves. It truly saves us a lot of time!
Vulhub Official Website
As for installation, the official website already provides very detailed instructions, so I won’t repeat them here.
What I want to mention are some points to note. The official website suggests using a foreign VPS for setup because, as Docker users know, pulling Docker images in China is very slow due to the overseas sources.
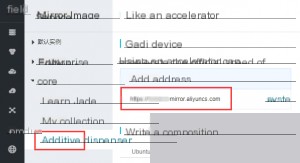
Since I’ve been using Alibaba Cloud servers, I switched to the Docker image source officially provided by Alibaba Cloud. Of course, using other sources is also fine.
Here, I’ll take CentOS as an example.
1. Install/Upgrade Docker Client
It is recommended to install Docker client version 1.10.0 or above. Refer to the documentation: docker-ce
2. Configure Image Accelerator
For users with Docker client versions greater than 1.10.0:
You can use an accelerator by modifying the daemon configuration file /etc/docker/daemon.json:
sudo mkdir -p /etc/docker
sudo tee /etc/docker/daemon.json <<-'EOF'
{
  "registry-mirrors": ["your-mirror-address"]
}
EOF
sudo systemctl daemon-reload
sudo systemctl restart docker
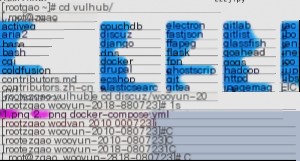
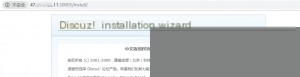
Assuming the environment required for Vulhub has been installed, we can now start the lab. Here, I’ll use a Discuz vulnerability as an example, located in the Vulhub directory.
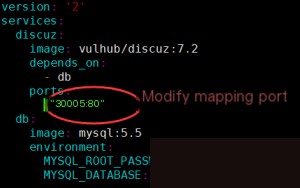
Before starting, you can edit the configuration file as needed. Since the default port 8080 was already in use on my server, I assigned a random one.
Now, start the vulnerability environment. Execute the following command in the current directory:
docker-compose up -d

This indicates that the environment has started successfully. However, some information about the vulnerability can still be found in the README.md file in the directory. Now, access the corresponding port.
But don’t forget to remove the environment afterward! As mentioned on the official website:
All environments in Vulhub are vulnerability labs. After testing, please promptly shut down and remove the environment to avoid malicious exploitation by others.
Although the labs run entirely in Docker, most malware does not lose its effectiveness just because it runs in a container!
After completing the vulnerability test, execute the following command to remove the environment:
docker-compose down
Now you can happily start reproducing vulnerabilities.