
1. Course Overview: Server Attack Techniques
This course is a hands-on lab tutorial. To ensure clarity during the labs, theoretical content will be included as needed, with recommendations for must-read articles. The goal is to reinforce your theoretical foundation while practicing Server Attack Techniques through practical exercises.
Note: Due to the cost of configuring cloud hosts for the labs, the usage will be limited. Each lab can be used up to 6 times only.
2. Learning Methodology for Server Attack Techniques
The Kali series courses on the lab platform consist of five training camps. This particular training camp focuses on server attack techniques. The course includes 20 labs, all of which provide detailed guides and screenshots. It is designed for students with basic Linux knowledge who want to quickly get started with Kali penetration testing.
The recommended learning approach involves frequent practice and asking questions. After starting a lab, follow the steps systematically while understanding the purpose and mechanism behind each step.
If reading materials are recommended at the start of a lab, ensure you read them before proceeding. Theoretical knowledge is fundamental for effective practice.
3. Overview of This Section: Server Attack Techniques
In this lab, we will get an initial introduction to Kali Linux and penetration testing concepts. The tasks to be completed are as follows:
- Understand what Kali Linux is.
- Learn how to install Kali Linux.
- Become familiar with the Metasploitable2 target machine.
- Learn how to use the multi-machine lab environment provided by the lab platform.
- Perform a basic vulnerability scan from Kali to the target machine.
4. Recommended Reading: Server Attack Techniques
The following materials are recommended for this section:
5. An Introduction to Kali: Server Attack Techniques
5.1 What is Kali Linux?
Kali Linux is a Debian-based Linux operating system designed for penetration testing and security audits. It originally evolved from a similar system called BackTrack in March 2013 and is developed by the Offensive Security team. To support penetration testing and security auditing, Kali Linux is customized with specific kernel, network service, and user configurations.
Kali includes pre-installed security tools such as the well-known Nmap port scanner, John the Ripper password cracker, and Metasploit Framework remote exploit software. The focus of this training camp is to teach how to use a variety of tools in Kali Linux to attack vulnerable target machines, while also explaining the principles behind these attacks.
The latest version of Kali Linux, as of 2016, is 2.0-2016.2, which is the version used in the lab’s virtual machine environment. It includes over 600 penetration testing tools and carries kernel patches specifically for security auditing purposes.

Image Source: Kali Official Website
5.2 Server Attack Techniques in Penetration Testing
Penetration testing refers to the process of evaluating the security of a target server or network with authorized access. This involves using various scanning and attack methods to probe, exploit, or impact the target system’s defenses, as well as setting up potential backdoors. The goal is to ensure the robustness of the target system against real-world threats. Many companies and teams specialize in penetration testing services, and there is high demand for professionals in this domain in industries like technology and online services.
5.3 Server Attack Techniques: Vulnerability Analysis
Vulnerability analysis involves using penetration testing tools to identify potential security flaws in the target system. It determines if the system has implemented necessary patches or security measures. If vulnerabilities are present, the risks are assessed based on factors like ease of exploitation and potential impact.
5.4 Social Engineering
Social engineering, in the context of information security, refers to using interpersonal manipulation or deceit to gain access to sensitive information or authority that can be used in attacks.
For instance, creating a phishing website to trick users into providing login credentials or even banking information leverages deception to gather critical data without the user being aware of the malicious intent.
6. Installing and Deploying Kali
Note: The lab platform comes pre-configured with a Kali virtual machine environment, so additional installation is unnecessary. The steps below are for setting up a local environment as a reference.
Kali Linux is already installed in a virtual machine within the lab environment. However, for those interested in local setup, this section outlines the basic installation steps.
There are several methods to install Kali Linux:
- Download the official ISO image and install it on a physical machine or virtual machine.
- Download the official virtual machine image and launch it in virtualization software.
- Download and deploy an ARM image for ARM-based systems.
It is essential to download ISO files only from the official website and verify the SHA1 checksum to avoid compromised versions.
As a learning environment, Kali is commonly set up in a virtual machine. The lab environment uses this approach by providing a pre-built virtual machine image to simplify the process. Alternatively, you can follow these links for help with official ISO installation:
- Kali ISO Download Link (Note: The Light version only includes commonly used tools. The full version is recommended.)
- Kali Installation Guide
It is recommended to use VirtualBox as the virtualization software. On an Ubuntu operating system, you can install it using:
sudo apt-get update
sudo apt-get install virtualbox
After installation, the virtual network is configured automatically. The next step is to download the virtual machine image from the Offensive Security website:
Be sure to download the appropriate virtual machine image for your virtualization software. For VirtualBox, use this link:
The virtual machine image is provided as a pre-configured OVA file. Using the import feature in VirtualBox, you can load it easily. Once imported, you can launch the virtual machine.
The default login credentials for the Kali virtual environment are username: `root`, password: `toor`.
7. Starting the Lab Environment
7.1 Overview of the Lab Environment
The lab environment on the platform includes two virtual machines: an attacker machine and a target machine:
- Attacker machine: Kali Linux, running within a Docker container for performance optimization. To access the Kali Linux system, execute the following command:
$ docker run -ti --network host 6f113 bashOnce inside the Kali container, append the following entry to the /etc/hosts file to map the target machine hostname, avoiding the need to input the IP address repeatedly:
$ sudo echo "192.168.122.102 target" >> /etc/hosts- Target machine: Metasploitable2 virtual machine, with the hostname `target` and IP address `192.168.122.102`. The default login is `msfadmin/msfadmin`.
7.2 Virtual Machine Management
The two virtual machines mentioned above are pre-installed in the lab’s virtual environment and can be managed using Libvirt commands.
Libvirt is a free, open-source C library that supports major virtualization tools on Linux. It provides a unified, dependable programming interface, supporting bindings for languages like C, C++, Ruby, and Python. Most Linux virtualization management tools, including `virt-manager` (GUI) and `virt-install` (CLI), are built using Libvirt.
In brief, Libvirt is a standardized interface for managing various virtualization resources. Alongside its SDKs in different programming languages, it also offers a command-line tool called
virsh. This tool can be used in our lab setup, and familiarizing yourself with its commands will aid in debugging during development.
Here are a few introductory commands for using virsh in the lab environment:
# Start the libvirt-bin service
sudo service libvirt-bin start
# View a list of virtual machines on the current system (returns empty by default)
sudo virsh list
# View a list of virtual networks (default network returned by default)
sudo virsh net-list --all
Below are some commonly used virsh commands:
Commands Description
Command            Description
help               Displays the description of this command
quit               Exits virsh and returns to the Shell
connect            Connects to a specified virtual machine server
create             Starts a new virtual machine
destroy            Deletes a virtual machine
start              Powers on a non-running (predefined) virtual machine
define             Defines a virtual machine from an XML file
undefine           Unregisters a virtual machine
dumpxml            Outputs the configuration details of a virtual machine
list               Lists virtual machines
reboot             Restarts the virtual machine
save               Saves the state of a virtual machine
restore            Restores the state of a virtual machine
suspend            Pauses a virtual machine
resume             Resumes a paused virtual machine
dump               Dumps the kernel of a virtual machine to a file for troubleshooting
shutdown           Shuts down a virtual machine
setmem             Modifies the memory size
setmaxmem          Sets the maximum memory size
setvcpus           Adjusts the number of virtual CPUs
7.3 View and Start Lab Environment
On the experiment desktop, double-click the Xfce terminal icon to open a terminal. All subsequent commands will be executed in this terminal.

Click on the File button → Open Tab to create a new tab. Then, use the virsh list command to check the list and status of virtual machines in the current environment. Make sure to run this command with sudo and include the --all parameter to display virtual machines that are powered off:
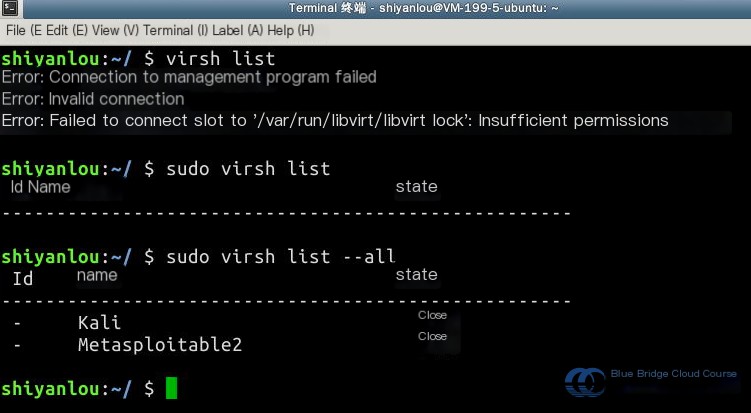
Next, use the virsh start command to boot up the desired virtual machine. Remember that the virtual machine name is case-sensitive, with capitalized first letters. After starting the machine, verify its status and confirm it’s in the running state:
$ sudo virsh start Metasploitable2
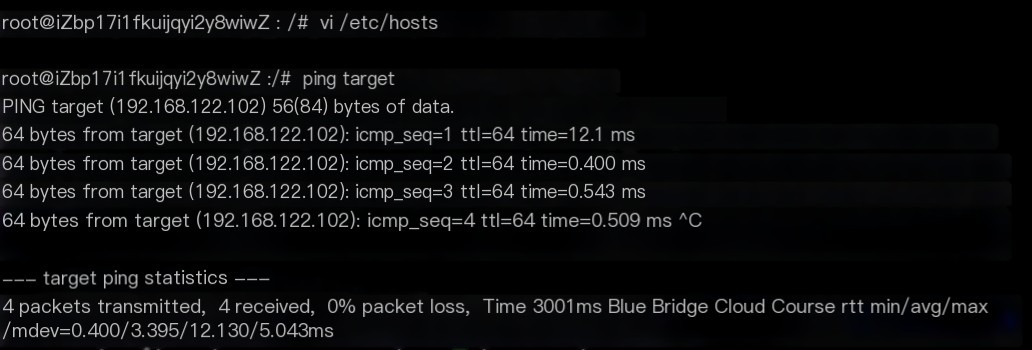
Note that virtual machines take some time to start. You may need to wait approximately four minutes. Run the following command, and if you can ping the target, it indicates the target machine has successfully started:
ping -c 3 target

Open a new tab and execute ping target to test whether the Kali system can ping the target machine. Exit the ping test using Ctrl-C.
With both lab environments now started, you’re ready to begin penetration testing.
8. Kali Package Management and Software Installation
8.1 Kali APT Package Management
Kali uses the same package management tool as Ubuntu but relies on its own specialized repositories.
APT, short for Advanced Packaging Tool, is the package manager for Debian and its derivatives. APT automates the downloading, configuration, and installation of software packages, whether in binary or source code format, simplifying software management on Unix-based systems. Initially designed as a front-end for
dpkgto handle.debpackages, APT has since been extended to support RPM-based systems through the APT-RPM project. This package manager includes various tools, such asapt-get,apt-cache, andapt-cdrom, widely used in Debian-based distributions.
#Represents a number, used to set the silence level. This is useful when you don't want too much output on the screen while installing packages.-fRepairs broken dependencies-dDownload only, do not install--reinstallReinstalls a package that is already installed but may have issues--install-suggestsInstalls packages suggested by APT### 8.4 Installing Packages
Regarding installation, as demonstrated earlier, you just need to execute apt-get install <package name>. Besides this, you should also learn how to reinstall packages.
Many times, it becomes necessary to reinstall a package, such as when your system is corrupted, or some incorrect configurations prevent the software from working properly.
You can reinstall using the following command:
$ sudo apt-get --reinstall install w3mAnother important skill is how to install software when you don’t know the full package name. Usually, the Tab key is used for autocompletion of package names, but there are better methods to search for packages, which will be introduced later. Additionally, if you need to install multiple packages at once, you can use regular expressions to match package names in a batch installation.
### 8.5 Upgrading Software
# Update software sources
$ sudo apt-get update
# Upgrade packages without dependency issues
$ sudo apt-get upgrade
# Upgrade and resolve dependencies
$ sudo apt-get dist-upgrade
### 8.6 Uninstalling Software
If you feel that w3m doesn’t suit your needs or you’ve found a better alternative, uninstalling it is simple! Just use one command, followed by Enter, to remove it: sudo apt-get remove w3m. The system will prompt you for confirmation, and after that, the software will be “gone.”
Alternatively, you can issue:
# Remove without keeping configuration files
$ sudo apt-get purge w3m
# Or sudo apt-get --purge remove
# Remove unused dependent packages
$ sudo apt-get autoremove
### 8.7 Searching for Software
If you come across a software you’d like to try, but aren’t sure if it exists in the repository, you can use the search functionality as follows:
sudo apt-cache search softname1 softname2 softname3……
The apt-cache command is a tool for performing operations on local data. The search subcommand, as the name suggests, looks for information about softname1, softname2, etc., in the database.
That’s all for online installation. To learn more about APT, you can refer to:
## 9. Introduction to the Metasploitable2 Target Machine
### 9.1 Overview of Metasploitable2
Metasploitable2 is the target machine used in the Shiyanlou training camp. It’s a customized Ubuntu system for penetration testing and vulnerability demonstration. This system is filled with common vulnerabilities. In subsequent experiments, we’ll use Kali Linux to conduct penetration tests, discover vulnerabilities, and carry out attacks on this system.
Metasploitable2 is distributed as a virtual machine. In Shiyanlou, the latest version available is 2.0.0, which hasn’t been updated since 2012.
Since the Shiyanlou environment allows quick creation of machines in seconds, there’s no need to worry about damaging the target system during penetration tests. Simply stop the experiment and restart it to get a fresh test environment.
Note: Part of this section is adapted from the official Metasploitable2 documentation.
### 9.2 Installing Metasploitable2
Note: The Shiyanlou environment already comes with the Metasploitable2 VM pre-deployed. The following steps are for those interested in setting up the target system locally.
First, download the latest version of the Metasploitable2 VM from the following link:
You can use wget to download. The downloaded file is a zip archive that needs to be extracted with the following command:
unzip metasploitable-linux-2.0.0.zipThe extracted file is a virtual disk in VMDK format. Use VMware or VirtualBox to create a new virtual machine, selecting the existing disk instead of creating a new one. Once the virtual machine is created, you can simply start it.
The default username and password for the Metasploitable2 environment are both msfadmin. SSH is enabled by default and can be used to log in to the system directly.
### 9.3 Logging In to Metasploitable2
Following the steps outlined in section 7.3, log in to Metasploitable2 using SSH with the username msfadmin and the password msfadmin:
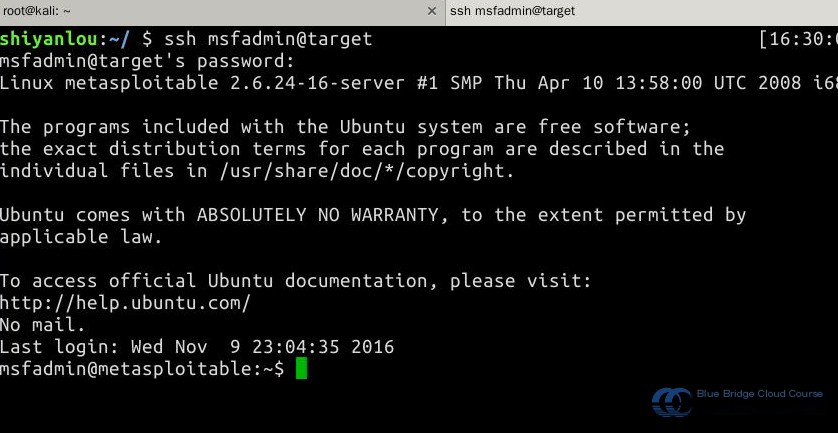
### 9.4 Viewing Open Services
To test vulnerabilities in various services, this system keeps many services open. Use the netstat -tln command to view the listening ports on the system:

The list reveals that many network services are running, such as port 21 (FTP service) and port 22 (SSH service). These services pose a potential risk of attack. The subsequent experiments will explore how to exploit vulnerabilities in specific services to compromise the Metasploitable2 system.
We can also use the rpcinfo command to view the active services in the current system:
This list includes port numbers and their corresponding services.
### 9.5 Weak Passwords
Metasploitable2 comes with numerous weak passwords for both system and data accounts, including but not limited to:
- msfadmin:msfadmin
- user:user
- postgres:postgres
- sys:batman
- klog:123456789
- service:service
### 9.6 Backdoor Services
The system contains many potential backdoor services. For example, the FTP service uses the vsftpd software, which has a known backdoor vulnerability. In this version of the software, if the FTP username includes a smiley face :), it will open a shell on port 6200. A simple testing method involves using telnet to connect to the vsftpd service and sending a smiley face to get a shell.
This simple experiment is assigned as homework for this section. You can share your methods and results in the discussion forum.
### 9.7 Web Services
The system comes pre-installed with several web services containing various web vulnerabilities. You can view them by opening Firefox in the experimental environment and entering http://target:
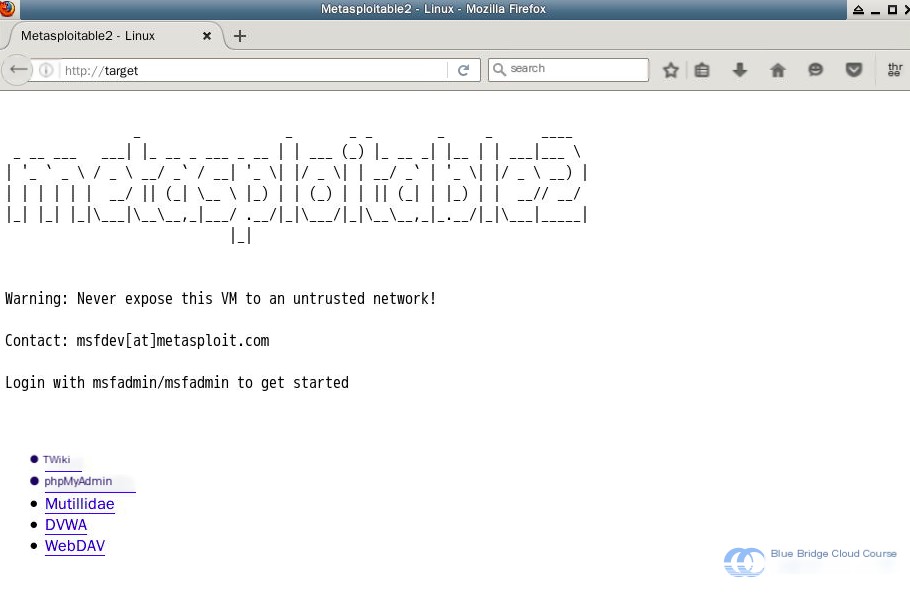
These web applications have numerous exploitable vulnerabilities. We’ll learn how to leverage them for web penetration testing in another training session.
10. Scanning Operations in the Experimental Environment
10.1 Logging into Kali
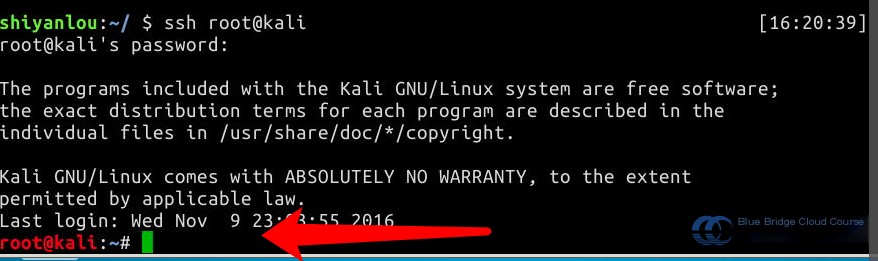
To start, connect to Kali via SSH. Most attacks will need to be conducted within the Kali virtual machine. Note that the username is “root,” and the password “toor” will not be displayed. Use the command ssh root@kali to connect. The experimental environment has already mapped IP addresses to hostnames in the /etc/hosts file to avoid having to remember complex IP addresses:
10.2 Scanning Open Services on the Target Host
In Kali, you can use the Nmap tool to scan open services on Metasploitable2. To save time, we’ll limit the scan to ports 1-1000. Be sure to understand the parameters used with Nmap:
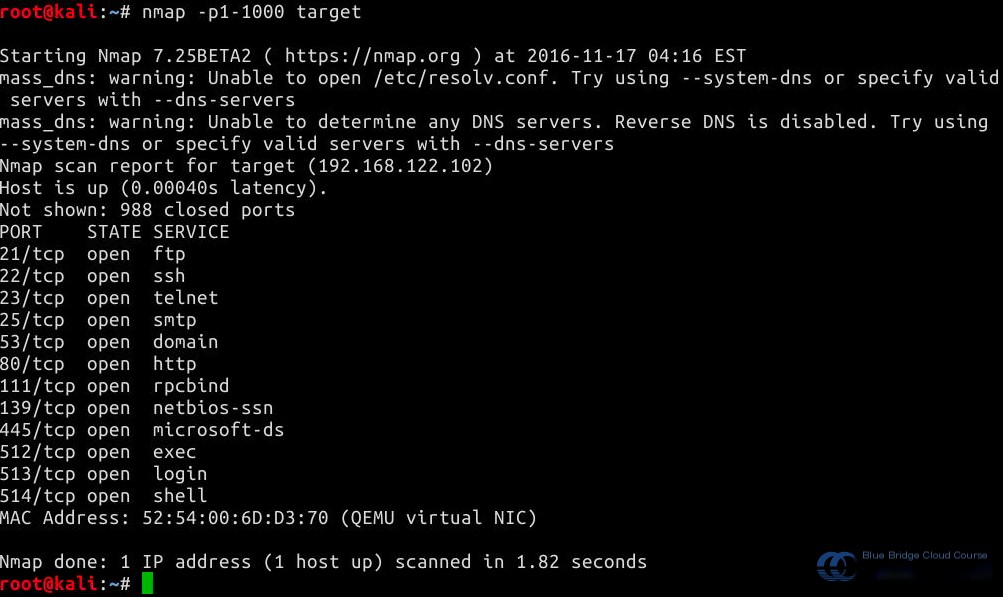
In later experiments, we’ll dive deeper into Nmap usage. For now, this is a quick overview of how to conduct scans using tools between the two virtual machines in the environment.
11. Summary
In this experiment, we covered the following topics. If you have any questions, feel free to discuss them with us on Shiyanlou Q&A:
- Understanding what Kali Linux is
- Learning how to install Kali Linux
- Familiarizing yourself with the Metasploitable2 target machine
- Learning how to use the multi-machine experimental environment provided by Shiyanlou
- Attempting basic vulnerability scanning from Kali to the target machine
Be sure to work through the entire experiment yourself. Reading the text is easy, but performing the actual steps may present challenges. Solving these problems is where the real learning happens.