This course is a hands-on tutorial. To clearly explain some operations in the experiments, theoretical content will be included. Additionally, highly recommended articles worth reading will be shared with you. This ensures both practical skills and a solid theoretical foundation.
Note: Due to the high cost of configuring cloud hosts used for experiments, the number of attempts is limited to no more than six per experiment.
2. Learning Approach to Nmap Commands
The Kali series on Experiment Labs consists of five training camps. This particular training camp focuses on web application attack techniques. The course contains 20 experiments, each with detailed steps and screenshots. It is suitable for individuals with basic Linux knowledge who wish to quickly get started with Kali penetration testing.
The recommended approach is to practice extensively and ask questions. Follow the experiment steps while understanding each step comprehensively.
If the experiment recommends reading materials in its early stages, ensure you read them first before proceeding. Theoretical knowledge forms the essential foundation for practical application.
3. Summary of Nmap Commands
This experiment dives deeper into the concept of penetration testing, examining the entire process. The following tasks need to be completed step by step:
Kali integrates a variety of tools for scanning, attacking, etc. For website penetration testing or attacks, performing blind scans or attacks is inefficient and wastes time. Instead, the process follows these steps:
Identifying objectives: First, determine what you are testing or attacking.
Information gathering: Use various tools to collect data such as domain names, IP addresses, ports, platforms running back-end applications, and more. Understanding the application’s framework enhances targeted attacks or vulnerability exploitation.
Vulnerability scanning: After gaining insights into the target platform, anticipate possible vulnerabilities in its components or use scanning tools to discover them.
Vulnerability validation: Once vulnerabilities are identified, validate them by exploiting the target. This involves gaining system access and escalating privileges for further control.
Privilege escalation: After compromising the system, create a hidden user with high privileges or place backdoor programs for easier subsequent access.
Documentation: Always document each attack for summarizing and accumulating knowledge.
5.1 Identifying Objectives
This step is straightforward—select your target website or system. Having a clear objective is crucial for focused efforts.
5.2 Information Gathering
Information gathering is one of the most critical stages in penetration testing or attacks. “Know your enemy and know yourself, and you can fight a hundred battles without disaster.” Without knowing your target platform, database, or web application language, trying everything would be futile.
Key information is gathered in the following ways:
Domain-related information of the website
Server-related information of the website
Common vulnerabilities in web components (e.g., Nginx, Tomcat). This information can be found through social engineering and Google Hacking.
By gathering such details, you gain a comprehensive understanding of the target website. This allows you to focus your attacks effectively, reducing unnecessary efforts and significantly improving your success rate.
1. Domain-related information of the website (due to the experimental environment being closed, this part cannot be completed in the experiment environment. Students can practice this locally.)
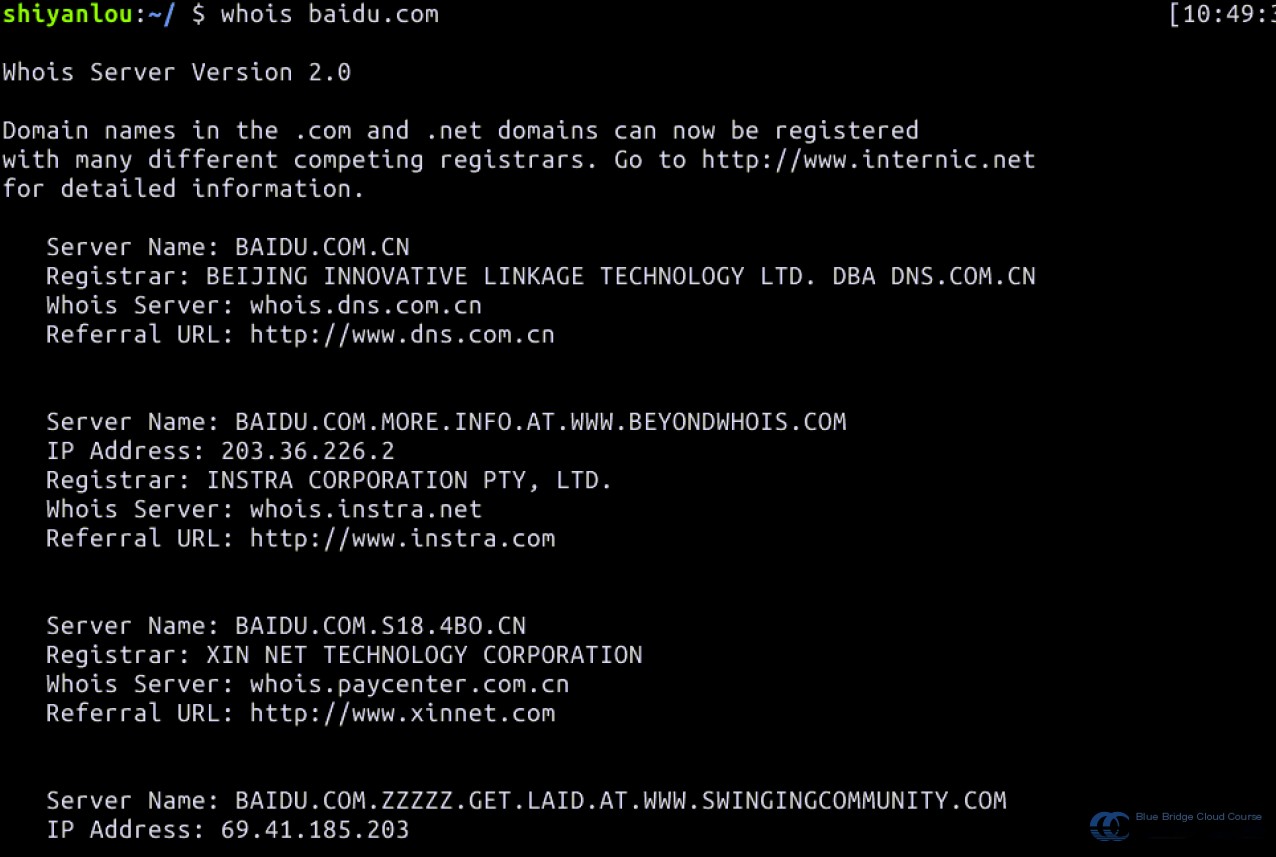
A website’s domain is often the first piece of information to analyze. To identify a target website, you typically visit the website, making its domain the most straightforward entry point. Tools like whois are commonly used to query domain registration details and related information.
WhoIs (pronounced “Who is”, not an acronym) is a protocol used to query domain IP and ownership information. Simply put, it is a database for checking if a domain is registered and accessing detailed registration information (e.g., owner, registrar). (Information source: Baidu Encyclopedia)
With the whois tool, you can retrieve details such as the domain registration entity, DNS servers, and creation date. For example:
whois baidu.com
You can get:
The information is detailed and includes DNS servers, registrar contact details, and more. Although third-party domain registrars often conceal private data to protect user privacy, these details can be invaluable in later stages.
For faster DNS-related queries, tools like host can be used.
host -t ns baidu.com
host is not limited to DNS queries alone. Domain records can be categorized as follows:
Type
Description
SOA
Start of Authority (authoritative record)
NS
Name Server (domain server record)
A
IPv4 address mapping
MX
Mail Exchange record
PTR
Reverse IP address mapping
CNAME
Canonical Name (alias record)
Port
Description
80
HTTP (using Nginx, Apache, etc.)
443
HTTPS
3306
MySQL
3389
RDP
5432
PostgreSQL
5900
VNC
6379
Redis
8080
Tomcat (or similar)
If we observe these ports being open, we can generally infer the architecture of the target host and the services or components running on it. But how can we check which ports are open on a target host? For this, we use a powerful port scanning tool called nmap.
nmap, short for Network Mapper, is a network security and auditing tool used for network discovery. It allows you to detect whether a host is online, identify open ports, determine the services running on them (including their versions), and even detect the operating system and device type.
For instance, using nmap on a target host can give us information like service versions, port configurations, vendor identification, and operating system type (e.g., Windows or Linux).
Before starting, ensure your virtual machine environment is up and running:
## Start the Kali environment
sudo virsh start Kali

## Start Metasploitable2
sudo virsh start Metasploitable2
Note: Booting the virtual machines may take around 4 minutes.
After both virtual machines have started completely, log into the Kali system using the following command:
## Kali has only the root user; the default password is "toor"
ssh root@kali
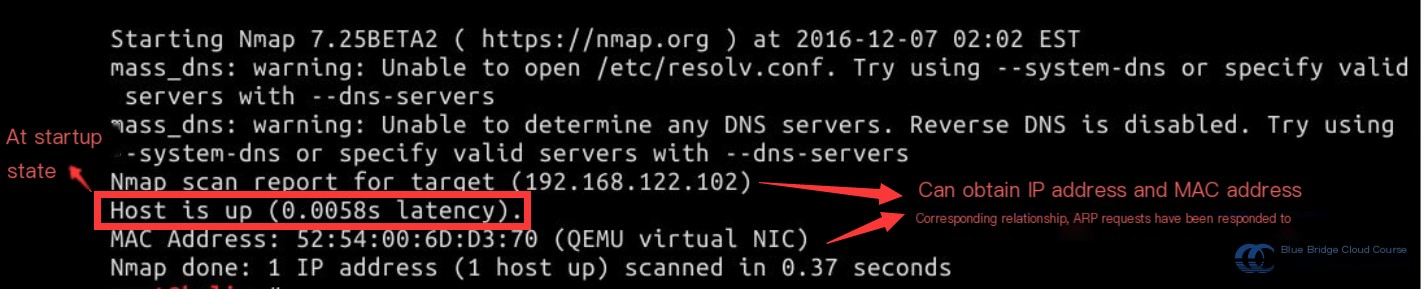
After successfully logging in, we use nmap on the Kali system to scan the prepared target machine:
nmap -sn target
Before attacking a host, you must first check whether it is online. If it’s offline, any further actions will be wasted effort. This initial check is known as an exploration scan. Running the above command will produce results like this:
The -sn parameter is commonly referred to as a “ping scan,” used to identify whether the target host is online. It sends broadcast ARP requests within a Local Area Network (LAN). If the target responds to the ARP request, it is determined to be online. Otherwise, it is offline.
Some networking basics: The OSI model divides network communications into seven layers. When using the -sn parameter, nmap adapts its operation according to the network layer involved:
If scanning an IP address within the same LAN or subnet, nmap first sends ARP requests since ARP is a protocol at Layer 2 (Data Link Layer) responsible for resolving IP addresses to MAC addresses. This makes the scan operate at the Layer 2 level.
If scanning an external (non-LAN) IP address, ARP requests are not applicable, and nmap instead uses ICMP (Internet Control Message Protocol), which operates at Layer 3 (Network Layer). Common ping commands use ICMP as well.
Note that when using ICMP, nmap cannot retrieve MAC addresses, as these are not included in Layer 3 communications.
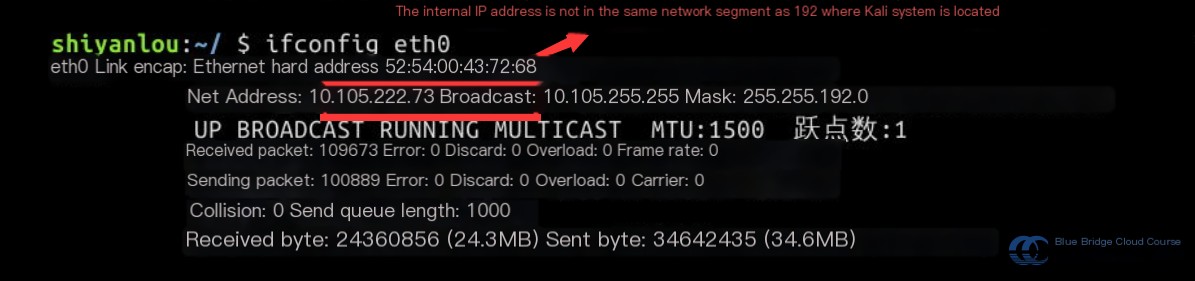
To determine your host’s internal IP address in Shiyanlou’s shell, use:
ifconfig eth0
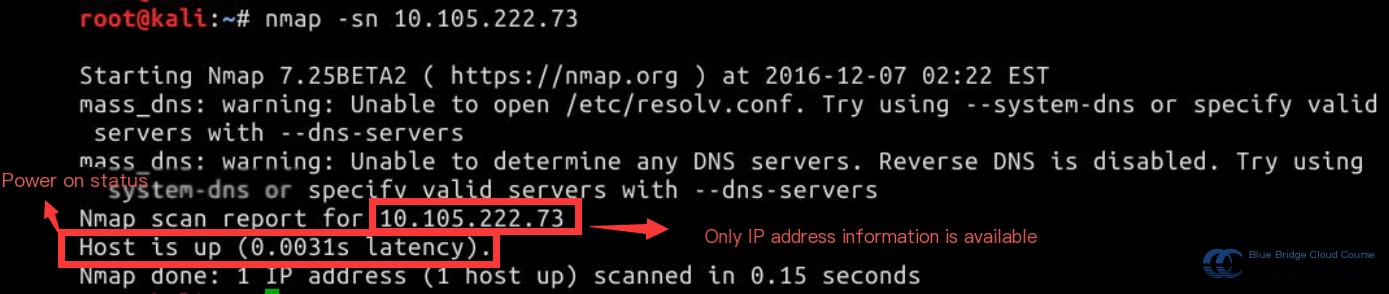
Then, on the Kali machine, perform the scan on the host machine using:
nmap -sn 10.105.222.73
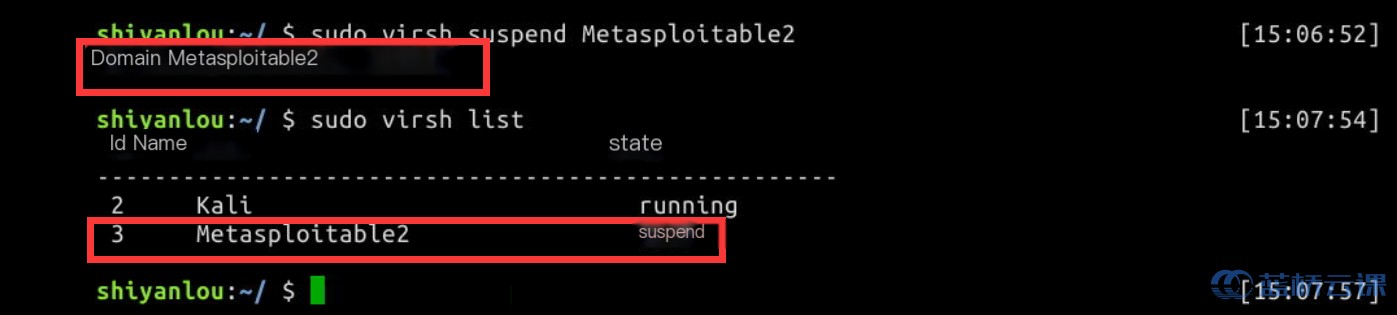
If the target machine is suspended or shut down, you’ll receive a response indicating that the target appears to be offline as it doesn’t respond to ARP requests. Suspend the target virtual machine with the following command:
sudo virsh suspend Metasploitable2
Then try the scan again from Kali:
nmap -sn target
You’ll notice a result like this:
Other tools with similar functionalities include netdiscover, arping, and scapy. These primarily operate at the Data Link layer to discover hosts. While scapy is far more powerful—capable of probing the Network and even Transport layers—it is considerably more complex to use. If you’re interested, I recommend digging deeper into these tools.
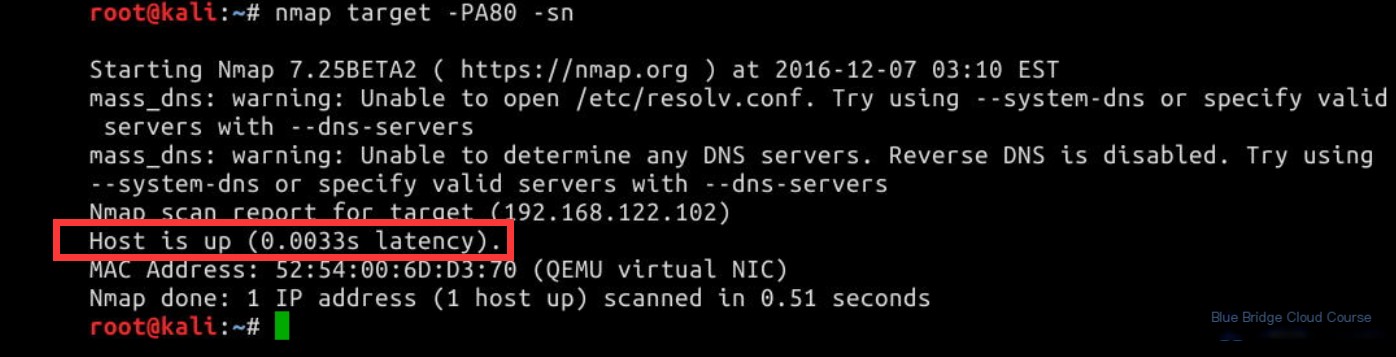
If a target host employs strict security measures like an active firewall that blocks ICMP packets, you’ll need to probe at the Transport layer instead. Most systems respond to TCP or UDP requests, so we can try the following command:
nmap target -PA80 -sn
Here, -PA performs a probe using TCP ACK packets aimed at port 80 (commonly used for HTTP). Understanding this requires some knowledge of networking: HTTP relies on TCP for data transmission, which involves a three-way handshake process between the server and client to establish a reliable connection. This handshake uses SYN and ACK packets to initiate and acknowledge communication.
The three-way handshake process is an essential part of establishing reliable communication for TCP-based services. It works as follows:
… (to be continued)
### Translation:
The client sends a connection request packet to the server (SYN packet).
The server, upon receiving the packet, agrees to establish a connection, sends an acknowledgment packet (ACK packet), and simultaneously sends its own SYN connection request packet back to the client.
The client responds to the server’s request by sending an acknowledgment packet (ACK packet).
This process is known as the “three-way handshake.”
Using this method, we can achieve the following results:
Note: If your result is “shutdown” instead of matching mine, that’s because we just suspended the system, and you’ll need to resume it. Execute the following command: sudo virsh resume Metasploitable2.
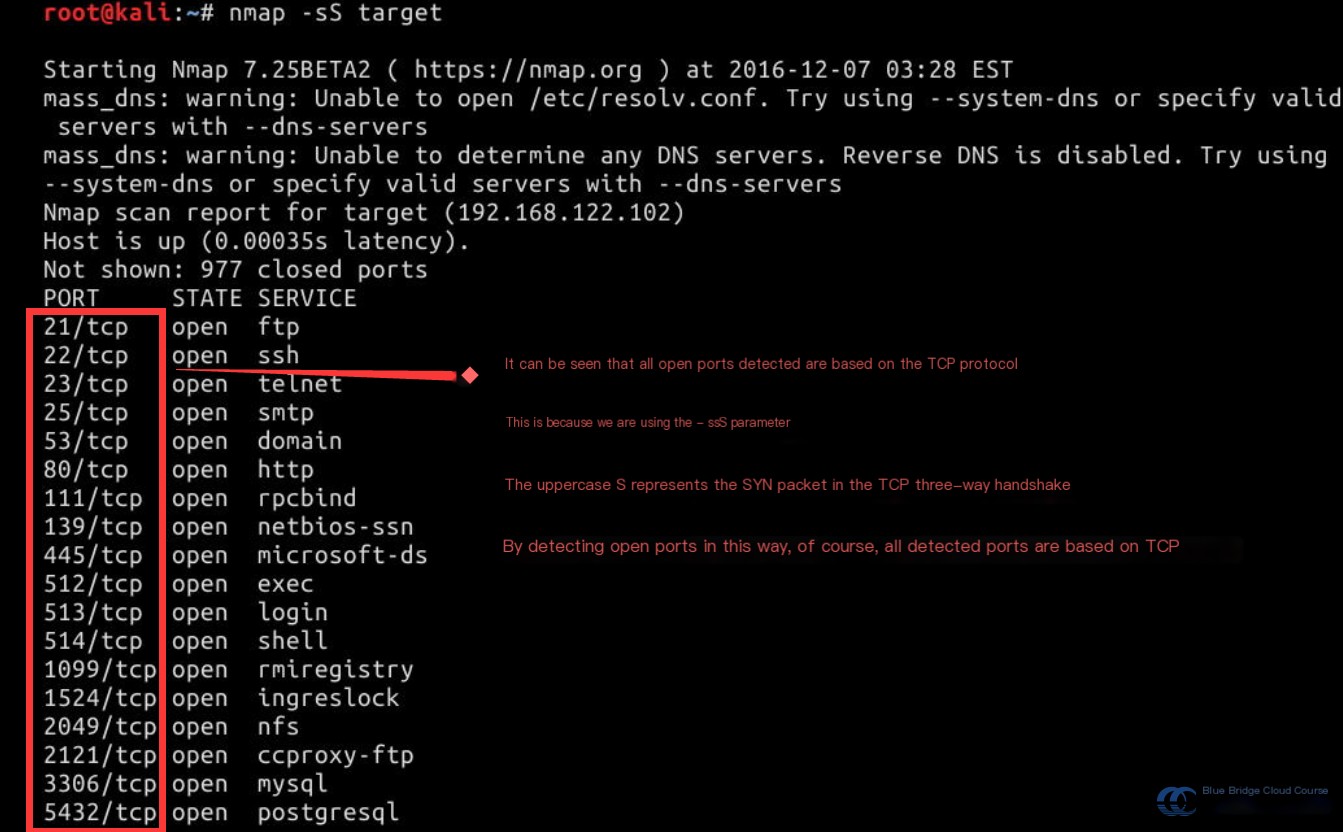
Of course, we can avoid going through so much trouble to confirm if the system is powered on by simply scanning to see if any ports are open. This kind of scan is often referred to as a “port scan”:
nmap -sS target
We can now view all the TCP-based open ports on the target machine:
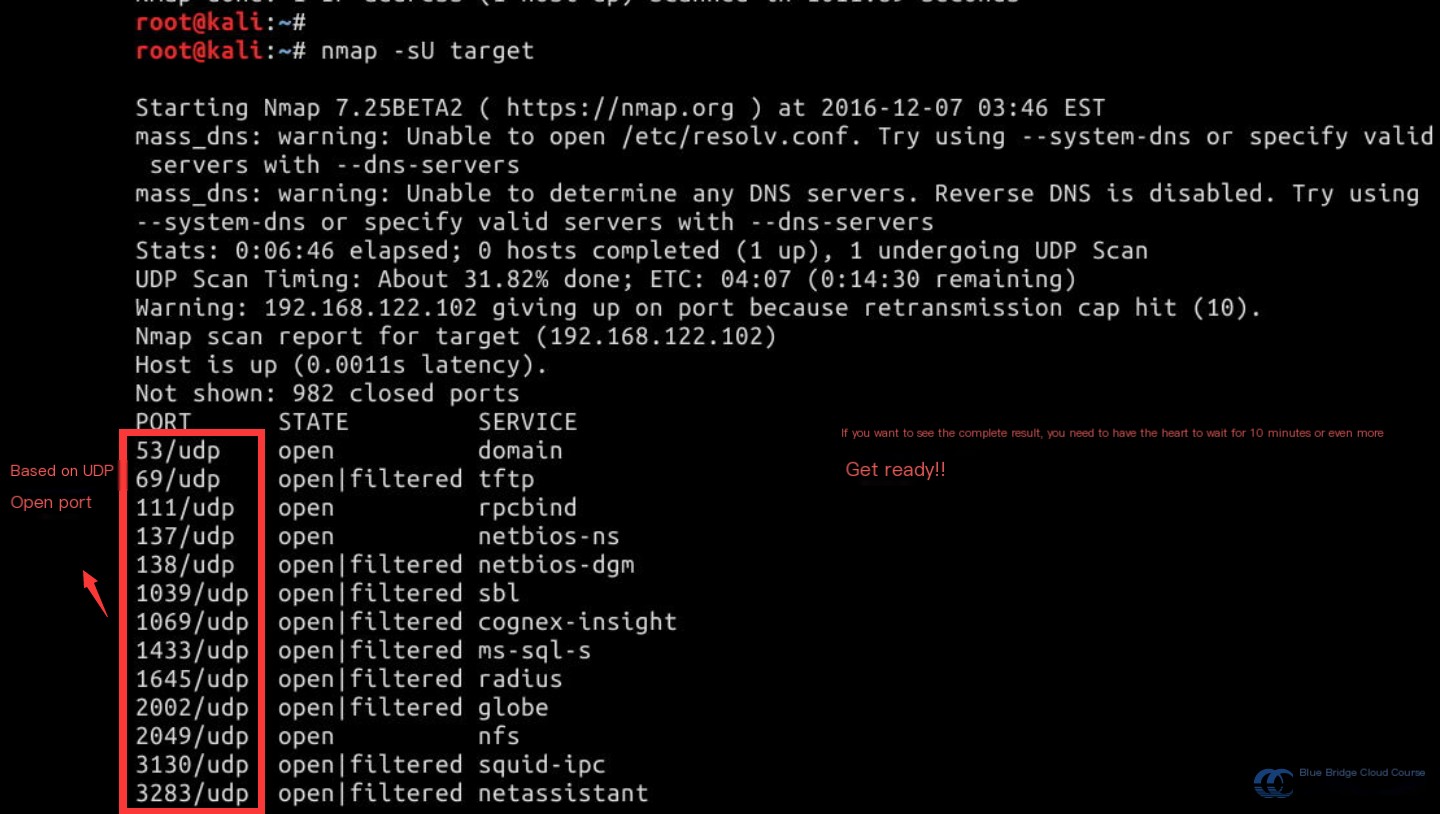
If you want to inspect UDP open ports, use the -sU parameter instead. Keep in mind, though, that scanning UDP ports is significantly slower—it may take around 10 minutes or more. To check the progress of the scan in real-time, press Enter:
nmap target -sU
Because UDP is a connectionless protocol, an open UDP port won’t return any response. However, if the port is closed, certain systems may send back a PORT_UNREACH error. Using this method, we can infer whether a UDP port is open. Since this relies on responses from specific systems, errors may arise. This explains why UDP scanning is much slower compared to TCP, where a three-way handshake quickly confirms a port’s status with response packets.
Once it’s confirmed that the system is running and has open ports, we can identify the operating system on the target platform. Since platforms like Linux, Windows, or MacOS differ significantly—and servers are generally either Linux or Windows—this step, known as “fingerprint identification,” helps determine the OS. To perform OS detection, use the following command:
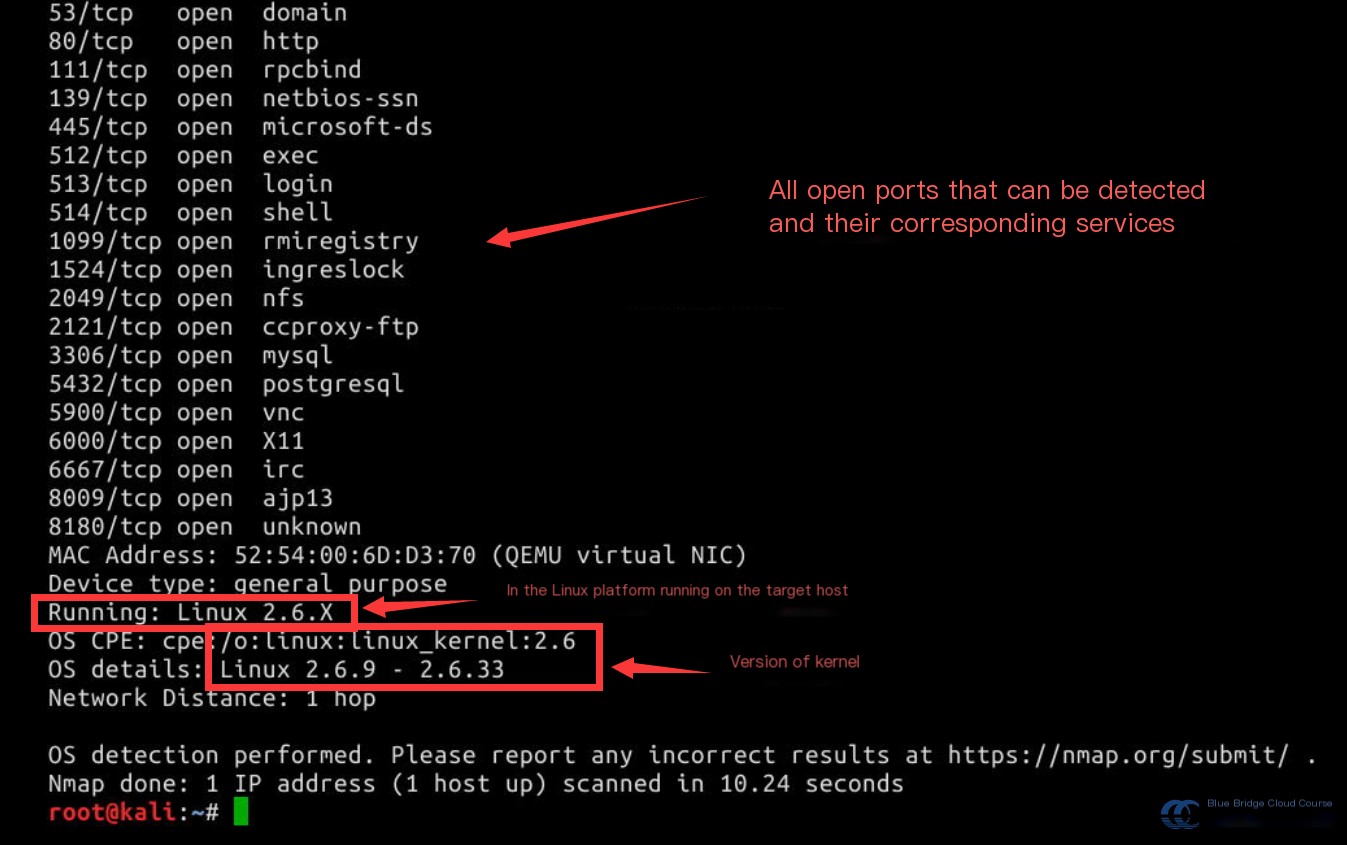
nmap -O target
The output will provide information like this:
The -O parameter enables operating system detection. As shown in the image, Nmap identifies all open ports on the target host and provides a guess of the OS type and version at the end.
Once the OS type and version are identified, the next step is service detection. While nmap -O displays protocol versions, it doesn’t reveal the specific software components implementing those protocols. For example, port 80 may support HTTP, which could be implemented by Apache, Nginx, Tomcat, Jetty, or other software—all of which can run on port 80. Different implementations may have distinct vulnerabilities, impacting the method of exploitation.
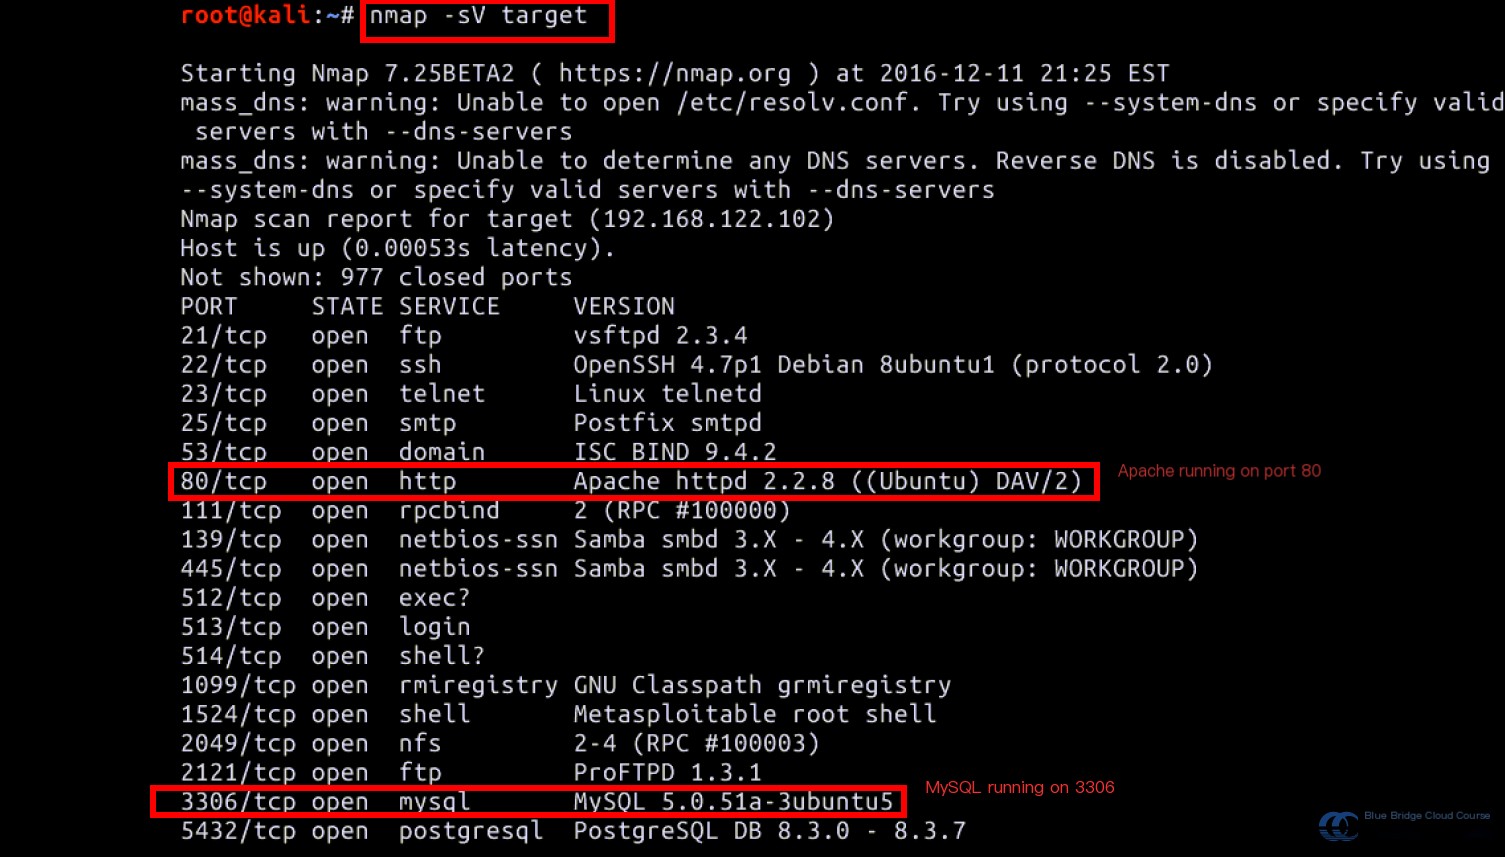
Accurately identifying services helps narrow the attack surface and increases the likelihood of success, making subsequent steps more efficient. Use the following command to detect all open ports, protocols, and their associated components:
nmap -sV target
As shown, Nmap identifies the software running on each open port. For instance, port 80 uses Apache instead of Nginx, meaning we can focus on Apache-related vulnerabilities rather than wasting effort on unrelated components.
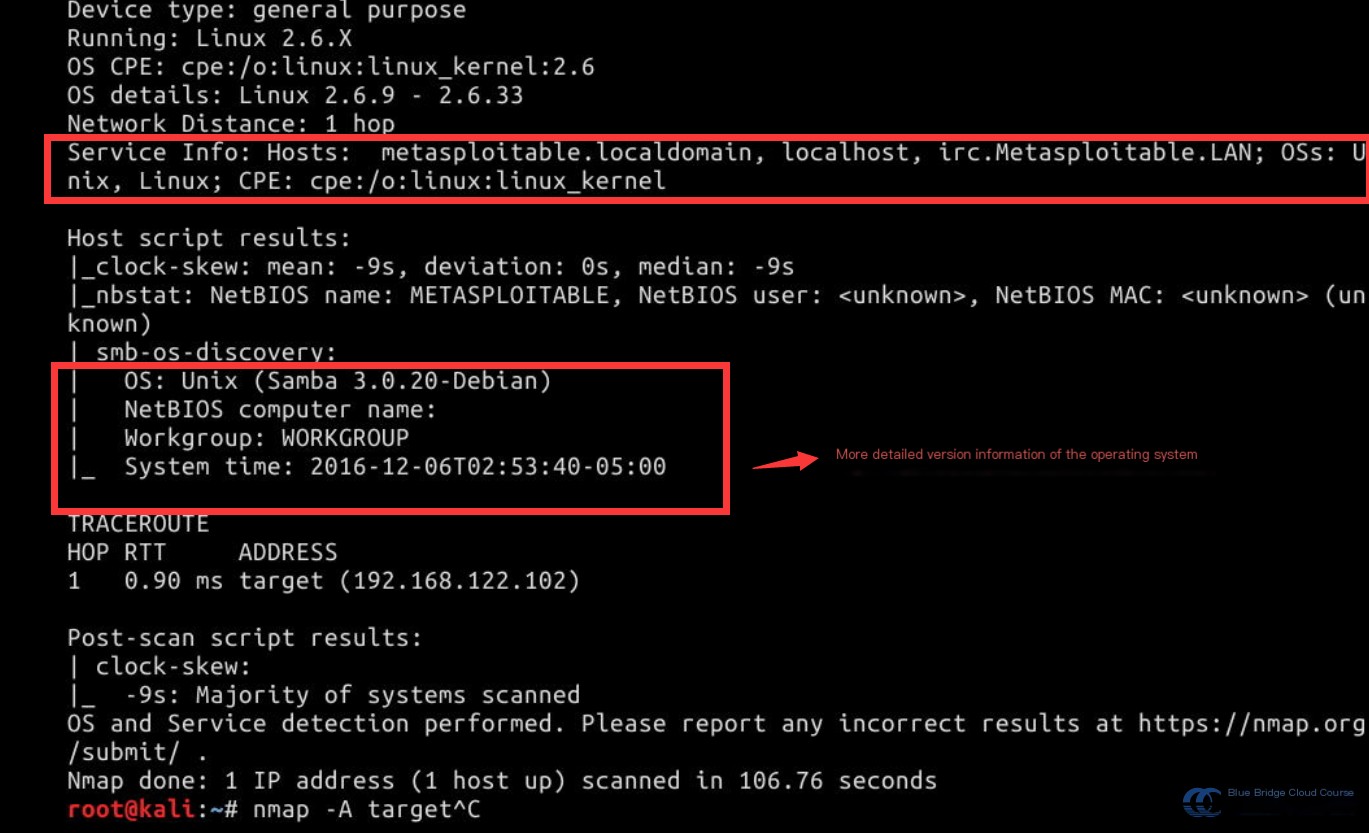
If you need more detailed OS and service information, use the -A parameter to enable both OS and service/version detection simultaneously:
nmap -A target
As you scroll through the output, you’ll notice substantially more information is displayed. This includes open ports, services running on those ports, the software versions used, and even more precise details about the target OS. The -A parameter overlaps slightly with -sV, but each emphasizes different aspects, so you can choose based on your focus.
This method provides comprehensive information, including software versions, narrowing down the scope for testing. You can even explore vulnerability databases to find exploits targeting specific software versions.
For example, in Linux kernel versions >= 2.6.22 and those before the patch released on October 18, 2016, the Dirty COW vulnerability is exploitable. If the target operating system is an outdated version, this vulnerability can be exploited to achieve privilege escalation and compromise the target host.
So, how does Nmap accomplish this? It leverages one of its most notable features: remote OS detection using TCP/IP stack fingerprinting. Nmap sends a series of TCP and UDP packets to the remote host and meticulously analyzes every bit of the responses. After performing several tests, such as TCP Initial Sequence Number (ISN) sampling, TCP option support and ordering, IPID sampling, and initial window size checks, Nmap compares the resulting data against the nmap-os-fingerprints database, which contains over 1,500 known OS fingerprints. If a match is found, detailed information about the OS is displayed. Each fingerprint includes a free-form descriptive text about the OS and classification details, such as vendor name (e.g., Sun), OS family (e.g., Solaris), OS version (e.g., 10), and device type (e.g., general-purpose, router, switch, game console, etc.). (This section is sourced from the Nmap official documentation.)
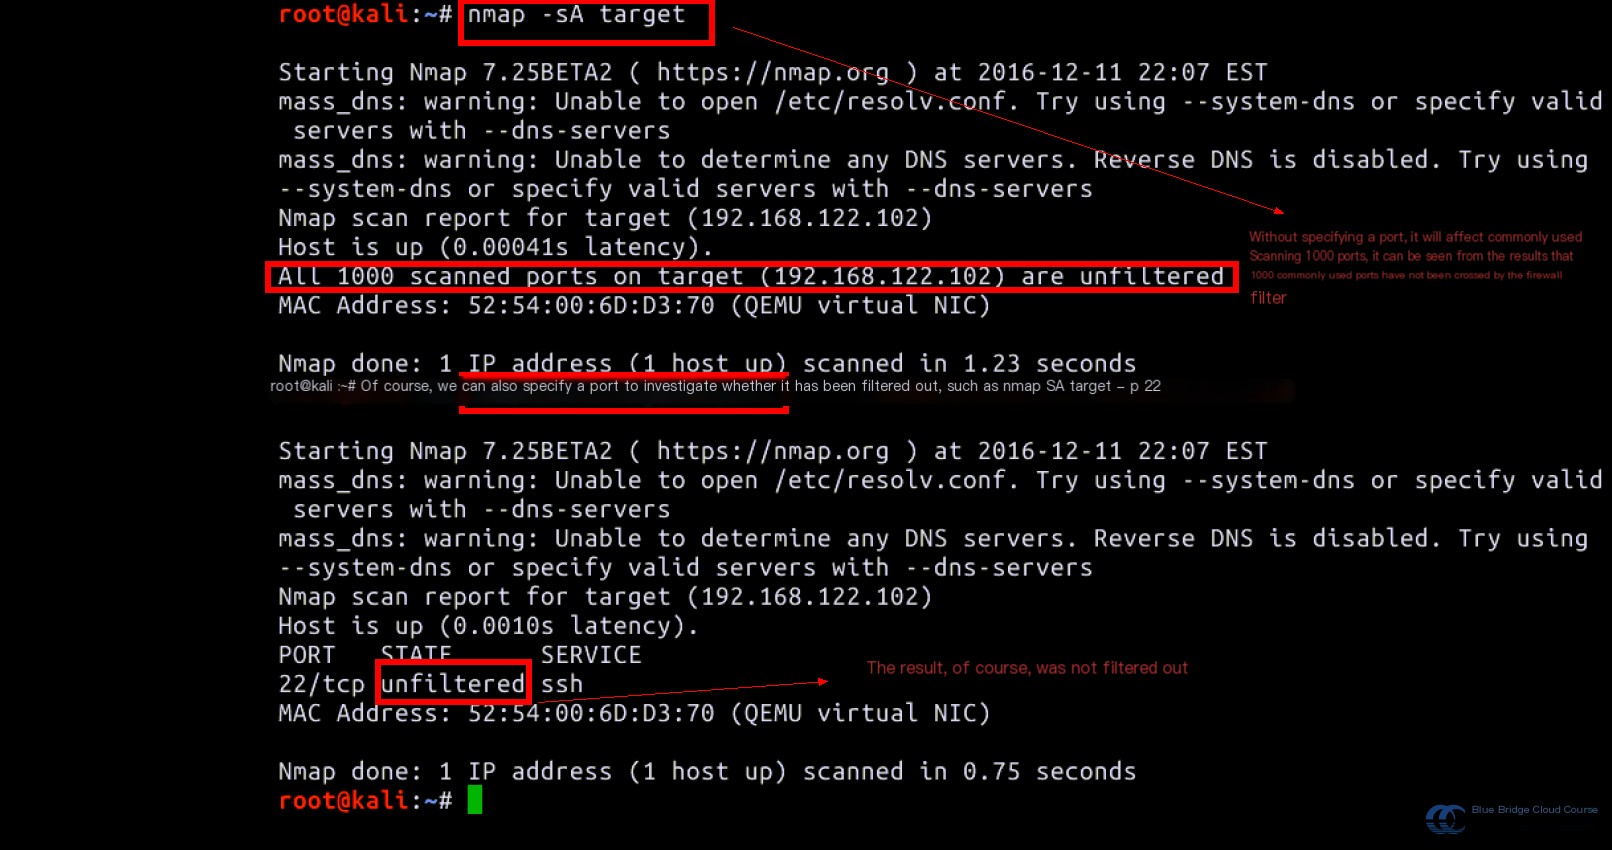
While there are methods to attack, there are also ways to defend. Beyond identifying services and operating systems, you also need to detect firewalls. You can use the following command to determine whether a target’s ports are filtered by a firewall:
nmap -sA target
How can firewall detection be achieved? The simplest way is by analyzing responses to different packets in the TCP three-way handshake to determine whether filtering is in place:
Response to SYN Packet
Response to ACK Packet
Conclusion
Responds with SYN + ACK (second handshake is possible)
Responds with RST
No stateful filtering; inbound and outbound communication is possible
Responds with SYN + ACK (second handshake is possible)
No response to ACK
Stateful filtering is in place; inbound connections are allowed, but outbound responses are blocked
No response to SYN (first handshake is not possible)
Responds with RST
Stateful filtering is in place; inbound requests are blocked, but outbound responses are allowed
No response to SYN (first handshake is not possible)
No response to ACK
No filter
Using this method, conclusions about firewall behavior can be formed based on port states. The following table summarizes port status and type:
Port State
Port Type
Description
Blocked
Closed Port
The port is in a closed state
Filtered
Filtered Port
The port is being filtered by a firewall
Allowed
Open Port (Unfiltered)
The port is open
Nmap also provides a useful parameter for scanning:
Parameter
Meaning
nmap -T0
Very slow scan, optimized for avoiding IDS (Intrusion Detection Systems)
nmap -T1
Slow scan, speeds between T0 and T2, can evade some IDS as well
nmap -T2
Reduced scanning speed, generally not used
nmap -T3
Default scanning speed
nmap -T4
Faster scan, may overwhelm the target and trigger firewalls
nmap -T5
Ultra-fast scan, sacrifices accuracy for speed
Nmap is incredibly powerful and can scan targets based on packet types and states, scan multiple IPs simultaneously, and even scan entire subnets. For more advanced use, consult the Nmap official documentation.
While we’ve seen the power of Nmap, it does come with a lot of parameters and options, making it somewhat complex. Kali Linux offers another robust tool—Metasploit.
Metasploit simplifies scanning compared to Nmap. Instead of testing every port, it focuses on services running on limited ports, making it highly efficient and faster.
Scanning using Metasploit is straightforward and involves just a few steps. For example, to scan for UDP-related ports using Metasploit:
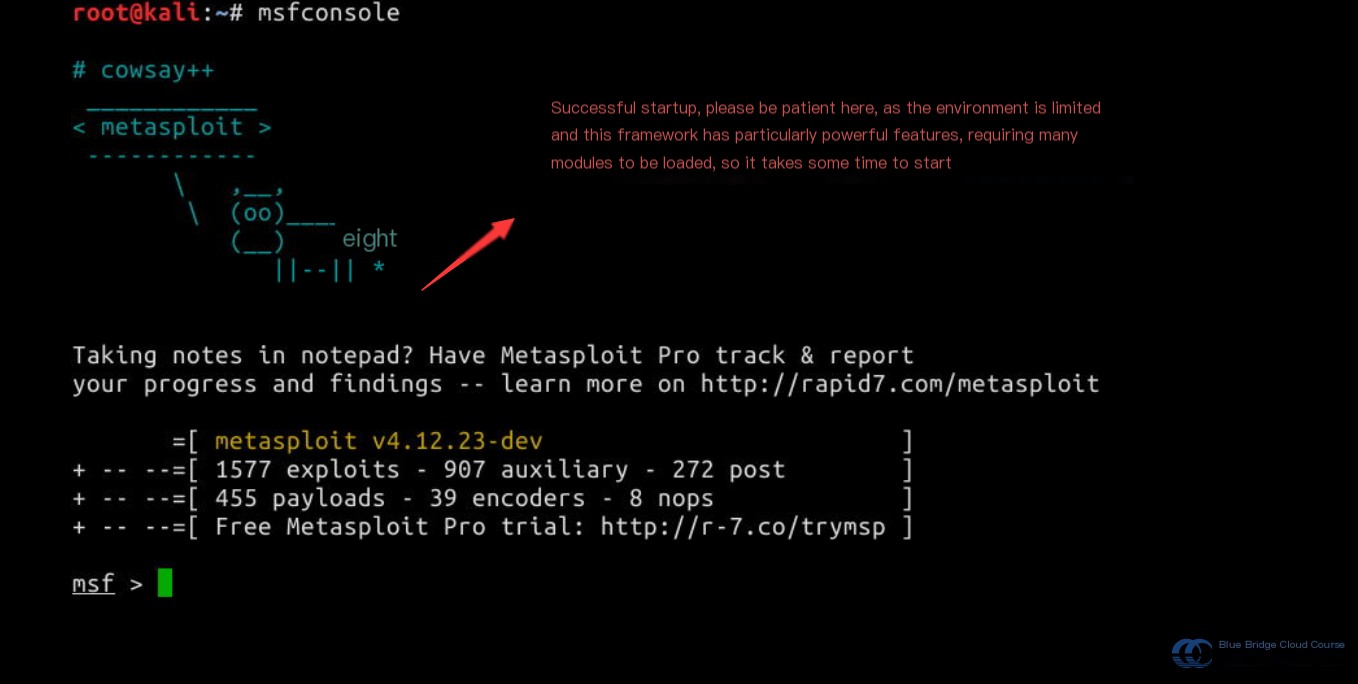
First, enter the console interface with the command:
# Launching the console may take some time. Be patient or review the following steps in advance.
root@kali:~# msfconsole
Next, use the use command to activate the desired module:
msf > use auxiliary/scanner/discovery/udp_sweep
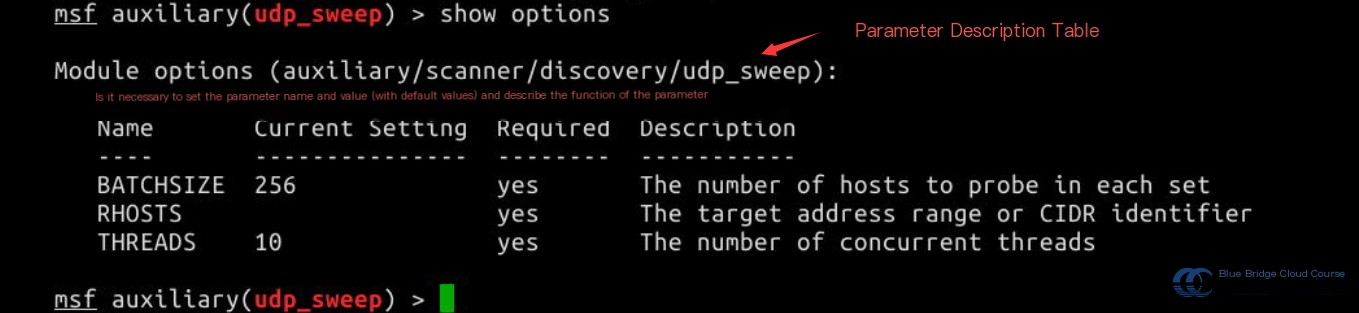
Then, use the set command to configure the required parameters. Before that, you can list the available settings with the show options command to check which parameters can or must be set:
msf auxiliary(udp_sweep) > show options
This command displays a table with all configurable parameters, including the parameter names, their current values, whether they are mandatory, and a brief description.
For instance, a required but unset parameter is RHOSTS. This parameter specifies the target host’s IP address and can be set to a single IP or an IP range. Use the set command to configure it:
msf auxiliary(udp_sweep) >Certainly! Here's the translated content in American English:

---


set RHOSTS 192.168.122.102

# If you want to set an IP range:
msf auxiliary(udp_sweep) > set RHOSTS 192.168.122.1-100


Set the parameter ` THREADS` to define the number of threads for executing commands. Increasing this value can help improve scan speed. [Insert relevant image with description: "msfconsole-set"] Finally, use the ` run` command to automatically execute the module. Once run, the results will be displayed directly below. It’s quite simple, with only four steps required. As you’ll notice, the results are presented swiftly, showing the services corresponding to ports and the UDP versions used: [Insert relevant image showing msfconsole-run and the next-step visuals "msfconsole-run.png"] This approach proves to be much more efficient than Nmap's scanning capabilities. Metasploit also includes modules for firewall identification, based on SYN/ACK response probes, to determine if ports are filtered: Step 1 is to enter Metasploit's console interface (skip this step if you're already in the interface): ## Entering the console interface takes some time. Please be patient, or preview the steps below: root@kali:~# msfconsole ImageCam setup at-this-stage---CLI scanning queueDecompiler;enums scaffolds parameter scanner.auto reviewed ref Img analytics-in-context SwitchAssistant
The site: parameter has similar parameters often used, such as:
Parameter
Description
intext
Searches the content of an article
intitle
Searches the title of a webpage
cache
Searches cached pages that may have been deleted
related
Searches for websites related to a specific one
filetype
Searches for a specific file type, such as pdf, txt, etc.
info
Searches for information about a specific website
inurl
Matches keywords within a site’s URL
define
Searches the definition of specific terms
For example, using the related parameter to find programming study websites similar to Codecademy:
related:www.codecademy.com
These are just a few basic uses; the concept itself is not complicated. However, applying it effectively can yield surprising information. With careful data collection, you can even uncover backend credentials such as usernames and passwords for systems like phpMyAdmin.
5.3 Vulnerability Scanning
Searching for vulnerabilities manually via Google or Baidu search engines can be very time-consuming and may produce no results. As a result, tools have been developed to assist in automatic vulnerability detection for target sites.
One of the most frequently used tools for vulnerability scanning is Nessus, an automated vulnerability scanning tool that provides an attractive web interface to display discovered vulnerabilities in the target system. However, due to environmental constraints, it has not been installed in the experimental setup for this guide. Interested users can set it up independently.
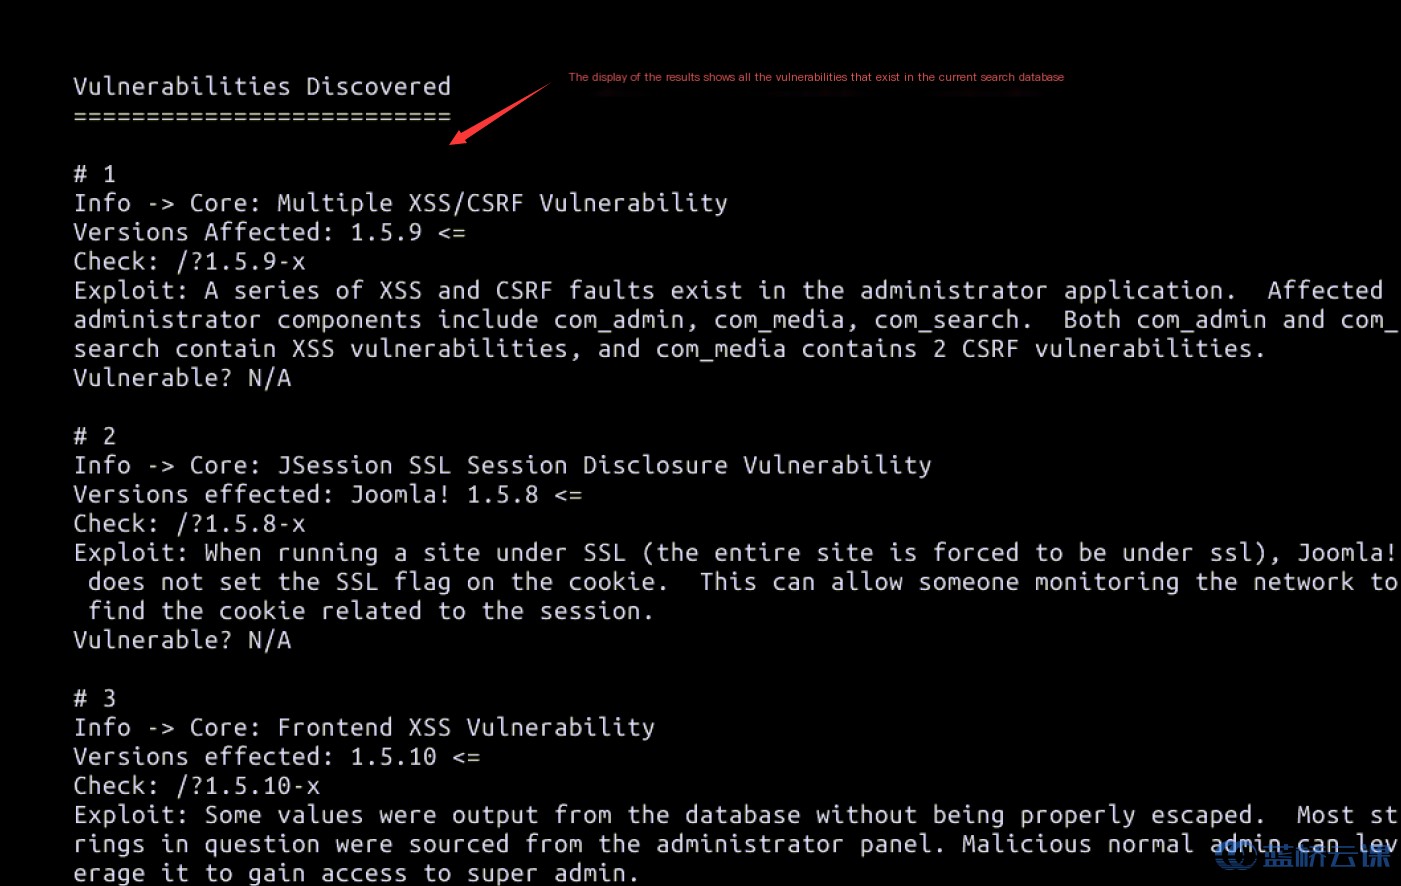
Another commonly used tool is joomscan, known as Joomla Security Scanner. It identifies vulnerabilities specific to Joomla systems and publishes results in text or HTML format reports. You can use the following command to detect vulnerabilities in target machines:
joomscan -u target
The results are then displayed:
This tool allows you to uncover most exploitable web vulnerabilities, offering explanations for each.
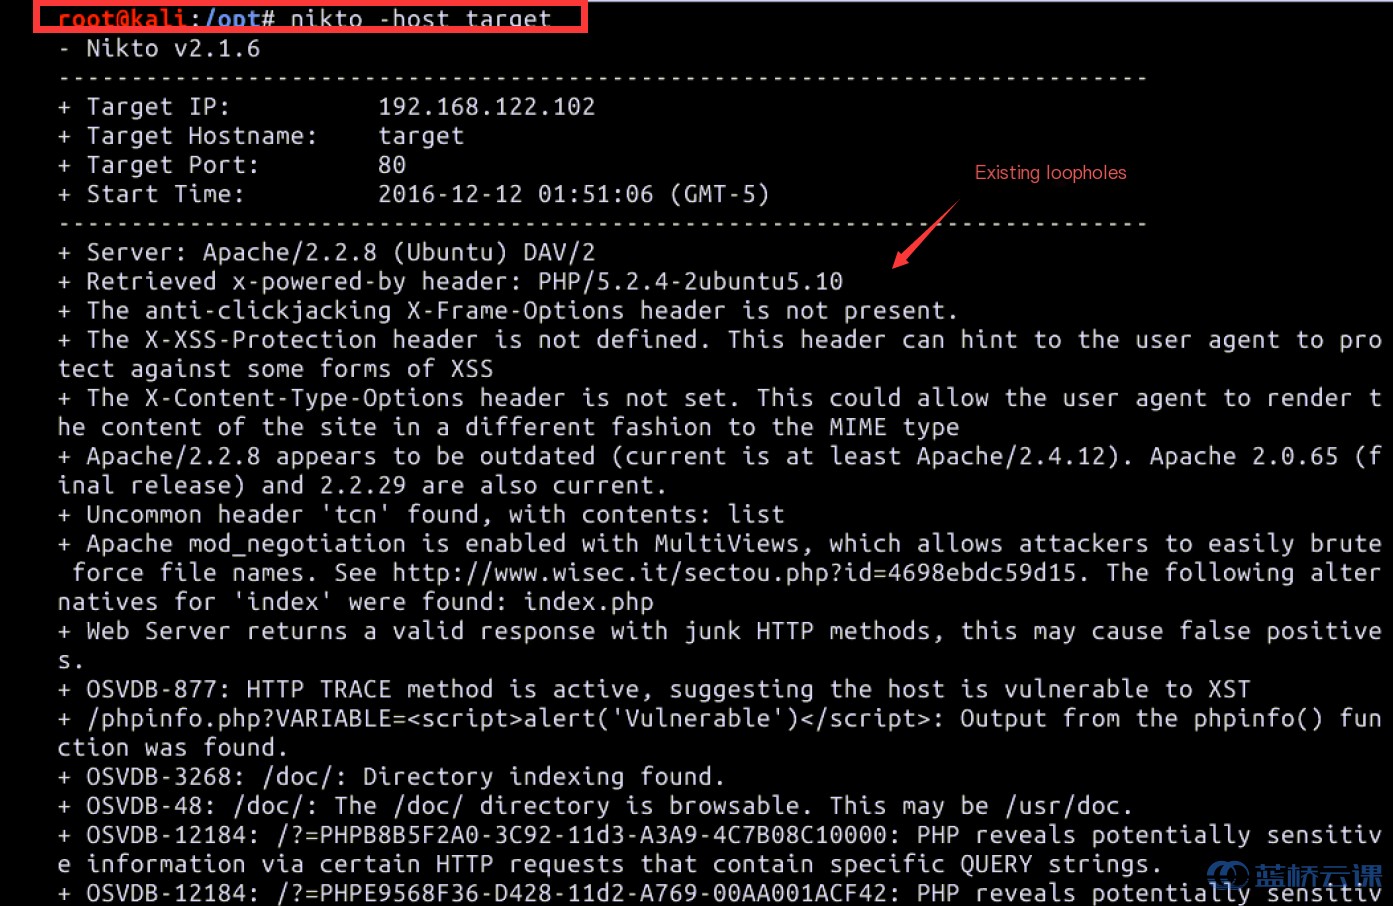
A similar tool is Nikto, an open-source Perl module that performs comprehensive scans of web servers by identifying suspicious files:
5.4 Vulnerability Validation
After scanning for vulnerabilities in a target host, the next step is to validate them. This involves exploiting vulnerabilities using methods like Python scripts or modules from the Metasploit Framework (msf). Attacking a vulnerability allows you to retrieve sensitive information or even log in to the target host to take further actions.
For instance, consider the “smiley backdoor” vulnerability in FTP. It applies only if vulnerability 2.3.4 is found during earlier information gathering. Without this precondition, the effort is futile.
The vsftpd v2.3.4 version contains a backdoor vulnerability. This backdoor appends a “smiley” to the username, binding the listener to port 6200. Using SSH on port 6200 allows access despite a rapid patch release from developers. Some systems that had this vulnerable version installed remain unpatched. (You can explore this discussion for validation: https://www.shiyanlou.com/questions/37109 )
5.5 Privilege Persistence
After successfully breaching a system and logging in, it’s crucial to establish backdoor access for future logins. This prevents the need to repeat attacks and counteracts any administrator repairs of vulnerabilities. Backdoors may take the form of webshells or other programs.
5.6 Documentation
Documenting the entire attack process is essential to briefing developers and referencing later. It also serves as a valuable learning resource for self-improvement.
6. Summary
This section’s experiment covered the following topics. For any unclear points, feel free to interact with us on the Shiyanlou Q&A forum:
Penetration testing process:
Target identification
Information gathering
Vulnerability scanning
Vulnerability validation
Privilege persistence
Documentation
Key sections focused on information gathering and vulnerability scanning. Mastery of tools like Nmap is particularly beneficial for enthusiasts aiming to explore further.
Ensure you practice hands-on experiments instead of merely reading instructions. The process of solving real-world problems is where true value lies.
12. Exercises
Practice using tools like whois and host locally to retrieve information about a site’s domain;
Use Google Hacking techniques to search for Kali-related pdf resources.