
**Note: This IDS snort experiment was tested on both Kali and CentOS 6.8. Unfortunately, I encountered difficulties during the experiment with Kali and could not complete it. However, using CentOS 6.8, I was able to finish the experiment successfully.**
Software used in the experiment:
https://download.csdn.net/download/weixin_52553215/88800055
[Experiment Objective]
Understand the basic principles of IDS;
Master the implementation of advanced IDS with Snort;
[Experiment Content]
1. Experiment Environment: Kali
2. Job Implementation: Snort
[Experiment Environment]
1. Virtual Machine Platform: VMware Workstation
2. Operating Systems: Kali, CentOS 6.8
3. Snort: An open-source intrusion detection system
[Experiment Steps]
Kali:
1. Install Kali and check the network
Installation process is omitted.
1.1 Change sources
Execute the following commands:
vim /etc/apt/sources.list
Comment out the original sources
USTC Kali mirror source
deb http://mirrors.ustc.edu.cn/kali kali-rolling main non-free contrib
deb-src http://mirrors.ustc.edu.cn/kali kali-rolling main non-free contrib
Paste the above sources into the position shown below
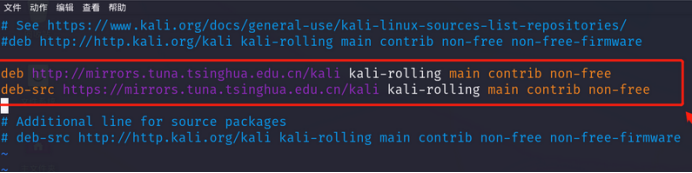
Save the configuration and exit
Execute the following commands:
apt-get update
apt-get upgrade
apt-get dist-upgrade
apt-get clean
2. Install Snort IDS
2.1 Install daq dependencies
Execute the following commands:
sudo apt-get install flex
sudo apt-get install bison
sudo apt install aptitude
sudo aptitude install libpcap-dev
2.2 Install daq
Execute the following commands:
wget https://www.snort.org/downloads/snort/daq-2.0.7.tar.gz
tar xvfz daq-2.0.7.tar.gz
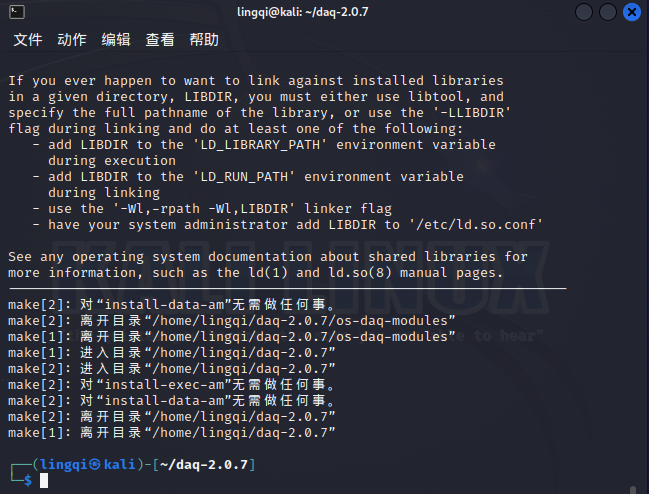
cd daq-2.0.7
./configure && make && sudo make install
make
2.3 Install Snort dependencies
Execute the following commands:
sudo su
aptitude install libpcre3-dev
aptitude install libdumbnet-dev
aptitude install zlib1g-dev
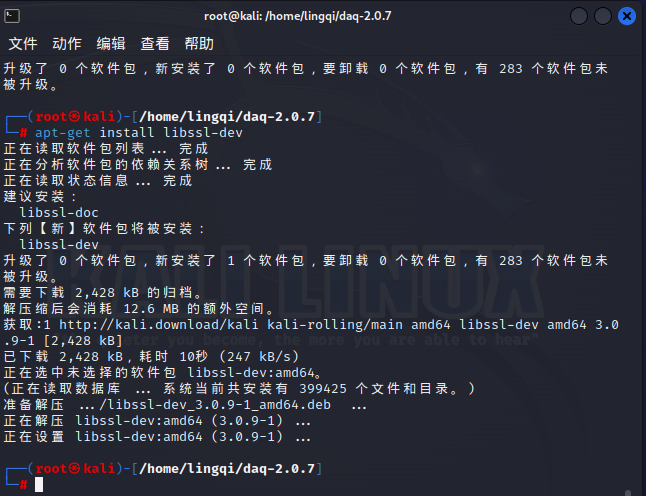
apt install openssl
apt-get install libssl-dev
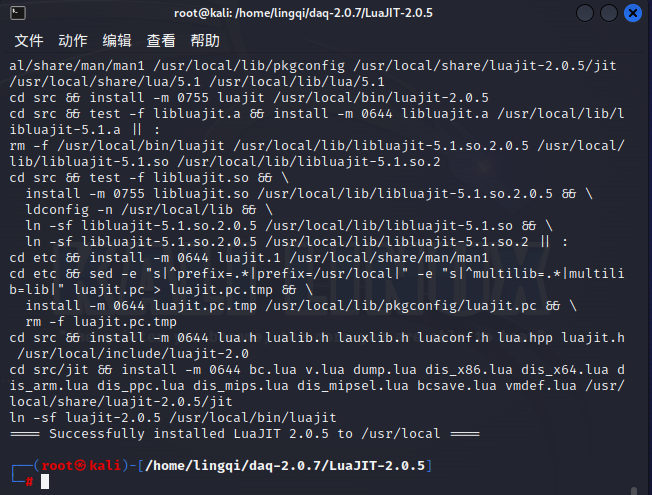
Install LuaJIT:
sudo wget http://luajit.org/download/LuaJIT-2.0.5.tar.gz
sudo tar -zxvf LuaJIT-2.0.5.tar.gz
cd LuaJIT-2.0.5/
sudo make && sudo make install
LuaJIT-2.0.5 installation complete:
2.4 Install Snort
Execute the following commands:
wget https://www.snort.org/downloads/snort/snort-2.9.20.tar.gz
tar xvfz snort-2.9.20.tar.gz
cd snort-2.9.20
./configure –enable-sourcefire && make && sudo make install
Error: fatal error: rpc/types.h: No such file or directory
Execute the following commands:
sudo apt-get install -y libtirpc-dev
sudo ln -s /usr/include/tirpc/rpc/* /usr/include/rpc
Error: fatal error: netconfig.h: No such file or directory
Execute the following commands:
sudo ln -s /usr/include/tirpc/netconfig.h /usr/include
Execute the following commands:
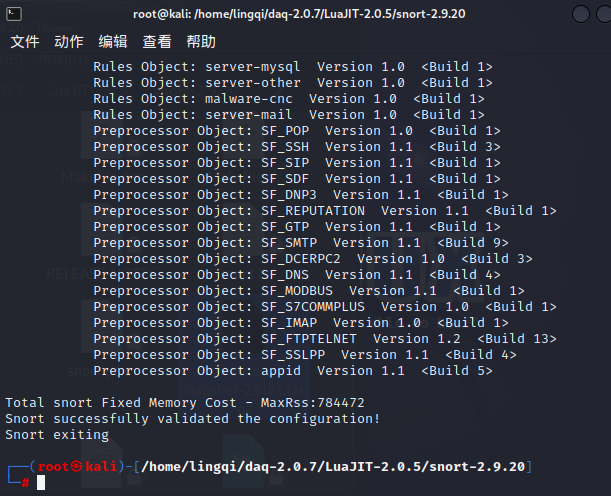
snort
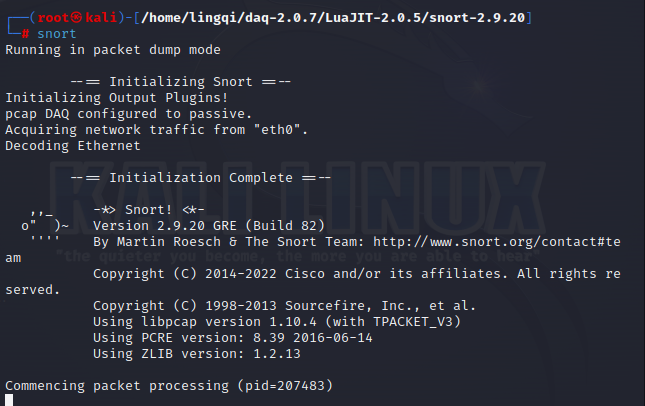
Successfully installed
3. Configure Snort
3.1 Create necessary directories
# Snort installation directory
sudo mkdir -p /etc/snort/rules/iplists
sudo mkdir -p /etc/snort/preproc_rules
sudo mkdir /usr/local/lib/snort_dynamicrules
sudo mkdir /etc/snort/so_rules
# Store filter rules and server black/white lists
sudo touch /etc/snort/rules/iplists/default.blacklist
sudo touch /etc/snort/rules/iplists/default.whitelist
sudo touch /etc/snort/rules/so_rules
# Create log directories
sudo mkdir /var/log/snort
sudo mkdir /var/log/snort/archived_logs
# Adjust permissions
sudo chmod -R 5775 /etc/snort
sudo chmod -R 5775 /var/log/snort
sudo chmod -R 5775 /var/log/snort/archived_logs
sudo chmod -R 5775 /etc/snort/rules/so_rules
sudo chmod -R 5775 /usr/local/lib/snort_dynamicrules
3.2 Copy files to /etc/snort
cd /home/lingqi/daq-2.0.7/LuaJIT-2.0.5/
cp ./snort-2.9.20/etc/*.conf* /etc/snort
cp ./snort-2.9.20/etc/*.map /etc/snort
cp ./snort-2.9.20/etc/*.dtd /etc/snort
cp ./snort-2.9.20/src/dynamic-preprocessors/build/usr/local/lib/snort_dynamicpreprocessor/* /usr/local/lib/snort_dynamicpreprocessor/
3.3 Modify default configuration
# Open the configuration file
sudo vim /etc/snort/snort.conf
# Modify paths
var RULE_PATH /etc/snort/rules
var SO_RULE_PATH /etc/snort/so_rules
var PREPROC_RULE_PATH /etc/snort/preproc_rules
var WHITE_LIST_PATH /etc/snort/rules/iplists/
var BLACK_LIST_PATH /etc/snort/rules/iplists/
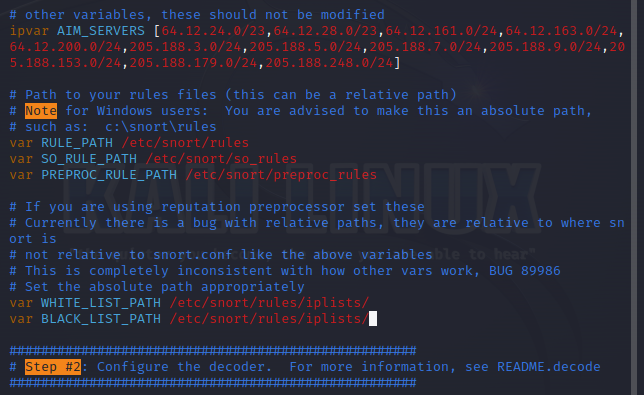
# Enable blacklist and whitelist
3.4 Install rules package
Snort – Network Intrusion Detection & Prevention System
sudo tar zxvf snortrules-snapshot-29181.tar.gz -C /etc/snort
Error:

The error message, “stdin: not in gzip format,” indicates that the file is not in gzip format. You can use the “file” command to check the file’s specific information:

It turns out that the file is an HTML document. Go back to the Snort website and download the file directly.
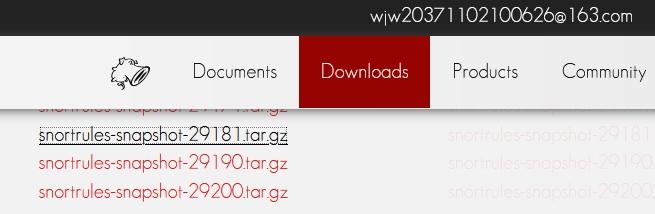
sudo tar zxvf snortrules-snapshot-29181.tar.gz -C /etc/snort
sudo cp /etc/snort/so_rules/precompiled/RHEL-8/x86-64/2.9.18.1/* /usr/local/lib/snort_dynamicrules/
4 Start Testing
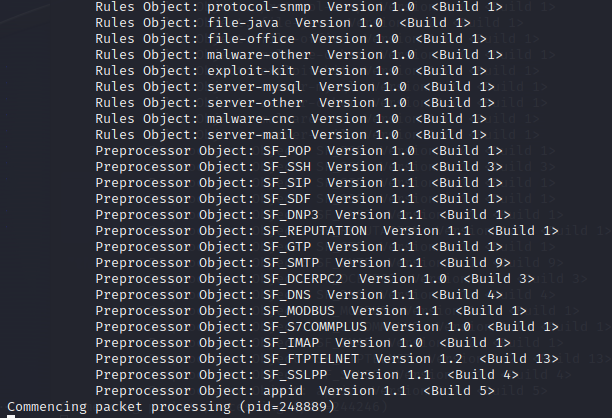
sudo snort -T -c /etc/snort/snort.conf
CentOS:
Section I: Preparation
Use the CentOS-6.8-x86_64-mini ISO to install the operating system in a virtual machine.
By default, the network IP is automatically obtained during installation, so you need to change it to a static IP address.
#ifconfig -a //Check network interface configuration
#vi /etc/sysconfig/network-scripts/ifcfg-eth0 //Edit network interface configuration file
To set a static IP address, change BOOTPROTO=dhcp to static, then add the following (configure IP based on your network environment):
IPADDR=192.168.91.128
NETMASK=255.255.255.0
GATEWAY=192.168.91.2
DNS1=192.168.91.2
DNS2=8.8.8.8 //You can add multiple DNS addresses based on your local network provider
Save and exit, then restart the network service.
1. Use the command cat /etc/issue to see your system version, note down the exact version.
2. Backup critical files to ensure you can revert if something goes wrong.
1.mkdir /etc/yum.repos.d/bakk //Create a directory
2.mv /etc/yum.repos.d/* /etc/yum.repos.d/bakk //Ignore any errors
3. Open the CentOS-Base.repo configuration file.
vim /etc/yum.repos.d/CentOS-Base.repo
Clear its content!
Copy the following code into it:
Note: If your system version is not 6.7, replace “6.7” in the 5 “baseurl” lines with your system’s version.
# CentOS-Base.repo
#
# The mirror system uses the client’s IP address and the
# update status of each mirror to select mirrors that are up-to-date and
# geographically close to the client. Use this for CentOS updates
# unless you are manually selecting other mirrors.
#
# If the mirrorlist= option does not work for you, as a fallback you can use the
# remarked out baseurl= line instead.
#
#
[base]
name=CentOS-$releasever – Base
#mirrorlist=http://mirrorlist.centos.org/?release=$releasever&arch=$basearch&repo=os&infra=$infra
#baseurl=https://mirrorlist.centos.org/centos/$releasever/os/$basearch/
baseurl=https://mirrors.aliyun.com/centos-vault/6.7/os/$basearch/
gpgcheck=1
gpgkey=file:///etc/pki/rpm-gpg/RPM-GPG-KEY-CentOS-6
#released updates
[updates]
name=CentOS-$releasever – Updates
#mirrorlist=http://mirrorlist.centos.org/?release=$releasever&arch=$basearch&repo=updates&infra=$infra
#baseurl=https://mirrors.tuna.tsinghua.edu.cn/centos-vault/$releasever/updates/$basearch/
baseurl=https://mirrors.aliyun.com/centos-vault/6.7/updates/$basearch/
gpgcheck=1
gpgkey=file:///etc/pki/rpm-gpg/RPM-GPG-KEY-CentOS-6
#additional packages that may be useful
[extras]
name=CentOS-$releasever – Extras
#mirrorlist=http://mirrorlist.centos.org/?release=$releasever&arch=$basearch&repo=extras&infra=$infra
#baseurl=https://mirrors.tuna.tsinghua.edu.cn/centos-vault/$releasever/extras/$basearch/
baseurl=https://mirrors.aliyun.com/centos-vault/6.7/extras/$basearch/
gpgcheck=1
gpgkey=file:///etc/pki/rpm-gpg/RPM-GPG-KEY-CentOS-6
#additional packages that extend functionality of existing packages
[centosplus]
name=CentOS-$releasever – Plus
#mirrorlist=http://mirrorlist.centos.org/?release=$releasever&arch=$basearch&repo=centosplus&infra=$infra
#baseurl=https://mirrors.tuna.tsinghua.edu.cn/centos-vault/$releasever/centosplus/$basearch/
baseurl=https://mirrors.aliyun.com/centos-vault/6.7/centosplus/$basearch/
gpgcheck=1
enabled=0
gpgkey=file:///etc/pki/rpm-gpg/RPM-GPG-KEY-CentOS-6
#contrib – packages by Centos Users
[contrib]
name=CentOS-$releasever – Contrib
#mirrorlist=http://mirrorlist.centos.org/?release=$releasever&arch=$basearch&repo=contrib&infra=$infra
#baseurl=https://mirrors.tuna.tsinghua.edu.cn/centos-vault/$releasever/contrib/$basearch/
baseurl=https://mirrors.aliyun.com/centos-vault/6.7/contrib/$basearch/
gpgcheck=1
enabled=0
gpgkey=file:///etc/pki/rpm-gpg/RPM-GPG-KEY-CentOS-6
4. Clean the yum cache.
yum clean all
5. Cache the server’s software package information locally to improve the speed of searching and installing software.
yum makecache
At this point, yum functionality should be successfully enabled.
#yum -y update //Update the system, this may take a while
Step 6. Copy software to the specified directory.
Use WinSCP to copy the files libdnet-1.12.tgz, daq-2.0.4.tar.gz, snort-2.9.7.0.tar.gz, and snortrules-snapshot-2970.tar.gz to the /usr/local/src/ directory in the CentOS 6.8 system.

Following these six steps, the preparation for Snort installation is complete.
2. Compile and Install Snort
Once the preparations are complete, proceed with the official installation of Snort. The compilation and installation of Snort require the following 10 steps.
Step 1. Install essential environment and dependency packages.
#yum install -y gcc gcc-c++ flex bison zlib-devel zlib-static libxml2 libpcap pcre-devel pcre-static libpcap-devel.x8664 tcpdump git libtool curl man make
Note, if pcre is not installed, the pre-compilation will encounter the following problem, for example, when we execute ./configure, the error message is as follows:
ERROR! Libpcre library not found, go get it from http://www.pcre.org
Step 2. Unpack libdnet, DAQ, and Snort installation packages.
During the server’s installation configuration process, many may download the latest source package from the official website, but it may encounter various missing dependency issues, causing installation failure. Because some software (like Snort) needs the DAQ (Data Acquisition) library installed first before proceeding with the installation, and DAQ can only be installed after libdnet is installed. Otherwise, it will report an error indicating missing dependency files. The specific operations are as follows:
#cd /usr/local/src
#tar -zxvf libdnet-1.12.tgz
#tar -zxvf daq-2.0.4.tar.gz
#tar -zxvf snort-2.9.7.0.tar.gz
The following packages must be installed in sequence: libdnet, DAQ, and Snort.
● Install libdnet-1.12.tgz.
#cd /usr/local/src/libdnet-1.12/
#./configure
#make && make install
● Install DAQ.
wget http://www.tcpdump.org/release/libpcap-1.0.0.tar.gz
tar xvfz libpcap-1.0.0.tar.gz
cd libpcap-1.0.0/
./configure
make
make install
#cd daq-2.0.4
#./configure
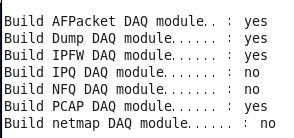
After the compilation environment check is complete, you can see the states of AFPacket DAQ module, Dump DAQ module, IPFW DAQ module, and PCAP DAQ module are all “yes”. Only then can you continue compiling the software package.
#make && make install //Compile and install
● Install Snort 2.9 (make sure to correctly install libdnet, DAQ, and zlib before installing Snort).
#cd /usr/local/src/snort-2.9.7.0
#./configure –enable-sourcefire
#make && make install
There should be no error messages during compilation before proceeding with installation.
Step 3. Add user and group.
Create user and group, and set permissions. Since the files uncompressed with the root identity are all related to root, they need to be changed to the Snort user’s owner and related permissions.
#groupadd -g 40000 snort //Add a new Snort group
#useradd snort -u 40000 -d /var/log/snort -s /sbin/nologin -c SNORT_IDS -g snort
//Add Snort user to the Snort group, create the directory /var/log/snort, and disallow system login
Step 4. Configure Snort.
● Create a new directory /etc/snort/.
#mkdir /etc/snort/
● Unpack snortrules-snapshot-2970.tar.gz into /etc/snort/ directory.
#cd /etc/snort
#tar –zxvf /usr/local/src/snortrules-snapshot-2970.tar.gz –C . (This step is crucial, unpack to the current directory)
After executing this command, four directories will be generated under the /etc/snort/ directory: etc, preproc_rules, rules, and so_rules.
#cp /etc/snort/etc/sid-msg.map /etc/snort
● Unzip the downloaded Snort package (snort-2.9.7.0.tar.gz), and copy it to the /etc/snort/ directory after uncompressing.
#cd /etc/snort/
#cp /usr/local/src/snort-2.9.7.0/etc/* .
● Set owner and group for the directory /etc/snort and all its files.
#chown -R snort:snort *
● Create whitelist and blacklist rule files.
#touch /etc/snort/rules/white_list.rules /etc/snort/rules/black_list.rules
Create two files named white_list.rules and black_list.rules under /etc/snort/rules directory.
● Edit the configuration file snort.conf and modify the following lines.
#vi /etc/snort/snort.conf
● Configure Variables in Snort.conf
There are many variables and options in the snort.conf configuration file, which apply to all rules in the rules directory. As beginners, the two most important variables to master are:
$HOME_NET: The network you want to monitor (expressed in CIDR format).
$EXTERNAL_NET: The external, untrusted network.
The default values of these two variables are both “any”, simply understood as “monitoring everything by default”. However, we need to make appropriate modifications. Below we set the network variable, the first thing is to change the line 45 ipvar HOME_NET any to ipvar HOME_NET 192.168.x.x segment, and write it in CIDR format. You can also add multiple network segments, in this experiment, the monitored segment is 192.168.11.0/24, as shown in the example below.
ipvar HOME_NET [192.168.11.0/24] // If unrestricted, the segment address can also be changed to “any”
Change line 48 ipvar EXTERNAL_NET any to ipvar EXTERNAL_NET $HOME_NET
If the current segment also has DNS, SMTP, HTTP, SQLServer, and SSH services, we recommend defining variables as follows.
ipvar DNS_SERVERS $HOME_NET
ipvar SMTP_SERVERS $HOME_NET
ipvar HTTP_SERVERS $HOME_NET
ipvar SQL_SERVERS $HOME_NET
ipvar SNMP_SERVERS $HOME_NET
ipvar SSH_SERVERS $HOME_NET
…
Note: Modifying $HOME_NET and $EXTERNAL_NET variables is not mandatory. For beginners, the default value ‘any’ can be used.
But the relative rule paths below must be changed to absolute paths, otherwise, an error will occur when starting Snort.
Line 104 var RULE_PATH ../rules Change to var RULE_PATH /etc/snort/rules
Line 105 var SO_RULE_PATH ../so_rules Change to var SO_RULE_PATH /etc/snort/so_rules
Line 106 var PREPROC_RULE_PATH ../preproc_rules Change to var PREPROC_RULE_PATH /etc/snort/preproc_rules
Line 113 var WHITE_LIST_PATH ../rules Change to var WHITE_LIST_PATH /etc/snort/rules
Line 114 var BLACK_LIST_PATH ../rules Change to var BLACK_LIST_PATH /etc/snort/rules
● Set the log save path.
Line 186 config logdir:/var/log/snort/
● Configure output plugins.
Snort can use database plugins (spo_database.c and spo_database.h) to write preprocessor output logs to the database. But the following configuration writes alerts to the alert file and writes preprocessor output logs to unified2 format binary files for Barnyard2 to read and use.
Change Line 521 to:
output unified2:filename snort.log,limit 128
Remember to remove the comment annotations when making the above modifications. After completing modifications, save and exit. The snort.conf configuration file modification is now finished. Proceed to the next step.
Step 5. Create the snort_dynamicrules directory and set owner and group permissions.
#mkdir -p /usr/local/lib/snort_dynamicrules
#chown -R snort:snort /usr/local/lib/snort_dynamicrules
#chmod -R 755 /usr/local/lib/snort_dynamicrules
Step 6. Create a symbolic link named Snort in the /usr/sbin/ directory.
#cd /usr/sbin
#ln -s /usr/local/bin/snort snort
Step 7. Add test rules.
Although many rule files were copied when installing Snort, the rules in these files are all commented out by default. Ignore these commented-out rules for now. Next, we will write a rule.
#vi /etc/snort/rules/local.rules
Add the following content:
alert icmp any any -> $HOME_NET any (msg:”ICMP Packet Detected”;sid:1000003;rev:1;)
Save and exit to complete the writing of the first detection rule.
Step 8. Test Snort.
#snort -T -i eth0 -u snort -g snort -c /etc/snort/snort.conf
Note: The parameter “-T” here means that Snort will exit the program after completion of the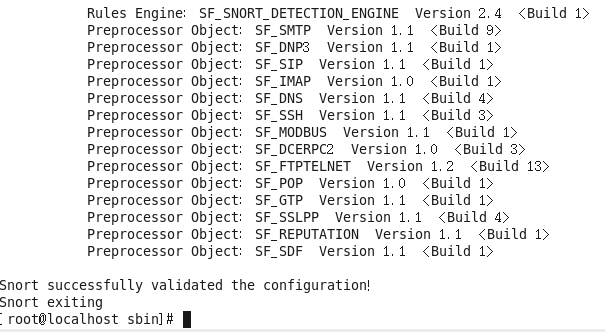
If you see the message “Snort successfully validated the configuration!”, it means the installation and configuration were successful.
Step 9: Test with the ping command.
The purpose of testing with the ping command is to generate alerts in Snort. The ping command uses the ICMP protocol, and IDS captures ICMP packets using the libpcap function. Here’s how to proceed on the Snort host:
#snort -i eth0 -c /etc/snort/snort.conf -A fast
Note: The -A fast option in the above command has the following meaning.
-A fast: This parameter includes the following information in the alert:
timestamp
alert message
source/destination IP address
port
After entering the above command, alert records are stored in /var/log/snort/alert and /var/log/snort/snort.log.timestamp (this is a binary file storing packets, which cannot be read with the tail command). Use the following command to view the alert directly.
#cd /var/log/snort/
#tail -f /var/log/snort/alert //View alerts
Example:
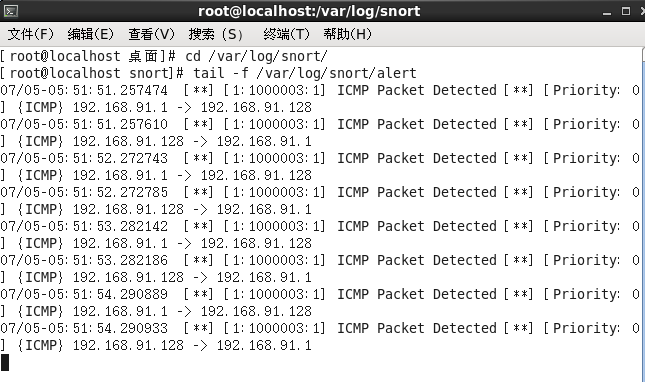
/var/log/snort/alert is a text file, which can be viewed with any editor.
Next, we will store these alerts in the database.
Note: If the correct path is not set in steps 6 or 7 mentioned above, you will encounter a fatal error when starting Snort, causing the program to exit abnormally due to missing dynamic rules files.
ERROR: parser.c (5047)
Further Understanding: Understanding the /etc/snort/sid-msg.map file is very important. The signature represents a standardized list of alerts, where the alert event information is standardized by assigning rule numbers (sig_id), rule descriptions (sig_name), rule classification numbers (sig_class_id), rule priority (sig_priority), rule version number (sig_rev), and the internal number within Snort (sig_sid; sig_gid).
The specific content of sig_class_id and sig_priority is contained in the classification.config file, and sid_sid and sid_gid map a message in the /etc/snort/gen-msg.map file to a Snort rule.
Explanation of classification:
The classification.config file comes from the snortrules-snapshot-2970.tar.gz package.
Here, the term classification means incident categorization. The installation package downloaded from the Snort website includes a manual with a detailed classification table.
In Snort, it records the classification of intrusion signatures. Each intrusion signature’s classification is designated by specifying the classification attribute value when writing the corresponding Snort rule.
The classification.config file is referenced by both the /etc/snort/snort.conf and /etc/snort/barnyard2.conf configuration files.
During the BASE debugging experiment later, we’ll see the classification being used again.
Additionally, as a baseline user, it’s important to understand that Snort reserves numbers 1–1,000,000 as its internal identifiers, and numbers above 1,000,000 are available for user-defined use. This is a convention, not a requirement, so when writing your own rules, you need to add your own rule numbers and messages to the sid-msg.map file. Properties like sig_reference and sig_class expand on their respective sig_id and sig_class_id attributes.
3. Storing Snort Alerts in MySQL Database
Storing Snort alerts in a MySQL database involves the following steps:
Step 1: Install MySQL database and PHP extensions.
#yum install -y mysql-server mysql-devel php-mysql php-pear php-gd libtool php-imap php-ldap php-odbc php-xml php-pecl-apc
#chkconfig –level 235 mysqld on //Set MySQL service to start at run levels 2, 3, and 5
#/etc/init.d/mysqld start
Step 2: Set a password for the root database administrator (for debugging convenience, use a simple numeric password 123456).
#/usr/bin/mysqladmin -u root password ‘123456’
Note, when the root user logs into phpMyAdmin, the same password will be used.
Step 3: Create the Snort database and set read permissions.
#mysql -u root -p //Connect to MySQL
Enter the password “123456” set in step 2.
mysql> CREATE DATABASE snort; //Create a new database
mysql> USE snort;
mysql> CREATE USER ‘snort’@’localhost’ IDENTIFIED BY ‘123456’;
In the above commands, “123456” is the password for the MySQL user Snort.
Next, create a user named snort with password “123456” and grant permissions to the snort database.
Before proceeding, extract barnyard2-1.9.tar.gz to /usr/local/src/.
#tar -zxvf /usr/local/src/barnyard2-1.9.tar.gz -C /usr/local/src/
Grant user snort database operation permissions
mysql> GRANT CREATE, SELECT, UPDATE, INSERT, DELETE ON snort.* TO snort@localhost IDENTIFIED BY ‘123456’;
mysql> SET PASSWORD FOR ‘snort’@’localhost’=PASSWORD(‘123456’); //Set the user snort’s access password
mysql> SOURCE /usr/local/src/barnyard2-1.9/schemas/create_mysql; //Create the database structure by importing the create_mysql file. This command cannot be repeated; during the BASE setup step, additional tables will be written into the snort database.
After running the create_mysql script, verify the configuration by running the following SQL statements at the MySQL prompt:
mysql> SHOW TABLES;
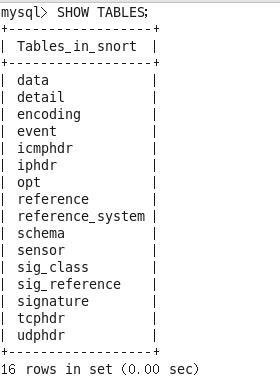
Seeing the above tables confirms successful operation, so we can proceed.
mysql> FLUSH PRIVILEGES; //Refresh database privileges
mysql> exit
Note: Use absolute paths when importing mysql database tables from barnyard2-1.9. We are now entering the most error-prone stage.
Step 4: Install and configure Barnyard2.
Barnyard2 is used to read binary event files produced by Snort (/var/log/snort/snort.log.XXXXXXXXXX) and store them in MySQL. Snort’s configuration file includes plugins to record Snort alerts in MySQL; however, this can lead to a significant data increase. When the IDS detects an intrusion, it writes data to the database using INSERT statements, which can be very slow. Therefore, directly outputting to the database can be inefficient with large data volumes, prompting the use of an external agent to output alerts to Barnyard2.
● Source package installation.
Re-enter the barnyard2-1.9/ directory
#cd /usr/local/src/barnyard2-1.9/
#./configure –with-mysql –with-mysql-libraries=/usr/lib64/mysql //Ensure configuration parameters are correct to avoid errors
#make
If compilation errors occur, identify and resolve them based on the error messages.
#make install
● Configure Barnyard2.
After Barnyard2 is properly installed, create the Barnyard2 directory and the barnyard2.waldo file in /var/log/.
#mkdir /var/log/barnyard2
#touch /var/log/snort/barnyard2.waldo
● Set the owner and group for the barnyard2.waldo file.
#chown snort:snort /var/log/snort/barnyard2.waldo
● Copy Barnyard2’s configuration file.
Similar to Snort configuration, Barnyard2’s initial setup involves copying an existing .conf configuration file. Therefore, copy Barnyard2’s configuration template to the /etc/snort directory.
#cp /usr/local/src/barnyard2-1.9/etc/barnyard2.conf /etc/snort
● Edit the barnyard2.conf configuration file.
#vi /etc/snort/barnyard2.conf
Locate the relevant lines and modify them as follows:
Line 44: config logdir:/var/log/barnyard2 //Ensure the directory owner and group are set to snort.snort, as incorrect settings will lead to failure.
Line 56: config hostname: localhost
Line 57: config interface: eth0
Line 131: config waldo_file:/var/log/snort/barnyard2.waldo
The following line sets database access permissions with the username snort, password 123456, database name snort, and host localhost.
Line 318: output database: log, mysql, user=snort password=123456 dbname=snort host=localhost
Save and exit the editor after making the necessary changes. The modification of the barnyard2.conf file is now complete.
● Change the owner and group of the directory.
#chown snort:snort /var/log/barnyard2
● Start Snort and Barnyard2 for combined testing
#snort -q -u snort -g snort -c /etc/snort/snort.conf -i eth0 –D
After executing this command, only the following three lines of information will appear:
Spawning daemon child…
My daemon child 12903 lives…
Daemon parent exiting (0)
Snort is quietly running in the background (the “-D” parameter indicates running as a background process).
● Testing Barnyard2.
The following command is used to test whether the Barnyard2 program can run normally.
#barnyard2 -c /etc/snort/barnyard2.conf -d /var/log/snort/ -f snort.log -w /var/log/snort/barnyard2.waldo -g snort -u snort -T
The output information from this command is as follows:
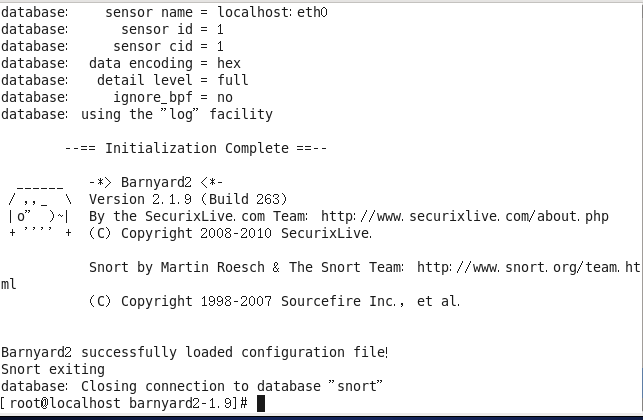
If your machine shows the above information, it means the program can run normally. Only then can we continue with the following steps.
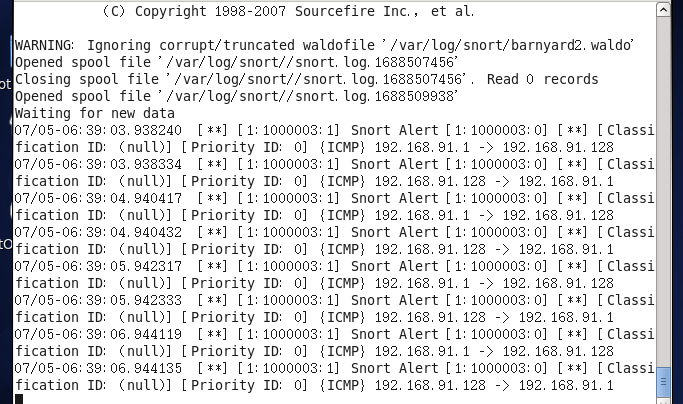
Similarly, ping the host to formally start the barnyard2 program, and continue executing the following command.
#barnyard2 -c /etc/snort/barnyard2.conf -d /var/log/snort/ -f snort.log -w /var/log/snort/barnyard2.waldo
The explanation of the command parameters is as follows.
● -c: This option specifies the path to the Barnyard configuration file. This parameter is required.
● -d: Specifies the path of the Unified format files. Here it is specified as /var/log/snort/, and all Unified files must be placed in this directory. This parameter is required.
● -f: This option specifies the name of the Unified file when Barnyard runs continuously. Snort adds a UNIX timestamp to each generated Snort Unified file; the filename is what remains after removing the timestamp suffix.
According to the command execution results, alert files will be generated in the /var/log/snort/ directory. You can see that the format of the alert files is snort.log.timestamp. And why must the format be snort.log.XXXXXXX? This is because, in Step 5 of configuring snort.conf, we set a syntax line:
output unified2:filename snort.log,limit 128
This defines the format of the output alert file. If you want to change snort.log.XXXXX to unified2.alert.XXXXXX, please modify it according to the following syntax:
output unified2:filename unified2.alert,limit 128
At the same time, the -f parameter must follow unified2.alert, not snort.log. Pay attention to the corresponding relationships.
● -w: This option enables the verification function, telling Barnyard the name of the verification file (also called the waldo file). This file is used to record the most recently processed alerts in the file. If the waldo file is not used, Barnyard must fully load a log file. This parameter’s function is to transmit alert information to the intrusion detection database.
In the /var/log/snort directory, there are several snort.log+time_stamp binary files, which are generated by the Snort output plugin.
Step 5: Use the following command to check if alert information has been saved to the database.
#mysql -u snort -p -D snort -e “SELECT COUNT(*) FROM event”
The actual operation result is as follows:
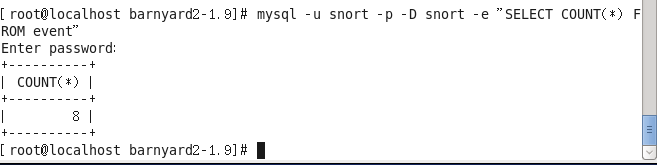
If there are no numbers below count(*), it means the alert information has not been saved to the database, and you need to check the configuration process from the beginning.
The following command is very important, emphasizing again the complete startup command for Barnyard2:
[root@localhost ~]# barnyard2 -c /etc/snort/barnyard2.conf -d /var/log/snort/ -f snort.log -w /var/log/snort/barnyard2.waldo -g snort -u snort
Section 4: Access Permission Settings
If this step is conducted in a simple simulation environment, it can be ignored.
Suppose I only want a particular IP to access the 22 and 80 ports on the Snort server. We make the following settings on the Snort host.
Block all IP access to the Snort server’s 22 and 80 ports.
iptables -I INPUT -p tcp –dport 80 -j DROP
iptables -I INPUT -p tcp –dport 22 -j DROP
Allow IP address 192.168.11.2 to access the Snort server’s 80 and 22 ports.
#iptables -I INPUT -s 192.168.11.2 -p tcp –dport 80 -j ACCEPT
#iptables -I INPUT -s 192.168.11.2 -p tcp –dport 22 -j ACCEPT
Save the iptables rules.
#service iptables save
Restart the firewall.
#service iptables restart
Section 5: Setting Up the BASE Visual Intrusion Detection System
If everything in the previous sections is working correctly, it means Snort has been installed and alert information has been saved to the database. Next, we will begin installing BASE (Basic Analysis and Security Engine, built on ACID), which will display Snort alert information from MySQL through the Web.
To display logs stored in the database on the web, we need to install BASE (the front-end program for displaying intrusion detection events). Here, we will use the base-1.4.5.tar.gz version. Since it involves Web services, we first need to set up the LAMP environment, and then install the BASE package. The specific installation steps are as follows.
Step 1: Install httpd, mysql-server, mysql-devel, php, and php-mysql.
The commands are as follows.
#yum install –y httpd mysql-server php php-mysql mysql-devel php-gd
Step 2: Install PHP plugins (mcrypt, libmcrypt, libmcrypt-devel), the commands are as follows.
#yum install epel-release //Extend package update
#yum install –y mcrypt libmcrypt libmcrypt-devel php-pear
Updating the plugins takes quite a bit of time, the operation is as follows.
#pear upgrade PEAR
Step 3: Continue executing the following commands.
Install the Image_Graph-alpha, Image_Canvas-alpha, Image_Color, and Numbers_Roman packages.
The operations are as follows.
#pear channel-update pear.php.net
#pear install Image_Graph-alpha Image_Canvas-alpha Image_Color Numbers_Roman
Tips: Image_graph, previously known as GraPHPit, is a package for chart operations and an open-source project. It was later integrated into Pear and renamed Image_Graph (where -alpha is its version number). Therefore, it is installed using the pear command.
To check installed packages, use the following method:
[root@localhost barnyard2-1.9]# pear list
Step 4: Install the ADOdb package.
Although PHP is a powerful tool for building Web systems, its database access functionality is not standardized. MySQL uses a different and incompatible API. Thus, ADOdb is used as an intermediary for conversion. The biggest advantage of ADOdb is that regardless of the back-end database, the way to access the database remains consistent. The latest version of ADOdb is 5.20, and it supports many database types such as MySQL, PostgreSQL, and Oracle. First, we will extract adodb519.tar.gz to the /var/www/html/ directory.
# tar zxvf adodb519.tar.gz -C /var/www/html/
After extraction, we find a new directory called adodb5. We need to rename this directory to adodb.
#mv /var/www/html/adodb5 /var/www/html/adodb
Step 5: Extract the BASE package.
[root@localhost src]# pwd
/usr/local/src
#tar zxvf base-1.4.5.tar.gz -C /var/www/html/
After extraction, a new directory called base-1.4.5 appears. We need to rename it.
#mv /var/www/html/base-1.4.5/ /var/www/html/base
Step 6: Modify the PHP configuration file.
#vi /etc/php.ini
Change line 513 to the following.
error_reporting = E_ALL & ~E_NOTICE
Save and exit after modification.
Note: Explanation of the error_reporting() function:
error_reporting() sets the PHP error reporting level and returns the current level. Error reporting is graded; let’s understand the error reporting levels of this function.
E_ALL – All errors and warnings
E_ERROR – Fatal runtime errors
E_WARNING – Runtime warnings (non-fatal errors)
E_PARSE – Compile-time parse errors
E_NOTICE – Runtime notices (these are often caused by bugs in your code).
Step 7: Change ownership and group permissions of the /var/www/html/ directory.
#chown -R apache:apache /var/www/html/
Note: If this step is not set correctly, there may be an error message “Config Writeable: No” during the subsequent BASE configuration process, preventing the completion of the BASE configuration task.
Step 8: Restart MySQL and Web services, and finally stop the Firewall service.
#service mysqld restart //Start database service
#service httpd restart //Restart Web service
#service iptables stop //Stop the firewall temporarily for debugging convenience.
Step 9: Set up BASE through the Web interface.
First, test the Web by opening Apache’s page http://192.168.91.128/. After seeing the test page, officially open the BASE page.
Open your browser and enter the URL http://192.168.91.128/base/setup/index.php. Upon completion, the installation interface appears, as shown in the figure.
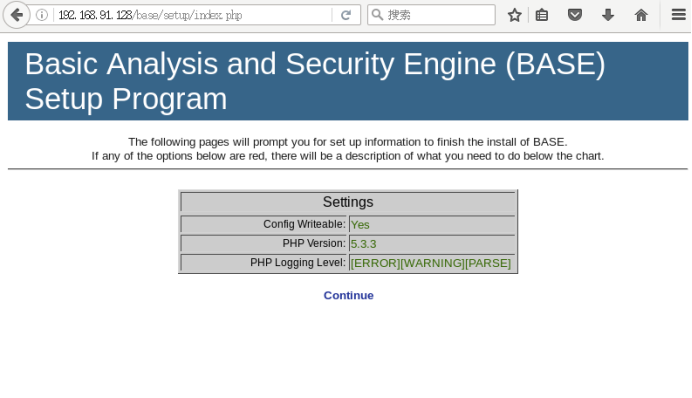
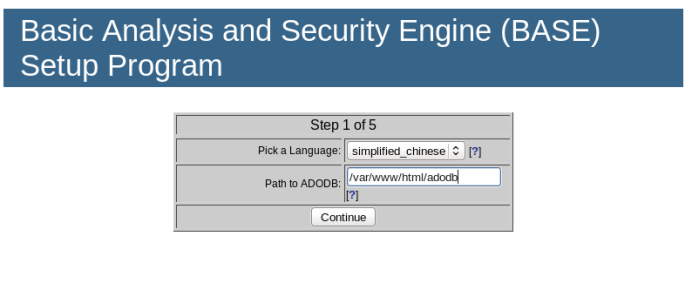
Click the Continue button to start selecting the language and ADOdb path, as shown in the image.
Select Chinese for the language option and enter /var/www/html/adodb for the ADOdb path, then click the Continue button.
Next, enter the database name, access username, and password as shown below.
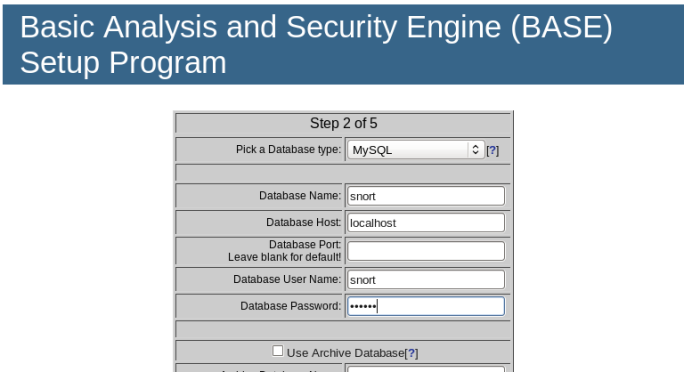
Setting up an archive database is not required here, so you can leave the last five fields blank.
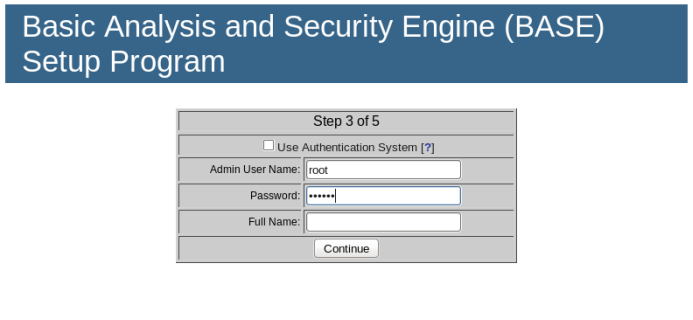
In the next step, set the administrator name to root and keep the password as “123456”. Full Name is not necessary, as shown below.
The next step is to create the BASE table structure.
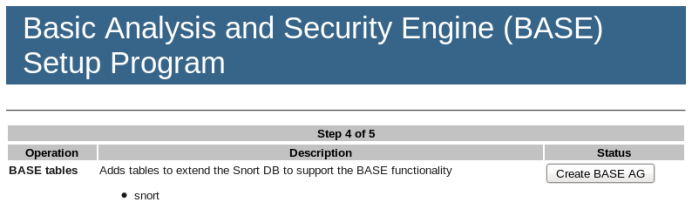
In the image above, “BASE AG” stands for Alert Group.
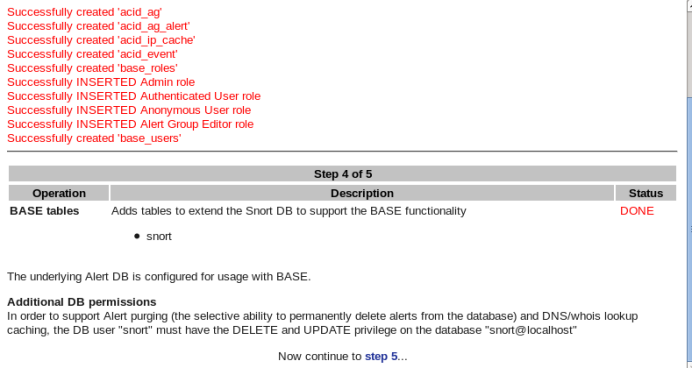
If you see a message indicating the acid table has been created successfully and the BASE tables status shows “DONE”, the installation is complete. Click the step5… button at the bottom of the screen to finish the installation.
【Result Analysis】
Demonstrating the Snort working process
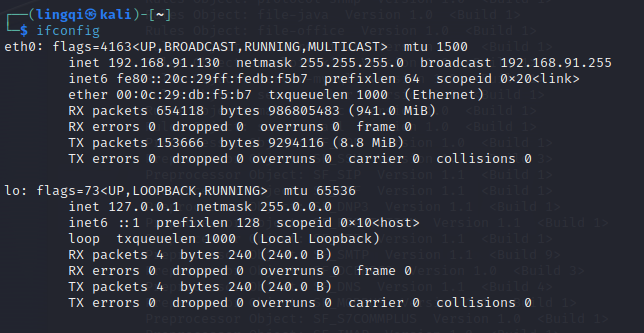
1Kali: Using Snort to Detect Ping Attacks
1.1 Setting rules in the rules/icmp-info.rules file
cd /etc/snort/rules/
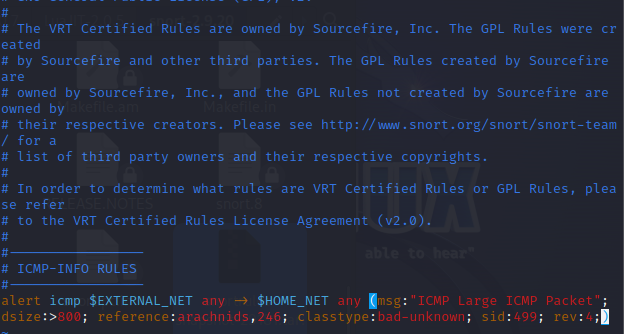
# Set the following rule in the rules/icmp-info.rules file
alert icmp $EXTERNAL_NET any -> $HOME_NET any (msg:”ICMP Large ICMP Packet”; dsize:> 800; reference:arachnids,246; classtype:bad-unknown; sid:499; rev:4;)
1.2 Using Snort rules to detect traffic and output results to the Snort log
snort -i eth0 -c /etc/snort/snort.conf -A fast -l /var/log/snort/

Successfully started Snort for detection
1.3 Executing a Ping Attack with Packets Greater than 800 from a Host within the LAN
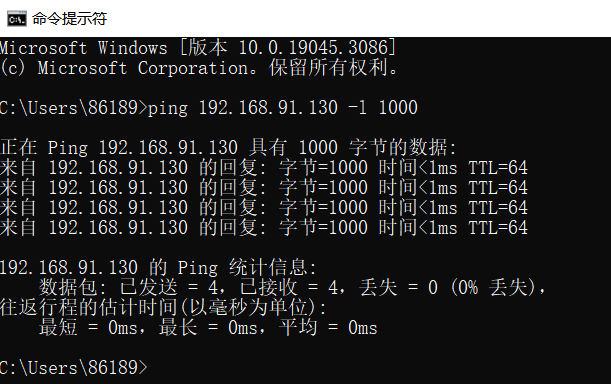
1.4 Checking Detection Results in the Log

Successfully detected ping attacks with packets greater than 800.
2Kali: Using Snort to Detect Nmap Scans
2.1 Setting up TCP rules in /etc/snort/rules/local.rules
vim /etc/snort/rules/local.rules
alert tcp $EXTERNAL_NET any -> $HOME_NET any (msg:”nmap scan”;sid:1000000888;)
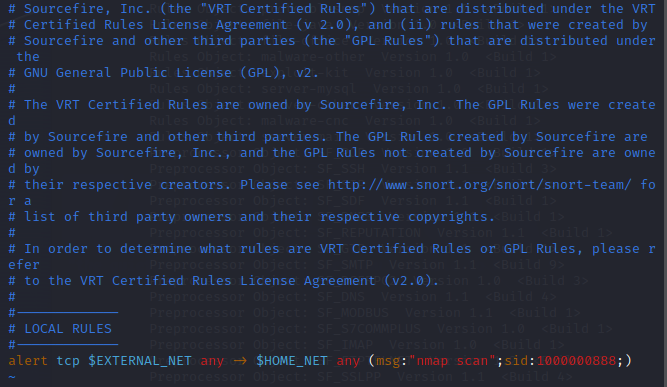
2.2 Starting Snort to Detect Scans within the LAN
sudo snort -i eth0 -c /etc/snort/snort.conf -A fast -l /var/log/snort/
2.3 Executing an Nmap Scan within the LAN Using a Host (another Kali machine on the same subnet)
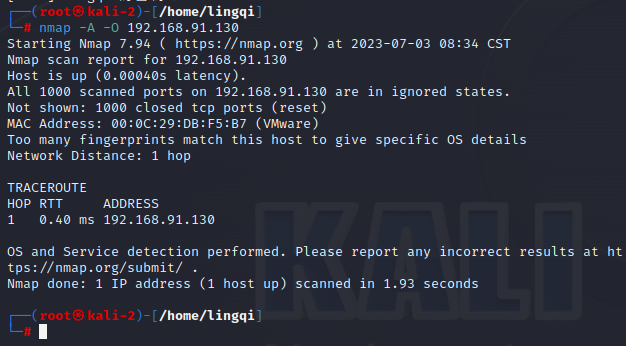
2.4 Checking Detection Results in /var/log/snort/alert

Successfully detected the Nmap scan.
3CentOS: Using Snort to Detect ICMP Packets and Display Alerts on a Web Page
Run #barnyard2 -c /etc/snort/barnyard2.conf -d /var/log/snort/ -f snort.log –w /var/log/snort/barnyard2.waldo
Use the client terminal command line to ping the host 192.168.91.128. You should then receive ICMP alerts in the BASE interface.
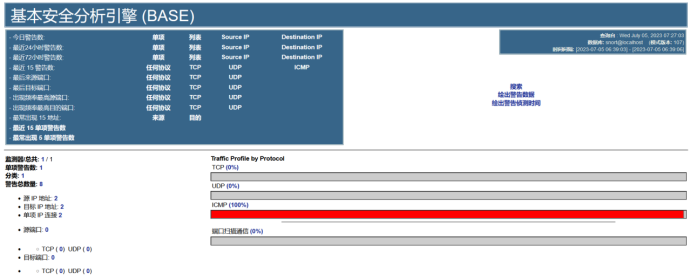
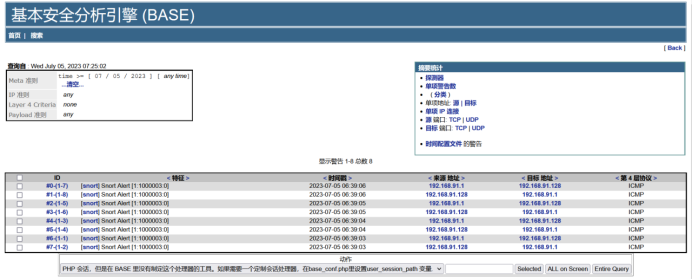
The list above shows the ICMP messages.
【Personal Summary & Reflections】
I first conducted this experiment using the Kali operating system. From the installation of the system to successfully configuring Snort, I encountered several issues, but I resolved them one by one by searching for solutions online, and I successfully tested Snort’s operation. Overall, the process went quite smoothly. However, when I attempted to install the MySQL database, I found that Kali does not support MySQL but only MariaDB, which caused problems during table creation and downloading configuration files. I eventually abandoned the idea of setting up a MySQL database on Kali.
I then chose to conduct the experiment with CentOS 6.8. Having gained experience from setting up Snort on Kali, I successfully installed and configured Snort, Barnyard2, and BASE on CentOS, documenting the issues and solutions along the way. This hands-on experience provided me with deeper insights into setting up the Snort intrusion detection system.