
Creating a Kali Image for Raspberry Pi
Tools Preparation
- Raspberry Pi 4B
- SanDisk 64G TF Card
- Raspberry Pi Imager (Official Raspberry Pi Image Burning Tool)
- Kali Raspberry Pi Image
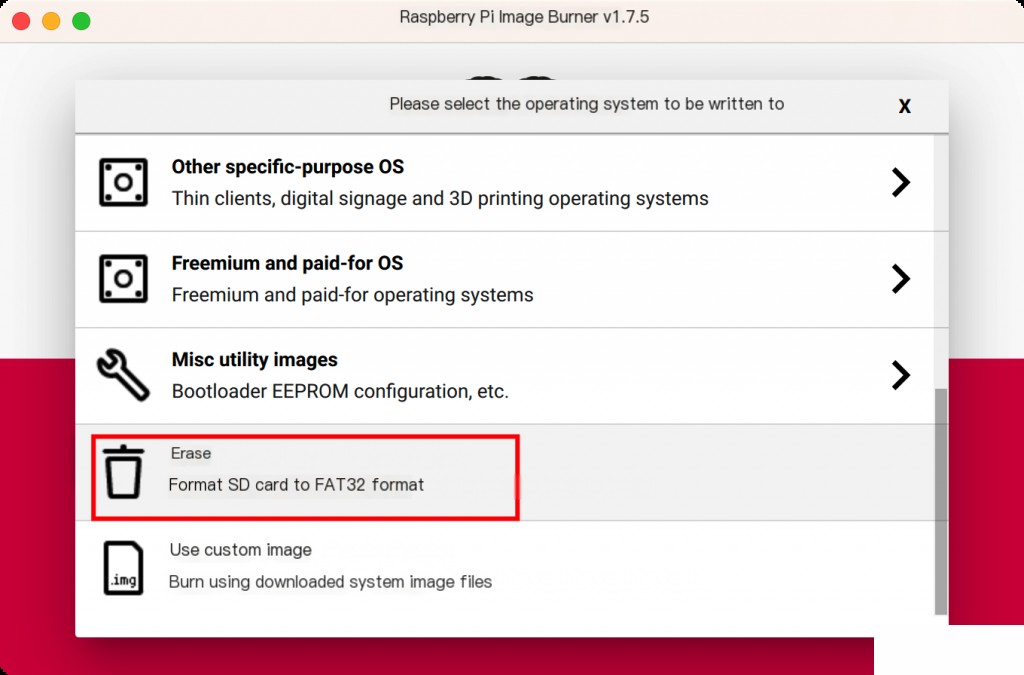
Formatting the TF Card
Format the TF card first; otherwise, writing the image directly may result in errors.
Burning the Kali Image
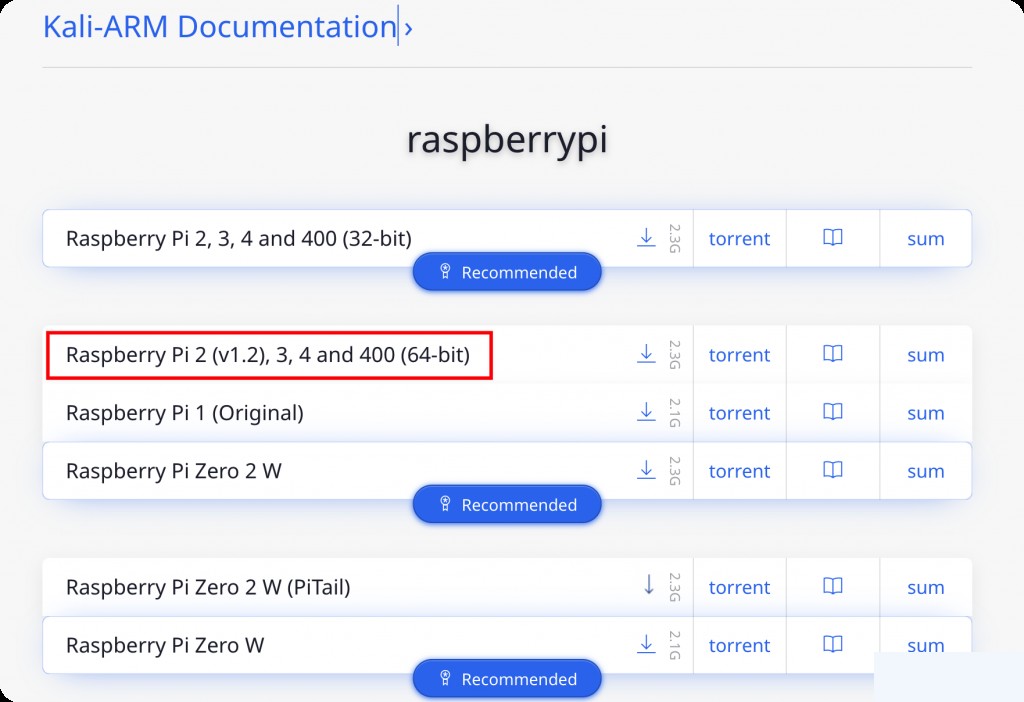
Download the 64-bit Kali image for Raspberry Pi 4B.
Then, in the image burner, customize and select the downloaded image to start burning.
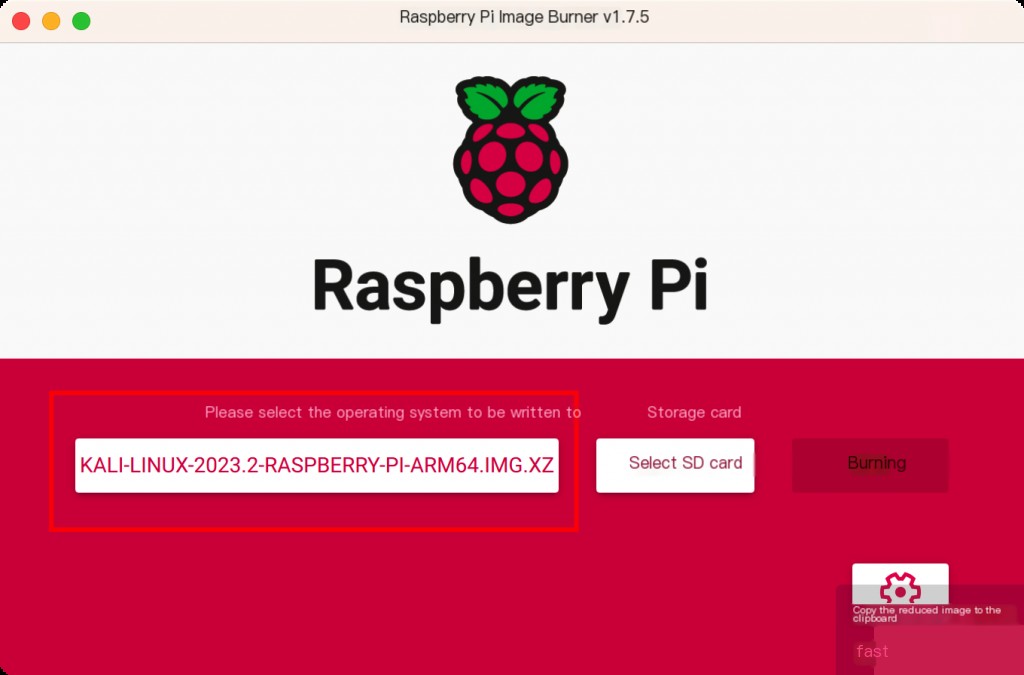
Wait for about ten minutes. Once the burning is complete, insert the TF card into the Raspberry Pi to boot it up.
Basic Kali Configuration
It is recommended to connect a monitor initially for configuration. The default username and password for the image are kali / kali. Since some tools on Kali can only be operated via GUI, it is best to enable both SSH and VNC.
Enabling SSH Remote Connection
By default, Kali does not allow root user login. Set the root password first and then modify sshd_config.
 sudo su
echo 'root:new_password' | chpasswd
sed -i 's/^#PermitRootLogin.*/PermitRootLogin yes/' /etc/ssh/sshd_config
sed -i 's/^PasswordAuthentication.*/PasswordAuthentication yes/' /etc/ssh/sshd_config
systemctl restart sshd
Configuring VNC Connection
The following operations are recommended to be executed via SSH connection, as configuring VNC while connected to a monitor may cause issues.
Install the Xfce desktop environment. Without it, VNC will display a black screen with no image.
 apt update
apt install -y xfce4 xfce4-goodies tightvncserver autocutsel
Run vncserver to generate the configuration file.
vncserver :1
Since the VNC service starts on port 5900, we need to create a new port for the desktop environment. Here, 1 means +1, i.e., port 5901. If it is vncserver :2, it will be port 5902, and so on.
Resolving VNC Screen Tearing
According to online tutorials, configuring VNC while connected to a monitor and then connecting may cause screen tearing, with the mouse turning into a cross. The error in the logs is as follows: xfce4-session: Another session manager is already running
Modify the VNC configuration file to resolve the screen tearing issue. (Note: The xstartup file is generated the first time the VNC service is started)
 cd /root/.vnc/
cp xstartup xstartup.bak
cat < xstartup
#!/bin/sh
unset SESSION_MANAGER
unset DBUS_SESSION_BUS_ADDRESS
startxfce4 &

autocutsel -fork
EOF
Setting VNC to Start on Boot
 cat < /etc/systemd/system/[email protected]
[Unit]
Description=Start TightVNC server at startup
After=syslog.target network.target

[Service]
Type=forking
User=root
Group=root
WorkingDirectory=/root

PIDFile=/root/.vnc/%H:%i.pid
ExecStartPre=-/usr/bin/vncserver -kill :%i >  /dev/null 2> &1
ExecStart=/usr/bin/vncserver -depth 24 -geometry 2560x1440 :%i
ExecStop=/usr/bin/vncserver -kill :%i

[Install]
WantedBy=multi-user.target
EOF
The [email protected] with @ allows passing different parameters to %i at startup, enabling multiple VNC servers.
Note: The VNC resolution can be modified with the -geometry parameter.
- 2560×1440 (2k)
- 1920×1080
After modifying the configuration file, restart systemd and set it to start on boot.
 systemctl daemon-reload
systemctl start [email protected]
systemctl enable [email protected]
Then connect to Kali’s 5900 port to access VNC.
Advanced Configuration for Proximity Penetration
Installing FRP and Setting it to Start on Boot
FRP download link: https://github.com/fatedier/frp/releases
Download the arm64 version for Raspberry Pi. The version should match the server side.
 wget https://github.com/fatedier/frp/releases/download/v0.49.0/frp_0.49.0_linux_arm64.tar.gz
tar xvf frp_0.49.0_linux_arm64.tar.gz
cd frp_0.49.0_linux_arm64
chmod +x frpc frps
cp frpc /usr/bin/
cp frpc.ini /etc/
Modify frpc.ini as needed, then add frpc to start on boot.
 cat < /etc/systemd/system/frpc.service
[Unit]
Description=frpc
After=multi-user.target

[Service]
TimeoutStartSec=10
RestartSec=30s
Restart=always
ExecStart=/usr/bin/frpc -c /etc/frpc.ini
ExecStop=/bin/kill $MAINPID

[Install]
WantedBy=multi-user.target
EOF

systemctl enable frpc
systemctl start frpc
Planting a Backdoor on the Raspberry Pi
As a precaution, you can plant a backdoor on the Raspberry Pi and set it to start on boot, automatically connecting back to the C2 in case of emergencies.
 cat < /etc/rc.local
#!/bin/bash
/var/tmp/  &
EOF
You can restart the service to test if it works without rebooting the Raspberry Pi.
systemctl restart rc-local
Installing Input Method
Tried installing Sogou input method, but it never displayed the Chinese text window correctly after installation. Finally switched to Google Pinyin input method as a workaround.
Install fcitx and Google Pinyin
apt install fcitx fcitx-googlepinyin
Switch input method framework
im-config

After completing the input method setup, be sure to restart the system for it to take effect.
Installing Tor Browser
Do not install Tor via command line; it does not work. Instead, download it from the official website.
https://www.torproject.org/download

Choose the Linux download, then double-click to extract the tar.xz archive.
Enter the browser directory and edit the start-tor-browser file, removing the following content.

Double-click start-tor-browser.desktop to launch the Tor browser.
Installing Chrome Browser
 wget https://dl.google.com/linux/direct/google-chrome-stable_current_amd64.deb
dpkg --install google-chrome-stable_current_amd64.deb
apt install --assume-yes --fix-broken
If installed using the root user, Chrome cannot be run with root privileges. It needs to be run with regular user privileges. The first time, you might encounter the following error.
Authorization required, but no authorization protocol specified
Execute the following command in the terminal.
xhost +
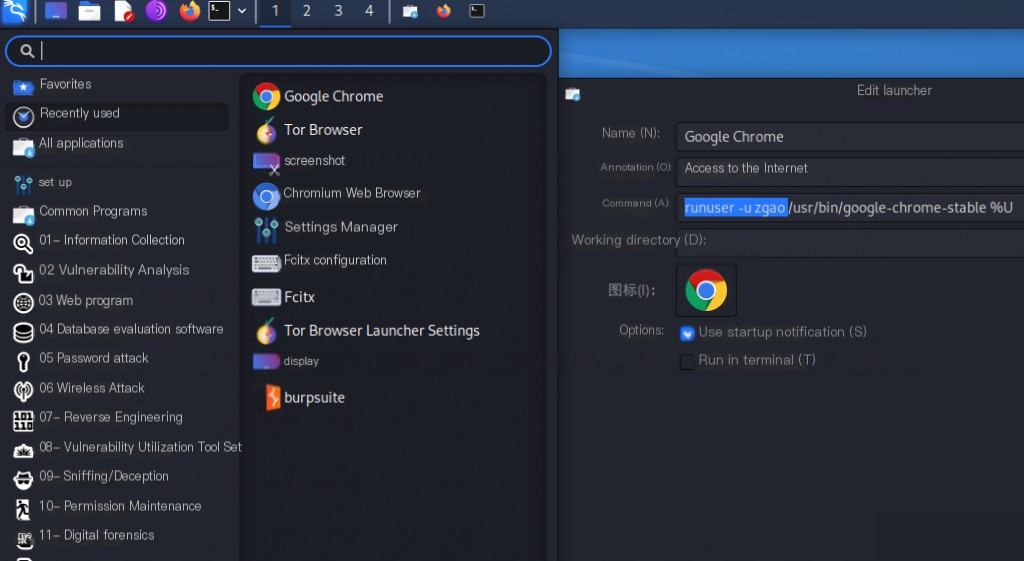
In the menu, edit the Chrome launcher by adding the following to the command line:
runuser -u username /usr/bin/google-chrome-stable %U
Or run it directly with root privileges by adding the following to the command line:
--no-sandbox --user-data-dir
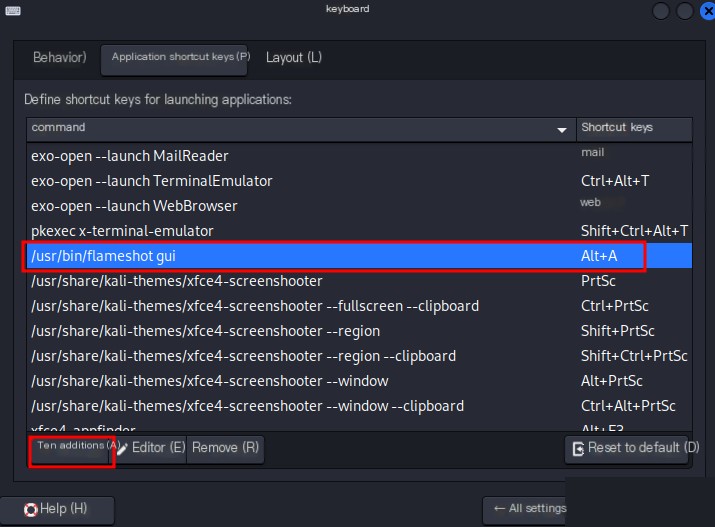
Installing Screenshot Tool
Kali comes with a built-in screenshot shortcut key, which is Shift + PrintScreen. However, the default screenshot tool does not allow you to input text in the screenshots. Therefore, you need to install a third-party screenshot tool, and here we recommend Flameshot.
bash
apt install flameshot -y
Set the screenshot shortcut key.
## Display Real-Time Network Speed in the Menu Bar
The effect is as follows:

In XFCE, you can display network speed by adding a panel plugin. The `xfce4-netload-plugin` is an option.
First, ensure the corresponding plugin is installed. On Debian-based systems, you can install it using the following command:
bash
apt install xfce4-netload-plugin
Right-click on the XFCE panel, select “Panel” -> “Add New Items”. Find “Network Load Monitor” (or a similar name) in the list and add it. Through the plugin’s properties, you can select the network interface to monitor and other settings.
## Add Custom Programs to the Menu
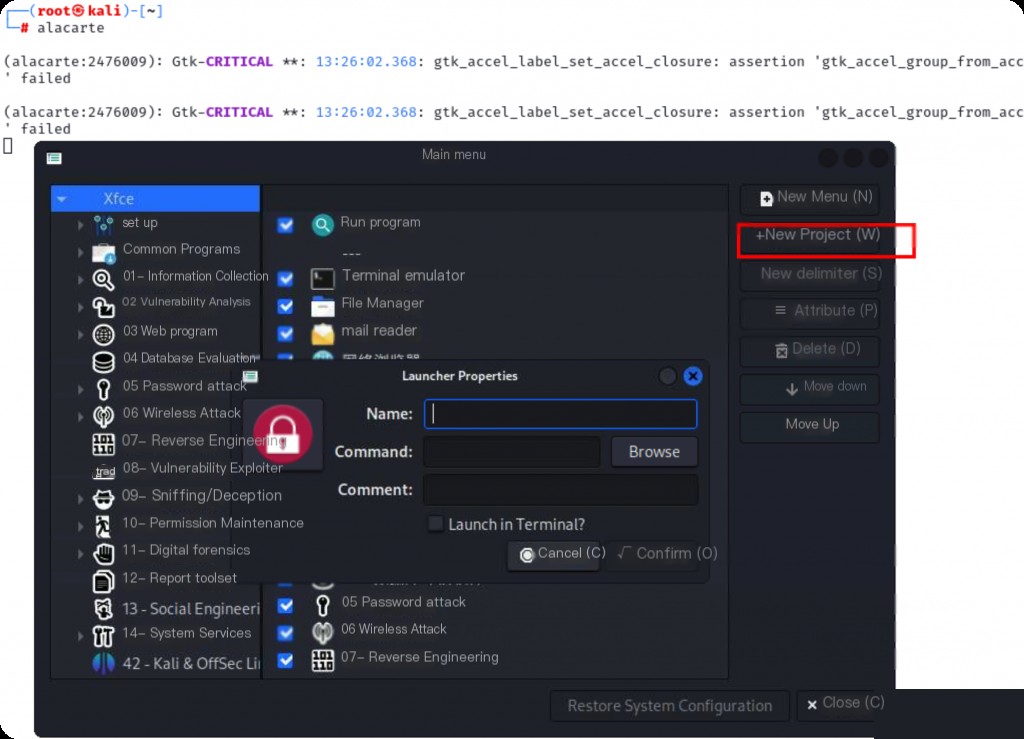
Kali will place system-built programs in the menu bar, but programs you install yourself are not added to the menu entry.
bash
apt install alacarte
For those using the GNOME desktop environment on Kali Linux, you can use a menu editor called `Alacarte`. It is a graphical menu editing tool that allows you to easily add, edit, or delete menu items.
## Dynamically Adjust VNC Resolution
By default, the VNC client does not support dynamically adjusting the VNC resolution to fit the client’s screen size. However, you can manually modify it.
bash
xrandr
This command will display the currently supported resolutions.
bash
xrandr –output VNC-0 –mode 2560×1440
After executing this command, the current VNC window size will be adjusted to the corresponding resolution.