
Windows has many event logs that are not enabled by default, such as process creation, DNS queries, file monitoring, network connections, etc. Enabling these advanced Windows event logs can help hunt more threats during incident response.
Process Creation
Process creation events are a type of Windows event that, if enabled, are recorded in the local Windows Event Viewer as event ID 4688 whenever a new process starts. They include information such as time, process name, parent process, command line (optional but preferred), and more.
Processes on a Windows computer are simply running applications. On a typical workstation or server, multiple processes will start throughout the workday. Most of these processes are innocent, but malware often initiates one or more processes during its operation. If an attacker gains remote access to the system, they can launch multiple processes to interact with the computer and achieve their goals. Process creation events allow you to log such malicious activities, and if logged, they can be identified and monitored.
Enabling Process Audit Logs
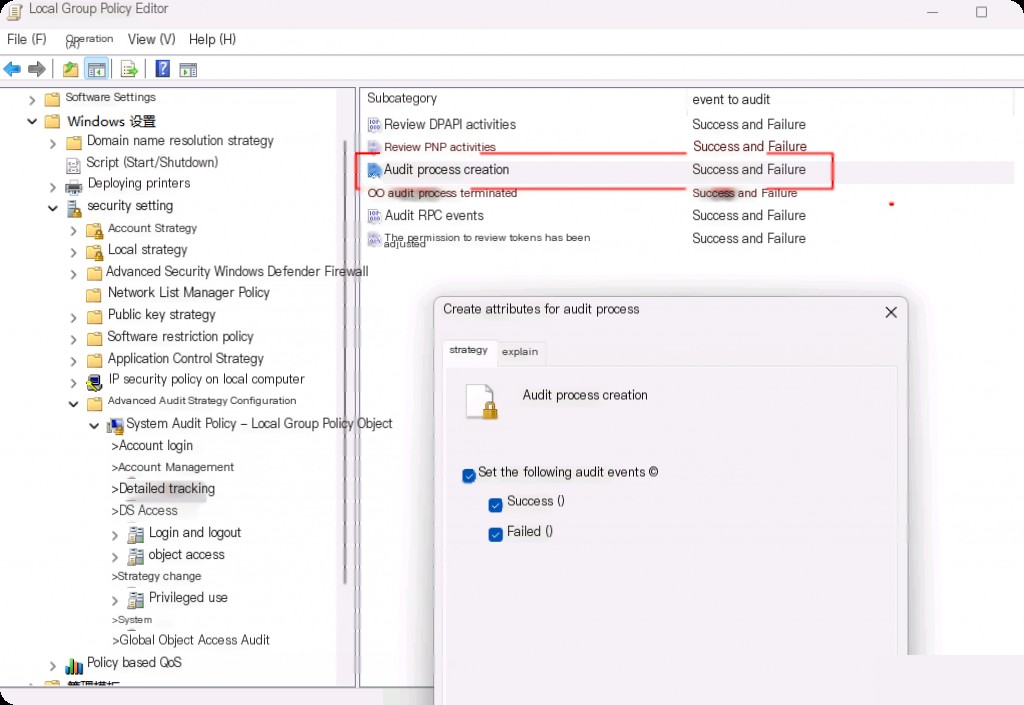
There are two ways to enable process audit logs: GUI and command line. Press Win+R to open the Run dialog, type gpedit.msc to open the Local Group Policy Editor.
Then navigate to Computer Configuration > Windows Settings > Security Settings > Advanced Audit Policy Configuration > Audit Policies > Detailed Tracking > Audit Process Creation
If we also want to include “CommandLine” to be recorded during process creation, we need to go to the same Group Policy Editor, navigate to Computer Configuration > Administrative Templates > System > Audit Process Creation > and set “Include command line in process creation events” to Enabled.
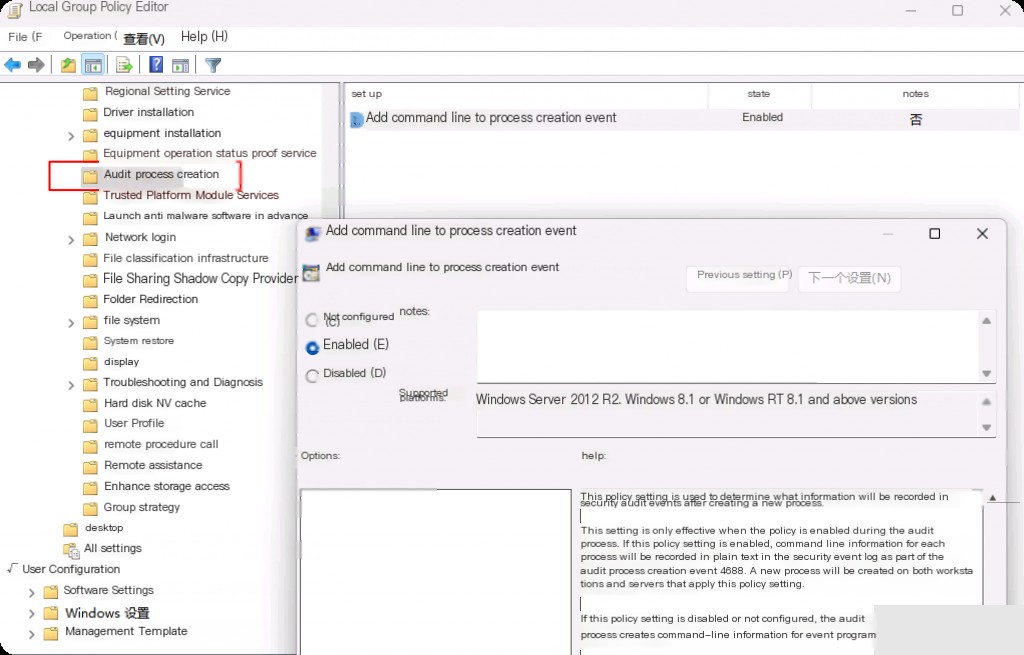
Now all process creation logs will include “CommandLine”.
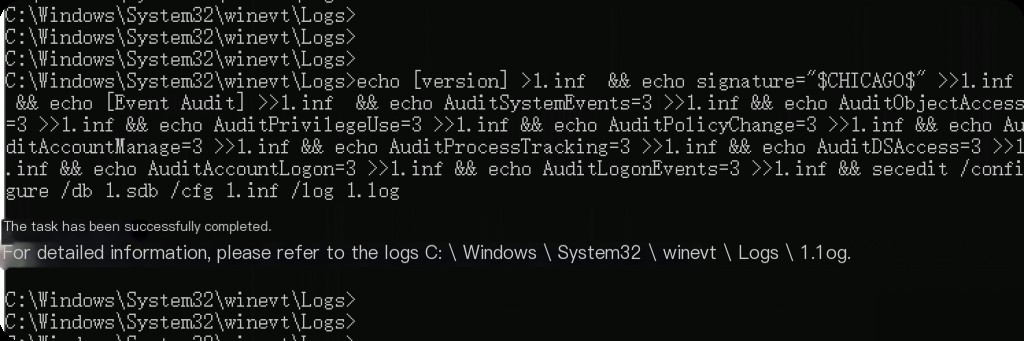
The command method to enable it is as follows:
echo [version] > 1.inf && echo signature="$CHICAGO$" > > 1.inf && echo [Event Audit] > > 1.inf && echo AuditSystemEvents=3 > > 1.inf && echo AuditObjectAccess=3 > > 1.inf && echo AuditPrivilegeUse=3 > > 1.inf && echo AuditPolicyChange=3 > > 1.inf && echo AuditAccountManage=3 > > 1.inf && echo AuditProcessTracking=3 > > 1.inf && echo AuditDSAccess=3 > > 1.inf && echo AuditAccountLogon=3 > > 1.inf && echo AuditLogonEvents=3 > > 1.inf && secedit /configure /db 1.sdb /cfg 1.inf /log 1.log
Analyzing Process Audit Logs
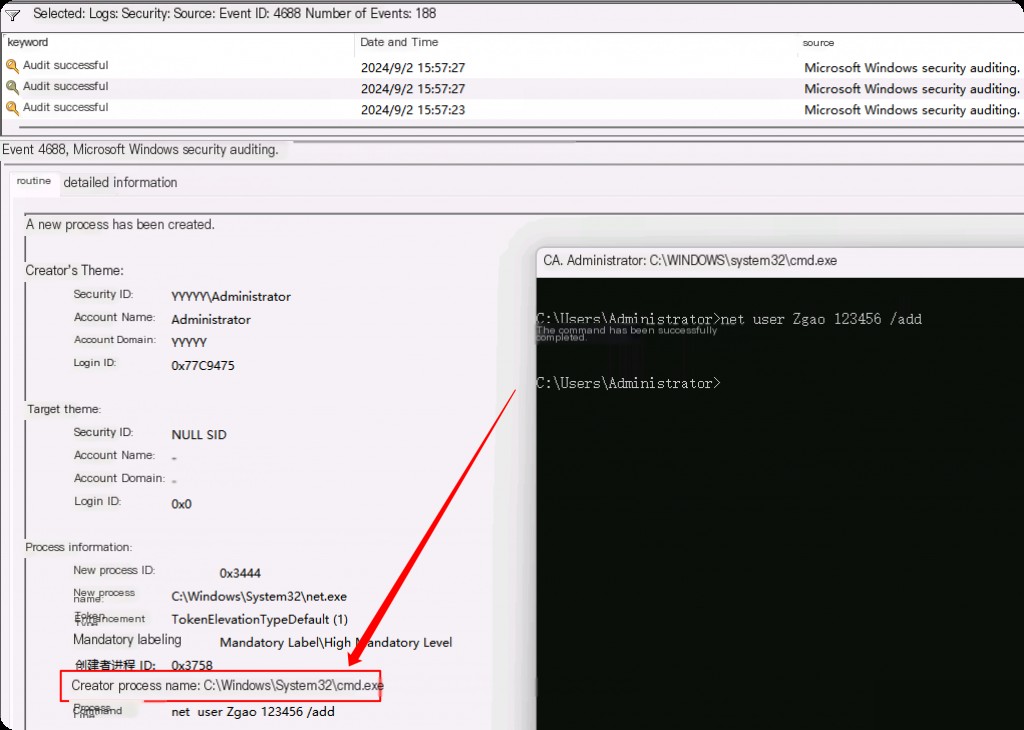
This example event shows us the power of the process command line. We can immediately see the purpose of the process and observe that the process net.exe was generated by cmd.exe, with the command line “net user Zgao 123456 /add”.
“net.exe is a native binary used to manage users/groups on the system. In this example, it is clear that the attacker has created a backdoor user account [MITRE Technique: T1136], and due to command line auditing, we now have the password for the backdoor account, providing more context.
Network Connections
Network connection analysis can help you monitor network traffic, identify suspicious connections, track application behavior, and investigate security incidents. For example, if we have logging capabilities to record network connection information along with the process that initiated it, we can easily correlate and perform context analysis if an information stealer is running on the system, identifying suspicious/malicious network activity just from these logs.
Enabling Network Connection Audit Logs
To enable auditing of Windows Filtering Platform logs, go to “Local Group Policy Editor > Computer Configuration > Windows Settings > Security Settings > Advanced Audit Policy Configuration > System Audit Policies > Object Access > Audit Filtering Platform Connection”.
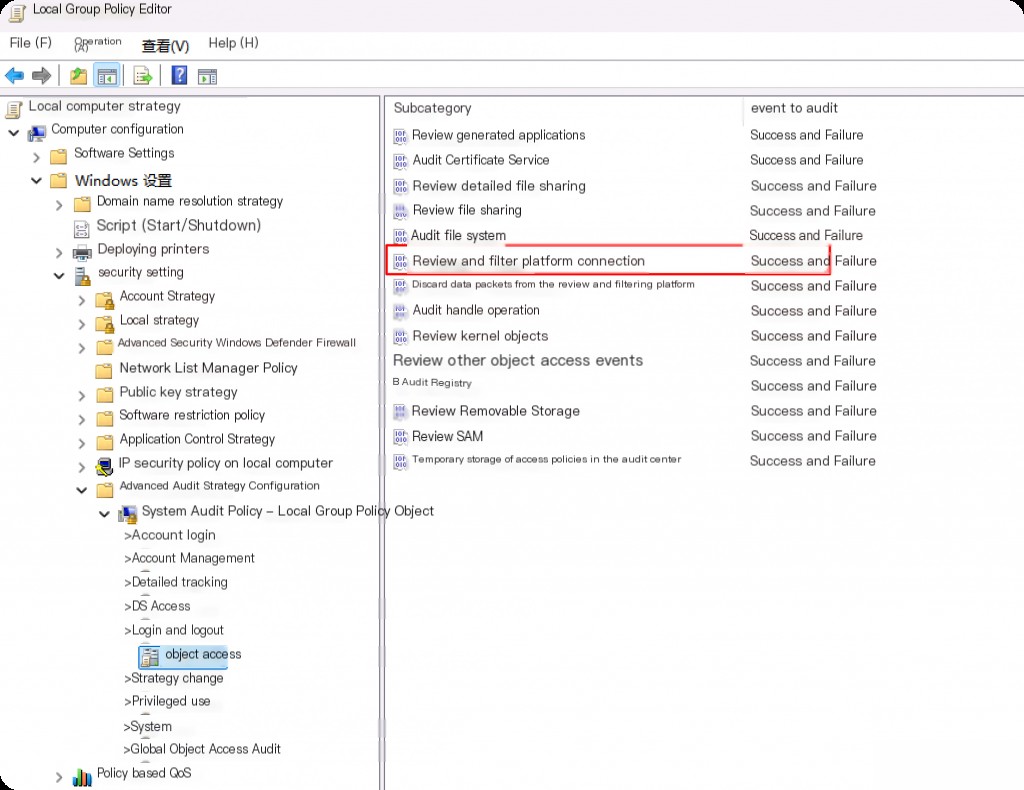
This will log network connections, including the process name. Similarly, you can use the command to enable process audit logs to enable network connection audit logs.
Analyzing Network Connection Logs
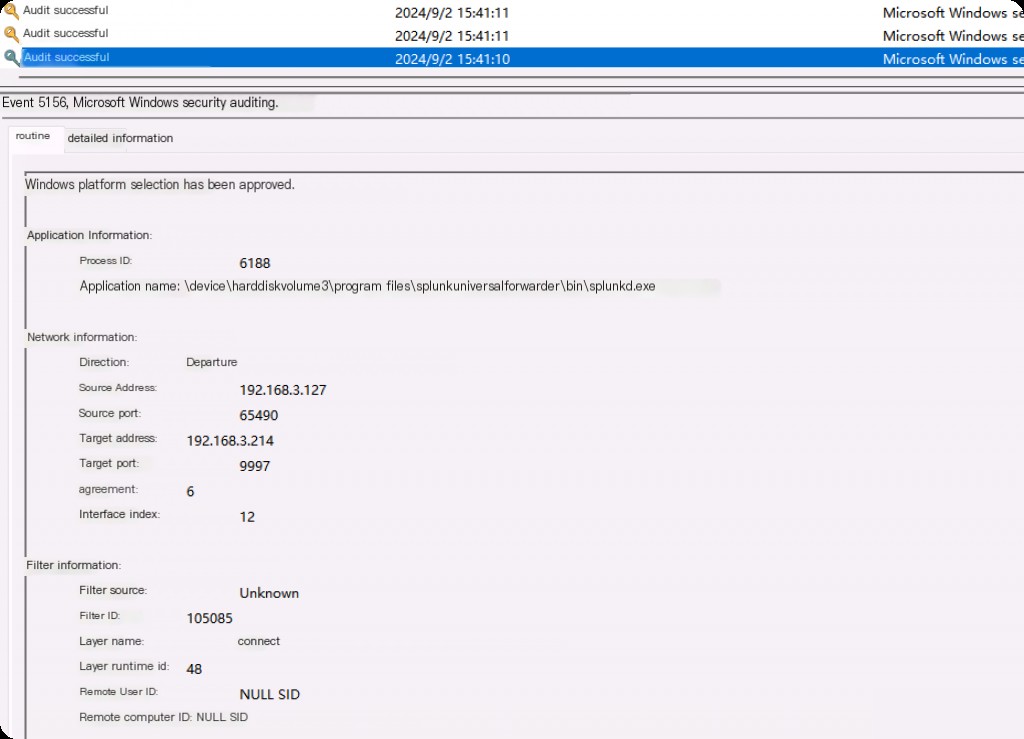
- Application Name: The process establishing the connection.
- Direction: Outbound/Inbound tells us whether the connection is internal or external.
- Source Address and Port: The local system IP and port.
- Destination Address and Port: The remote IP and port establishing the connection.
We can use this valuable information to identify malicious network connections, such as command and control activities, information stealers, or botnet traffic.
DNS Requests
Enabling DNS Logging
To log DNS queries, we can enable “DNS Client Events” in the Event Viewer. Open the Event Viewer and navigate to “Applications and Services Logs > Microsoft > Windows > DNS Client Events/Operational”, right-click and select “Enable Log”.

You can also enable DNS query logs via the command line.
wevtutil sl Microsoft-Windows-DNS-Client/Operational /e:true /ms:4194304
ms refers to the log file size, here set to 4MB.
Analyzing DNS Logs
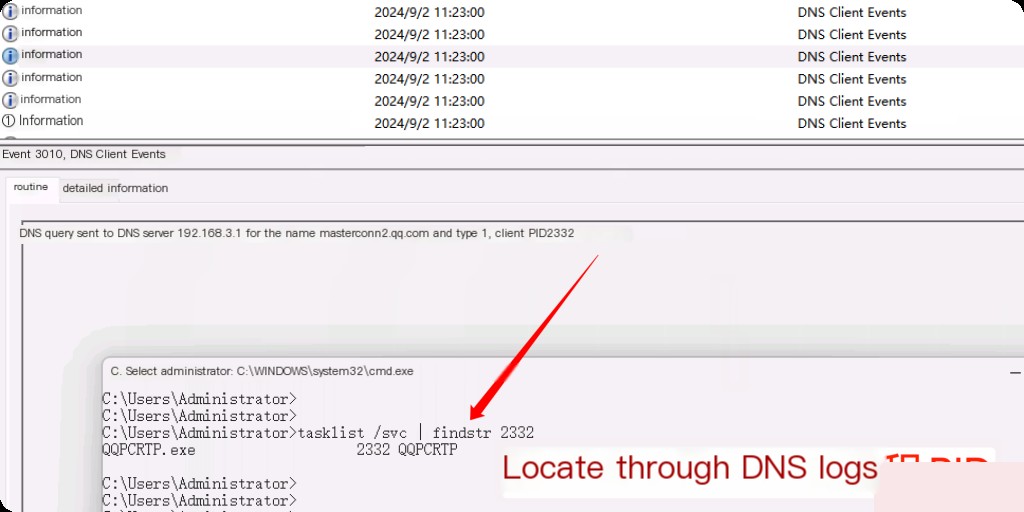
We can use these event IDs to find suspicious/malicious domains when malicious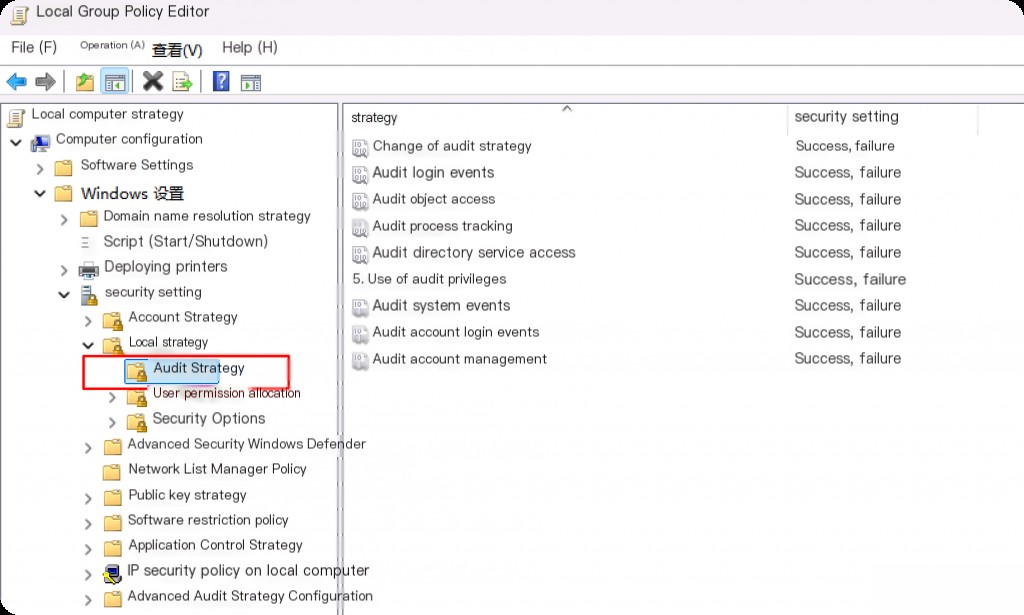
Go to the folder’s “Properties” and select the “Security” tab. Then go to the “Advanced” tab. Now switch to the “Auditing” tab and click “Add.” This will open the “Auditing” screen, where we click “Select a principal,” and then we can choose any specific user or group whose activities we want to monitor.
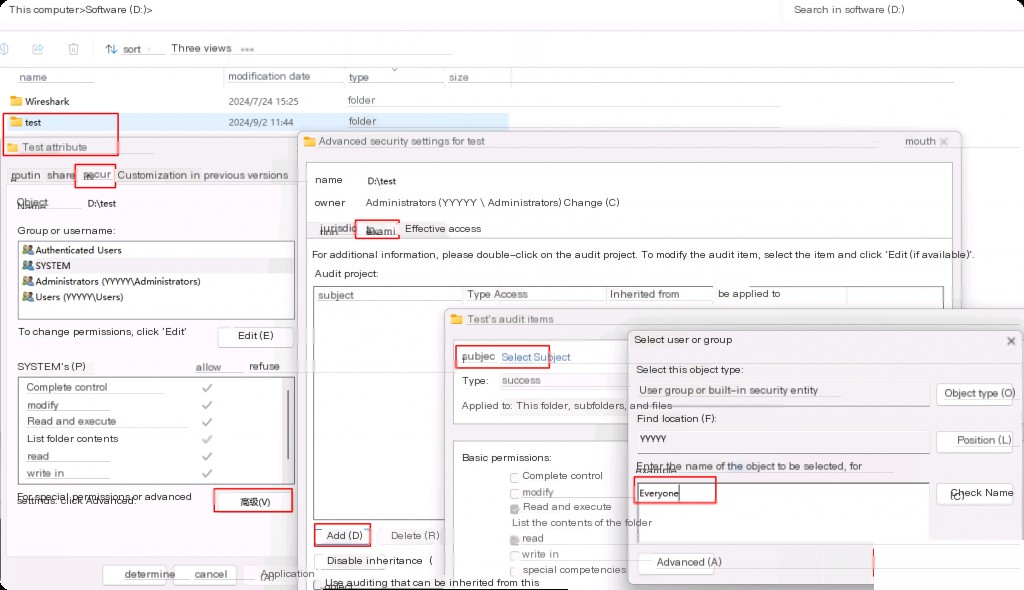
We want to monitor any activity by anyone, so we enter “Everyone” as the object name. After clicking “OK,” you will see the following:
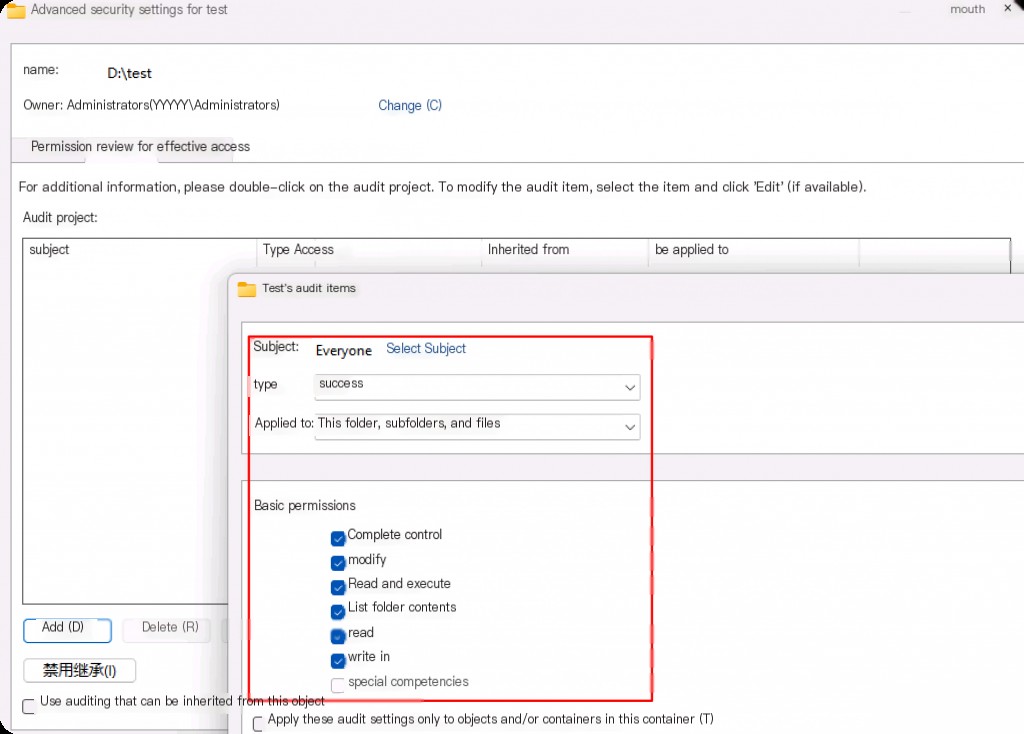
Here, select the “Type” dropdown menu and set it to “All,” which will audit all activities, including successes and failures.
File Monitoring Log Analysis
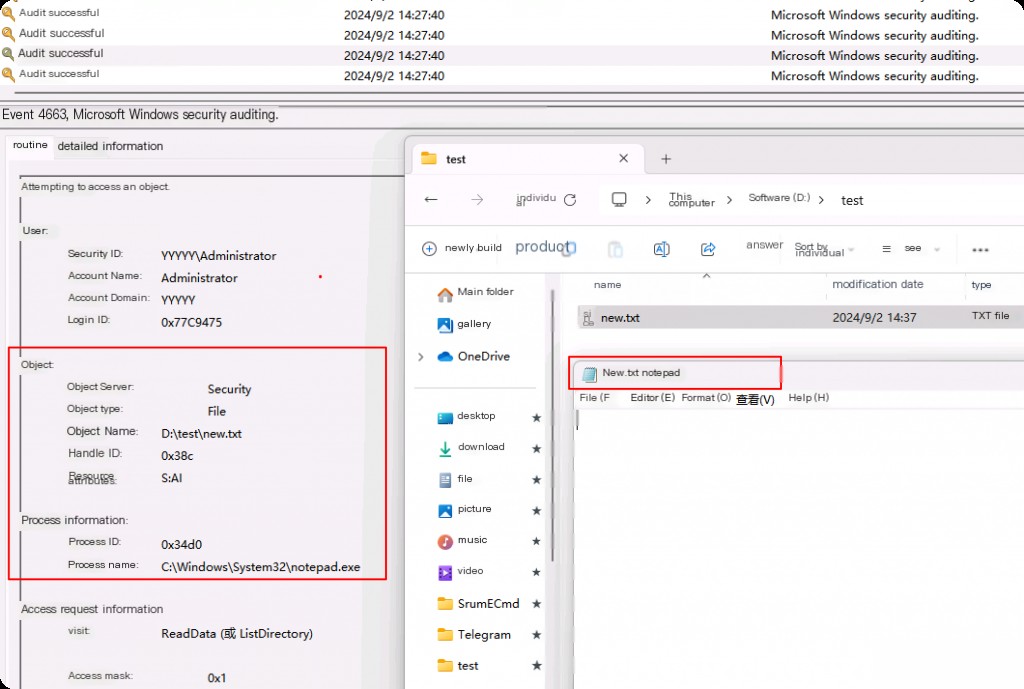
Now let’s monitor this activity. Currently, we need to focus on event IDs 4656 and 4663. We create a new file in the test directory, and we will now access it. We will first look at event ID 4656. This event ID is logged when an object is requested.
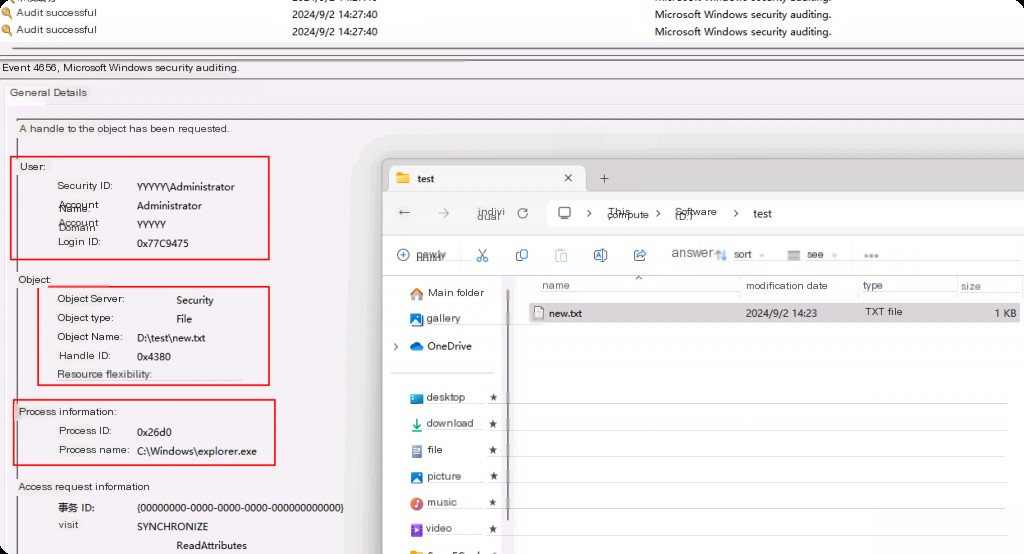
The highlighted parts of the log are important to us. First, we have user account information, i.e., which user account accessed the target object that created the event. Second, the “Object” section shows the “Object Name” (the content being accessed and causing the log to be recorded). In this example, the object is a file named “new.txt” in the “D:/test” folder.
Finally, we have process information, which shows the process accessing the relevant object. In this example, it is “explorer.exe” because we opened the file location via “explorer.exe”.
Another event ID, 4663, is generated when access to the target object succeeds or fails. The presence of event ID 4656 alone does not indicate that access has occurred, but if we see 4663 as evidence of successful auditing, it means it indeed succeeded.
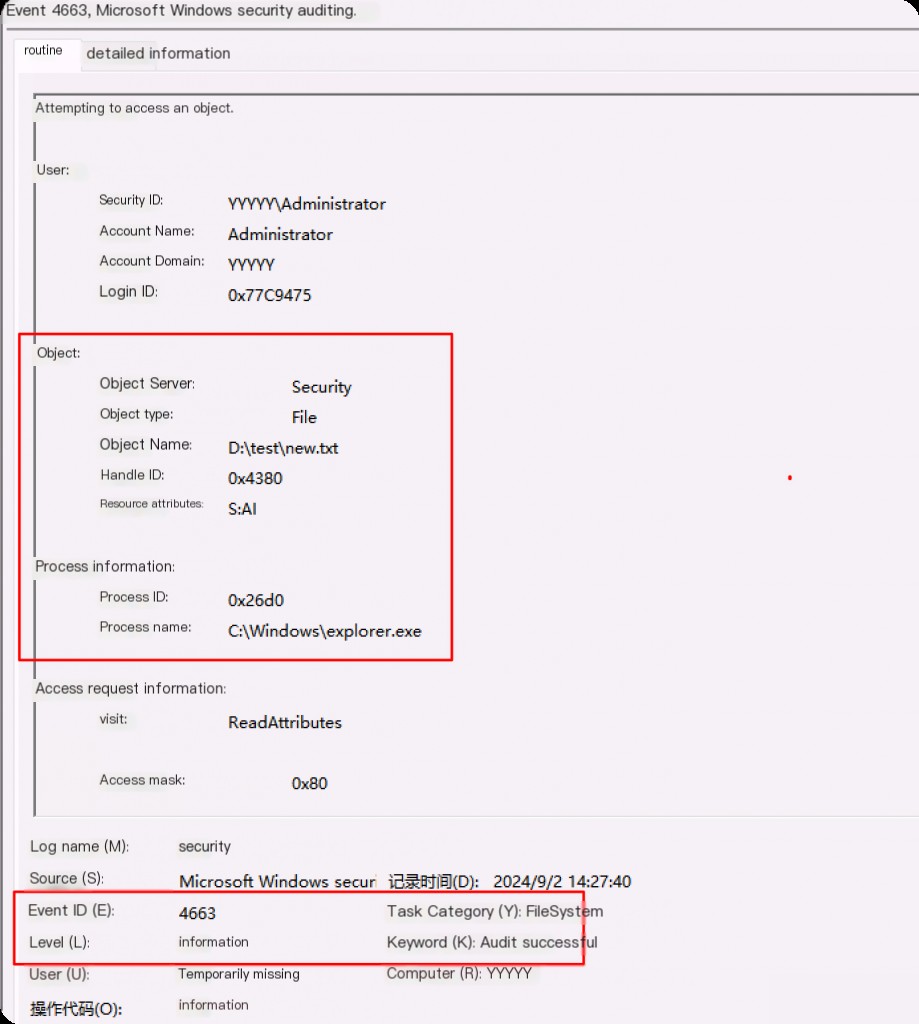
Here we can see the same information as before, the only difference being that this event confirms that access indeed succeeded.
We can also confirm whether event ID 4663 indicates that the object was accessed or failed by looking at the keywords. If it shows “Audit Success,” it means the object was accessed; if it shows “Audit Failure,” it means access was denied.
This is useful in cases where monitoring the process accessing the file is suspicious, such as the use of cmd, PowerShell scripts, etc.
BITS Client Events
Background Intelligent Transfer Service (BITS) was introduced by Microsoft with Windows XP to simplify and coordinate the download and upload of large files. Applications and system components, including Windows Update, use BITS to distribute operating system and application updates in a way that minimizes user disruption.
Like many other technologies, BITS can be used by legitimate applications as well as attackers. When a malicious application creates a BITS job, the files are downloaded or uploaded as part of the service host process. This can be used to bypass firewalls that might block insecure or unfamiliar processes and to disguise the application making the request. BITS transfers can also be scheduled to occur at specific times, rather than relying on long-running processes or task schedulers.
Using Bitsadmin to Download Files
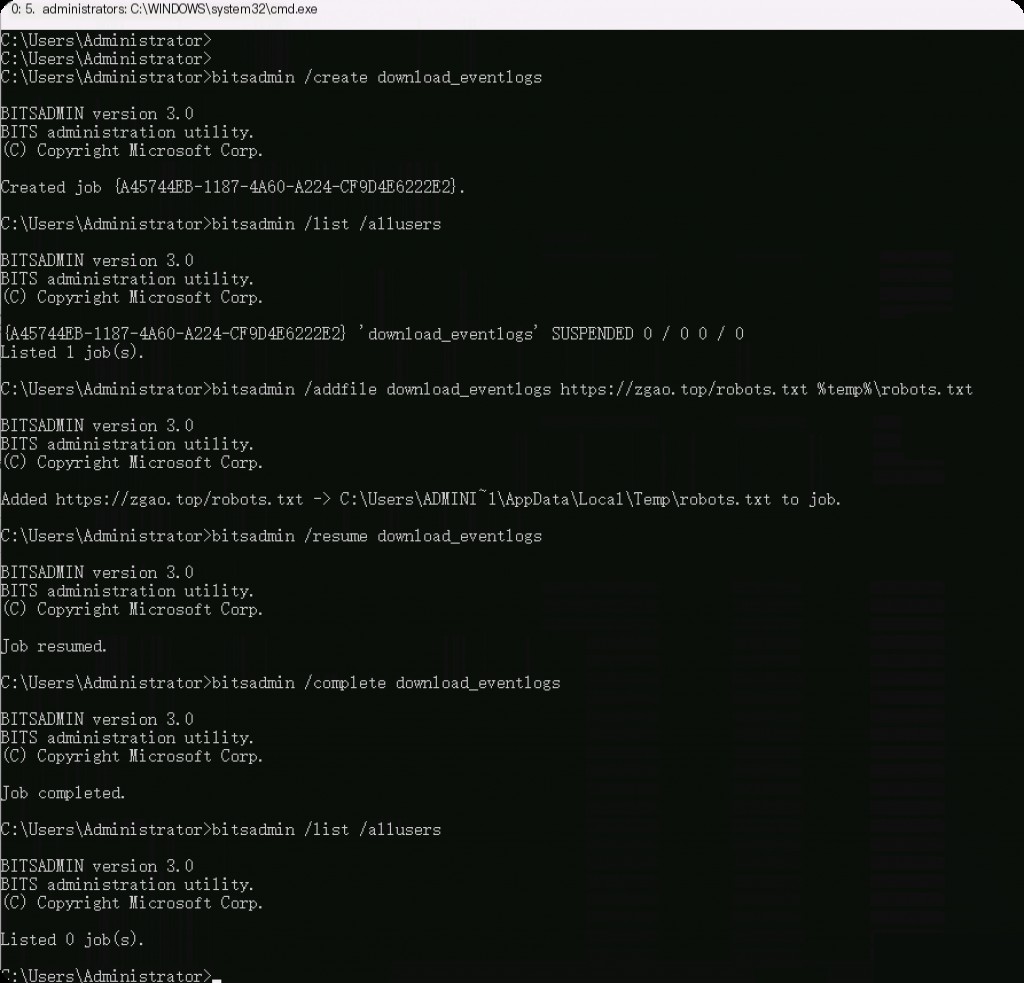
Let’s first simulate how an attacker might abuse the bitsadmin lolbin to download malware/scripts to evade defenses.
 bitsadmin /create download_eventlogs
bitsadmin /list /allusers
bitsadmin /addfile download_eventlogs https://zgao.top/robots.txt %temp%\robots.txt
bitsadmin /resume download_eventlogs
bitsadmin /complete download_eventlogs
bitsadmin /list /allusers
The first command used here is to create a job named “download_eventlogs.” Next, set the job parameters. These parameters include the remote URL/URI from which to retrieve the file and the local path to save the downloaded file. Following is the resume flag for downloading the target file. The BITS session remains open until the BITS job is completed using the /Complete flag.
Analyzing Bits-Client Logs
Bits-Client operational logs are located under “Applications and Services Logs > Microsoft > Windows > Bits-Client > Operational.” This log is enabled by default.
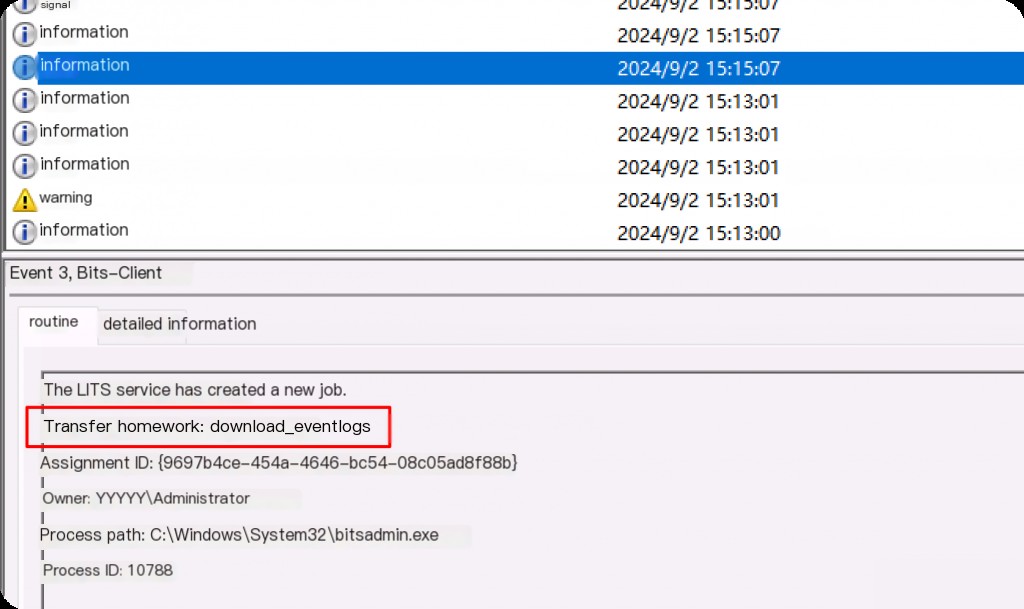
The first event ID is event ID 3, which is generated when a Bits job is created.
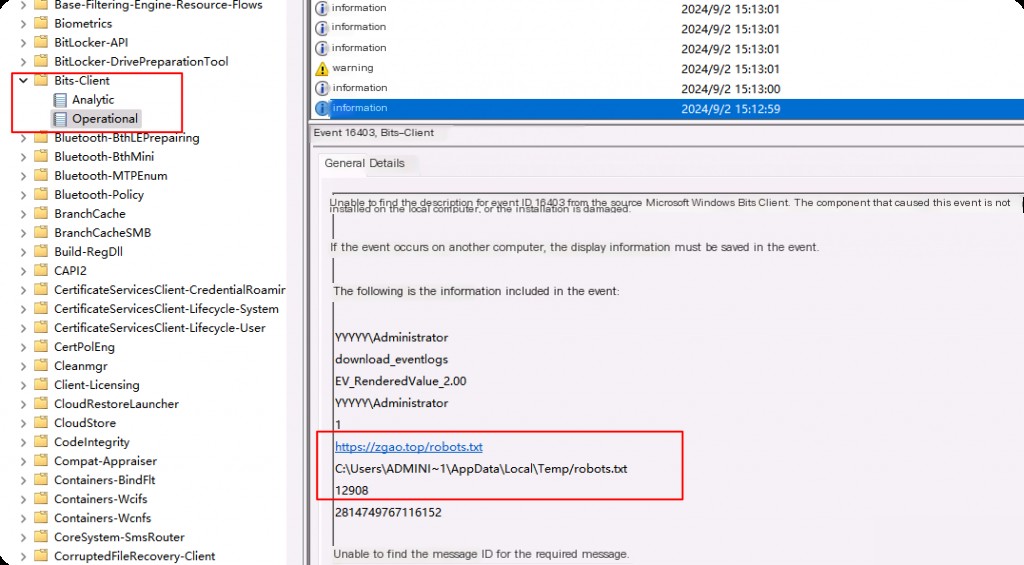
The next event ID is event ID 16403. Note that this log is generated when we provide the job with its parameters (e.g., remote URI, local path, etc.).
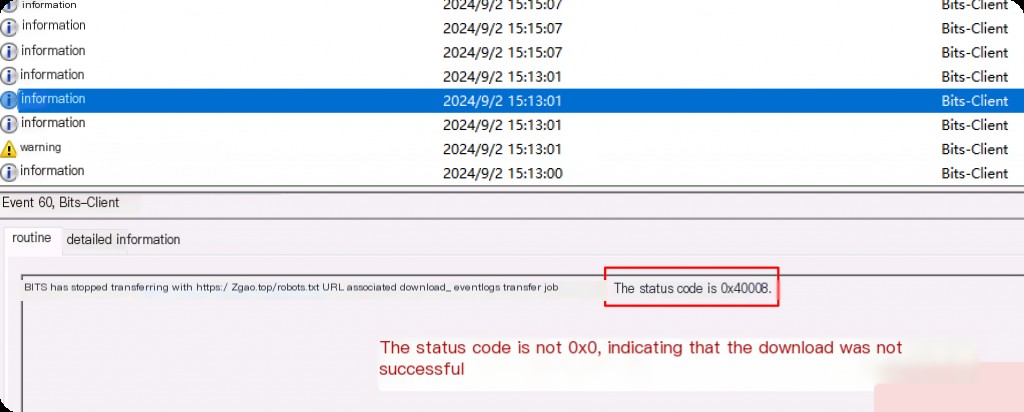
The next event IDs are event IDs 59 and 60. Event 59 indicates the time the job started, and event 60 indicates the time the job completed. One thing to note about event ID 60 is the status code. A status code of 0x0 indicates a successful download, so it is crucial to check whether the download was successful.
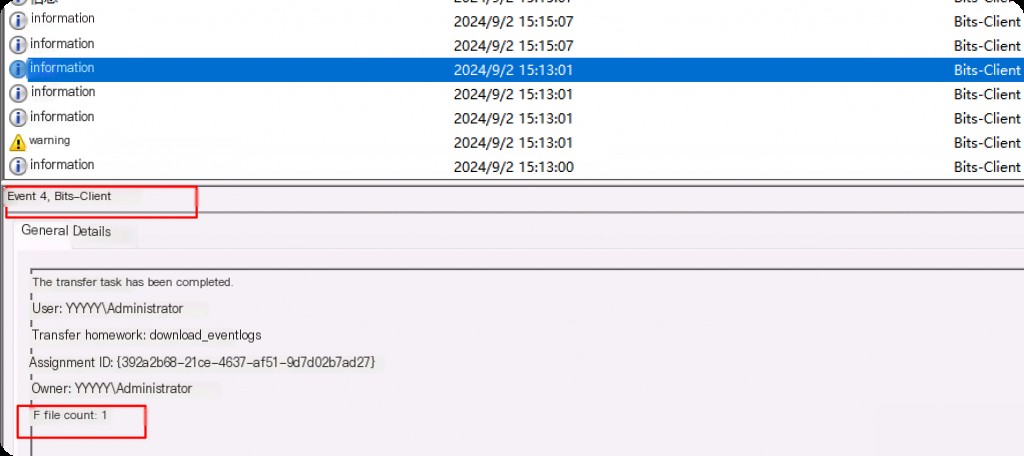
Finally, if the /complete flag has been run to complete the job, event ID 4 will be generated, indicating that the job is complete. The file count tells us how many files were downloaded/uploaded during the entire job.
Below are the commonly used event IDs for bits:
- Event ID 3 : BITS job created.
- Event ID 16403 : BITS job parameters defined.
- Event ID 59 : BITS job started/resumed.
- Event ID 60 : BITS job stopped. (Status code defines success)
- Event ID 4 : BITS job completed.
MSI Events
MSI, formerly known as Microsoft Installer, is a Windows installation package format. It is used to install and deploy necessary Windows applications or packages on end-user machines. MSI is a standardized installation method that simplifies the installation process for users.
Installing an MSI file is straightforward and usually does not require user intervention. Using MSI installation is typically similar to running an executable file.
Distinguishing between legitimate installers and malicious MSI files can be very difficult. Threat actors often disguise themselves as well-known software updates, tricking victims into “updating” software on their computers.
MSI allows the LocalSystem account (NT AUTHORITY\SYSTEM) to run, so unauthorized LocalSystem access can compromise the system and lead to further network compromise. Since MSI is based on COM structured storage, this allows threat actors to store malicious files within the MSI file and use custom actions to control the stored files. This technique provides threat actors with multiple execution mode options to infect the victim’s computer.
Analyzing MSI Event Logs
Click “OK,” and a list of all events related to MSI activities will be displayed.
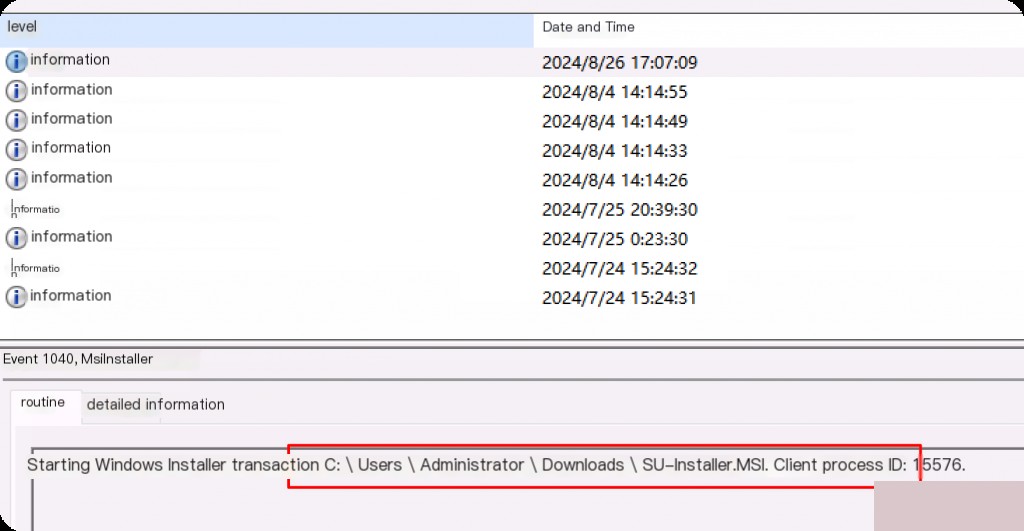
Event ID 1040 records the start time of the MSI installation or uninstallation process, including details such as the full path of the MSI and the process ID.
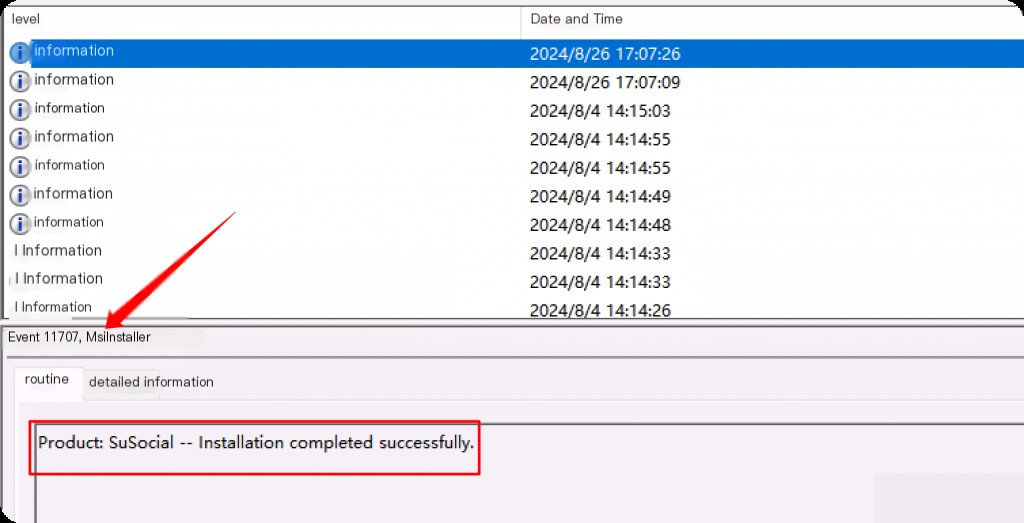
The next key event ID is event ID 11707. This event ID, along with event ID 1040, tells us whether an installation or uninstallation occurred.
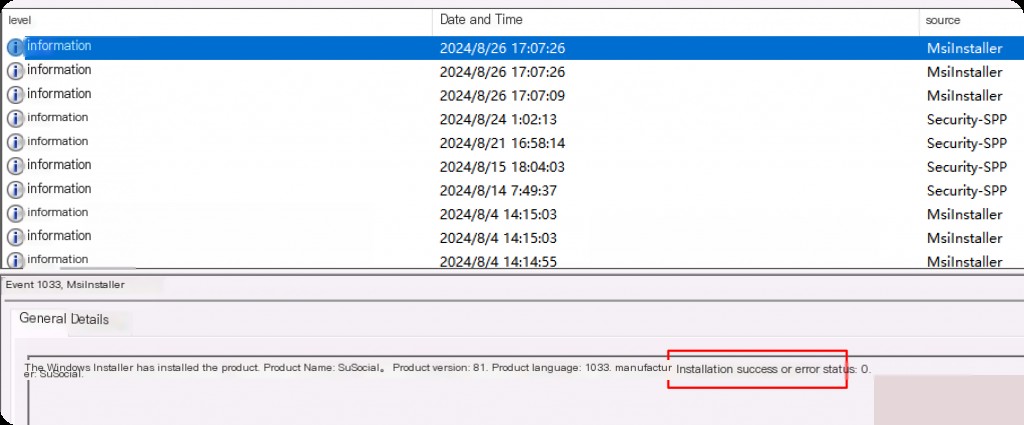
Event ID 1033 indicates whether the product was verified and successfully installed. It also contains the product name, version, and manufacturer name. This is particularly useful in cases where malware attempts to hide within a forged MSI or a legitimate MSI is injected with malicious code (e.g., as part of a supply chain attack).
The status code indicates whether the installation was successful. A status of “0” indicates a successful installation with no errors.
If we want to see if an installed MSI product has been removed, we can look at event ID 1034. Malware often uninstalls itself after completing its tasks, such as adding persistence routines, backdoors, etc.