

Introduction
When using Kubernetes, you might encounter some network issues. If checking configurations and logs doesn’t help in troubleshooting, you may need to capture network packets. However, the tcpdump command is usually not installed within a Pod. So, is there a way to capture Pod network packets directly from the host machine?
Of course, there is. This article introduces the nsenter command, which allows you to enter the net namespace of a Pod container. Additionally, this article provides a script for quickly entering the net namespace of a Pod container for your convenience.
nsenter Usage Parameters
nsenter [options] [program [arguments]]options:-t, --target pid: Specify the target process's pid to enter the namespace-m, --mount[=file]: Enter the mount namespace. If a file is specified, enter the file's namespace-u, --uts[=file]: Enter the uts namespace. If a file is specified, enter the file's namespace-i, --ipc[=file]: Enter the ipc namespace. If a file is specified, enter the file's namespace-n, --net[=file]: Enter the net namespace. If a file is specified, enter the file's namespace-p, --pid[=file]: Enter the pid namespace. If a file is specified, enter the file's namespace-U, --user[=file]: Enter the user namespace. If a file is specified, enter the file's namespace-G, --setgid gid: Set the gid for running the program-S, --setuid uid: Set the uid for running the program-r, --root[=directory]: Set the root directory-w, --wd[=directory]: Set the working directoryIf no program is given, the default is to execute $SHELL.Besides entering the
netnamespace,nsentercan also enter themnt,uts,ipc,pid,usernamespaces, and specify root and working directories.
Pod Container Packet Capture Demonstration
If a service’s network is unreachable, it is recommended to scale the service to one Pod and find the host machine and Pod name of this replica.
Check the host machine and Pod name where the Pod is located.
$ kubectl get pods -n test -o wideLog in to the host machine where the Pod is located and create an e_net.sh Shell script.
$ vim e_net.sh#!/usr/bin/env bashfunction e_net() { set -eu pod=`kubectl get pod ${pod_name} -n ${namespace} -o template --template='{{range .status.containerStatuses}}{{.containerID}}{{end}}' | sed 's/docker:\/\/\(.*\)$/\1/'` pid=`docker inspect -f {{.State.Pid}} $pod` echo -e "\033[32m Entering pod netns for ${namespace}/${pod_name} \033[0m" cmd="nsenter -n -t ${pid}" echo -e "\033[32m Execute the command: ${cmd} \033[0m" ${cmd}}# Run the functionpod_name=$1namespace=${2-"default"}e_netThe script depends on the following commands:
kubectl,docker,nsenter,sed,echomust be installed on the host machine.
# Add script execution permissions$ chmod +x e_net.shThis example captures request packets on port 8080 of the demo2-deployment-5f5f4fbd9b-92gd4 Pod in the test namespace.
# Enter the net namespace of Pod demo2-deployment-5f5f4fbd9b-92gd4$ ./e_net.sh demo2-deployment-5f5f4fbd9b-92gd4 test# Below is the output after the script execution Entering pod netns for test/demo2-deployment-5f5f4fbd9b-92gd4 Execute the command: nsenter -n -t 44762Now use ip addr or ifconfig to check, and you will find that the network card configuration only shows the network card configuration of the demo2-deployment-5f5f4fbd9b-92gd4 Pod.
$ ifconfig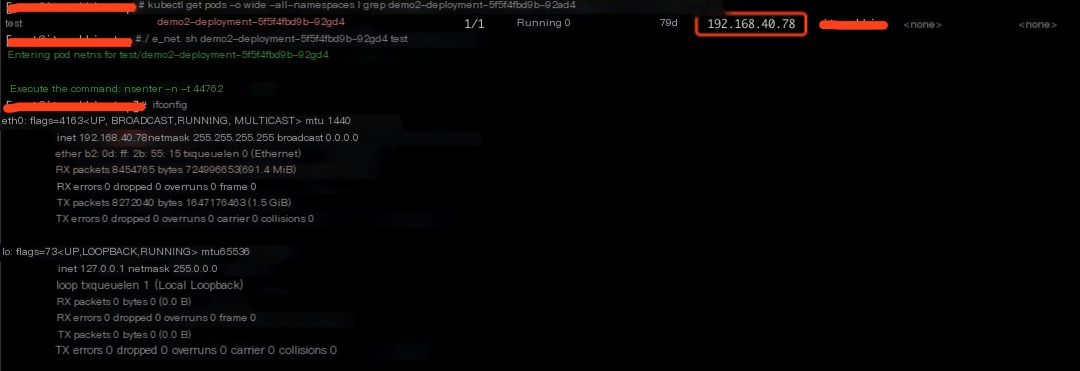 >
>
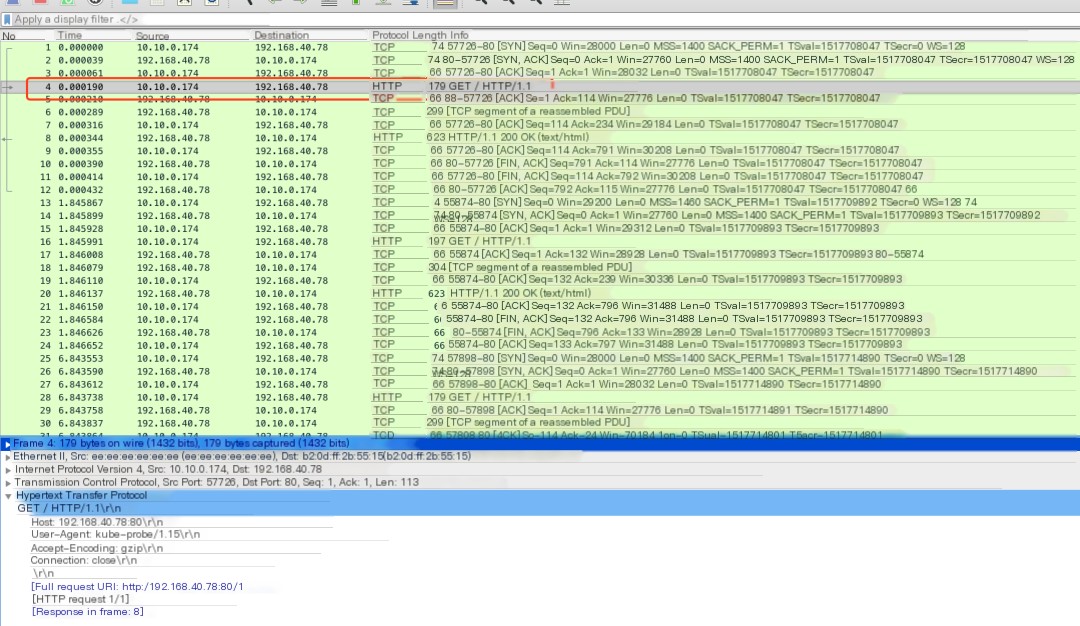
Use tcpdump to capture packets on the eth0 network card on port 80.
$ tcpdump -nnnvv -As 0 -i eth0 port 80 -w demo2.pcaptcpdump: listening on eth0, link-type EN10MB (Ethernet), capture size 262144 bytes63 packets captured63 packets received by filter0 packets dropped by kernelDownload demo2.pcap to your local machine and use wireshark to view the packets.
 >
>
Principle
namespace is a scope of some process attributes in Linux. By using namespaces, different processes can be isolated.
Linux is continuously adding namespaces, and currently, there are:
mount: Mount namespace, giving processes an independent mount file system, started in Linux 2.4.19ipc: IPC namespace, giving processes an independent IPC, including message queues, shared memory, and semaphores, started in Linux 2.6.19uts: UTS namespace, giving processes an independent hostname and domain name, started in Linux 2.6.19net: Network namespace, giving processes an independent network stack, started in Linux 2.6.24pid: PID namespace, giving processes an independent PID space, started in Linux 2.6.24user: User namespace, giving processes an independent user space, started in Linux 2.6.23, ended in Linux 3.8cgroup: Cgroup namespace, giving processes an independent cgroup control group, started in Linux 4.6
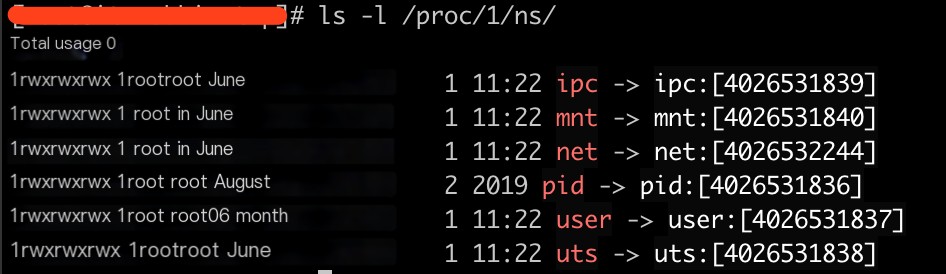
Every process in Linux has a namespace, and you can see the namespace file descriptors in the /proc/PID/ns directory.
nsenter
The nsenter command is essentially a wrapper over setns, allowing us to specify the process ID instead of the file descriptor of the namespace.
After specifying the process ID (PID) and the namespace to enter, nsenter will help us find the corresponding namespace file descriptor /proc/PID/ns/FD and then use that namespace to run a new program.