
As the title suggests, the method to bypass campus network authentication has been around for quite some time. However, it seems not many people are aware of it. I stumbled upon it during my freshman winter break last year. I vividly remember that when I first arrived at my university, I noticed that CDTU (the mobile campus network) had not yet patched this vulnerability. Determined to set up a server for free internet access, I went through numerous trials and errors before finally succeeding. Now, a year later, I’m sharing my entire experience with you.

Principle Analysis:
Let’s first focus on the principles and the specific ports used. After all, understanding the “why” is more important than just knowing the “how.”
Before connecting to a network that requires web authentication (e.g., CDTU), we are assigned a private IP address. At this point, if we access an HTTP website, the gateway intercepts and modifies the HTTP response packet, issuing a 302 redirect to a web authentication page (this is why HTTPS websites cannot redirect to the authentication page).
Here’s a simple experiment to demonstrate this. Using my campus network, CDTU, as an example:
Without authenticating on the campus network, I initiated both HTTP and HTTPS requests.
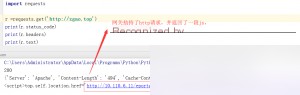
For the HTTPS request, the script threw an error, which I handled with exception handling.

The gateway (or switch) typically allows DHCP and DNS packets by default, specifically UDP 53 and UDP 67. Some gateways don’t even inspect these packets, meaning any form of data packet can pass through seamlessly.
Explanation from Baidu:
Port 53: This port is used by DNS (Domain Name System) servers for domain name resolution. It allows the conversion of domain names to IP addresses, enabling quick website access by remembering domain names instead of IPs.
Ports 67 and 68: Port 67 receives client requests for IP allocation, while port 68 responds to clients with success or failure messages. DHCP (Dynamic Host Configuration Protocol) is a network protocol used in LANs that operates over UDP. It primarily serves two purposes: automatically assigning IP addresses to devices in internal networks or ISPs and providing centralized management for network administrators. UDP 67 and UDP 68 are standard DHCP service ports, used by DHCP servers and clients, respectively.
The principle is the same for all three ports. By leveraging a public server, we can achieve free internet access.
Installing SoftEther VPN Server (Official Website Blocked)
Back in my freshman year, I successfully set this up to bypass campus network authentication and achieve free internet access. I was beyond excited at the time. 
Prerequisites: A cloud server with a public IP address (any cloud provider will do, but I personally recommend Alibaba Cloud).
You can use either Linux or Windows as the operating system and download the corresponding server software.
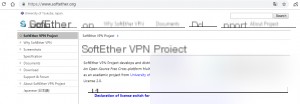
http://www.softether-download.com/cn.aspx
This is the SoftEther download page, but it’s blocked in some regions. You can search for alternative download sources online.
I’ll demonstrate the installation process on a Linux server using CentOS 7.
Connect to your VPS via SSH, update the system, and install tools like GCC.
If you’re using Ubuntu, replace “yum” with “apt” in the commands below.
yum update && yum upgrade
Install make, gcc, and g++ compilation tools:
yum install -y make gcc gcc-c++
Since I’m using a Hong Kong VPS, I was able to download the file directly. If you’re using a server in a restricted region, you can upload the file to your VPS manually.
wget http://www.softether-download.com/files/softether/v4.24-9651-beta-2017.10.23-tree/Linux/SoftEther_VPN_Server/64bit_-_Intel_x64_or_AMD64/softether-vpnserver-v4.24-9651-beta-2017.10.23-linux-x64-64bit.tar.gz
For those unfamiliar with uploading files to a VPS, here’s a simple command:
yum install -y lrzsz
rz # Upload a local file
sz [filename] # Download a specific file to your local machine
Typically, files are uploaded to the root directory of the root user, i.e., /root.
At this point, the SoftEther_VPN_Server compressed file should already be on your VPS.
tar -zxvf soft (press the Tab key to auto-complete)

Execute the following commands as shown in the image:
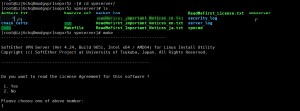
cd vpnserver/
make
Enter “1” three times consecutively.
Setting Up SoftEther VPN Service
./vpnserver start
./vpncmd
Follow the prompts: Enter “1,” press Enter, and press Enter again (don’t press “1” for all prompts).
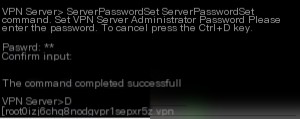
At the command prompt, type: ServerPasswordSet
Set the server management password. Confirm it twice, then press Ctrl+D to exit management mode.
It’s best to add vpnserver to the startup list so that it starts automatically when the VPS reboots.
vi /etc/rc.local
Add the following line before “exit 0”: /root/vpnserver/vpnserver start

Save and exit (don’t tell me you don’t know how to use vi; if you really don’t, use nano instead).
vi usage: Press Esc to return to command mode, press “i” to enter insert mode, and in command mode, type “:wq!” to save and exit.
The installation on the Linux server is now complete.
Managing SoftEther VPN Server on Windows
Next, we’ll manage the server using a graphical interface on your computer.
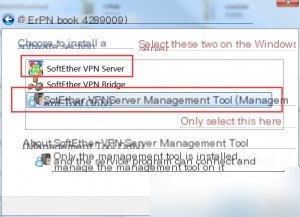
First, download and install SoftEther VPN Management.
Click “New Setting” to configure the name, hostname, IP, management password, etc.
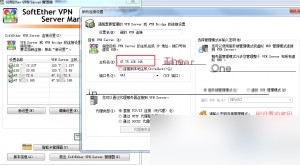
Select the newly created setting and click “Connect.” Close the two windows to access the main management interface.
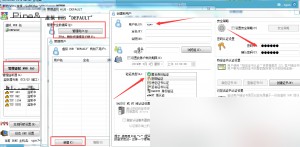
Click “Manage Virtual Hub” -> “Manage Users,” then click “New” in the lower-left corner. Enter a username, and choose an authentication method (anonymous, username/password, or certificate-based). In the security policy section, you can set the user’s maximum download and upload speeds.
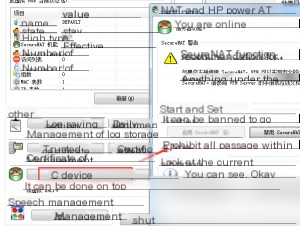
Note: SecureNAT and Local Bridge cannot be enabled simultaneously! Otherwise, it may cause a Layer 2 loop, consuming a significant amount of CPU resources.
Setting Up OpenVPN
OpenVPN configuration involves generating certificates, but SoftEther also provides a more convenient method for configuring both the server and the client. This saves us a lot of time and effort.
Server Configuration Method:
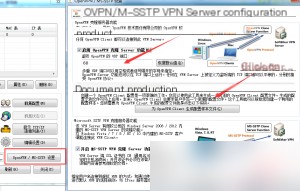
Ports 53/67/68 are generally usable. Here, I chose port 68.
On the main management interface, click on the bottom-right option for OpenVPN/MS-SSTP, set a UDP port, and then click “Generate Configuration File for OpenVPN.” Save the resulting ZIP file when prompted, and confirm.
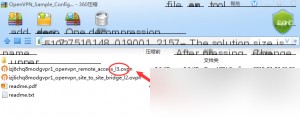
Client Configuration Method:
Download and install the OpenVPN client. Copy the file ending with `.l3` from the downloaded ZIP file into the `config` folder of the installation directory.
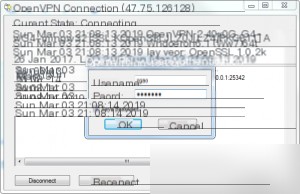
Open OpenVPN, right-click on the icon in the bottom-right corner, and select “Connect.”

Then, enter the username and password set in the Virtual Hub.
However, many cloud server providers require you to modify the corresponding security group policies on the server to allow port traffic, such as on Alibaba Cloud.
This allows you to bypass campus networks and achieve free data usage.
However,
CDTU (our campus network) has already patched this method. Interestingly, I worked with the network management center staff at the school to fix it. Haha, bet you didn’t see that coming! But the purpose of this post is to summarize the entire process for reference. If anyone has more creative ideas for free data usage, feel free to share them with me.
Update on November 6
Recently, many people have contacted me asking about issues encountered during setup. Here are some additional notes.
Currently, most people are downloading the latest version of SoftEther, which seems to be version 4.30. Based on testing, this version has issues. The final `.ovpn` file generated lacks CA information and is only 5 KB in size, whereas a normal file should be around 9 KB.
I recommend using version 4.24, as mentioned in this post. You can download it directly from my blog.
You can use the `wget` command to download it directly on your VPS:
wget https://zgao.top/download/softether-vpnserver-v4.24-9651-beta-2017.10.23-linux-x64-64bit.tar.gz
Another common issue arises during the setup process.
In command-line mode, SoftEther defaults to using port 443 to connect to the management interface. If port 443 on your VPS is already in use, you’ll encounter the following error:
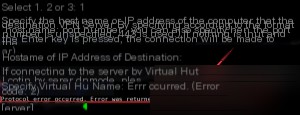
The solution is to directly enter:
localhost:5555
at the “Hostname or IP Address of destination” prompt, then press Enter.