
In Linux emergency response, the find command is one of the most frequently used commands. Here are some lesser-known find command troubleshooting tips that can greatly enhance efficiency when used proficiently.
Using find with Breadth-First Search to Locate Files
By default, the find command uses depth-first search and does not support breadth-first search.
One of the most frustrating aspects of emergency response is the need to search for keywords within certain files. Depth-first search causes the find command to perform unnecessary work in deep directories, and it must complete the search before moving to the next top-level directory, wasting a lot of time.
Is there a way to make find support breadth-first search?
Clever Use of the find Command’s depth Parameter
The find command supports searching directory levels, such as the -mindepth and -maxdepth parameters, which correspond to the minimum and maximum directory levels to search.
seq 1 10 | xargs -n2 -P5 sh -c 'find / -iname "xxx" -mindepth $1 -maxdepth $2 2> /dev/null' _
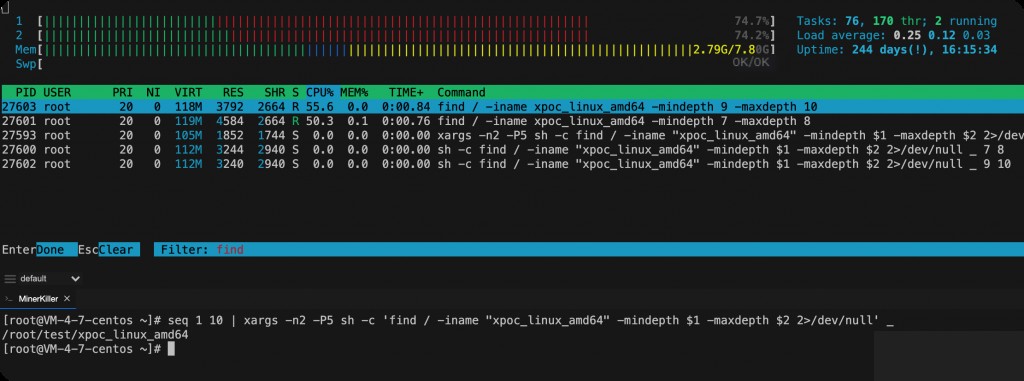
This command is equivalent to find searching within specified directory levels. For instance, the first search is within 1-2 levels, and the second search is within 3-4 levels. The above command might seem abstract, but it becomes clearer with the following example:
 [root@VM-4-7-centos ~]# seq 1 10 | xargs -n2
1 2
3 4
5 6
7 8
9 10
[root@VM-4-7-centos ~]# seq 1 10 | xargs -n2 sh -c 'echo find / -iname xxx -mindepth $1 -maxdepth $2 2> /dev/null' _
find / -iname xxx -mindepth 1 -maxdepth 2
find / -iname xxx -mindepth 3 -maxdepth 4
find / -iname xxx -mindepth 5 -maxdepth 6
find / -iname xxx -mindepth 7 -maxdepth 8
find / -iname xxx -mindepth 9 -maxdepth 10
The xargs -P5 option indicates that 5 subprocesses will execute simultaneously, which can speed up the search.
The seq 1 10 command specifies searching up to 10 directory levels, which can be adjusted as needed.
Using grep to Search for Keywords Within Files
seq 1 10 | xargs -n2 -P5 sh -c 'find / -type f -mindepth $1 -maxdepth $2 -exec grep -inl "keyword" {} 2> /dev/null \;' _
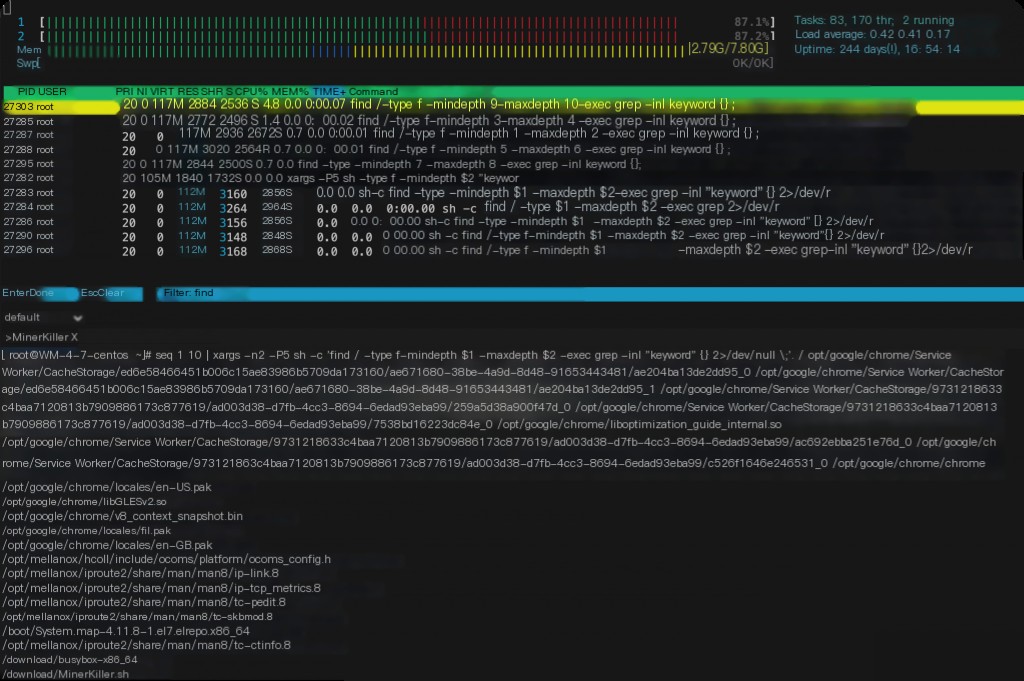
When a match is found, it does not directly display the matching content but prints the file path. This command is highly efficient for investigating when the specific keyword’s location within files is unknown.
Using find to Locate Files Modified Within a Specific Time Range
This is one of the most frequently used options in my investigations. Sometimes, locating file changes within a specific time frame requires the -newermt option. The format is as follows:
find / -newermt “start time” ! -newermt “end time”
Note that the exclamation mark in the middle cannot be omitted.
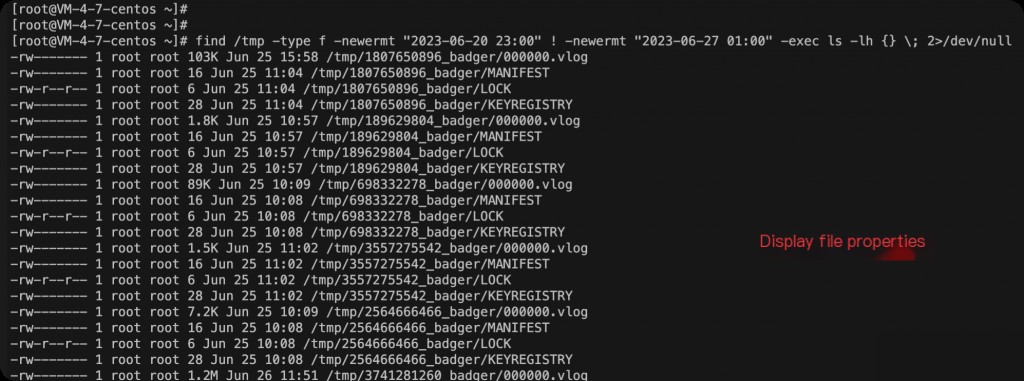
For example, to find files modified between 11:00 PM on December 31, 2022, and 1:00 AM on January 1, 2023, the command is as follows:
find / -newermt "2022-12-31 23:00" ! -newermt "2023-01-01 01:00" 2> /dev/null
Alternatively, you can also output the modification time of the files.
find / -newermt "2022-12-31 23:00" ! -newermt "2023-01-01 01:00" -exec ls -lh {} \; 2> /dev/null
Finding Files Modified in the Last n Days
For example, to find files modified in the last 3 days, the command is as follows:
find / -type f -mtime -3
To find files modified more than 3 days ago:
find / -type f -mtime +3
Using find to Locate Files with Specific Permissions
Finding Executable Files
find /root -executable -type f -exec ls -lh {} \; -quit
- -executable specifies files with executable permissions
- -quit exits after matching the first file that meets the criteria
Finding Files with the s Bit Set
find / \( -perm -4000 -o -perm -2000 \) -type f -exec ls -lh {} \; 2> /dev/null
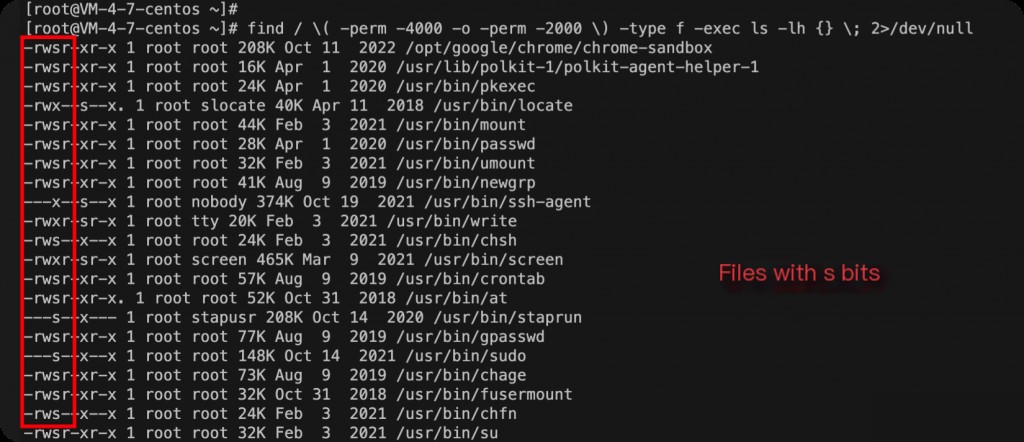
-perm -4000indicates files with thesetuidbit set-perm -2000indicates files with thesetgidbit set- -o indicates an OR relationship
Why use -perm -4000 instead of -perm 4000? What’s the difference?
When using the -perm option in the find command, the - prefix has a special meaning. -perm -mode matches any file with any of the bits specified by mode set, while -perm mode matches only files with permissions exactly equal to mode.
For example, -perm -4000 matches all files with the setuid bit set (regardless of other permission bits), while -perm 4000 matches files with permissions exactly equal to 4000 (i.e., only the setuid bit is set, and no other permission bits are set).
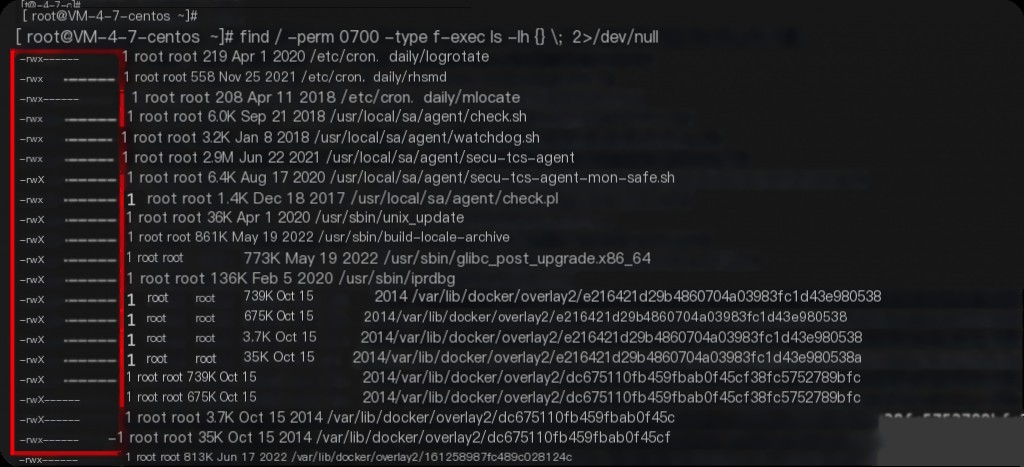
Finding Files with Specific Permissions
For example, to find files with 0700 permissions, which is an exact match:
find / -perm 0700 -type f -exec ls -lh {} \; 2> /dev/null
Using find to Exclude Directories
In emergency investigations, it is often necessary to exclude certain directories. For example, to find all executable files under the root directory but exclude the /usr directory:
find / -path /usr -prune -o -type f -executable
In this command, -path /usr -prune -o means if the path is /usr, do not search that path; otherwise, continue executing the subsequent command.
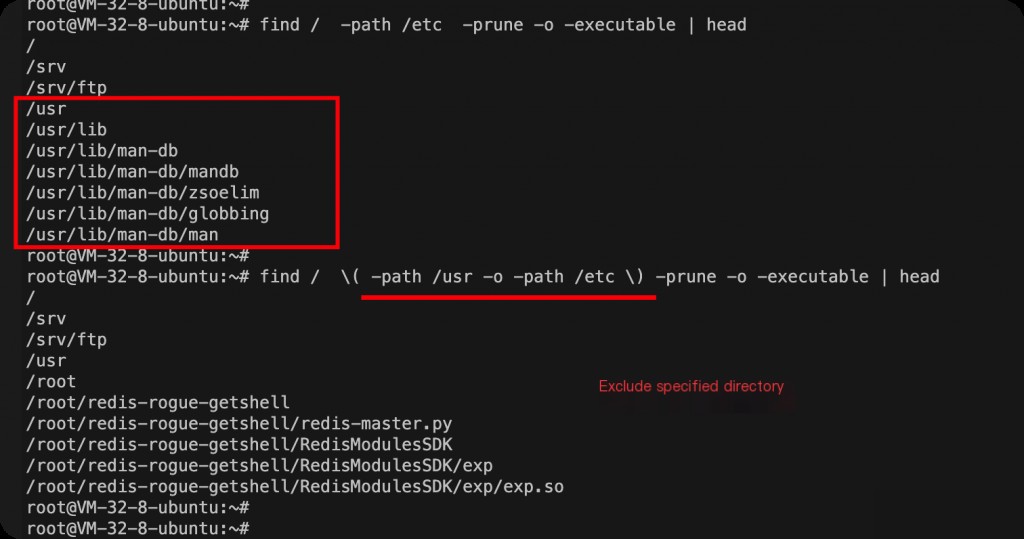
What if you need to exclude multiple directories?
find / \( -path /usr -o -path /etc \) -prune -o -executable
In this case, use parentheses to group multiple directories for exclusion.
Parallel Operations with find
Use + instead of \; to perform parallel operations in the find command.
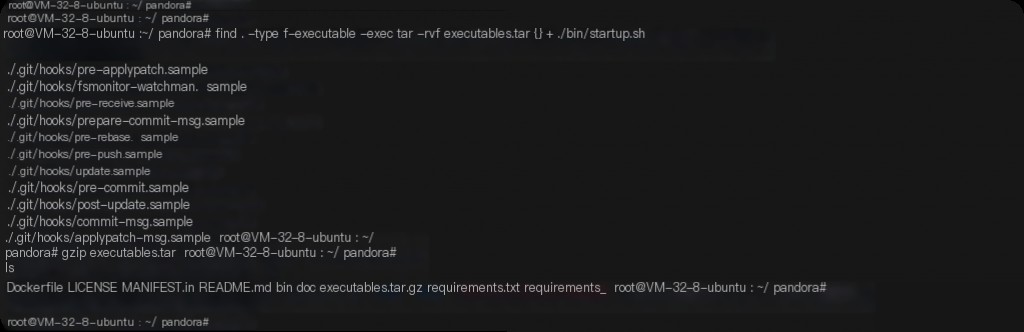
For example, after completing an investigation, you may need to package and transfer files from different directory levels. To package and compress all executable files under /targetDir:
 find /targetDir -type f -executable -exec tar -rvf executables.tar {} +
gzip executables.tar
Alternatively, find all files first, then add them to the tar archive in one go. This way, you can compress the archive without appending files. Note that -print0 and -0 options are used to handle special characters (such as spaces or newlines) in filenames.
find . -type f -executable -print0 | xargs -0 tar -czvf executables.tgz
However, this method does not utilize find’s parallel capabilities.
Another example: to find all .jpg files in a directory and copy them to another directory, use the following command:
find /path/to/dir -name "*.jpg" -exec cp {} /path/to/other/dir +
This will call cp with as many arguments as possible, rather than calling cp once for each file found.
Differences Between + and \; in find’s exec
In the find command’s -exec operation, you can end with ; or +.
- When ending with
;, thefindcommand executes the specified command after-execfor each matching file. If 100 files are found, the command will execute 100 times. - When ending with
+, thefindcommand passes as many matching filenames as possible to the command specified after-execin one go, potentially executing the command only once.
The + method is usually more efficient because it reduces the number of command executions. However, not all commands can accept multiple files as arguments, in which case the ; method is needed.
Regular Expression Search with find
The -regex option allows searching using regular expressions, not just simple filename matching. For example, to find files ending in png or jpg:
find / -regex ".*\.\(jpg\|png\)$"
This will find all .jpg and .png files, meeting more complex search needs.
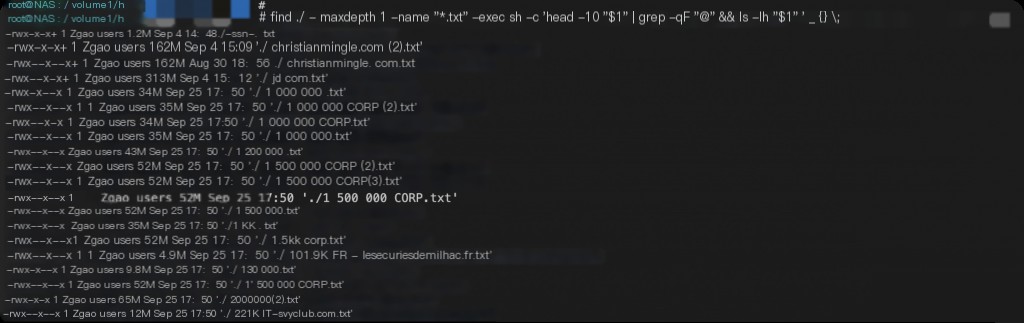
How to Handle Errors Caused by Spaces in Filenames?
For example, to check
find ./ -maxdepth 1 -name "*.txt" -exec sh -c 'head -10 $1 | grep -qF "@" && ls -lh $1 ' _ {} \;
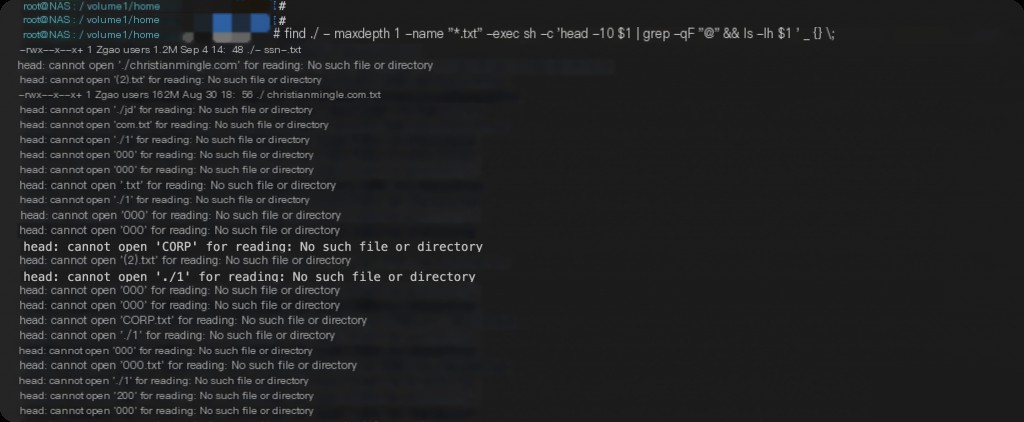
The correct way is to use double quotes around the filename placeholder.
find ./ -maxdepth 1 -name "*.txt" -exec sh -c 'head -10 "$1" | grep -qF "@" && ls -lh "$1" ' _ {} \;
How to Nest Single Quotes in -exec sh -c ‘command’?
For example, if you want to use sed within -exec where single quotes are necessary.
sed -i 's/\t/ /g' inputfile
You can write it like this:
find . -name "*.txt" -exec sh -c 'sed -i '\''s/\t/ /g'\'' {}' \;
Add an extra ‘\’ before each single quote.