PowerShell can be used for various aspects of security-related processes. This article introduces a collection of PowerShell commands or scripts to maximize the efficiency of security operations.
Creating Security Tools with PowerShell
Secure Strings
Sometimes we may want to save a password to a file and read it later. However, if the file is stored in plain text, anyone can read it. Therefore, we can use PowerShell’s `ConvertFrom-SecureString` and `ConvertTo-SecureString` cmdlets to save a SecureString to a file.
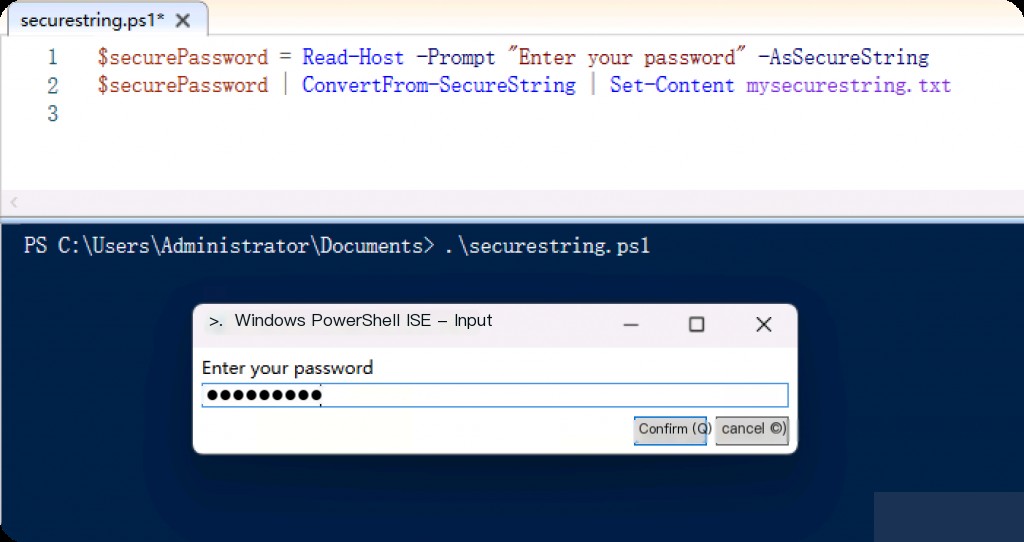
Use PowerShell code to create a SecureString, encrypt it, and save it to a file:
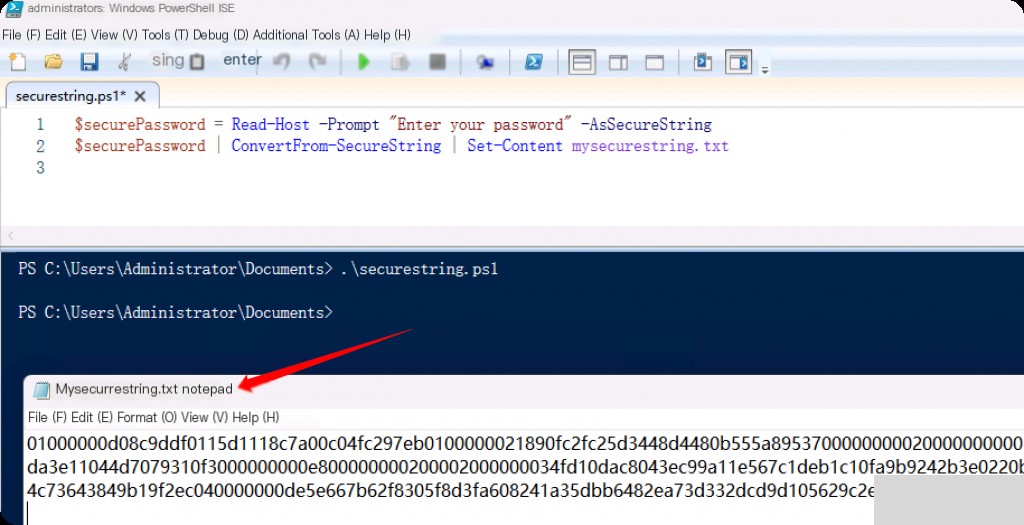
When we run this script and are prompted to enter a password, here we output p@ssw0rd!! Let’s enter its value and check the contents of the “mysecurestring.txt” file:
Now, without using plain text passwords in any files, scripts, or command lines, we can use the password by referencing the encrypted file when necessary.
 # Read SecureString from Saved file
$securePassword = Get-Content mysecurestring.txt | ConvertTo-SecureString

# Convert SecureString to PSCredential
$credential = New-Object System.Management.Automation.PSCredential ("username", $securePassword)

# Use Credential for web request
$webRequest = Invoke-WebRequest -Uri $url -Credential $credential
In this example, we use the Get-Content cmdlet to read the file and use ConvertTo-SecureString to recover the encrypted string. Then, we convert this SecureString into a PSCredential object and send that object as authentication information to the web service.
Tracking Important Windows Event IDs
Event ID 4625 This event is triggered when an account login attempt fails. This may indicate that an attacker is trying to take over the account.
Event ID 4648 Indicates that a user has performed explicit authentication for another account (especially for services or tasks). This may be normal, but it may also indicate that an attacker has taken over the account and is trying to use it to gain more access.
Event ID 4703 Indicates that the security settings of a task have changed. This may indicate that an attacker is trying to exploit some vulnerabilities.
Event ID 1102 Indicates that the logs have been cleared. This may indicate that an attacker is trying to cover their tracks.
Event ID 7045 Indicates that a new service has been installed. This may indicate that an attacker is trying to add a malicious service to the system.
We can write a script that scans the event logs for these events every hour and notifies us via email when any event is triggered:
 # SMTP Server Settings
$smtpServer = "smtp.zgao.top"
$smtpUser = "zgao"
$smtpPassword = "*"

# Sender and Recipient Mail Addresses
$from = "[email protected]"
$to = "[email protected]"

# Determine Start Time
$lastHour = (Get-Date).AddHours(-1)

#EventIDList
$eventIDs = @(4625, 4648, 4703, 1102, 7045)

#ControlEvents
foreach ($id in $eventIDs) {
	$events = Get-WinEvent -FilterHashtable @{Logname='Security'; ID=$id; StartTime=$lastHour}
	if ($events) {
		$subject = "Alert: Detected Event ID $id"
		$body = "Detected event ID $id on the following system: $($events[0].MachineName) at $($events[0].TimeCreated)"

		# Create Credential Object for SMTP
		$smtpCred = New-Object System.Management.Automation.PSCredential -ArgumentList $smtpUser, $($smtpPassword | ConvertTo-SecureString -AsPlainText -Force)

		# Send Email Notification
		Send-MailMessage -SmtpServer $smtpServer -From $from -To $to -Subject $subject -Body $body -Credential $smtpCred -UseSsl
	}
}
This script assumes that the SMTP server supports SSL and requires a username and password for authentication. These values should be set according to the requirements of your SMTP server. We just need to save it as a ps1 script and add it as a scheduled task to run every hour. It will check for events that occurred in the last 60 minutes and send us an email if any of the events specified in the $eventIDs string occurred.
The false positive rate in the notifications from the script we created may be high. For example, even if a user accidentally enters an incorrect password once, it will trigger a 4625 (login failure) event. So, how can we set a threshold for each event ID to trigger an alert only if it exceeds the threshold?
  # Only look for the past 1 hour
$lastHour = (Get-Date).AddHours(-1)

# EventID and Threshold List
$eventLimits = @{4625=10; 4648=5; 4703=3; 1102=1; 7045=2}

#ControlEvents
foreach ($entry in $eventLimits.GetEnumerator()) {
	$id = $entry.Key
	$limit = $entry.Value
	$events = Get-WinEvent -FilterHashtable @{Logname='Security'; ID=$id; StartTime=$lastHour} -ErrorAction SilentlyContinue
    if ($events -and $events.Count -gt $limit) {
        $subject = "Alert: Detected Event ID $id"
        $body = "Detected $($events.Count) instances of event ID $id on the following system: $($events[0].MachineName) at $($events[0].TimeCreated)"
        Write-Output $body
    } else {
        Write-Output "No events found for ID $id in the last hour."
    }
}
Since we don’t actually have a configured sending email, we output directly to the console here.
Combining Threat Intelligence with PowerShell
Threat intelligence sources provide intelligence information such as hashes, domains, IP addresses, etc. For example, by querying the hashes of applications running on our system, we can question whether the application is malicious, or whether the IP address connected to our system has a record of malicious activity.
IP Reputation Check
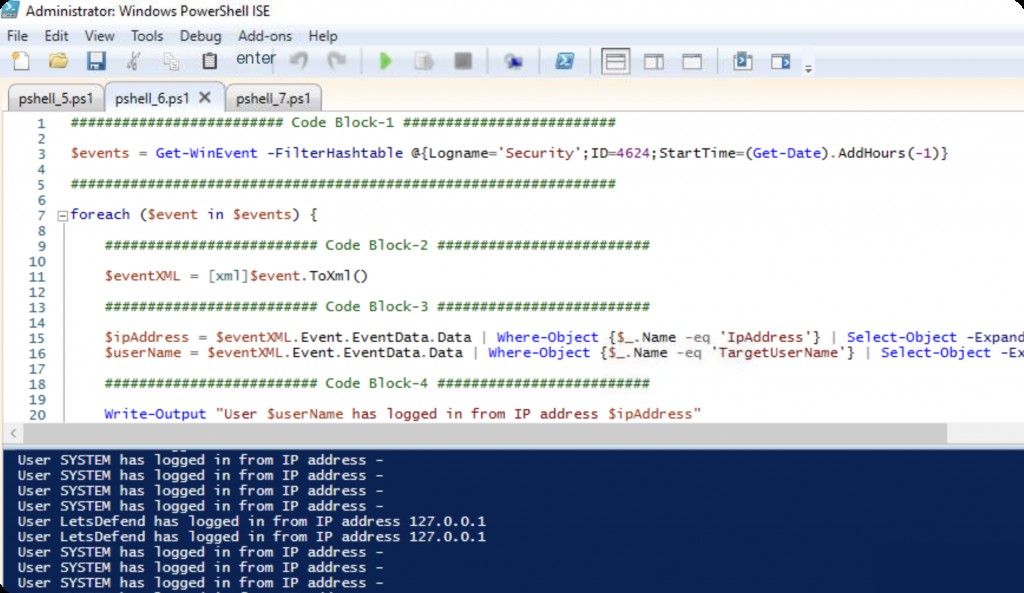
We list the usernames and IP addresses of users who have successfully logged into our system in the last hour and check if any of these IP addresses have a record of malicious activity.
 # Event ID 4624 indicates a successful user login attempt.
$events = Get-WinEvent -FilterHashtable @{Logname='Security';ID=4624;StartTime=(Get-Date).AddHours(-1)}

# We loop through the events we obtain
foreach ($event in $events) {
	# We get the XML version of the event
	$eventXML = [xml]$event.ToXml()

	# We get relevant information from XML.
	$ipAddress = $eventXML.Event.EventData.Data | Where-Object {$_.Name -eq 'IpAddress'} | Select-Object -ExpandProperty '#text'
	$userName = $eventXML.Event.EventData.Data | Where-Object {$_.Name -eq 'TargetUserName'} | Select-Object -ExpandProperty '#text'

	# We print the username and IP address on the screen
	Write-Output "User $userName has logged in from IP address $ipAddress"
}
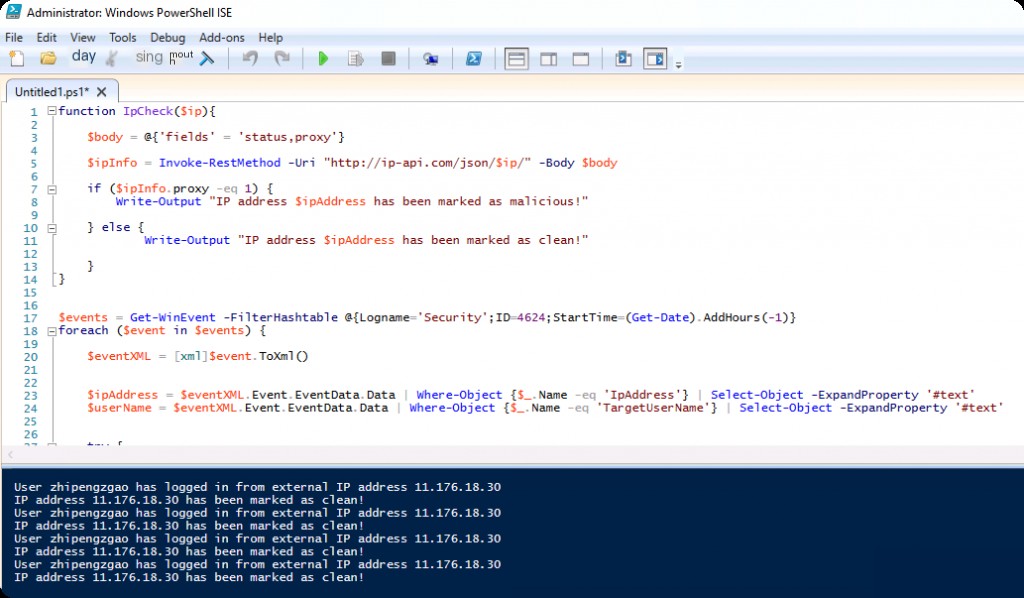
powershell
function IpCheck($ip){

	$body = @{'fields' = 'status,proxy'}

	$ipInfo = Invoke-RestMethod -Uri "http://ip-api.com/json/$ip/" -Body $body

	if ($ipInfo.proxy -eq 1) {
		Write-Output "IP address $ipAddress has been marked as malicious!"

	} else {
			Write-Output "IP address $ipAddress has been marked as clean!"

	}
}


$events = Get-WinEvent -FilterHashtable @{Logname='Security';ID=4624;StartTime=(Get-Date).AddHours(-1)}
foreach ($event in $events) {

	$eventXML = [xml]$event.ToXml()


	$ipAddress = $eventXML.Event.EventData.Data | Where-Object {$_.Name -eq 'IpAddress'} | Select-Object -ExpandProperty '#text'
	$userName = $eventXML.Event.EventData.Data | Where-Object {$_.Name -eq 'TargetUserName'} | Select-Object -ExpandProperty '#text'


	try {
		$ipBytes = [System.Net.IPAddress]::Parse($ipAddress).GetAddressBytes()
		if ($ipBytes[0] -eq 10) {
			# This is Local Block, Do Nothing
			continue
		}
		elseif ($ipBytes[0] -eq 172 -and $ipBytes[1] -ge 16 -and $ipBytes[1] -le 31) {
			# This is Local Block, Do Nothing
			continue
		}
		elseif ($ipBytes[0] -eq 192 -and $ipBytes[1] -eq 168) {
			# This is Local Block, Do Nothing
			continue
		}
		else {
			# This is Real IP
			Write-Output "User $userName has logged in from external IP address $ipAddress"
			ipCheck ($ipAddress)
		}
	}
	catch {
		# This is Local Login Success
		continue
	}
}
You can add an online interface to check the reputation of the IP.
Hash Reputation Check
We can use different algorithms to calculate the hash values of all files in the file system. This hash information is like a snapshot of the current state of the file, and even a single bit change in the file will change the hash value.
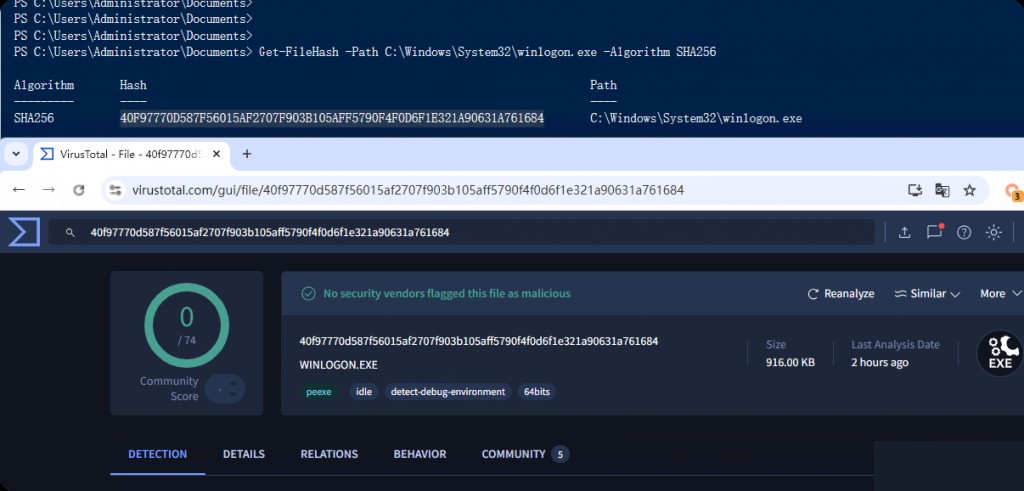
For example, when we use the Get-FileHash command with the SHA256 parameter to calculate the hash value of the “winlogon.exe” file running on the system, we get the following output:
So how do we use PowerShell to scan TI sources? The following script will extract the hash values of executable files (.exe, etc.) of running processes. We use these hash values to check if malware is running on our system:
# Get running process list
$processes = Get-Process

# Start Foreach loop for process list
$results = foreach ($process in $processes) {
	# Find current process path
	$filePath = $process.MainModule.FileName

	if ($filePath) {
		# Calculate Hash Value with SHA256 Algorithm
		$hash = Get-FileHash -Path $filePath -Algorithm SHA256
		# Add FileName,Path and Hash values into PSObject
		[PSCustomObject]@{
			'Process Name' = $process.Name
			'File Path' = $filePath
			'SHA256 Hash' = $hash.Hash
		}
	}
}

# Groups array by SHA256 hash value and returns only unique values
$results | Group-Object -Property 'SHA256 Hash' | ForEach-Object {
	$_.Group | Select-Object -First 1
}
In the above script, we first get the list of running processes on the system. Then, we find the path of each process in this list and calculate its hash value by providing this path to the Get-FileHash cmdlet. Instead of listing the values directly, we save the found values into a PSObject. The reason for doing this is to handle multiple copies of the same executable file. Since this can cause unnecessary clutter and confusion, we first accumulate the obtained values into a PSObject, and finally use the Group-Object cmdlet to make our output unique by taking only one value with the same hash value.
Let’s further develop our script and query the hash values we get on Virus Total (requires API key) for analysis.
# VirusTotal API key values
$virusTotalApiKey = "xxxxxxxxxxxxxxxxxxxxxxxxxxxxxxxxxxxxxxxxxxxxxxxx"
# Get running process list
$processes = Get-Process
# Start Foreach loop for process list
$results = foreach ($process in $processes) {
# Find current process path
$filePath = $process.MainModule.FileName
if ($filePath) {
# Calculate Hash Value with SHA256 Algorithm
$hash = Get-FileHash -Path $filePath -Algorithm SHA256
# Add FileName,Path and Hash values into PSObject
[PSCustomObject]@{
'Process Name' = $process.Name
'File Path' = $filePath
'SHA256 Hash' = $hash.Hash
}
}
}
# Groups array by SHA256 hash value and returns only unique values
$uniqueResults = $results | Group-Object -Property 'SHA256 Hash' | ForEach-Object {
$_.Group | Select-Object -First 1
}
foreach ($result in $uniqueResults) {
$hash = $result.'SHA256 Hash'
# VirusTotal Hash Control
try{
$vtResponse = Invoke-RestMethod -Method 'Get' -Uri "https://www.virustotal.com/api/v3/files/$hash" -Headers @{"x-apikey" = $virusTotalApiKey}
#Write-Output $vtResponse
if ($vtResponse.data.attributes.last_analysis_stats.malicious -gt 0) {
# If malicious found
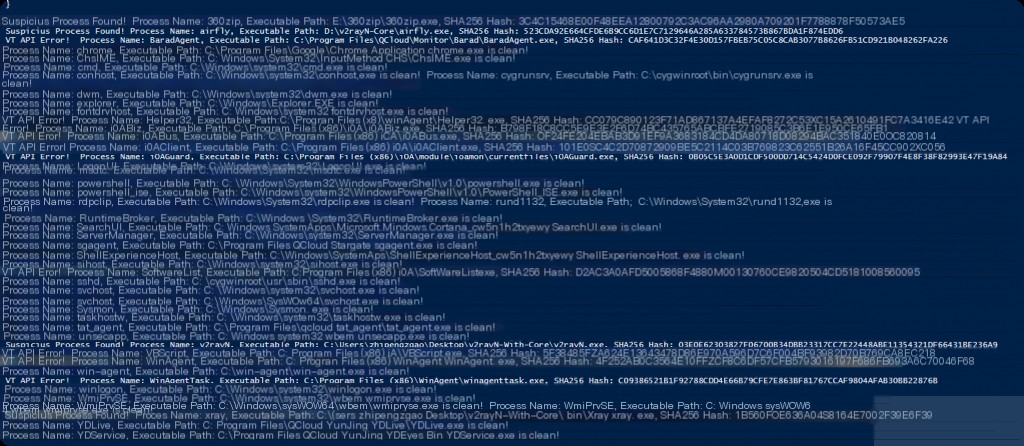
Write-Output "Suspicious Process Found! Process Name: $($result.'Process Name'), Executable Path: $($result.'File Path'), SHA256 Hash: $hash"
}else{
Write-Output "Process Name: $($result.'Process Name'), Executable Path: $($result.'File Path') is clean!"
}
}catch{
Write-Output "VT API Error! Process Name: $($result.'Process Name'), Executable Path: $($result.'File Path'), SHA256 Hash: $hash"
}
}
We filter the suspicious SHA1 in the output for further analysis. Since the VT API has request rate limits, we can collect more APIs as a pool to make batch requests to reduce interface errors.
We can run this script as needed or schedule it to run at specific times.
Check for Updates
Using PowerShell, we can check if any updates need to be applied to the system and report the results.
PowerShell is a command-line shell designed and developed by Microsoft that supports Windows, MacOS, and Linux operating systems. This means you can write a single PowerShell script and run it on different platforms. However, there are some important considerations when creating cross-platform scripts.
Checking PowerShell Version
The version of PowerShell affects the available features and commands. While PowerShell 5.1 was released as part of Windows, PowerShell 7 (formerly known as PowerShell Core) is Microsoft’s open-source version that runs on multiple platforms. Commands for performing certain tasks may be named differently in different versions of PowerShell. Some commands may not be available in every version of PowerShell. Another version-related issue is the parameters we use in commands, as some parameters may not be accepted in different versions of PowerShell.
This may require ensuring the use of a specific PowerShell version, for example:
 # Check PowerShell Version
if ($PSVersionTable.PSVersion.Major -lt 7) {
	Write-Output "This script requires PowerShell 7 or Greater"
}
Checking Platform-Specific Commands
Some PowerShell commands or features are only available on specific operating systems. In such cases, it is important to check the operating system and create the script accordingly.
 # Check OS
if ($IsWindows) {
    # Windows specific code
} elseif ($IsLinux) {
    # Linux specific code
} elseif ($IsMacOS) {
    # macOS specific code
}
File Paths and Separators
Different operating systems may have different file path separators and file structures. PowerShell provides some cross-platform compatibility features in this regard. For example, the Join-Path cmdlet allows you to use the correct file path separators on different platforms.
The Join-Path cmdlet is very useful when creating cross-platform scripts because it understands the file path format of the operating system. This means it can avoid cross-platform compatibility issues, especially those that may arise when manually combining file paths.
For example, in Linux, the file path separator is “/“, while in Windows it is “\“. The Join-Path cmdlet uses the correct separator based on the operating system it is running on.
Suppose you need to generate the full path of a file. We know this file is located in the “C:” drive, in the “users” folder, under the “Admin” subfolder, and the file name is “document.txt”.
This script sets the “$path” variable to “C:\Users\Admin\document.txt”. The Join-Path cmdlet is typically used in conjunction with other PowerShell cmdlets that operate on file paths and is used to create complex file path hierarchies. These cmdlets include Get-Content, Set-Content, Copy-Item, Remove-Item, and so on. When you use `Join-Path` with these cmdlets, it creates file paths in a more concise and less error-prone manner.