

I believe that friends who do traffic analysis and emergency response often need to use WireShark for network traffic packet analysis, such as NTA’s full traffic packets. However, it must be said that once the data packets are too large and the log entries are too many, loading becomes extremely slow, and analysis becomes particularly troublesome, making WireShark seem inadequate. Recently, I learned about the Brim tool, and after trying it out, I found it to be a boon for lazy people, so I’m here to introduce it to everyone.

Brim’s official website: https://www.brimsecurity.com/
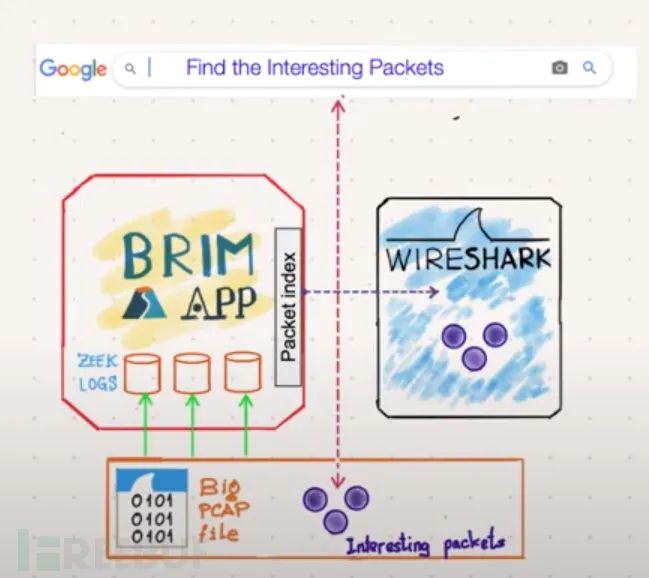
Brim is packaged as a desktop application, built with Electron like Slack, free and open-source. After installation, you can use Brim to open a PCAP file, which will convert the PCAP file into ZNG format Zeek logs. With Brim, you can search logs and collaborate with WireShark to deeply analyze data packets from specific traffic. Currently, Brim only supports desktop search, but it will also support cloud and cluster search functions in the future.
Generally, everyone uses WireShark to parse specific traffic or protocols. However, as mentioned above, WireShark has an unavoidable problem: if you load a huge PCAP file and need to analyze it, it becomes very painful. With Brim, you can quickly load large PCAP files and start searching immediately, getting responses within seconds. When you find traffic entries that need deliberate analysis, you can directly parse them into WireShark for analysis. A multi-GB PCAP file will generally extract a few hundred MB of ZNG logs, making it easy to search with Brim.
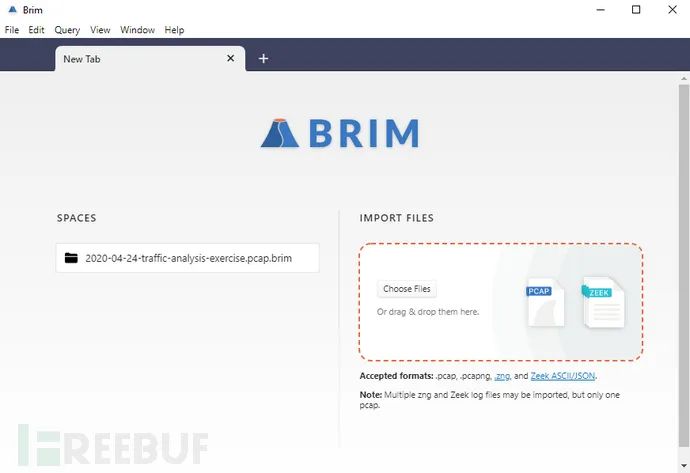
Installation is very simple. After downloading from the official website https://www.brimsecurity.com/download/, just double-click to allow, and there is no complex installation interface or configuration interface. You can use it directly after opening.
After Brim loads the Pcap file, it displays all data content in a KV structure, with each BLOCK being a key name = key value. For example, as shown in the screenshot, “CbLZFm13mbz1BVuu88” is the key value for the key name “uid”. Hovering the mouse over the key name position will show the key name.
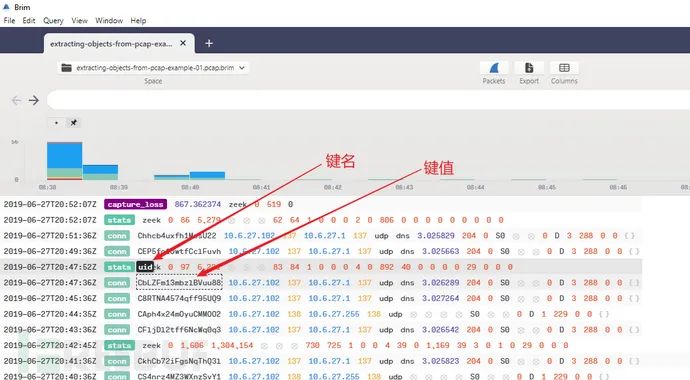
Each value corresponds to a key name. When you want to search, you can simply enter the key name directly or input the matching key-value pair in the form of K=V, making the search results more accurate and faster.
Brim’s interface doesn’t have much that needs setting and is very simple, so there’s no need to spend time explaining the menu one by one. We use Brim for data analysis from a practitioner’s perspective.
Let’s first see how to find host information in DHCP traffic in Wireshark.
Any host generating traffic on the network should have three identifiers: MAC address, IP address, and hostname.
In most cases, alerts for suspicious activity are based on IP addresses. If you capture the complete data packet of network traffic, the pcap packet retrieved on the internal IP address should show the relevant MAC address and hostname.
How do we use Wireshark to find such host information? We filter for two types of activities, DHCP or NBNS. DHCP traffic can help identify hosts of almost all types of computers connected to the network. NBNS traffic is mainly generated by computers running Microsoft Windows or Apple hosts running MacOS. We first try filtering DHCP traffic packet data.
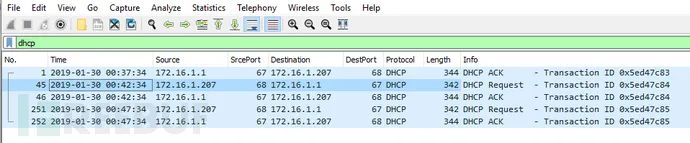
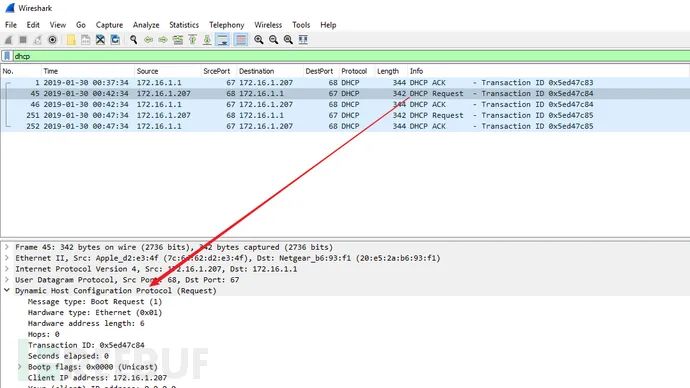
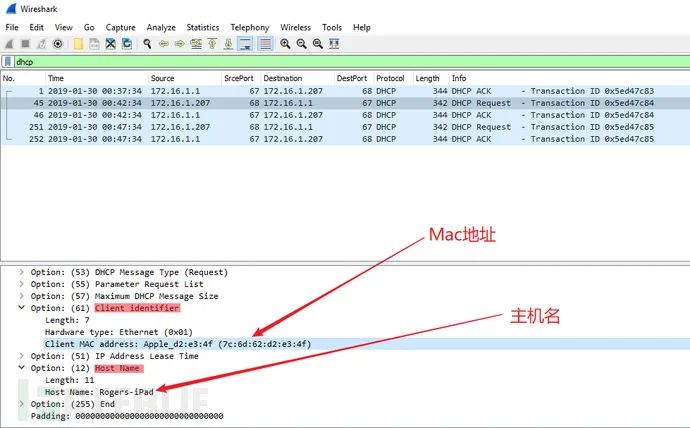
Select a frame in the information bar that shows a DHCP request. Go to the frame details section and expand the line of the DHCP protocol (request), as shown in the figure. Expand the lines of Client Identifier and Host Name. The client identifier details should show the MAC address assigned to 172.16.1[.]207, and the hostname details should show the hostname.
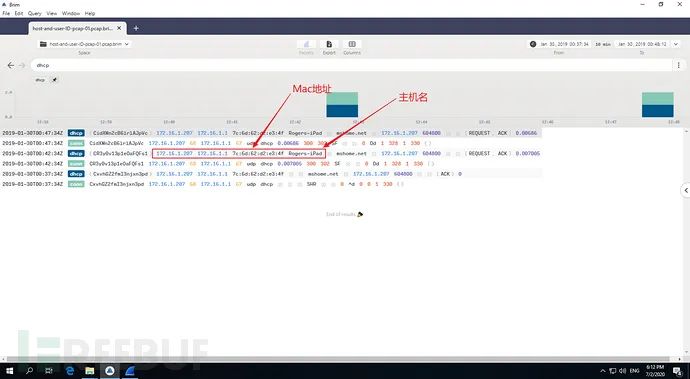
So what happens when Brim is used for searching? The same packet is dragged into Brim, and “dhcp” is entered in the search box.
We can see that the results are already displayed directly.
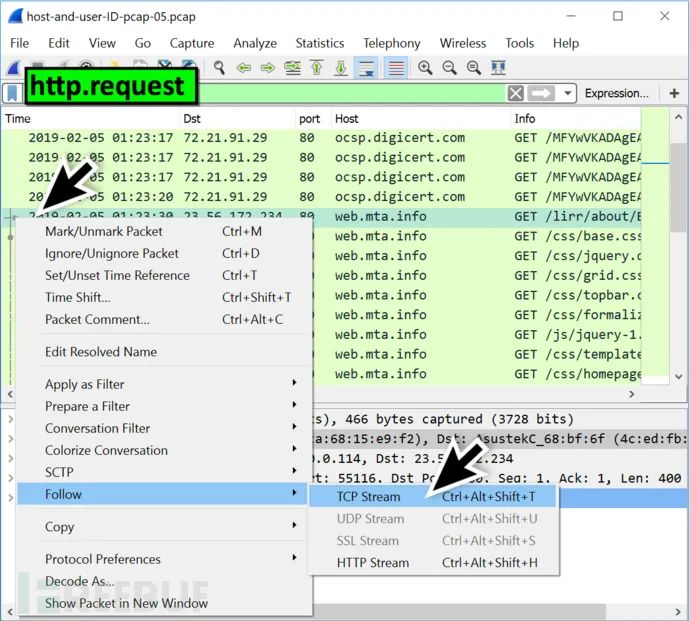
For example, if I want to query User-Agent information, in Wireshark, I might need to first find http.request through a filter, and then use Follow -> TCP Stream to display the User-Agent information we need to understand.

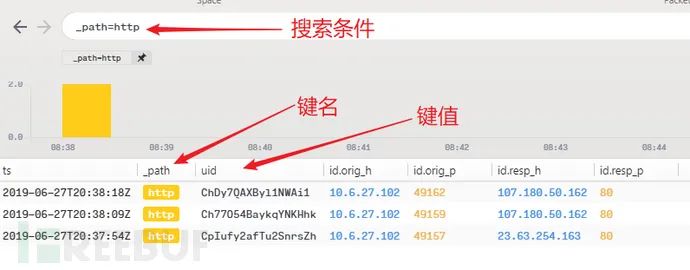
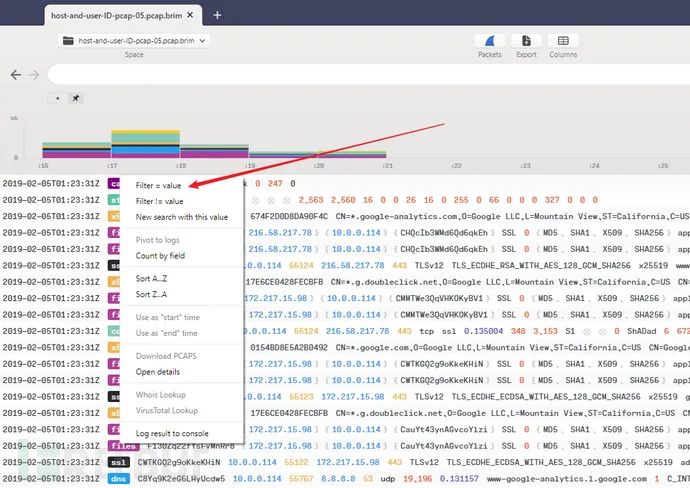
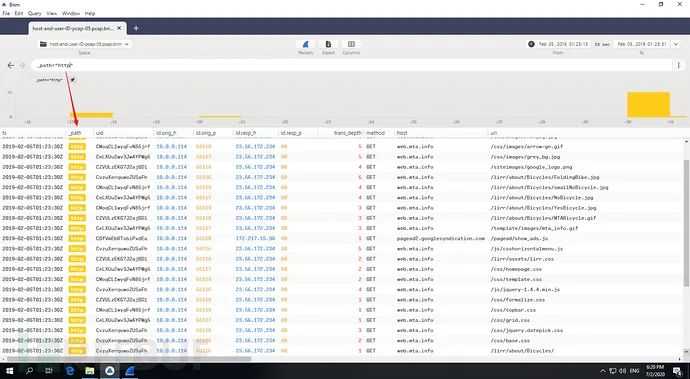
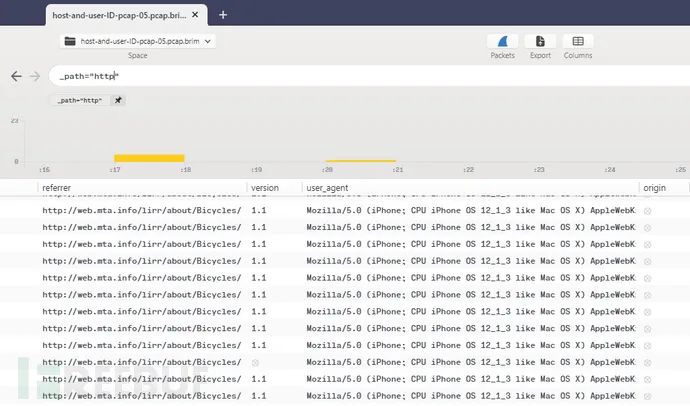
In Brim, right-click the data stream, then select Filter = Value or directly type _path=”http”, and Brim will immediately present the HTTP data stream we need, as shown below.
You can directly see the corresponding User-Agent information.
Similarly, when we want to know the username in the traffic packet, in Wireshark, we need to
In this way, we can obtain the username.

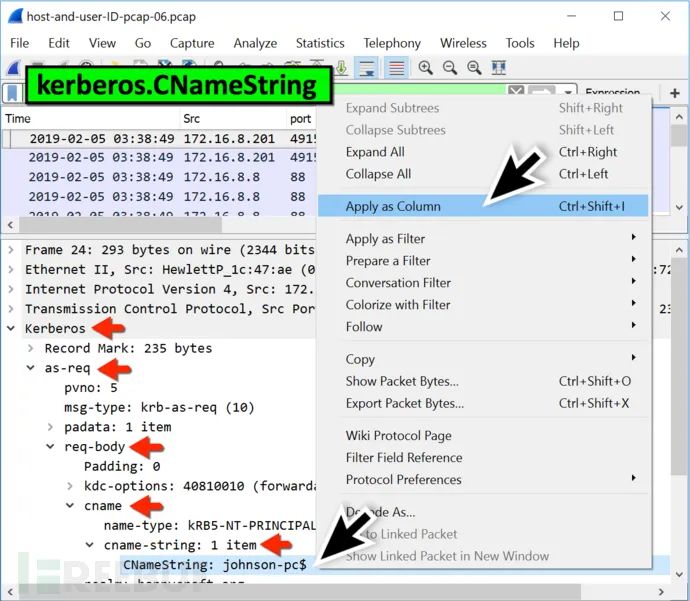
Or use “” in the filter.
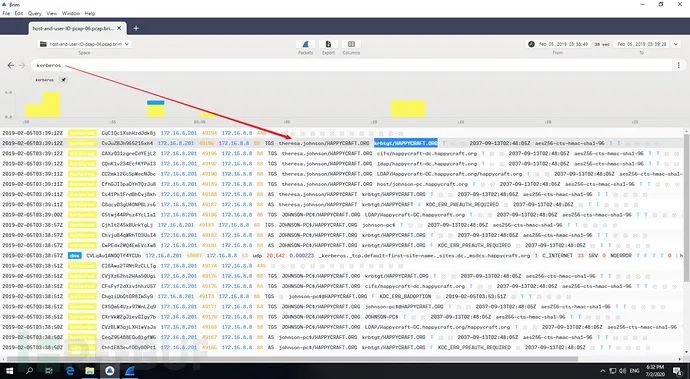
In Brim, simply enter kerberos, and the relevant information will be displayed very quickly.
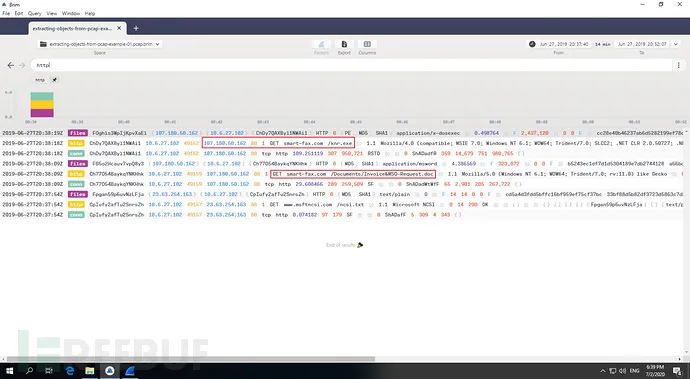
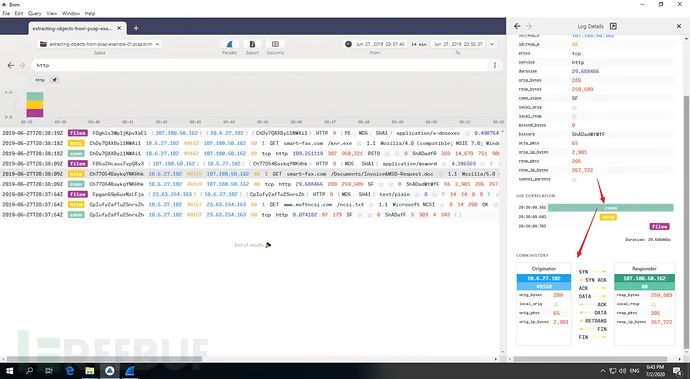
Next, let’s analyze the traffic packet of the NetWireRC virus. After importing the packet into Brim, we learn that this is an HTTP request. By simply entering http, we directly find the suspicious file.
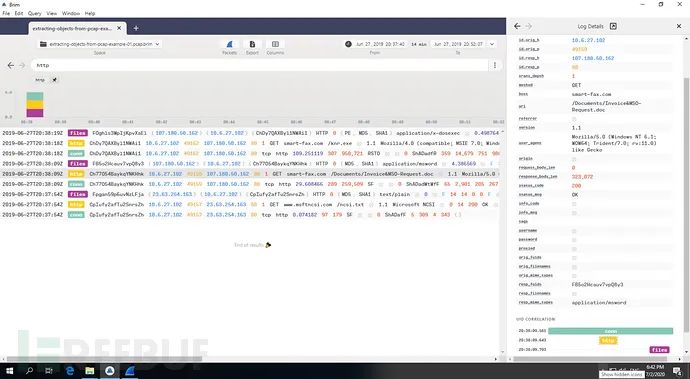
Right-click the suspicious Invoice&MSO-Request.doc file, click Open Details to expand the detailed information of the packet.
Click the conn button to display the handshake protocol processing situation.
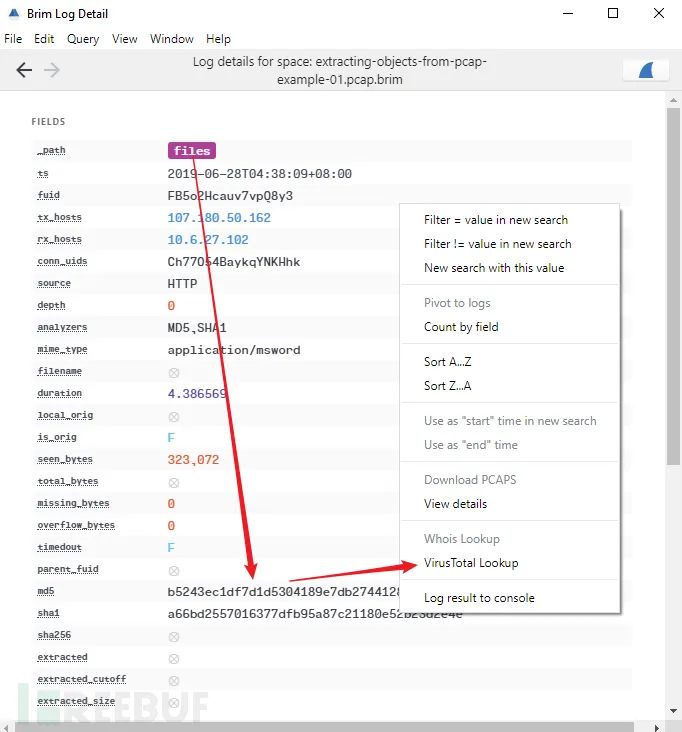
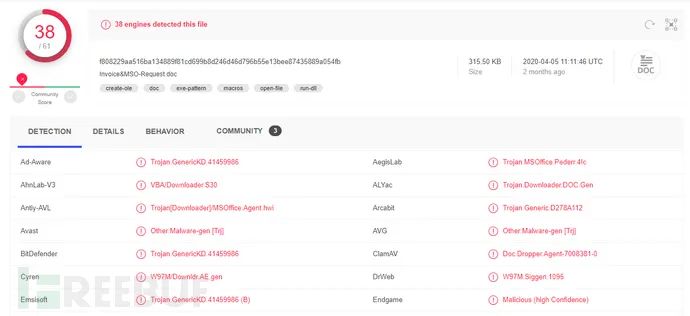
If the data packet is of file type, clicking the “files” tab will display specific information about the file, such as showing that it is a Word file and displaying its MD5/SHA1 hash value. By right-clicking, you can query the antivirus engine check results on VirusTotal.
As shown in the figure, the corresponding results are obtained very quickly. In WireShark, we might need to use Export HTTP Object and then use a hash tool to calculate the object’s hash value and other operations.
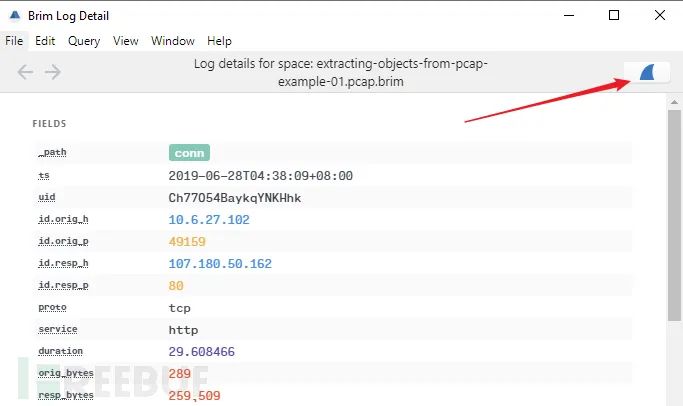
Of course, you can also click the small arrow next to “Log Details” at the top to open a new window. Clicking the Wireshark icon will open the data packet with Wireshark, allowing you to save the HTTP object in the data packet for further testing.
Similarly, you can directly double-click any tag data in the original search results, such as /knr.exe, to directly open a new window displaying detailed information.
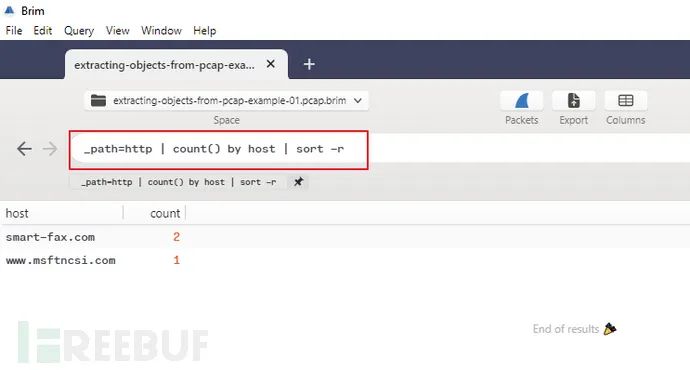
Brim also supports natural language and uses pipe command symbols for calculations. Those familiar with SHELL or using SPLUNK will be quite familiar with this syntax. For example, if I want to count how many HTTP requests there are, I can achieve it with the following command.
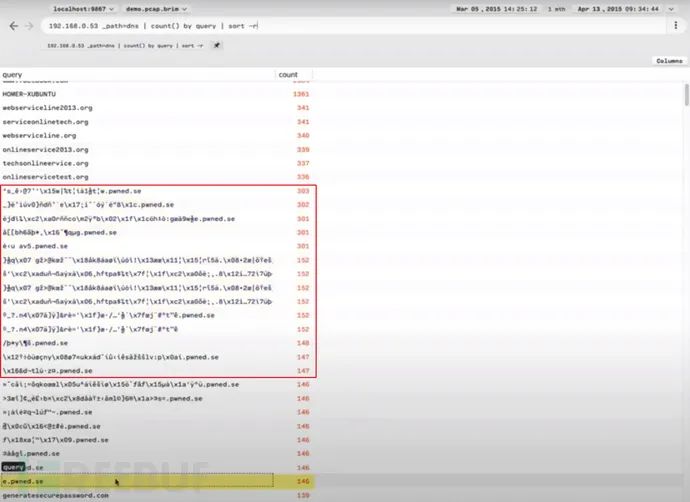
Or count DNS requests to quickly discover suspicious DNS data requests, facilitating the discovery of behaviors such as DNS tunnel attacks.
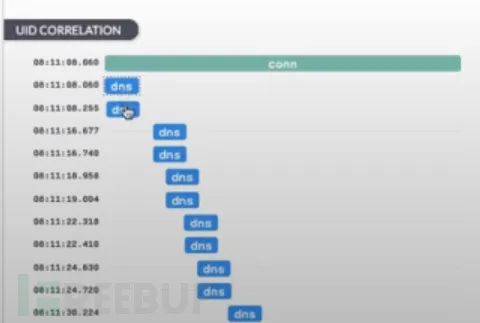
Right-click the DNS domain name you want to query, click “Pivot to logs”, and we can see the DNS access requests presented in a waterfall form.
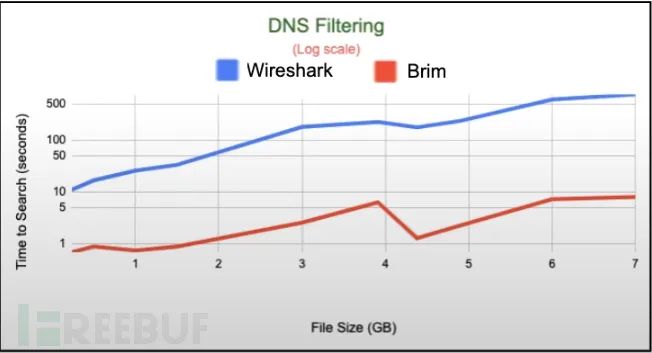
You might say that Wireshark can do all of this, and indeed it can. But don’t forget, as the data packet gets larger, the speed at which WireShark opens it becomes slower, while the same packet is processed much faster with Brim than with Wireshark.

In short, the Brim network packet analysis tool has the following benefits:
Brim project address: [GitHub Portal]