
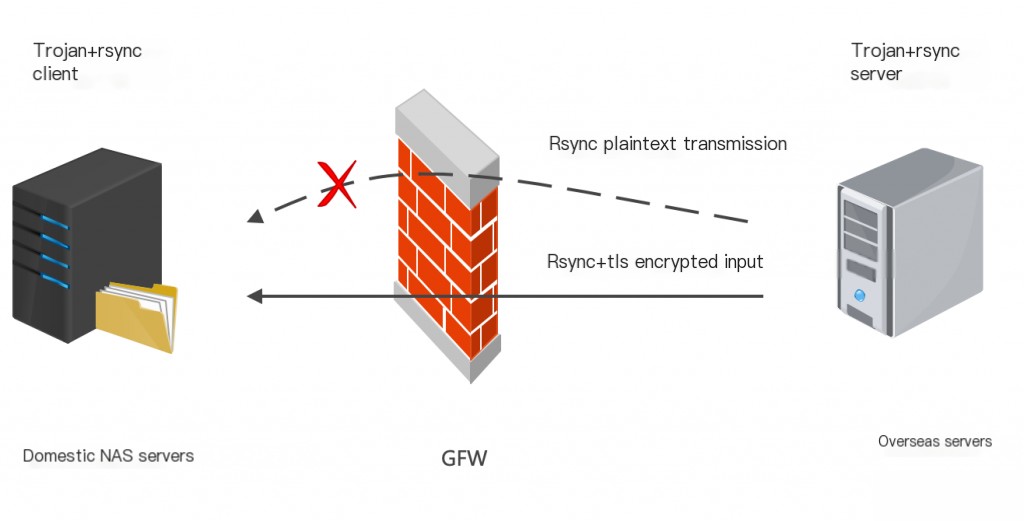
rsync is an efficient data synchronization tool, but it only supports ssh and rsync as transfer protocols. Recently, I encountered a scenario where I needed to synchronize data from an overseas server to a domestic NAS. Direct transmission is easily blocked by the GFW, but rsync itself does not support tls encryption.
Ultimately, I achieved remote file synchronization by disguising tls traffic using trojan + rsync.
Table of Contents
- Installing trojan and rsync
- Configuring the Server-side rsync Daemon
- Configuring Client-side proxychains
- rsync Synchronization of Server Files
- Transmission Results
Installing trojan and rsync
There are many tutorials online for installing trojan and configuring tls certificates. I recommend using a one-click script.
https://github.com/Jrohy/trojan
Then configure the trojan server and client, referring to online articles as this is not the focus of this post.
yum install rsync proxychains -y
Configuring the Server-side rsync Daemon
Modify the server’s /etc/rsyncd.conf configuration file.
  uid = root
 gid = root
 use chroot = yes
 max connections = 4
 pid file = /var/run/rsyncd.pid
 exclude = lost+found/
 transfer logging = yes
 timeout = 900
 ignore nonreadable = yes
 dont compress   = *.gz *.tgz *.zip *.z *.Z *.rpm *.deb *.bz2 *.rar
[slog]
path = /slog/ comment = slog data read only = no
Add the above configuration. Here, I named the module [slog], and the corresponding directory is /slog/. When the client downloads files, the root directory of the file path corresponds to /slog/.
pkill rsync || rsync --daemon --address=127.0.0.1
Then run rsync to start the daemon. Since the traffic needs to be encrypted via tls, the rsync port does not need to be exposed to the public internet. Trojan can access it locally, enhancing security.
Configuring Client-side proxychains
Since rsync itself does not support tls, to force rsync traffic through the trojan client’s proxy, proxychains is needed. Add the trojan port at the end of /etc/proxychains4.conf.
socks5 127.0.0.1 10811
rsync Synchronization of Server Files
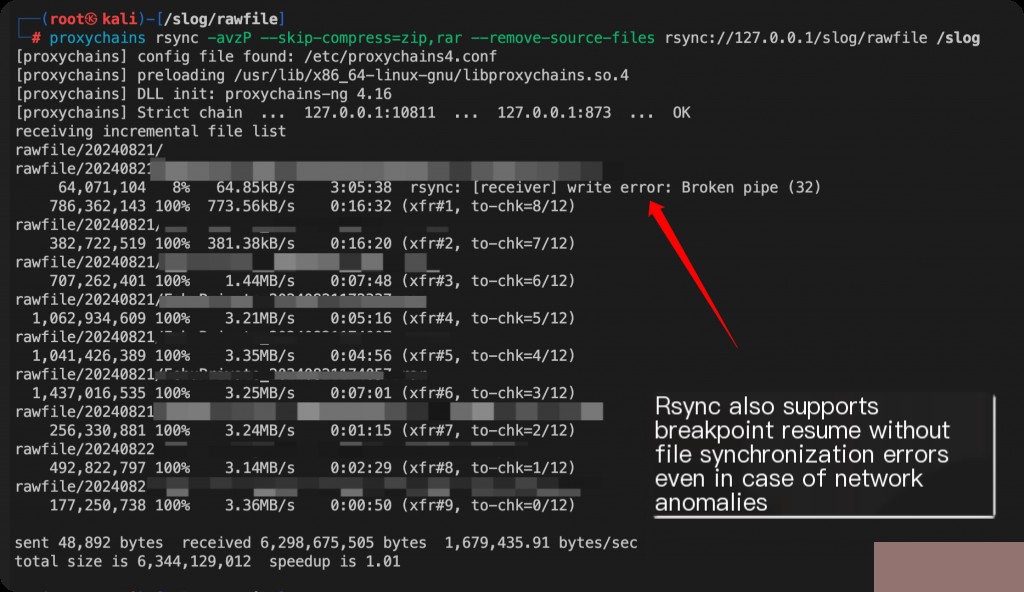
Before synchronizing files, you can test if the proxy is working properly.
 └─# proxychains rsync rsync://127.0.0.1
[proxychains] config file found: /etc/proxychains4.conf
[proxychains] preloading /usr/lib/x86_64-linux-gnu/libproxychains.so.4
[proxychains] DLL init: proxychains-ng 4.16
[proxychains] Strict chain  ...  127.0.0.1:10811  ...  127.0.0.1:873  ...  OK
slog            slog data
You can see that the proxy is working, and the server returned the rsync configuration module information.
proxychains rsync -avzP --skip-compress=zip,rar --remove-source-files rsync://127.0.0.1/slog/ /slog
Here is the explanation of the parameters:
-a(archive) — Preserves symbolic links, permissions, timestamps, etc.-v(verbose) — Displays detailed synchronization information.-z(compress) — Compresses data during transmission to reduce data transfer volume.-P— Equivalent to--partial --progress.--partialmakes rsync save partially transferred files, allowing future rsync runs to continue the unfinished transfer.--progressdisplays a progress bar during the transfer.- –skip-compress=zip,rar — No need to compress already compressed files, avoiding CPU resource waste.
- –remove-source-files — Deletes source files from the server after successful synchronization.
It is important to note that, after proxying through proxychains, rsync://127.0.0.1/slog/ no longer refers to the client address but the server address.
Transmission Results
The rsync traffic, after being proxied through tls, will not be blocked by the GFW. In practice, it can fully utilize the server’s bandwidth.
Why use the rsync protocol directly instead of the ssh protocol for transmission?
tls itself is already encrypted, so there is no need for ssh to encrypt again. rsync is a plaintext transmission protocol, and directly pairing it with tls is more efficient.
This approach can also be extended to other scenarios where data needs to be transmitted through the GFW, using proxychains with a proxy to achieve tls encrypted transmission.