
Abstract: Linux Platform
The widespread adoption of the Internet has profoundly impacted the entire world, making it more interconnected. While it has brought convenience to people living in the global village, it has also posed threats to their daily lives. As a result, intrusion detection systems (IDS) have emerged as a proactive and real-time security measure, playing a critical role in intrusion detection research. These systems primarily collect and analyze internal and external computer information to identify suspicious intrusion activities, issue warnings, and provide defense mechanisms, thereby minimizing the damage caused by network intrusions.
This study focuses on the concept of intrusion detection systems based on Linux. It provides an in-depth analysis of Snort from the perspective of system structure and operational processes, extending and implementing relevant rules. The design employs Lipcap for network packet capture, Snort as the intrusion detector for real-time packet analysis, MySQL for storing intrusion detection logs, Apache as the HTTP server, BASE as the web-based intrusion event database analysis platform, and Barnyard for logging alerts into the database. Apache provides network services for BASE, which serves as the analysis platform for viewing and analyzing MySQL databases. Finally, the debugging results are recorded and summarized.
Keywords: Snort; intrusion detection; IDS; network security
Introduction to the Linux Platform
Since the advent of the 21st century, the openness and interconnectivity of computer networks have made them frequent targets of attacks from hackers and malicious programs. To mitigate these threats and minimize their impact, intrusion detection technology has become a focal point of research. The Snort intrusion detection system was developed in response to these challenges. It is a cross-platform, extensible system that captures network packets, analyzes them, matches them against predefined rules, and logs various attack patterns. This allows the system to reduce detection errors and improve efficiency significantly. Additionally, Snort’s modular design enables further development and customization, making it increasingly critical for Linux-based platforms.
However, Snort’s user interface is not user-friendly, relying on command-line operations that complicate configuration and usage, increasing the likelihood of errors. The system’s modular architecture requires precise installation steps; any misstep can lead to configuration failures, making it challenging for users to complete the setup correctly in one attempt. Despite these challenges, Snort has evolved into a robust detection framework with support for third-party plugins. Its C-based source code allows for extensive customization, drawing significant attention from researchers worldwide. Many countries are now exploring Snort’s capabilities and applying it to small and medium-sized enterprises.
Current mainstream research focuses on two areas:
1. Expanding third-party plugins for detecting various network protocols and optimizing the user interface for better human-computer interaction, thereby enhancing detection capabilities.
2. Integrating machine learning and deep learning into the system to strengthen detection capabilities through autonomous learning, improving rule matching accuracy and detection efficiency.
This study aims to design and implement an intelligent intrusion detection system based on the Linux platform, specifically on CentOS hosts, to provide real-time intrusion detection. The goal is to minimize user intervention, simplifying system control. To enhance usability, a web-based console is provided, reducing deployment complexity and streamlining operations. The paper is divided into three main chapters:
Chapter 1: Introduces the concepts of intrusion detection on Linux and explains the principles of Snort, including its rule sets. This chapter provides a theoretical overview of the SIDS system.
Chapters 2 and 3: Detail the system’s requirements, database design, and implementation on the Linux platform, focusing on the realization of SIDS. The system includes a web-based console and database for intrusion detection and log recording.
Chapter 4: Validates the completed system and analyzes the results. Each function is tested to ensure the system can accurately detect attacks and operate correctly.
1 Overview of Intrusion Detection and Snort on the Linux Platform
Intrusion detection involves collecting and analyzing data from a network to identify potential threats or attacks against a host system. If a threat is detected, the system combines software and hardware measures to provide comprehensive protection for the host. Among the various intrusion detection tools, Snort stands out as the most mainstream and promising system.
1.1 Concept of Intrusion Detection Systems
Intrusion detection complements firewalls by helping systems respond to network attacks and extending the security management capabilities of administrators. These capabilities include security auditing, monitoring, attack identification, and response, thereby enhancing the integrity of the information security infrastructure. Intrusion detection systems collect information from critical points within a network and analyze it to identify security policy violations or signs of attacks.
Intrusion detection can be categorized into anomaly detection and misuse detection. Based on the information source, it can be divided into Host-based Intrusion Detection Systems (HIDS) and Network-based Intrusion Detection Systems (NIDS). HIDS analyze system logs and audit records, while NIDS analyze network packets. HIDS are complex to deploy and costly but offer specific monitoring capabilities, albeit heavily reliant on host logs. NIDS, on the other hand, are simpler to deploy and more cost-effective, offering better real-time performance and portability. However, NIDS struggle with large data volumes. A comprehensive intrusion detection system combines both HIDS and NIDS.
1.2 Snort System
Snort is a free, open-source, lightweight network intrusion detection system developed in C and based on Lipcap. It supports cross-platform deployment on Linux, Windows, and other systems. Snort can analyze data and rules simultaneously to detect potential threats. Its open-source nature allows developers to modify its source code for extended functionality, making it more user-friendly and versatile. A typical Snort deployment environment is shown in Figure 1.1.
1.3 Features of Snort
Snort is a multi-platform, extensible intrusion detection system. Defined as network-based, it captures network data and matches it against a rule library to identify intrusion behaviors. Key features include:
1. Cross-platform deployment and extensibility.
2. Real-time analysis and network packet capture capabilities, enabling rapid responses to intrusions with multiple alert mechanisms.
3. Flexible log formats, supporting binary (Topdump), ASCII, and XML formats for easier maintenance and inspection.
With its robust functionality, Snort has become a leading intrusion detection system. Researchers continue to expand its capabilities, and it is poised to become the largest detection system in the near future.

Figure 1.1 Snort Deployment Diagram
1.4 Snort Rules
Snort operates as a rule-based intrusion detection system. It parses data packets, matches them against a rule library, and identifies threats. Rules are organized into rule sets based on attributes such as source IP, destination IP, source port range, and destination port range. Intrusion detection involves two steps: capturing network packets and matching them against the rule set. If a match is found, the system raises an alert. If no match is found, the data is deemed safe.
### 4.1 Rule Structure
Generally, Snort rules are logically divided into two parts: the rule header and the rule options [10], as shown in Figure 1.2.
Figure 1.2 Snort Rule Structure
The most critical part of a Snort rule is the rule header. It consists of seven components: rule action, network protocol, source network address and port, direction indicator, and destination address and port. Snort uses the protocol specified in the rule header to determine the action to be performed. The basic structure of the Snort rule header is shown in Figure 1.3:
Figure 1.3 Snort Rule Header Structure
—
### 4.2 Rule Header
#### 1. Rule Actions
The rule action appears at the beginning of a Snort rule and specifies the action to be taken when the rule conditions are met. Snort provides five predefined actions, but users can also define custom actions. The predefined actions include:
– Log: Logs the event.
– Pass: Ignores the packet.
– Activate: Triggers a specific response to detection.
– Alert: Generates an alert.
– Dynamic: Performs dynamic actions, typically used in conjunction with `Activate`.
#### 2. Protocol
The protocol field is the second part of the rule header and specifies the type of protocol. Currently, Snort supports four protocol types: TCP, UDP, IP, and ICMP. Future expansions may include protocols like IPX and OSPF. When a protocol is specified in the header, its corresponding actions are activated.
#### 3. Network Address Segment
Network addresses are typically categorized into source network address and destination network address. A specific address can refer to an IP address, while the keyword `any` is used to denote any address. Network addresses can also be represented using CIDR notation, such as `/16` for Class B networks, `/24` for Class C networks, and `/32` for specific host addresses. The operator `!` can be used to exclude specific IP addresses from the rule.
#### 4. Port Numbers
Port numbers can be specified in various ways:
– The keyword `any` can represent any valid port, e.g., `log tcp any any -> 192.168.17.0/24`.
– A single static port number can be used, e.g., port `80` for HTTP or port `23` for Telnet.
– A range of ports can be defined using the `:` operator, e.g., `1:1024` represents ports 1 through 1024.
Example:
`alert tcp 192.168.2.0/24 23 -> any any (content: “confidential”; msg: “Detected confidential”;)`
#### 5. Direction Indicator
The direction indicator specifies the direction of traffic between the source and destination.
– `->`: Indicates traffic from the source address to the destination address.
– `<-`: Indicates traffic from the destination address to the source address. – `<->`: Indicates bidirectional traffic.
—
### 4.3 Rule Options
The rule options are the most critical part of Snort’s detection system. They define the alert messages and the characteristics of the packets to be inspected. Rule options are enclosed in parentheses, and each option must be separated by a semicolon (`;`). When the rule action is executed, the conditions specified in the options must be met. Each option consists of two main parts: a keyword and a value [11]. Common keywords include `msg`, `flow`, `ack`, etc.
—
### 1.5 Chapter Summary
This chapter introduced the overall concept of the Snort system and its functionalities. It also explained the primary structure of Snort rules, which are divided into two parts: the rule header and the rule options. The characteristics and structure of these two components were discussed in detail.
—
### 2. Requirements Analysis and Overall Design
This chapter focuses on analyzing the system to determine module segmentation and the relationships between modules. It explains the design of the functional structure, clarifies the tasks of each functional module, and provides the overall system design and functional structure. Finally, it outlines the specific design processes for each module, key business activities, main system design components, detailed information, database table design foundations, and decisions regarding table structures and specific content.
#### 2.1 Essential Functional Requirements Analysis
Functional requirements analysis is the foundational step of any project. It involves identifying the essential functionalities needed for the system. Based on these requirements, the corresponding functional modules are developed. According to the project investigation, the following functionalities were implemented:
1. Capturing Network Packets:
This is the first and most fundamental step in network detection. It serves as the prerequisite for the entire system’s operation. Network packets are captured using the `Lipcap` library and then analyzed to detect potential threats.
2. Analyzing Packet Information:
This is the core module of the system. Its primary function is to inspect and analyze captured data to assess intrusion risks.
3. Threat Behavior Alerts:
Since users cannot directly observe intrusion detection results, alert messages are used to indicate whether an intrusion has been detected.
4. Storing Detection Information:
Detected intrusion information cannot be discarded immediately. It needs to be stored in a database for future analysis and reference. This facilitates data statistics and visualization.
—
#### 2.2 Database Design
The system uses MySQL as its database. Since the detected and analyzed packets need to be stored, the database tables are designed based on packet information. Each table corresponds to specific protocol-related information, such as ARP, ICMP, UDP, IP, and TCP. Figure 2.1 illustrates the relationships between these tables.
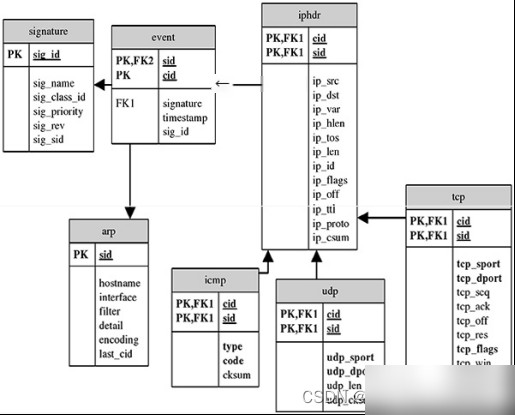
Figure 2.1 Database Model Diagram
—
### 2.3 Snort Overall Framework
The Snort architecture consists of four main plugin-based modules: packet capture module, preprocessing module, detection module, and alert module. The architecture is shown in Figure 2.2:
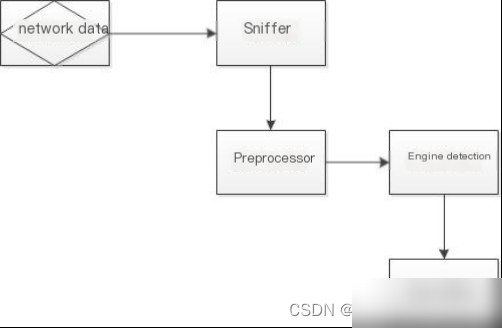
Figure 2.2 System Architecture Diagram
—
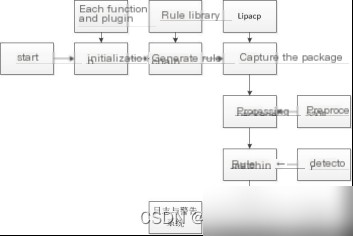
#### 2.3.1 Workflow
The Snort workflow involves several steps, from packet capture to parsing and output. The workflow is illustrated in Figure 2.3:
### Translation of WordPress Post Content
#### Figure 2.3 Snort Workflow
The first step in the Snort system is initialization, followed by parsing the rule file. A chain of rules is created from the rule file and stored in the rule library to prepare for subsequent rule matching. Using the Lipcap library, Snort captures packets from the network and sends them to the preprocessor. The preprocessor decodes the packets and performs data analysis. The analyzed results are then sent to the detection engine, where they are compared against the rule chain in the rule library. If any anomalies are detected, they are sent to the output module to notify the user via logs or alerts; otherwise, the packet is discarded.
- 3.2 Operating Modes
Snort has three operating modes: sniffing mode, packet logging mode, and network intrusion detection mode. The most fundamental and primary mode is sniffing mode. It is closely related to packet logging mode, as they are essentially similar but differ in output format. Network intrusion detection mode is the most common and requires certain plugins to be added, depending on the user’s needs.1. Sniffing Mode
Sniffing mode involves capturing packets from the network, analyzing them, and displaying the results on the host, as shown in Figure 2.4.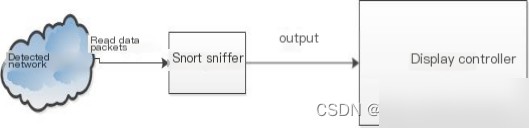
#### Figure 2.5 Snort Network Intrusion Detection Mode
In Linux, this mode can be started via the command line:
`snort -v`
When sniffing mode is successfully activated, Snort captures and analyzes network data, providing statistics on network protocols such as TCP, UDP, and ICMP. When sniffing mode is stopped, the statistical information is displayed on the host.
2. Packet Logging Mode
Packet logging mode builds upon sniffing mode by not merely displaying captured data on the screen but also storing it in the host’s memory. In Linux, a new `log` directory can be created to save Snort’s captured data in text format. Users can save the data in various formats based on their needs.
3. Network Intrusion Detection Mode
As shown in Figure 2.5, when Snort operates in network intrusion detection mode, it first captures network packets and parses them. If the parsed data matches intrusion rules in the rule library, the packets are logged, and alerts are generated. Otherwise, unmatched packets are discarded.
To run Snort in network intrusion detection mode on a Linux platform, use the following command:
`snort -i eth0 -c /etc/snort/snort.conf -A fast`
Here, `snort.conf` is the configuration file, and `eth0` refers to the corresponding network interface in the system. Snort matches each packet against the rule set and takes appropriate actions for matching packets.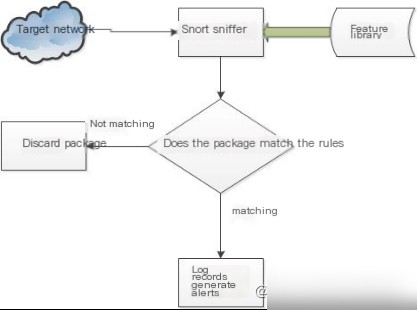
#### Chapter Summary
This chapter primarily introduces the system’s requirements analysis, database design, structural composition, and overall workflow. Through requirements analysis, the necessary functionalities are designed. Corresponding databases are then designed based on these functionalities. The chapter also explains each step of Snort’s architecture and its operating modes, emphasizing how specific rules are used to detect information. These steps will guide the subsequent system design.
### 3. Detailed Design and Implementation of SIDS
Snort is a highly flexible intrusion detection system that can be extended based on user requirements to create a comprehensive intrusion detection system. However, this extensibility also increases the system’s complexity. This article focuses on building Snort on a Linux platform to better demonstrate its full functionality.
#### 3.1 SIDS Implementation Plan
The implementation of SIDS varies depending on the operating environment. Snort can operate solely in sniffing mode, displaying data in binary format. Alternatively, users can use a text editor like `gedit` to view the data. However, this approach does not save the data, meaning intrusion data is only visible while Snort is running. Once Snort stops, the data is no longer accessible, which is not user-friendly.
To address this, systems with software extensions can be used. For example, a database and an analysis console can be added. The sniffer captures data and sends it to the database, which then forwards it to the analysis console. This approach not only saves intrusion data but also provides users with a clearer view of intrusion detection results. This significantly reduces data complexity and enhances data processing flexibility.
Based on user preferences, network intrusion detection systems can generally be configured in the following ways:
1. Install a standalone Snort sniffer to capture packets.
2. Install a sniffer along with a logging system.
3. Use a single sniffer with an administrator system.
4. Install a database and an analysis console alongside the sniffer.
To create a more comprehensive network intrusion detection system, the fourth configuration, which includes a database and analysis console, is recommended.
In this system, four hosts are named A, B, C, and D. Another host, E, is connected to host D’s network and can communicate with D over the network. Host D is not only a standalone machine but also a CentOS 7 server running Snort with BASE, MySQL, and Apache installed. Finally, host F is an external machine capable of launching attacks on any host within the internal network.
In the system topology shown in Figure 3.1, aliases are assigned to each device for easier reference during the design and implementation phases.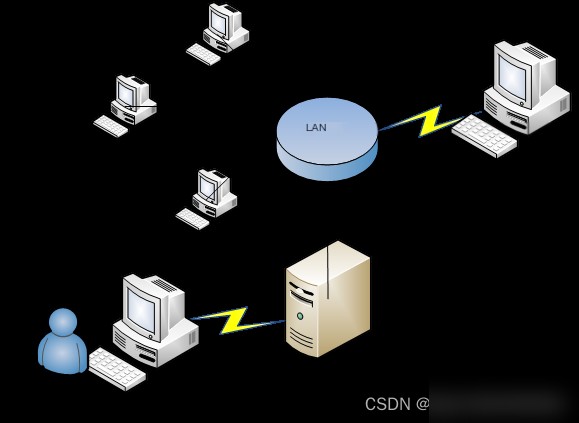
#### Figure 3.1 Sniffer Deployment with Database and Web Analysis Console
Based on the system topology, the following functionalities need to be implemented:
1. SIDS must detect attacks on internal network hosts.
2. Logs of detected attacks should be stored in the MySQL database via Barnyard, allowing administrators to view the data clearly.
Administrators can install `phpMyAdmin`, an open-source database management tool, to facilitate data analysis and research. Depending on user needs, different startup modes can be selected, and data can be edited or deleted, making the system more user-friendly.
This article employs several third-party plugins to enhance Snort’s capabilities, making it more efficient and user-friendly. The selected plugins and their functions are as follows:
1. Lipcap: Captures network packets.
2. MySQL: Stores alert information.
3. Apache: Serves as the web server for the analysis console.
4. PHP: Connects MySQL and the web analysis console.
5. BASE: Provides the front-end interface.
6. ADODB: Standardizes database storage methods.
7. Barnyard: Used by BASE to connect to the MySQL database.
In summary, the workflow involves the following steps:
1. Lipcap captures network packets and sends them to the MySQL database.
2. The Apache server acts as an intermediary, transferring data to the web interface.
3. The intrusion detection database analysis console (BASE) accesses the MySQL database via Apache.
4. Administrators use the BASE console to view detailed data and perform related operations.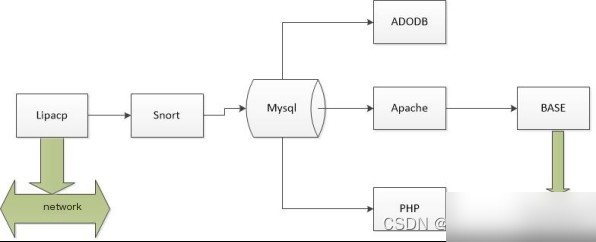 ### Figure 3.2 System Workflow
### 3.2 Preparations
This project aims to design a comprehensive Snort Intrusion Detection System (IDS). The first step is to identify the target objectives. The second step involves selecting the required functionalities based on the objectives. Finally, the corresponding plugins are chosen according to the requirements.
#### 3.2.1 Environment Preparation
Snort can be used to develop intrusion detection systems on various platforms, such as Linux and Windows. For this project, the Linux platform was chosen, as it allows for the seamless addition of necessary plugins to the system.
As shown in Figure 3.1, deploying a Snort system requires specific software and hardware conditions. Host D is selected as the SIDS (Snort-based Intrusion Detection System) computer, running CentOS 7 on Linux. The hardware includes a network interface card (NIC) to connect to the internal network. The required software includes MySQL database, Apache server, Barnyard tool, BASE framework, and other necessary plugins. The monitored data can be analyzed by the administrator using Computer E. Two computers, B and C, are used as test machines within the internal network. Computer F, located outside the internal network, is used to simulate attacks on internal hosts to test whether the Snort system can detect intrusions from external hosts. The results validate that Snort can detect intrusions within the internal network, proving the system’s feasibility.
#### 3.2.2 Software Preparation
To minimize system costs, open-source and free third-party plugins are selected. As shown in Table 3.3, these plugins can be downloaded from their official websites. The source code is open-source, allowing for secondary development based on user requirements. Selecting the appropriate version is crucial for compatibility, as different versions may cause configuration errors.
Table 3.3 Information on Supporting Software
| Software Name | Official Website | Function |
|—————|——————|———-|
| Apache | http://httpd.apache.org/ | Web server |
| PHP | http://www.php.net/ | PHP script support |
| MySQL | http://www.microsoft.cn/ | Database support |
| Libpcap | https://www.tcpdump.org/ | Packet capture tool |
| Snort 2.9 | http://www.snort.org | Snort installation package for Linux |
| BASE | http://www.cert.org/kb/acid | PHP-based data analysis console |
| ADODB | http://adodb.sourceforge.net | Database connection functions for PHP |
| Barnyard | http://www.securixlive.com/barnyard2/download.php | Snort-MySQL integration |
These software packages have been updated, and stable versions were chosen for configuration. Large version gaps can lead to significant differences, so plugins closely aligned with the Snort version were selected for easier implementation. Table 3.4 lists the software versions used to implement SIDS.
Table 3.4 Selected Software Versions
| Name | Archive File |
|————|————–|
| MySQL | mysql-5.7.29-linux-glibc2.12-x86_64.tar |
| Libpcap | libpcap-1.0.0.tar.gz |
| Snort | snort-2.9.7.0.tar.gz |
| PHP | php-7.2.2.tar.gz |
| Apache | httpd-2.4.32.tar.gz |
| BASE | base-1.4.5.tar.gz |
| ADODB | adodb519.tar.gz |
| Barnyard | barnyard2-1.9.tar.gz |
| DAQ | daq-2.0.4.tar.gz |
### 3.3 Implementation of SIDS
This section details the complete process of constructing a Snort IDS. To ensure the success of each installation step, functionality is tested after each step. If successful, the process continues; otherwise, the current step is reinstalled. This ensures the system’s feasibility and robustness.
The first step is to establish a Snort sniffer, which provides the basic functionality of intrusion detection. In subsequent sections, third-party plugins will be added to further enhance the system.
#### 3.3.1 Implementation of Data Capture
This section establishes a basic Snort intrusion detection system with sniffing capabilities. Initially, Snort, Libpcap, and DAQ are deployed. Unlike Windows, these packages require manual installation using command-line tools. Extract the tar.gz files to the `/usr/local/src` directory using the command:
bash
tar -zxvf .tar.gz
Then, navigate to the directory and run the following commands:
bash
./configure
make && make install
– `./configure` checks for the presence of GCC.
– `make` compiles the source code.
– `make install` installs the compiled binaries using the Makefile.
Once these steps are completed, a basic network intrusion detection system is operational. It can capture and log packets, but it cannot yet display alert information. To enable this, a rule set needs to be installed. Extract `snortrules-snapshot-2970.tar.gz` to `/usr/local/src/`, then move the extracted Snort folder to `/etc/snort/`:
bash
cd /etc/snort/
cp /usr/local/src/snort-2.9.7.0/etc/* .
Set ownership for the `/etc/snort` directory and its contents:
bash
chown -R snort:snort *
Create whitelist and blacklist rule files:
bash
touch /etc/snort/rules/white_list.rules /etc/snort/rules/black_list.rules
The rule set is now deployed. Start the intrusion detection system with the following command:
bash
snort -T -i eth0 -u snort -g snort -c /etc/snort/snort.conf
At this point, the system is operational, and any network intrusion will be logged. As shown in Figure 3.5, Snort displays packet information.
This sniffer now provides basic IDS functionality. To achieve full SIDS functionality, additional software and components must be integrated.
#### 3.3.2 Implementation of Data Storage
MySQL, a relational database management system, provides database support for the Snort network intrusion detection system. Install MySQL on Linux using the following command:
bash
yum install -y mysql-server mysql-devel
This simplifies the configuration process compared to other systems. After installation, set a password for the root user and log in to MySQL. Create a `snort` database and a `snort` user with the same password as the root user for ease of use.
Snort can output logs to the database using a database plugin. However, in this configuration, alerts are written to alert files, and preprocessor logs are output in Unified2 binary format for Barnyard2 to read. Modify line 521 in the configuration file as follows:
bash
output unified2: filename snort.log, limit 128
Create a symbolic link for Snort in the `/usr/sbin/` directory:
bash
ln -s /usr/local/bin/snort snort
Next, create tables in the `snort` database. Analyze the Snort source code to determine the required tables and fields, then write an SQL script to create them. Use the `source` command to import the script into the `snort` database:
bash
source
Using phpMyAdmin, you can visualize the database structure. As shown in Figure 3.6, the tables store information about TCP, UDP, ICMP, and other detected intrusions.
#### 3.3.3 Implementation of Rule Writing
After configuring the database, connect the Snort system to the `snort` database using Barnyard2 as the integration interface. Modify the `barnyard2.conf` file to configure MySQL connectivity:
bash
output database: log, mysql, user=snort password=123456 dbname=snort host=localhost
– `output`: Specifies the output type.
– `database`: Specifies the database type.
– `user`: The database user.
– `password`: The database password.
– `dbname`: The database name.
– `host`: The hostname or IP address of the database server.
This configuration allows Snort to store detected data in the MySQL database.
Next, create a test rule to verify that Snort can detect intrusions. Edit the `local.rules` file:
bash
vi /etc/snort/rules/local.rules
Add the following rule:
bash
alert icmp any any -> $HOME_NET any (msg:”ICMP Packet Detected”; sid:1000003; rev:1;)
This rule detects ICMP packets (e.g., ping requests) and logs them to the MySQL database. Start Snort with the following command:
bash
snort -i eth0 -c /etc/snort/snort.conf -A fast
If the configuration is successful, the message “successful validated the configuration” will appear, as shown in Figure 3.7.
To test the system, use Host A to send ICMP packets to Host C:
bash
ping 192.168.17.148
Snort will detect these packets and log them in the database. Using phpMyAdmin, you can view the ICMP table, as shown in Figure 3.8, which contains 12 entries. This confirms that the intrusion data was successfully stored, and the system is functioning correctly.
Figure 3.8 Data in the `icmphdr` Table on the Linux Platform
3.3.4 Implementation of Alert Display Functionality on the Linux Platform
After integrating database functionality into the Snort system, the system can store data in the database but cannot intuitively reflect the effectiveness of intrusion detection. Therefore, a web-based interactive interface was added to the Snort system, allowing users to view intrusion detection results visually on a webpage. Apache was used as the web server, and PHP served as the engine to read the MySQL database.
1. Building the Web Server on the Linux Platform
In Linux, use the command `yum install -y httpd` to directly install the Apache server. This reduces the need for additional configuration required in other systems, providing a quick and convenient installation method. Use the command `chkconfig –add httpd` to configure Apache to start automatically, simplifying operations.
This allows the administrator to enter the following URL in the browser on the administrator’s host (Host E):
`http://localhost`
Here, `localhost` represents the network address of Host D. As shown in Figure 3.9, the URL on Host E indicates that Apache has been successfully installed.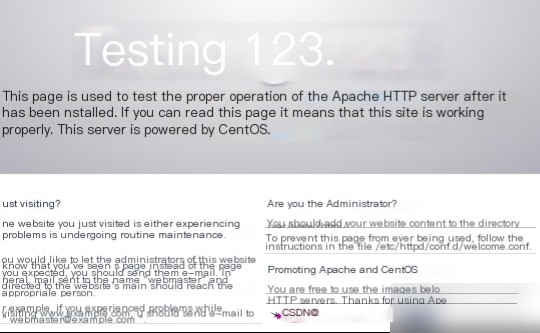
Figure 3.9 Apache Installation Success Page
2. Configuring Server Files on the Linux Platform
Since BASE is a PHP-based program, Apache must be configured to support PHP. Use the following command to install the necessary PHP plugins:
`yum install -y mysql-server php php-mysql php-mbstring php-mcrypt mysql-devel php-gd`
After installation and configuration, PHP will support Apache services. Test this using the following method:
Create a new file `test.php` in the `/var/www/html` directory with the following content:
` `http://localhost/test.php`
This tests Apache’s support for PHP. Figure 3.10 shows the success page, indicating that Apache can now support PHP.
Figure 3.10 Apache PHP Support Configuration Success Page
3. Configuring Server Support for MySQL and Graphical Interfaces
In the Linux command line, enter the following:
`pear channel-update pear.php.net`
`pear install Image_Graph-alpha Image_Canvas-alpha Image_Color`
Image_Graph, formerly known as GraPHPit, is a package for chart manipulation and an open-source project. For convenience, it has been integrated into Pear and renamed Image_Graph (with `-alpha` indicating its version). Installation is simplified using the `pear` command.
3.3.5 Implementation of Console Functionality
BASE is a PHP-based tool for viewing data output by Snort to the database. It also provides graphical analysis tools, enabling administrators to clearly analyze intrusion detection data, enhancing data analysis capabilities, and significantly reducing data redundancy caused by complexity.
Extract `base-1.4.5.tar.gz` to the `/var/www/html` directory. BASE requires a database user for access, which was created in previous sections as `snort`. Open BASE’s configuration file `php.ini` and modify the following:
`error_reporting = E_ALL & ~E_NOTICE`
Test BASE by entering the following URL in the browser on Host E:
`http://localhost/base/setup/index.php`
As shown in Figure 3.11, the page indicates successful BASE configuration. The “Config Writeable” field displays “Yes,” confirming successful configuration. The “PHP Version” field shows the current version number.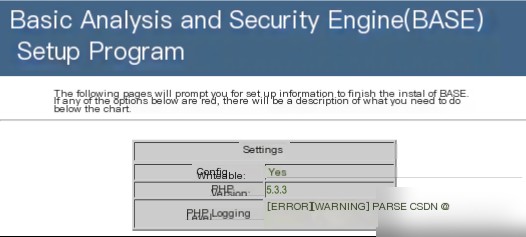
Figure 3.11 Successful BASE Database Connection
Then, navigate to BASE’s main page. As shown in Figure 3.12, the ICMP section displays 100%, indicating that every data packet was detected. A total of 8,269 intrusion events were detected, all captured by Snort and displayed in BASE. This completes the setup of a comprehensive SIDS.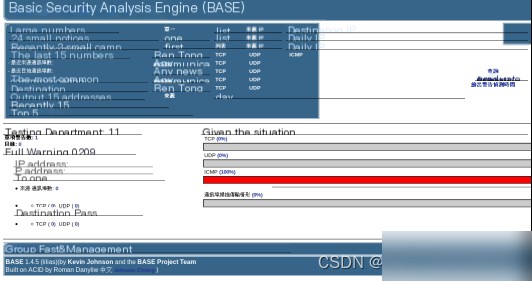
Figure 3.12 Snort-Captured Data Displayed in BASE
3.4 Chapter Summary
This chapter primarily discusses the implementation of various modules in the Snort intrusion detection program, including the data storage module, rule-writing module, alert display functionality, and control console module. It also introduces the development platforms and third-party plugins required by the system.
4. System Testing and Analysis of Detection Results
After completing the configuration of all functionalities, final testing of the Snort IDS is required. This involves writing a custom rule, matching it against the rule library, generating alert information, and storing the analyzed results in the database. The rule is as follows:
`alert icmp any any -> any any (msg:”ICMP Packet Detected”; sid:1000003; rev:1;)`
This rule detects ICMP packets and provides the alert message “ICMP Packet Detected” upon detection.
4.1 Collecting Intrusion Data
After setting the rule, use three hosts in the internal LAN—Host A, Host B, and Host C—as intrusion source addresses for testing. On Host D, enter the following command:
`snort -i eth0 -c /etc/snort/snort.conf -A fast`
This starts Snort in intrusion detection mode. On Host C, enter the following command:
`ping 192.168.17.148`
This command causes Host C to continuously send TTL ICMP packets to Host D. These ICMP packets are treated as intrusion information by SIDS, and the alert information is stored in the database.
4.2 Detection and Analysis
BASE provides multiple ways to view intrusion information, such as by time, source IP, packet content, etc. Administrators can use these views to obtain comprehensive information about the attack. Below are some methods for analyzing data:
1. Displaying Summary Information
On BASE’s homepage, as shown in Figure 4.1, the right side displays the proportion of data for three protocols. The page includes information such as total alerts, single alerts, source IPs, destination IPs, transmission details, and single IP connections. The right side of Figure 4.1 shows 18 repeated connections for the same attack, with a total of 8,269 detected intrusions, all caused by ICMP packets. Data for other protocols can be retrieved based on specific requirements.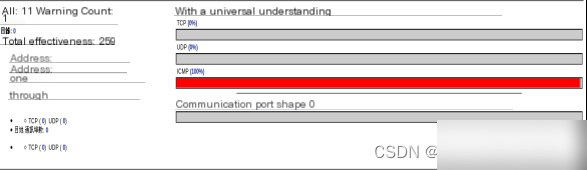
Figure 4.1 Statistical Information Query
2. Viewing Detailed Data Information
Click on any intrusion record to view detailed information, as shown in Figure 4.2. This includes ID, timestamp, source address, destination address, and communication level. Administrators can trace the source of the intrusion through the “Communication Level” field.
Figure 4.2 Detailed Intrusion Data View
3. Displaying Packet Content
Each detected packet contains detailed information, as shown in Figure 4.3. The “Meta” section includes hardware details such as ID, capture time, alert group, message, and detector interface. The “IP” section contains address information for the packet.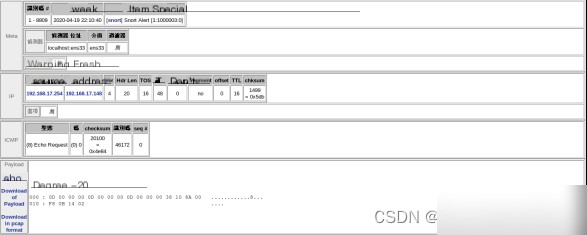
Figure 4.3 Viewing Single Packet Content
4. Graphical Analysis
Large amounts of data cannot intuitively reflect intrusion analysis. For users, statistical analysis is required. Graphical display methods are provided here, offering powerful functionality. As shown in Figures 4.4 and 4.5, users can select chart types, shapes, and parameters for the X and Y axes.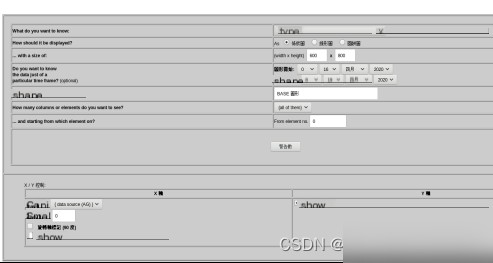
Figure 4.4 Chart View Options
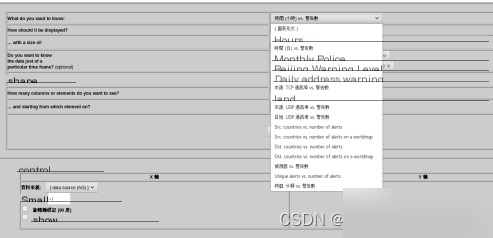
Figure 4.5 Chart View Types
Chart types include circular, linear, pie, and more. Data relationships such as time vs. alerts, source IP vs. alerts, and destination IP vs. alerts can be visualized. Users can select charts based on specific needs.
From the analysis above, it is evident that data captured based on rules is highly accurate, and the analysis of intrusion data is comprehensive.
4.3 Chapter Summary
This chapter focuses on testing the overall functionality of the Snort intrusion detection system. While the previous chapter tested individual modules, this chapter evaluates the entire system.
Conclusion
Intrusion Detection Systems (IDS) can be designed and deployed across multiple platforms. With the rapid proliferation of the internet, the threat of network intrusions has become increasingly significant. While intrusion detection on Windows platforms has been extensively studied, research on other platforms remains limited. This paper focuses on designing and implementing an IDS on the Linux platform, with the following contributions:
- An overview of internet security, highlighting the threats posed by network intrusions and introducing Snort technology, along with its limitations.
- The design of the SIDS system structure and the creation of intrusion detection rules, laying the groundwork for detailed system design.
- The complete design and implementation of the SIDS system, including functional enhancements to improve detection efficiency and user experience. Each step was tested to ensure proper system operation.
Despite its advantages, SIDS has areas for improvement:
- The large volume and high dimensionality of internet data increase the burden on intrusion detection, reducing efficiency. Machine learning and deep learning can be applied to develop models that enhance detection efficiency.
- Snort’s BM matching algorithm has limitations that affect detection efficiency. OptimReferences
[1] Han Donghai, Analysis of Intrusion Detection System Examples [M]. Beijing: Tsinghua University Press, 2002:63-82 [2] Tang Zhengjun. Design and Implementation of Network Intrusion Detection Systems [M]. Beijing: Electronic Industry Press, 2002:112-136 [3] Tang Zhengjun. Source Code Analysis of Hacker Intrusion Protection Systems [M]. Beijing: Machinery Industry Press, 2002:73-97 [4] Dong Yuge, Jin Hai, Zhao Zhen, Attacks and Protection – Network Security and Practical Protection Techniques [M]. Beijing: People’s Posts and Telecommunications Press, 2000:9~81 [5] Nie Yuanming, Qiu Ping. Network Information Security Technology [M]. Beijing: Science Press, 2001:154-162 [6] Wang Deshan, Wang Kechao. Discussion on Firewall Technology in Computer Network Security [J]. Network Security Technology and Application, 2013.07:61-62 [7] Wu Guo, Chen Lei, Si Zhigang, et al. Research on the Optimization Model of Network Security Situation Assessment Index System [J]. Computer Engineering and Science, 2017.05:861-869 [8] Ye Zhenxin. Research on the Linkage Model of Firewalls and Intrusion Detection Systems [D]. Shanghai Jiao Tong University, 2008 [9] Yin Xijie, Xu Jianguo. Research and Application of Multi-Firewall Technology in Enterprise Network Security [J]. Computer Applications and Software, 2015.08:292-295 [10] Li Shanping, Liu Wenfeng, Wang Huanlong, et al. Linux and Embedded Systems [M]. Beijing: Tsinghua University Press, 2002:121-143 [11] Chen Xiaohua, Luo Daisheng, He Xiaohai. Application of Data Mining Technology in Network Intrusion Detection [J]. Journal of Southwest University for Nationalities (Natural Science Edition), 2003.06:762-765 [12] Ren Zheng, Chen Zhigang. Intelligent Network Intrusion Detection System Based on Data Mining and Planning [J]. Computer Engineering and Science, 2006.03:5-7+16 [13] Qin Yingqiong. Brief Analysis of the Specific Application of Firewall Technology in Computer Network Security [J]. Network Security Technology and Application. 2013.11: 77-81 [14] Pandeeswari N, Kumar G. Anomaly Detection System in Cloud Environment Using Fuzzy Clustering Based ANN [J]. Mobile Networks and Applications, 2015: 1-12 [15] Ponsam J G, Srinivasan R. Multilayer Intrusion Detection MANET [J]. International Journal of Computer Application. 2014.98(20)s [16] Zhang Xiang, Zhang Jicai, Wang Tao, et al. Research on Open Source Intrusion Detection System—Snort [J]. Computer Applications, 2002, 22(11): 96-97. [17] Peng Zhao. Research and Implementation of Network Intrusion Prevention System Based on Linkage [D]. Beijing University of Posts and Telecommunications, 2010. [18] Shi Guozhen, Zhang Meng, Fu Peng et al. Design and Implementation of IDS Device Detection Tools. Information Network Security, 2016, 5: 23-29. [19] Li Wei, Yang Zhongming. Research Review of Intrusion Detection Systems [J]. Journal of Jilin University (Information Science Edition), 2016,34(5):657-662.