

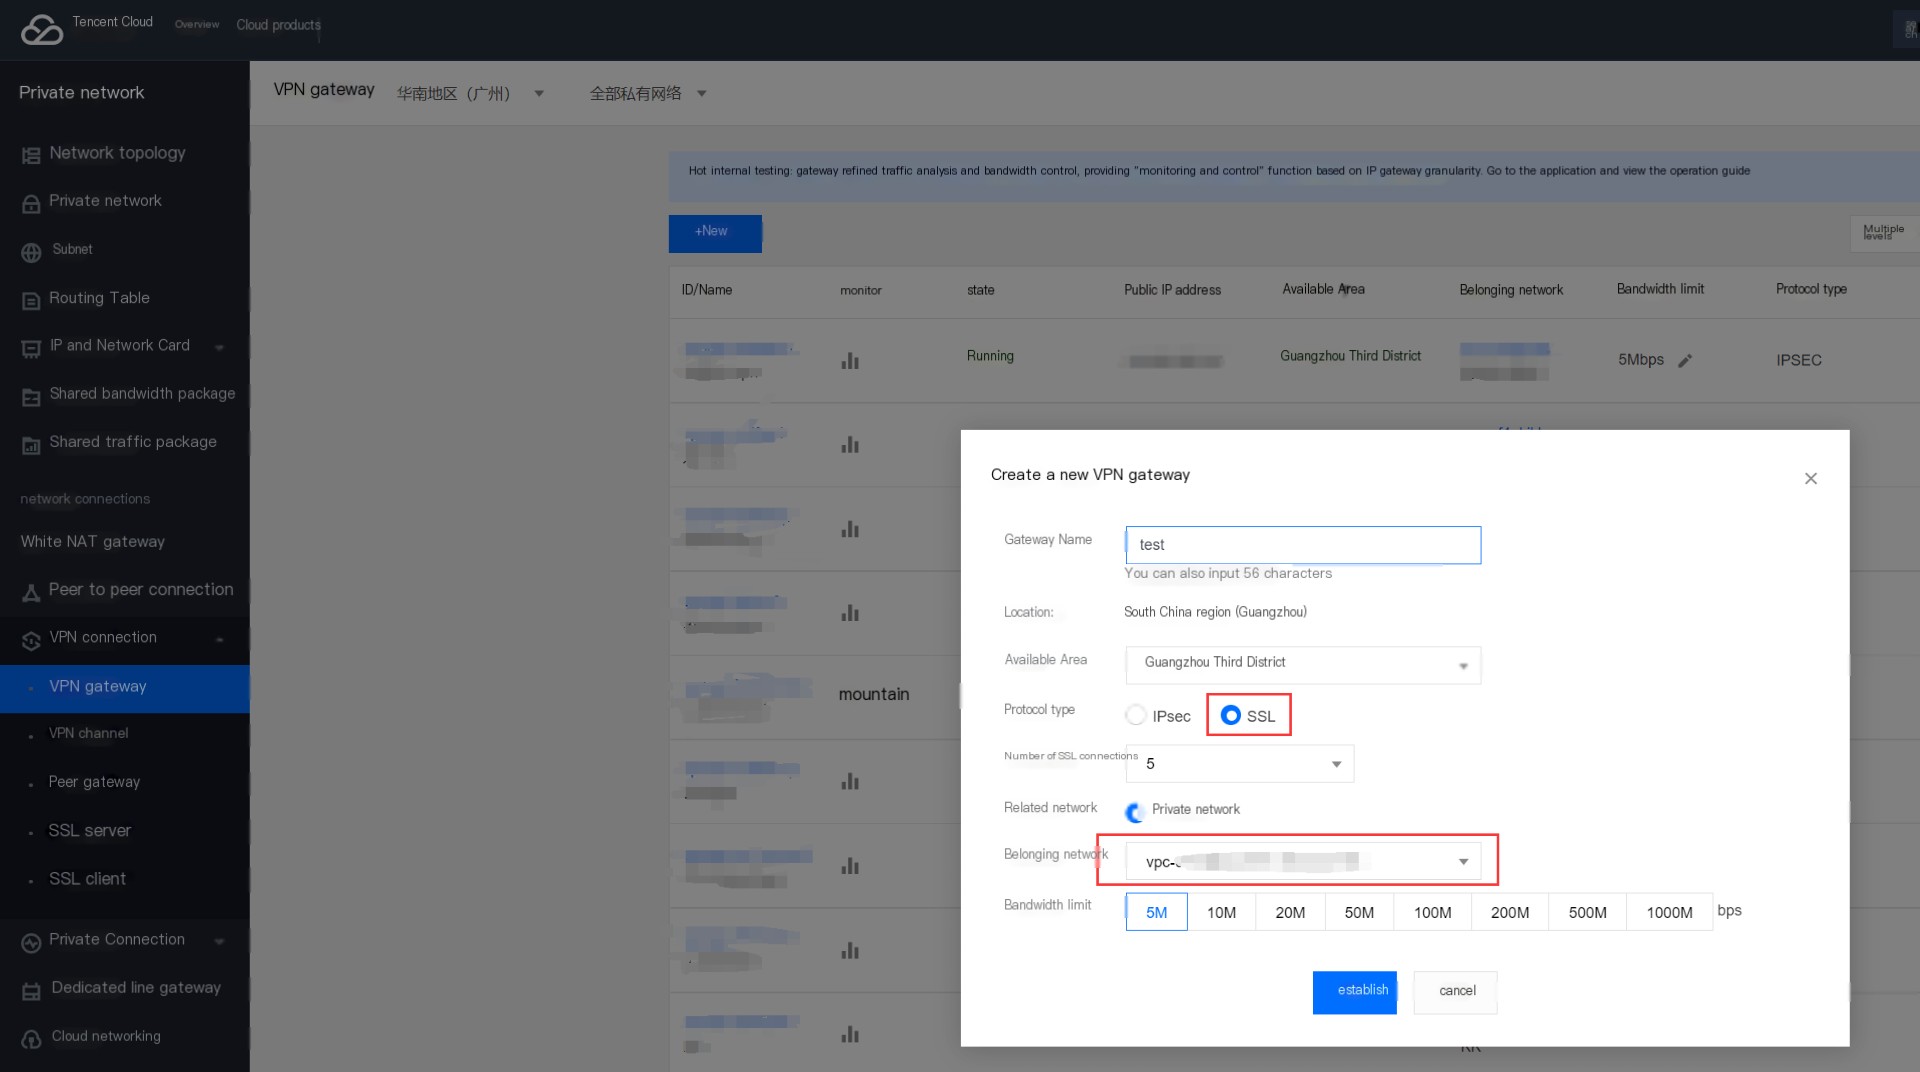
1. Create a Tencent Cloud SSL VPN Gateway
Choose SSL VPN as the protocol type and select the VPC network to connect, as shown below.
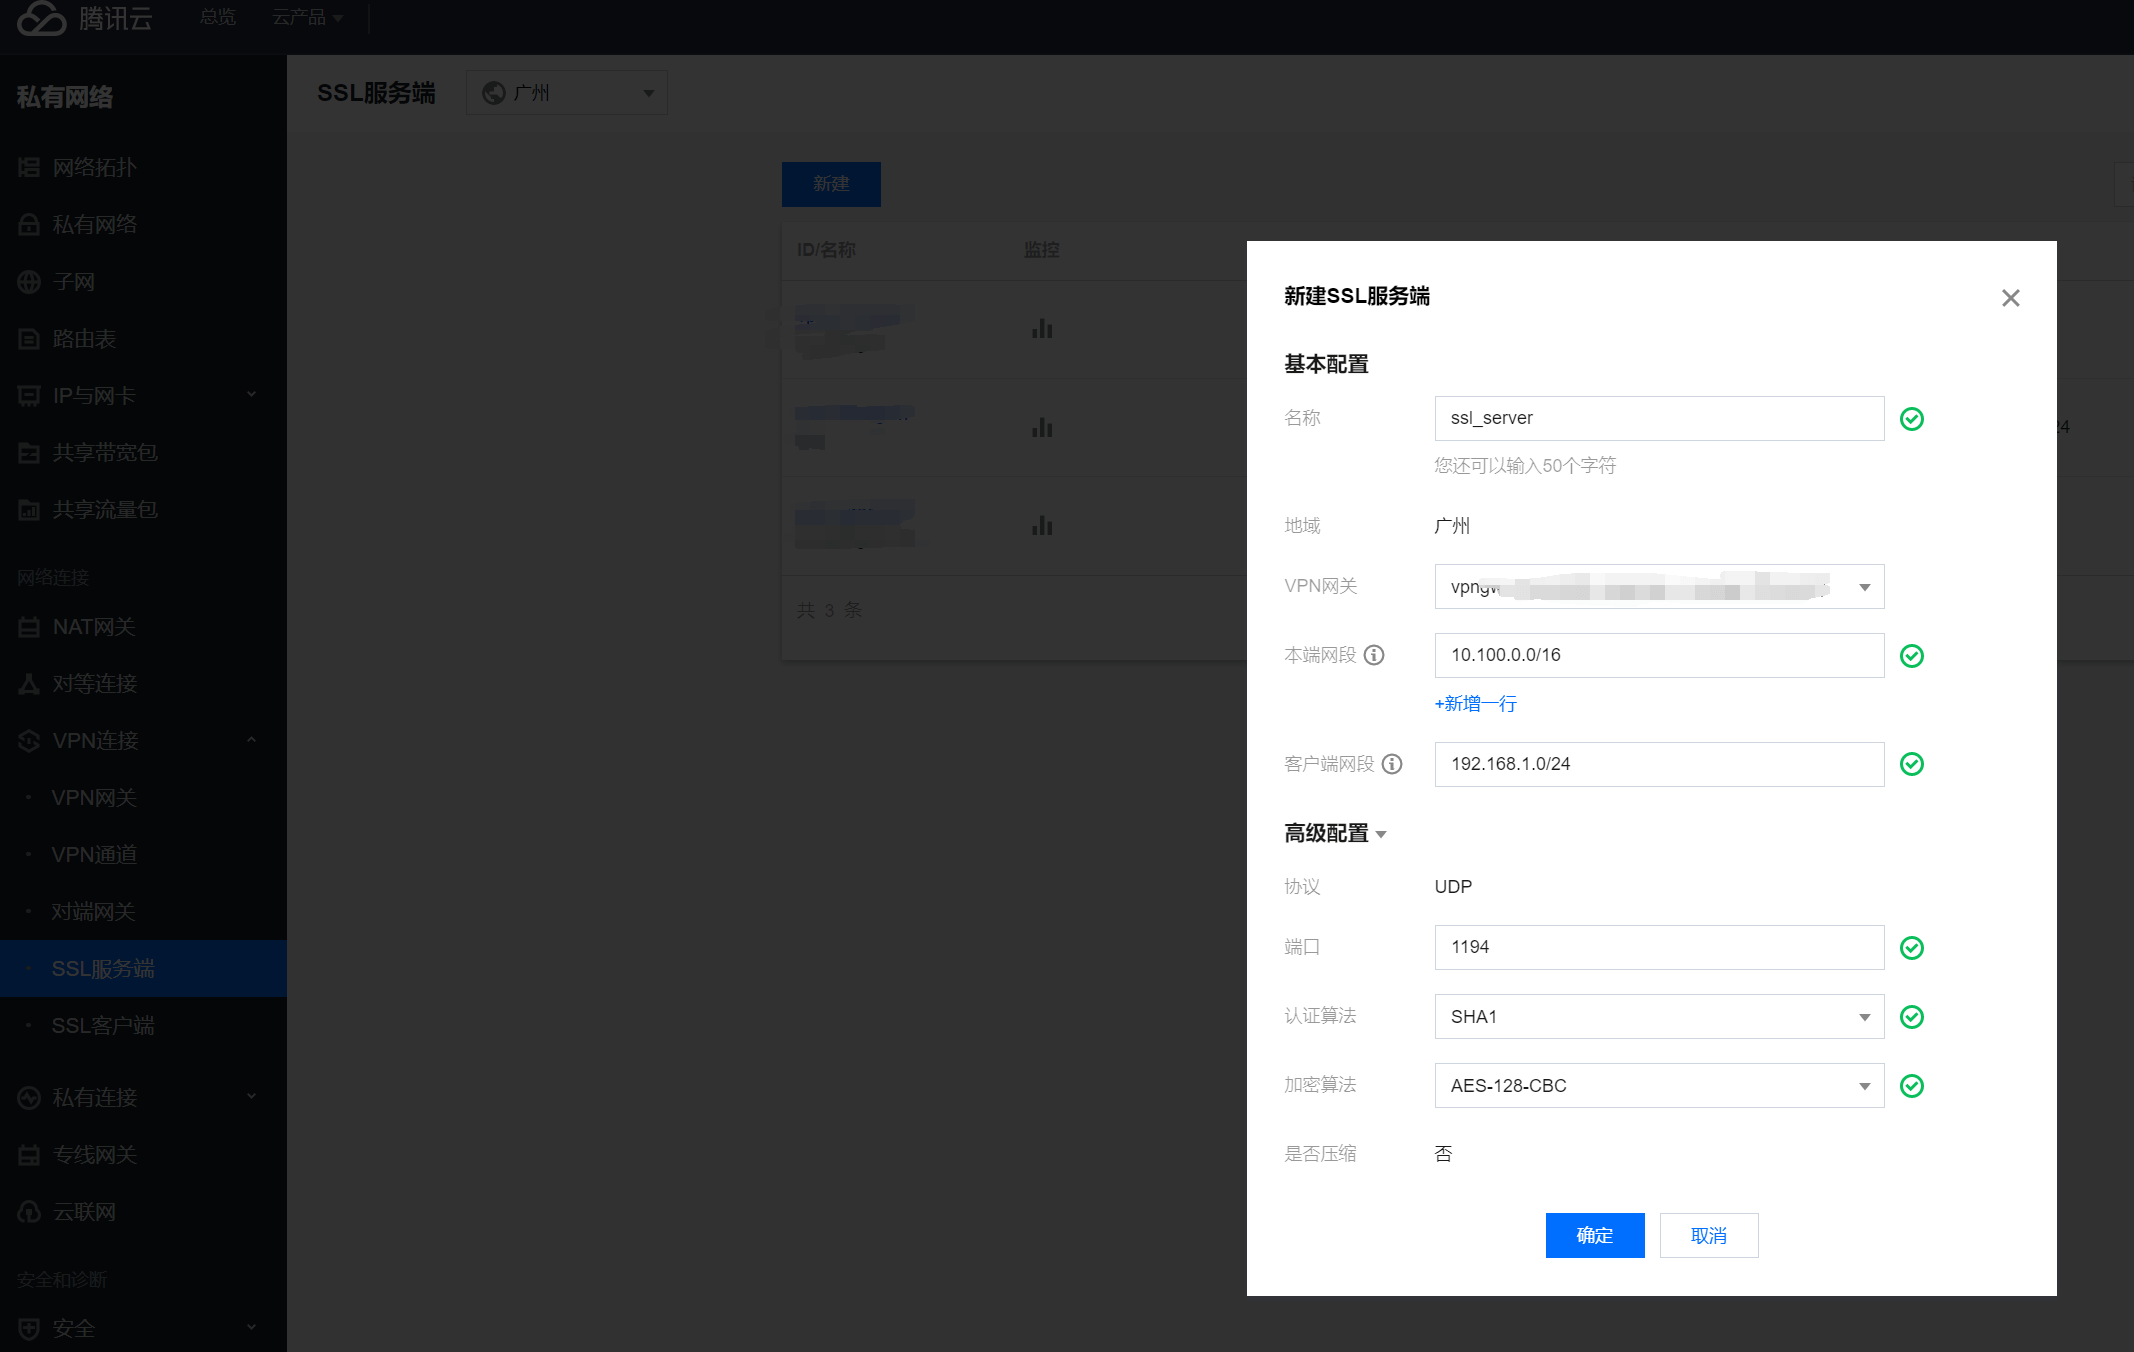
2. Set Up an SSL VPN Server
Currently, Tencent Cloud supports only the UDP SSL VPN protocol, not TCP. Follow these steps to enter the local network segment (VPC segment to connect) and remote network segment (client internal network segment), and provide information such as ports, authentication algorithms, and encryption algorithms:
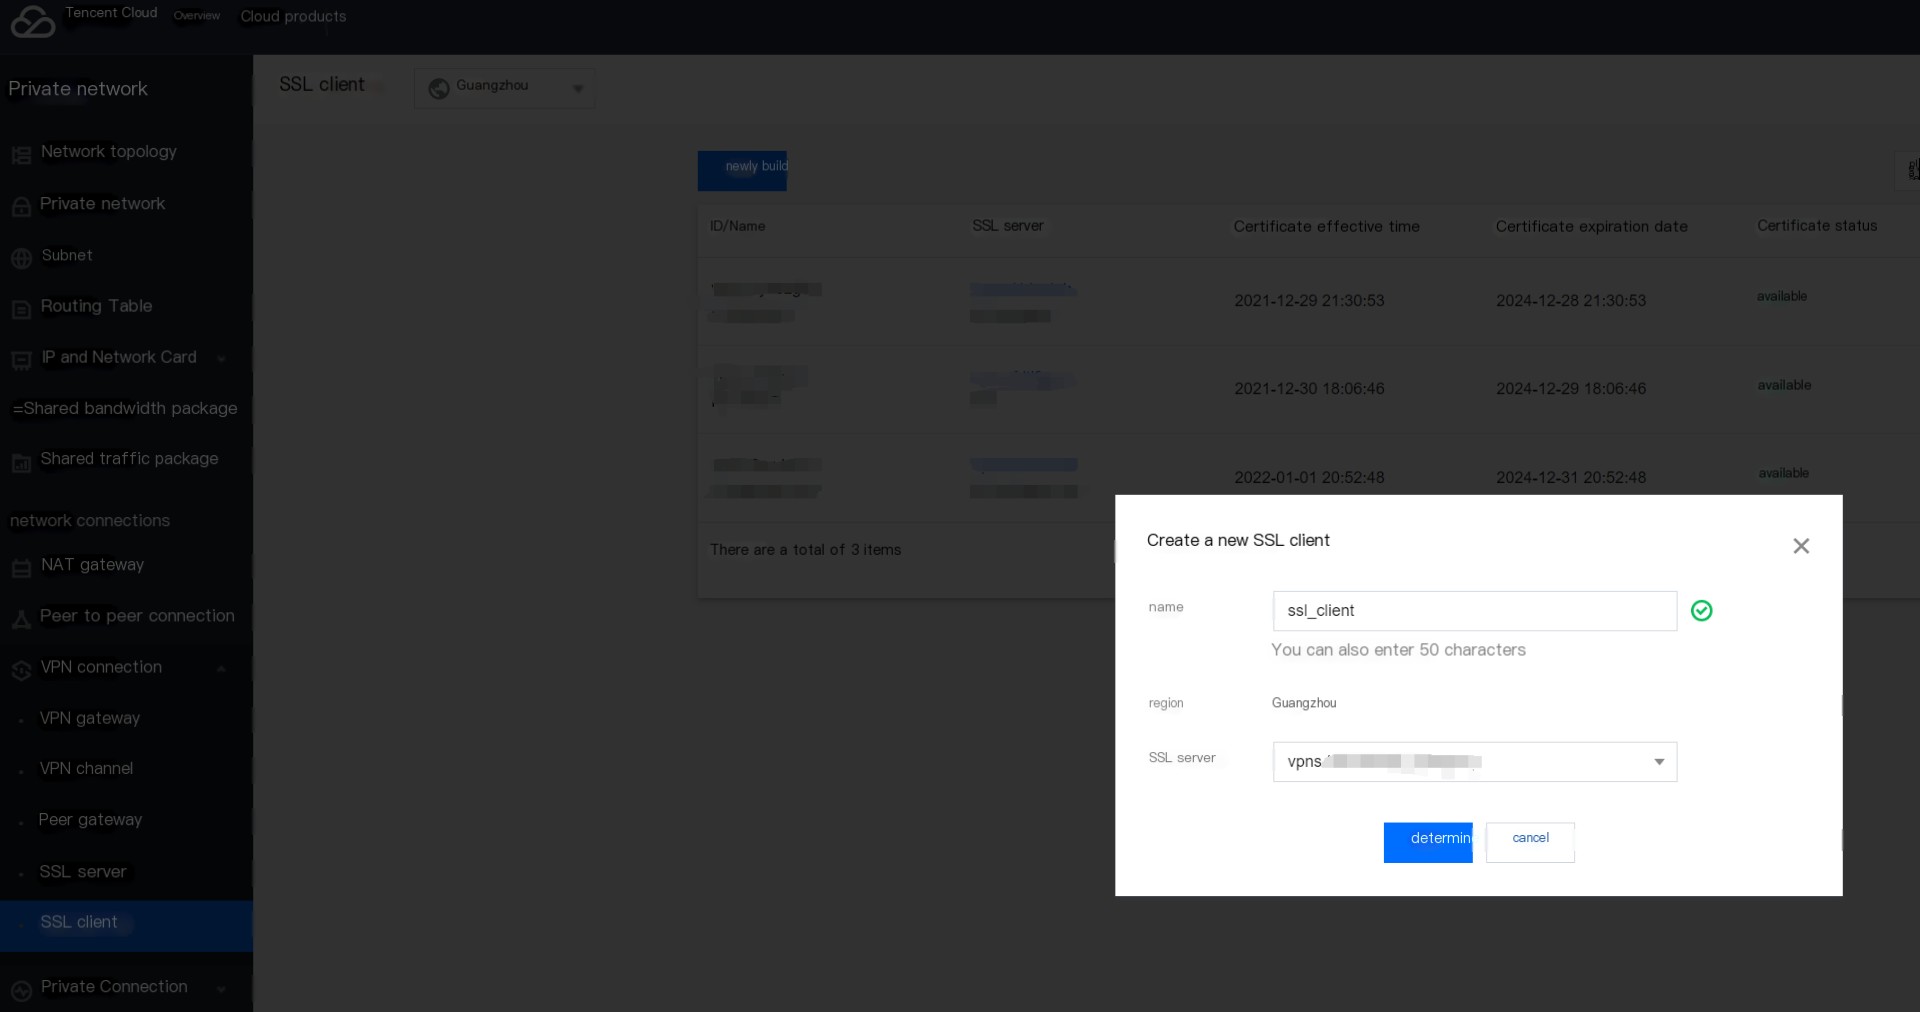
3. Create an SSL VPN Client
Select the server created in the previous step, fill in the remarks, and click OK:
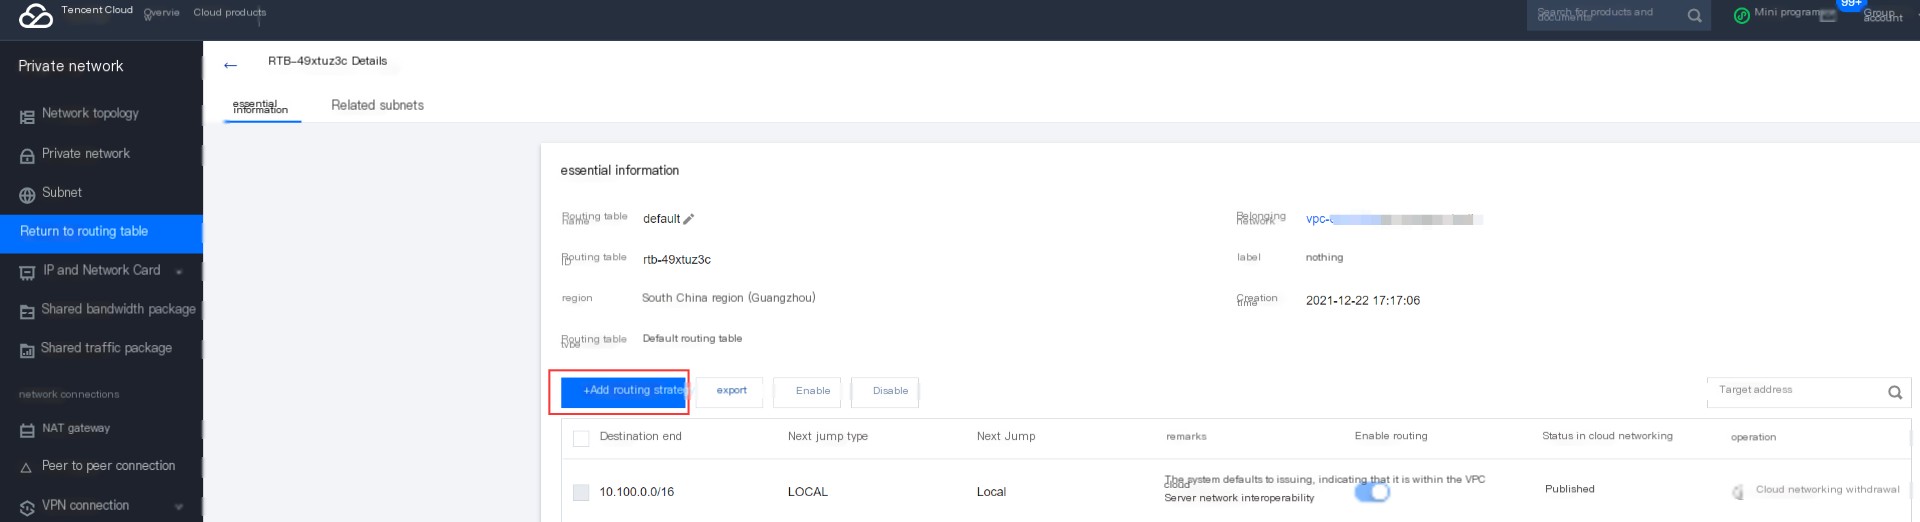
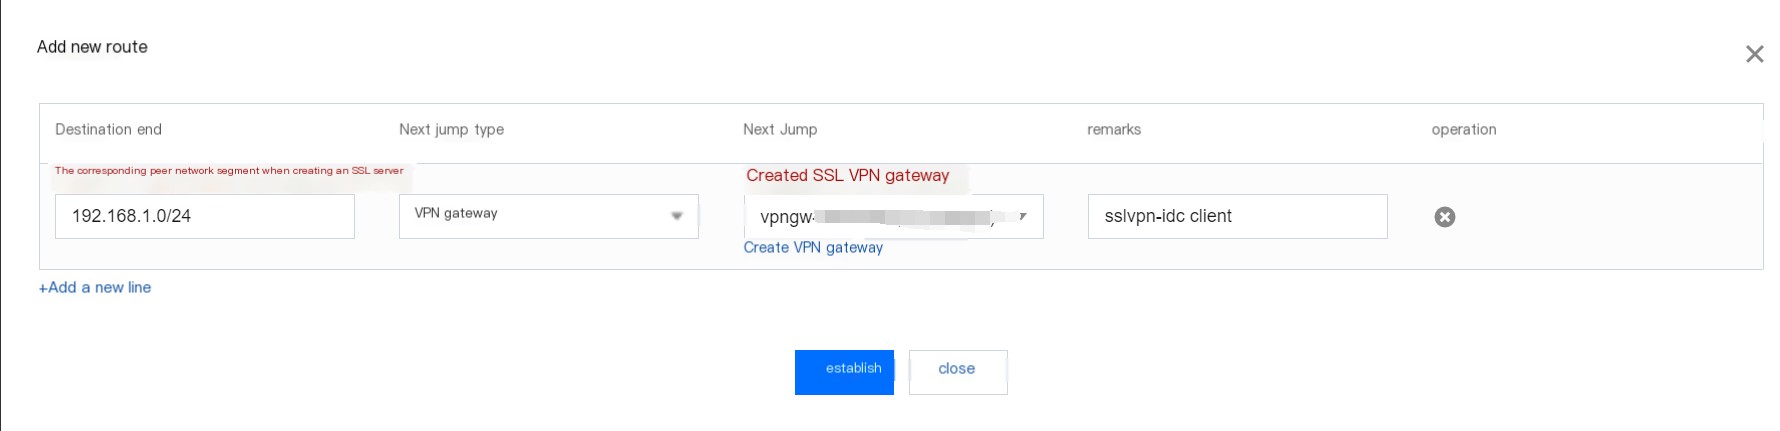
4. Add VPC Route for SSL VPN
When accessing the cloud from the cloud, it will look up the VPC route table direction, so you need to add a rule pointing to the client network segment in the corresponding VPC route table, with the next hop pointing to the SSL VPN gateway.
In the private network console, choose the corresponding VPC in the route table:

After entering the route table, select to add a new route policy:
At this point, all operations for the cloud SSL VPN are complete.
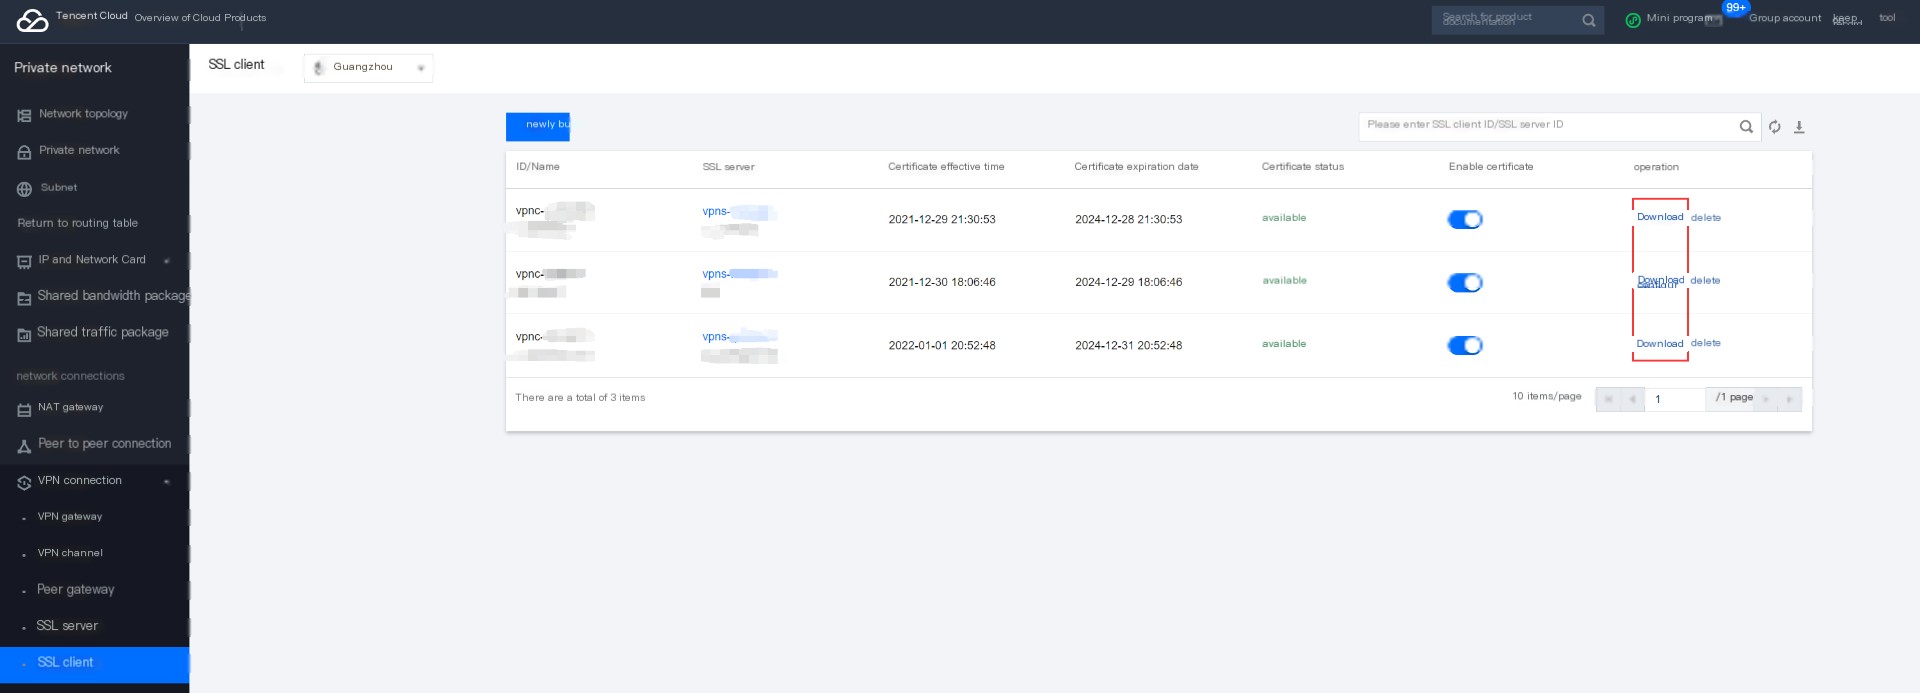
5. Download SSL VPN Configuration File
OpenVPN is a pioneer in open source under Linux, offering excellent performance and a friendly user GUI. The official recommendation is to use OpenVPN as the SSL VPN client. Next, we will demonstrate how to configure the OpenVPN client in Windows, Debian, CentOS, and other systems. The client configuration file will be generated after the SSL client is created and can be downloaded on the SSL client page:
6. Windows Configuration of OpenVPN Client
1. Download and Install
First, download OpenVPN Connect from the OpenVPN official download page (note that Connect is the OpenVPN client, do not accidentally download the server):
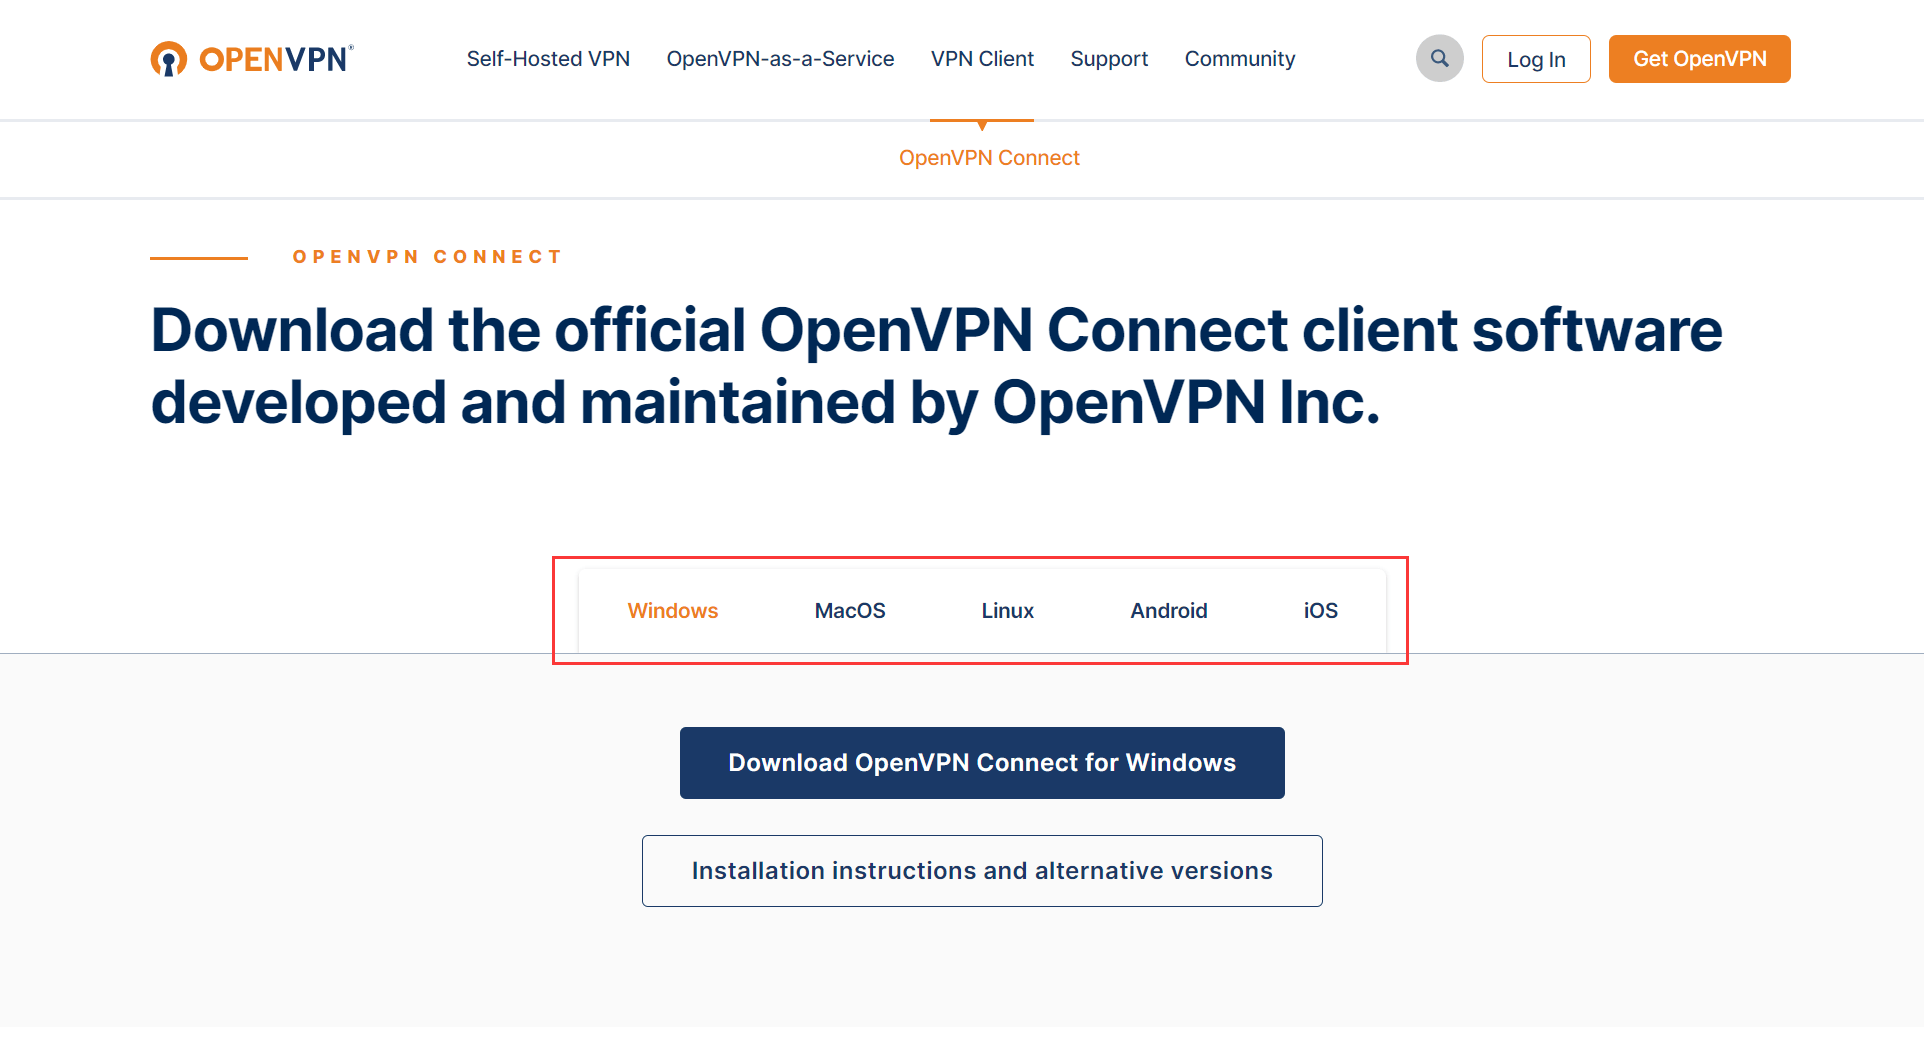
Select the Windows column and click Download. If the download page cannot be opened due to blocking, you can download it from this link.
2. Configure and Import
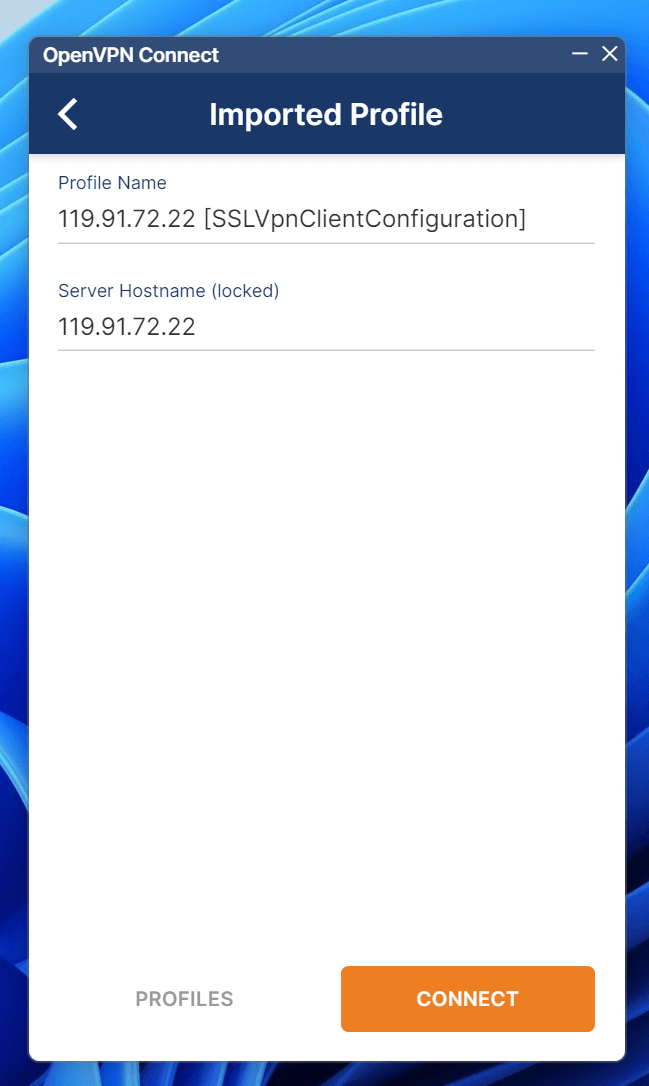
After installation, select Import Profile to import the configuration file:
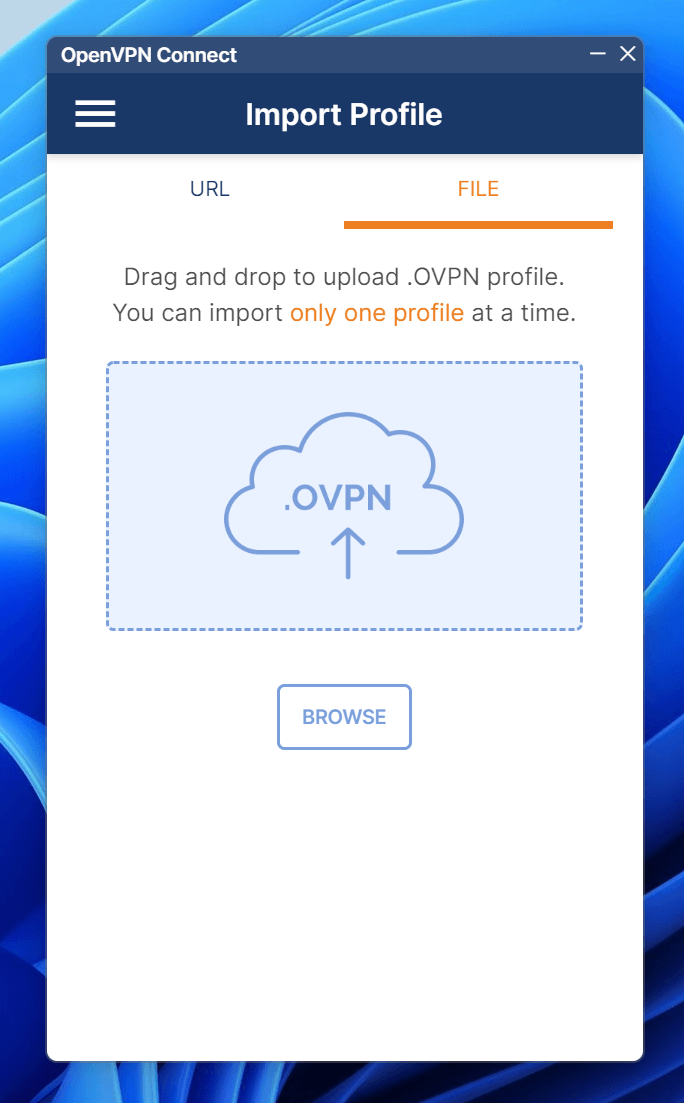
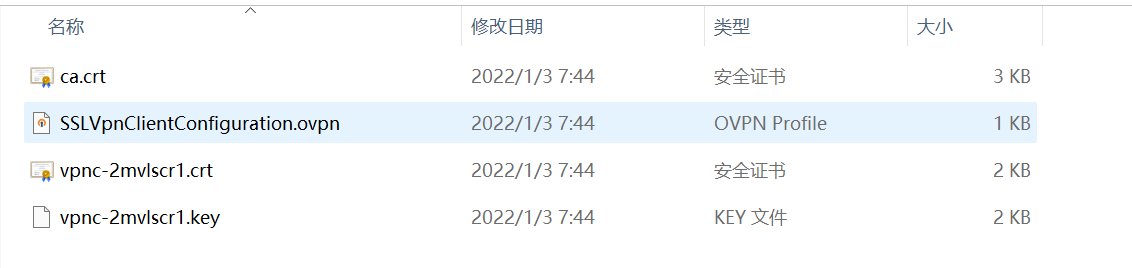
Extract the configuration file and drag the file ending with .ovpn into it:
3. Verify Connectivity
After importing, click connect and verify connectivity:
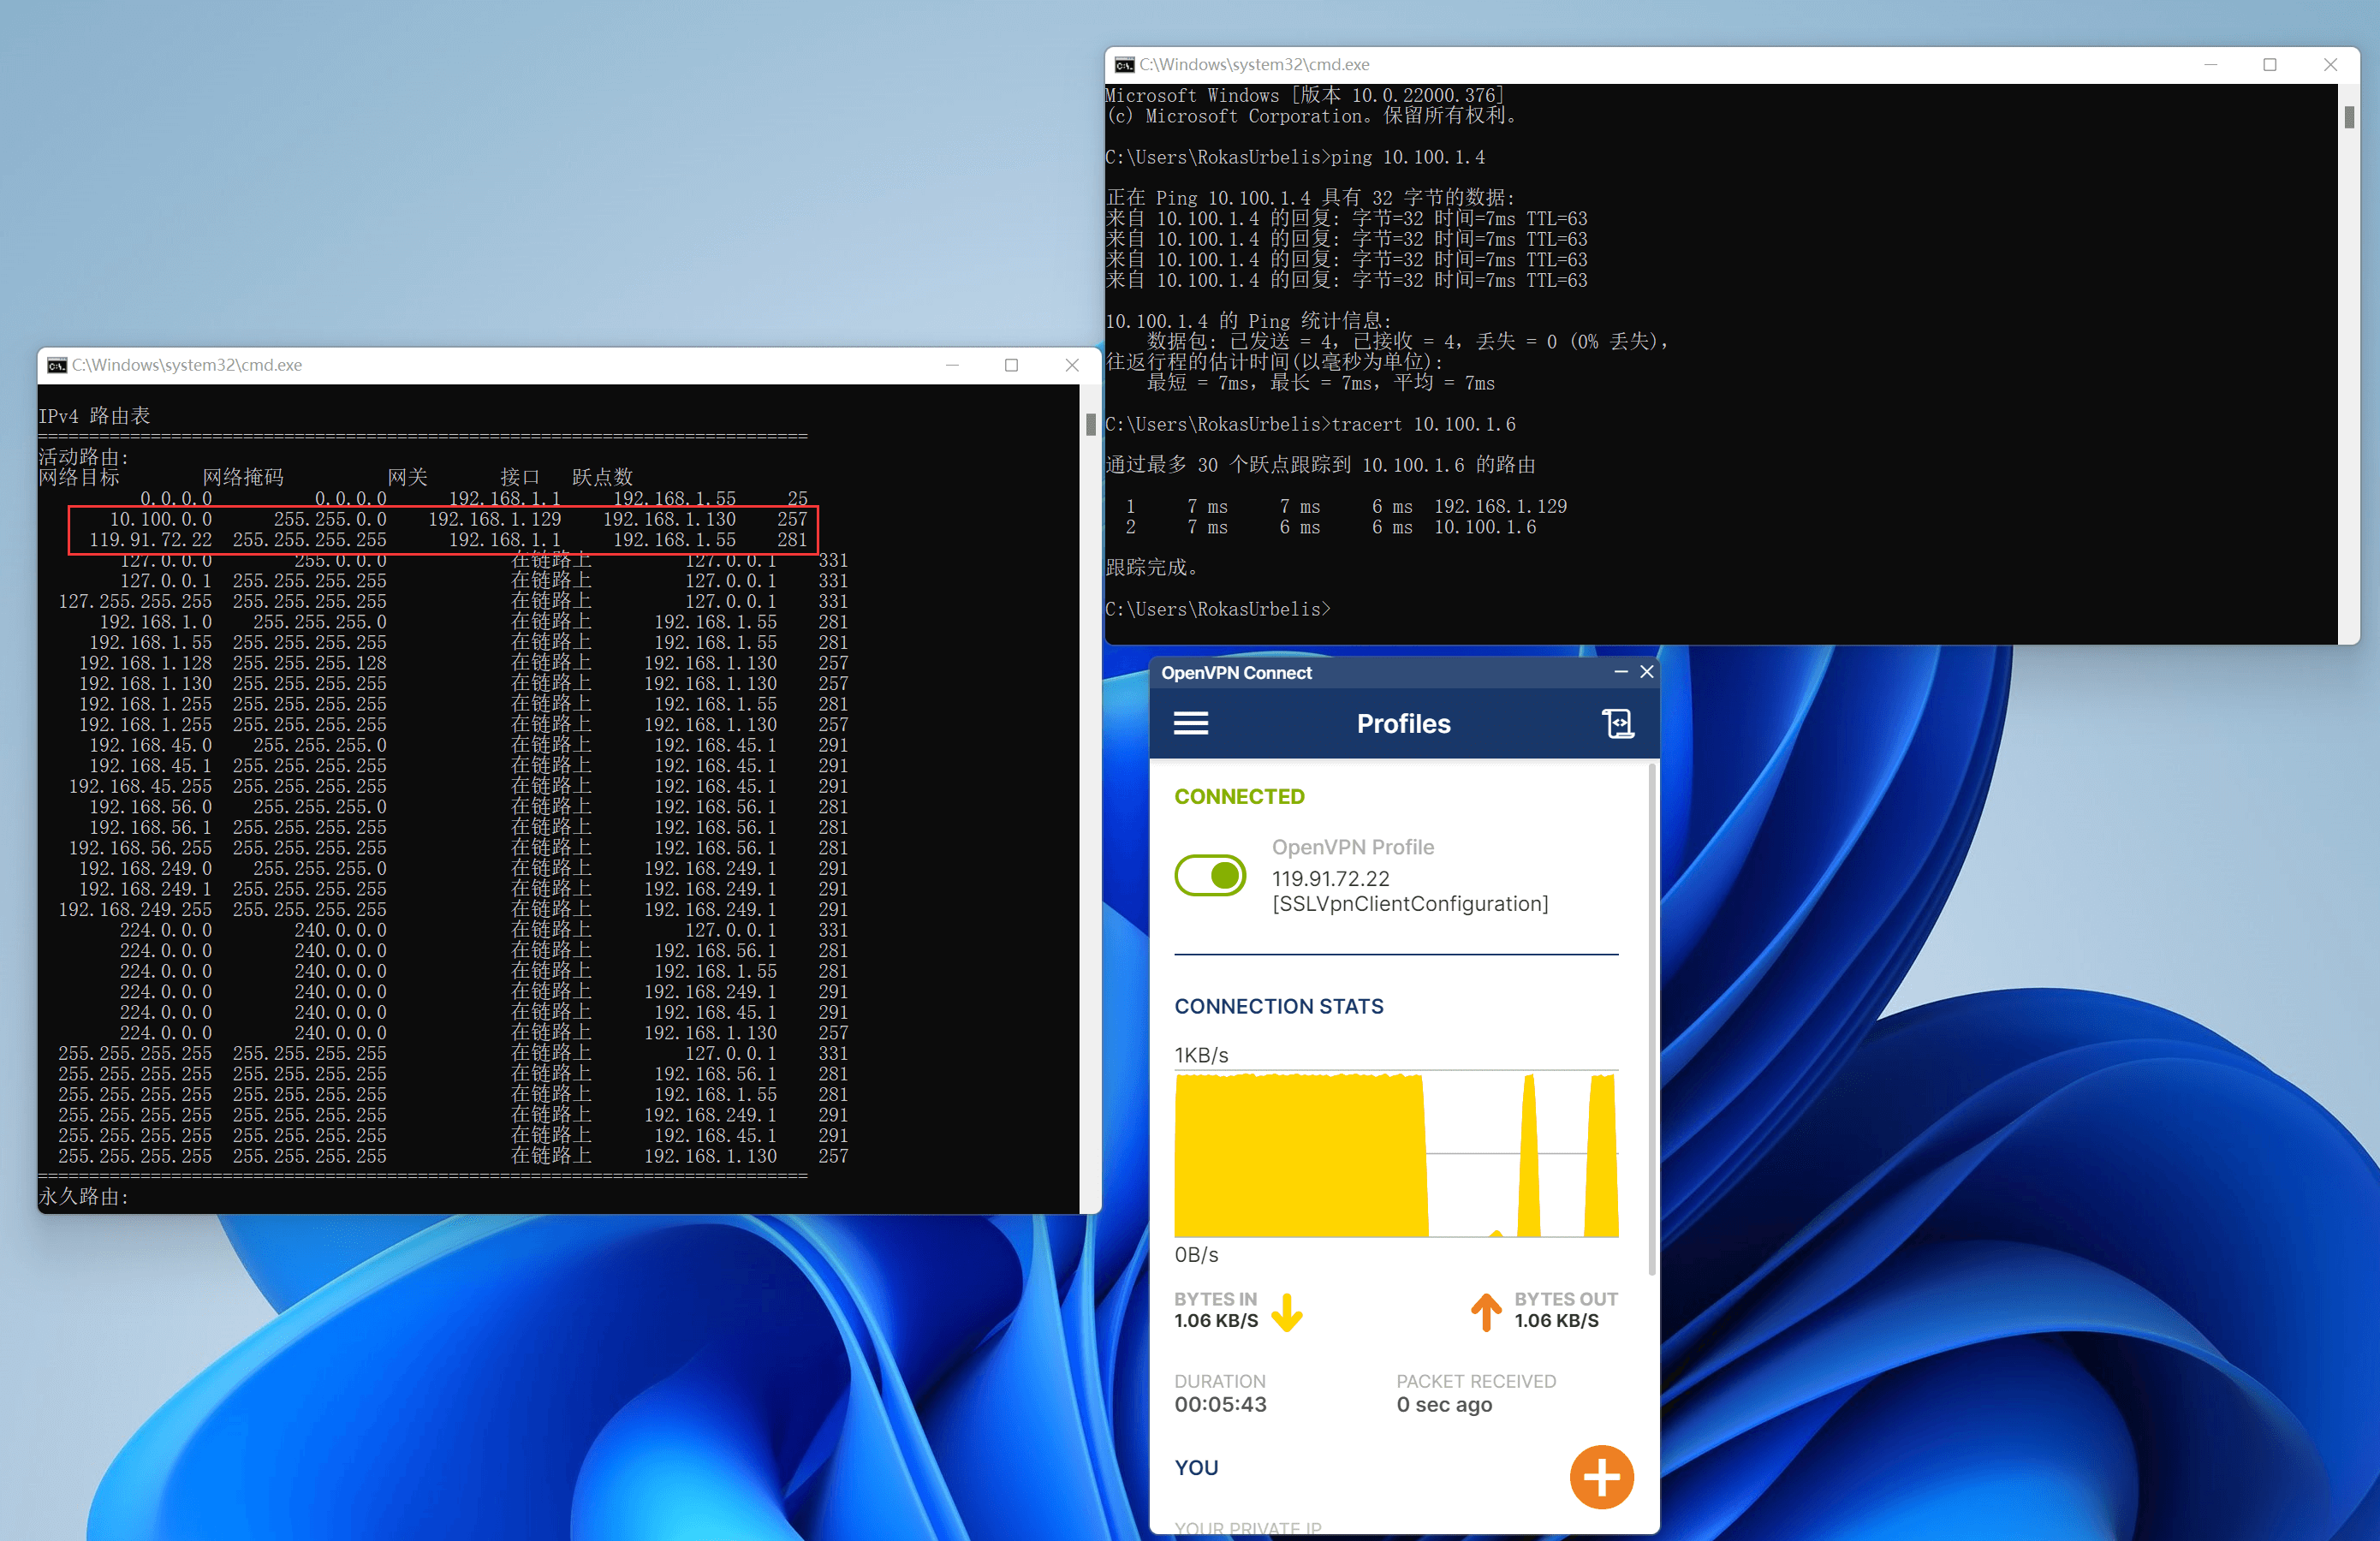
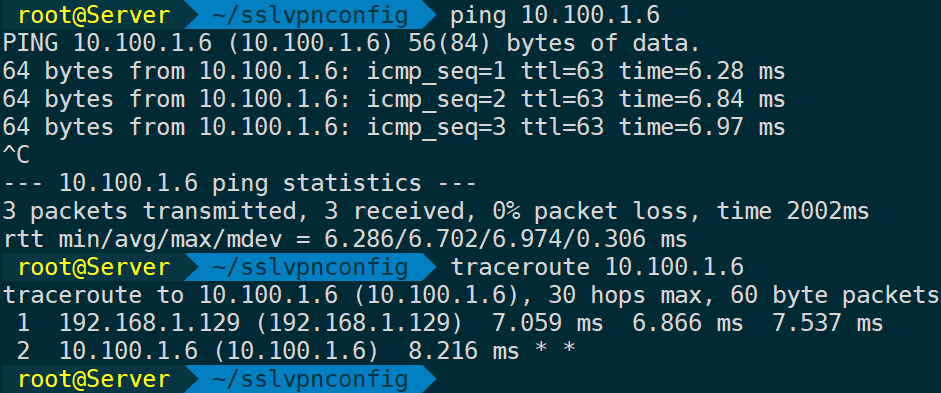
Using the route print command, you can see that once OpenVPN is running normally, routes to the remote gateway are automatically issued. Simultaneously ping the remote VPC segment to ensure connectivity, confirming traffic ingress and egress, indicating normal connection. If you cannot ping the cloud VPC machine, ensure the machine does not block pings, and that the security group and ACL properly allow the client internal network segment.
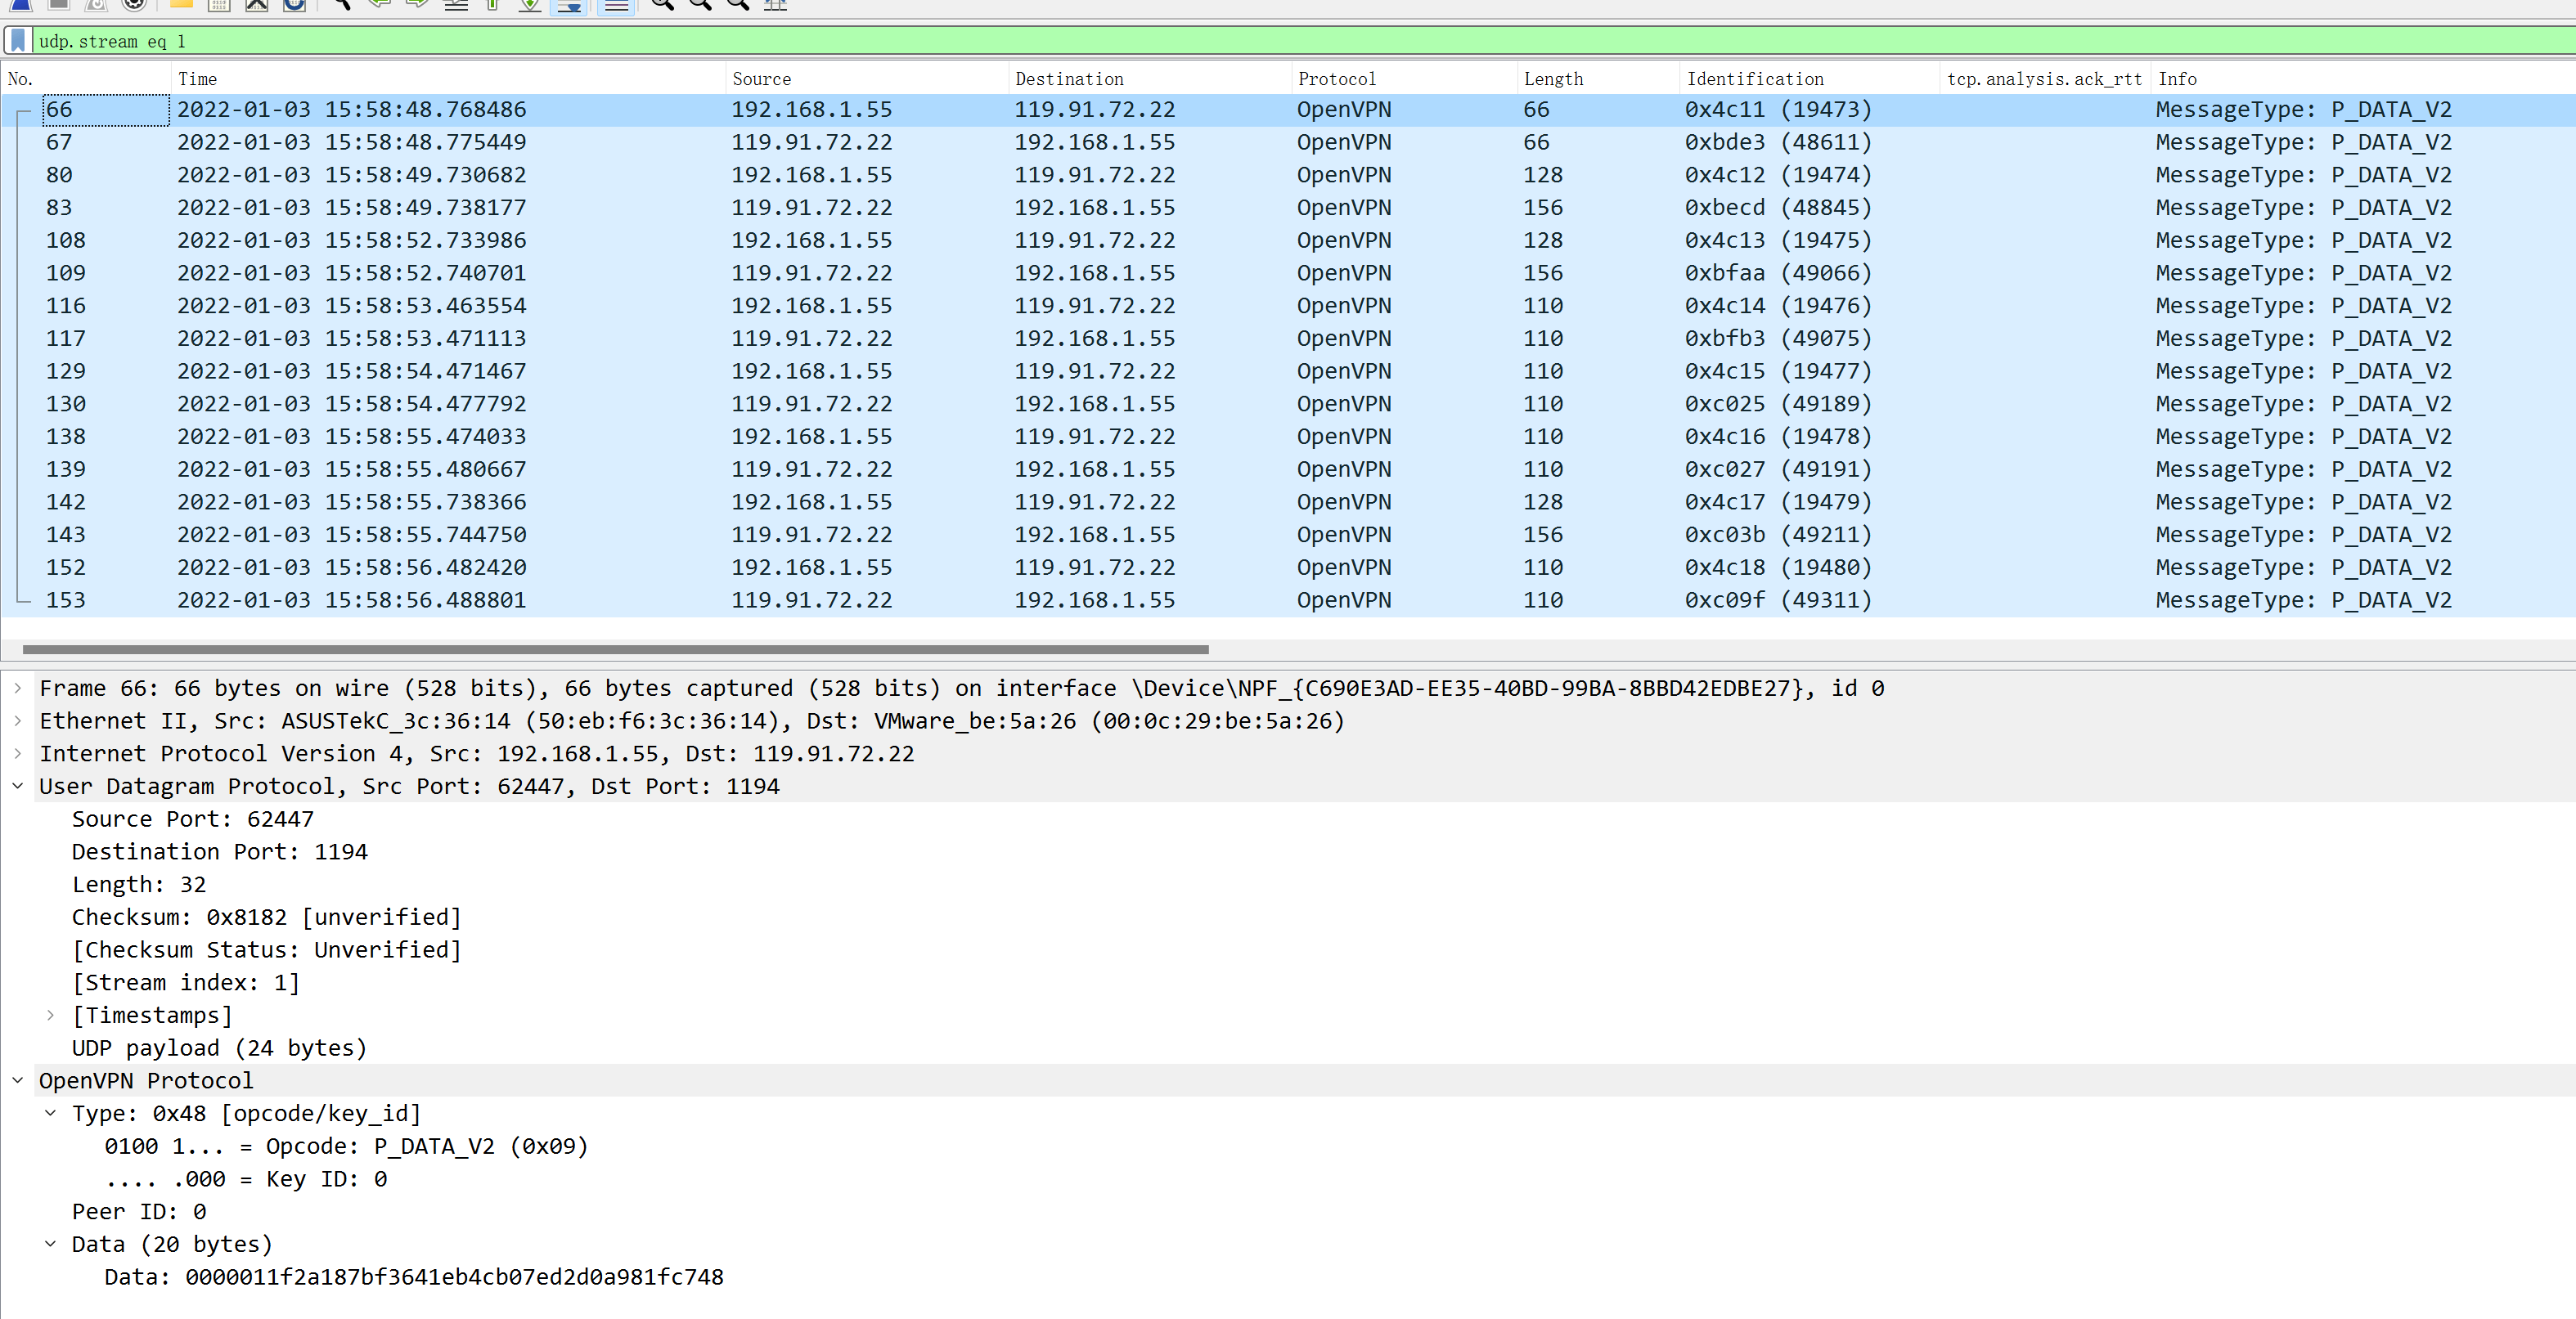
Using Wireshark packet capture, you can notice interaction with the remote internal network actually interacts with the remote VPN gateway, and hence, also relies on public network quality on both ends:
7. Debian/CentOS Configuration of OpenVPN Client
1. Debian Installation of Software Sources, Repository Key, and OpenVPN Client
Ensure Debian supports HTTPS transfer:
apt install apt-transport-httpsInstall the OpenVPN official repository key:
curl -fsSL https://swupdate.openvpn.net/repos/openvpn-repo-pkg-key.pub | gpg --dearmor > /etc/apt/trusted.gpg.d/openvpn-repo-pkg-keyring.gpgInstall the software source for the respective system version codename:
curl -fsSL https://swupdate.openvpn.net/community/openvpn3/repos/openvpn3-$DISTRO.list >/etc/apt/sources.list.d/openvpn3.list
apt-get update
Officially supported distribution codenames:
|
Distribution |
Version |
Codename ($DISTRO) |
Architecture |
|---|---|---|---|
|
Debian |
9 |
stretch |
amd64 |
|
Debian |
10 |
buster |
amd64,arm64* |
|
Debian |
11 |
bullseye |
amd64,arm64* |
|
Ubuntu |
18.04 |
bionic |
amd64, arm64* |
|
Ubuntu |
20.04 |
focal |
amd64,arm64* |
|
Ubuntu |
21.04 |
hirsute |
amd64, arm64* |
Using Debian9 stretch as an example, the installation of the software source should be:
curl -fsSL https://swupdate.openvpn.net/community/openvpn3/repos/openvpn3-stretch.list >/etc/apt/sources.list.d/openvpn3.list
apt-get update
Due to GFW reasons, domestic machines may not use the above software sources or be subject to speed limitations. Consider setting up a proxy server as explained in this article.
apt install openvpn32. CentOS Installation of OpenVPN Client
CentOS, Redhat series supported distribution codenames:
|
Distribution |
Version |
Architecture |
|---|---|---|
|
Fedora |
33, 34, Rawhide (*2) |
aarch64, s390x, x86_64 |
|
Red Hat Enterprise Linux / CentOS |
7 |
x86_64 |
|
Red Hat Enterprise Linux / CentOS |
8 |
aarch64, x86_64 |
CentOS7 installation of EPEL source:
yum install https://dl.fedoraproject.org/pub/epel/epel-release-latest-7.noarch.rpmRHEL7 installation of EPEL source:
sudo subscription-manager repos --enable "rhel-*-optional-rpms" --enable "rhel-*-extras-rpms" --enable "rhel-ha-for-rhel-*-server-rpms"RHEL/CentOS 8 installation of EPEL source:
yum install https://dl.fedoraproject.org/pub/epel/epel-release-latest-8.noarch.rpmRHEL8 install dependencies:
ARCH=$( /bin/arch )
subscription-manager repos --enable "codeready-builder-for-rhel-8-${ARCH}-rpms"
Install yum copr module:
yum install yum-plugin-coprEnable Copr repository:
yum copr enable dsommers/openvpn3Install OpenVPN client:
yum install openvpn3-clientNote, using OpenVPN version 3 client on CentOS/RedHat series may cause freezing when connecting. After verifying with packet captures and logs, no abnormalities were found, configured entirely according to official guidance, and tested across various network environments and versions. Suspected official bug; if encountered, it is recommended to install the following OpenVPN version 2.
yum install openvpn -yUsing OpenVPN version 2 to connect:
openvpn --config ${MY_CONFIGURATION_FILE}Running in the background can be:
nohup openvpn --config ${MY_CONFIGURATION_FILE} &>/dev/null &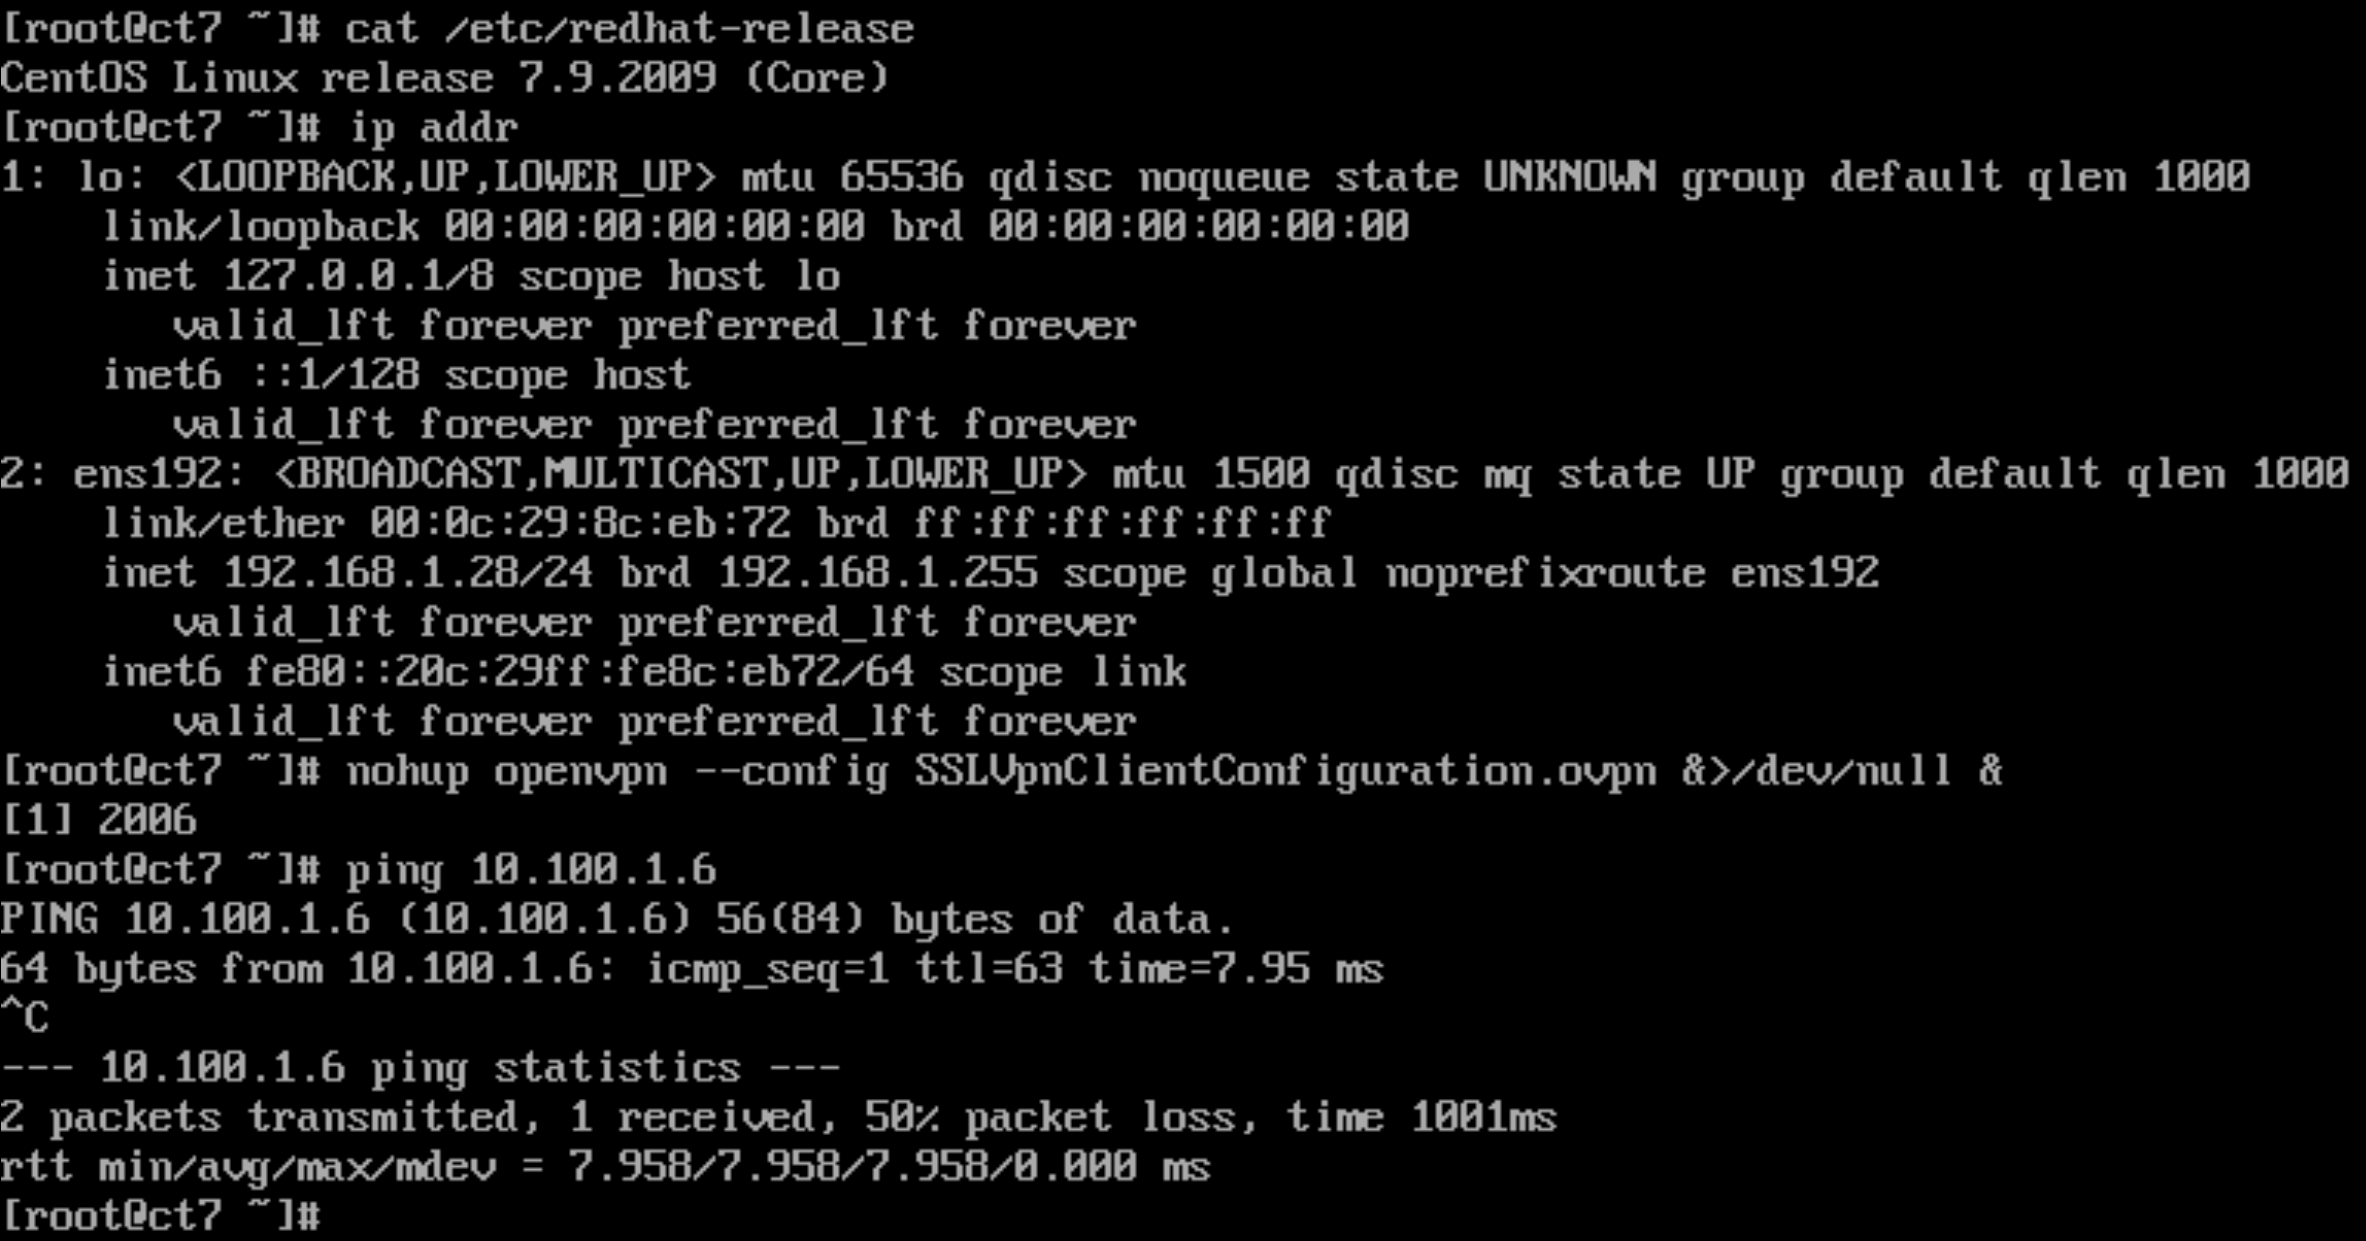
Or develop a systemd service.
3. Import Configuration File and Run
Upload the configuration exported from the Tencent Cloud SSL client console to Debian, extract it, and run using the following command:
openvpn3 config-import --config ${MY_CONFIGURATION_FILE}  #Import configuration file for session reuse
openvpn3 session-start --config ${MY_CONFIGURATION_FILE}  #Start session
Replace sslvpnclient.ovpn with the correct ovpn configuration file, the file name on Tencent Cloud’s official site should be SSLVpnClientConfiguration.ovpn, showing connected means it is connected.
At this point, OpenVPN is operating normally; open another tty to test connectivity:
4. OpenVPN Session Management
OpenVPN allows multiple configuration files and sessions to run simultaneously, manage sessions using the following commands:
openvpn3 sessions-list #View current running sessions list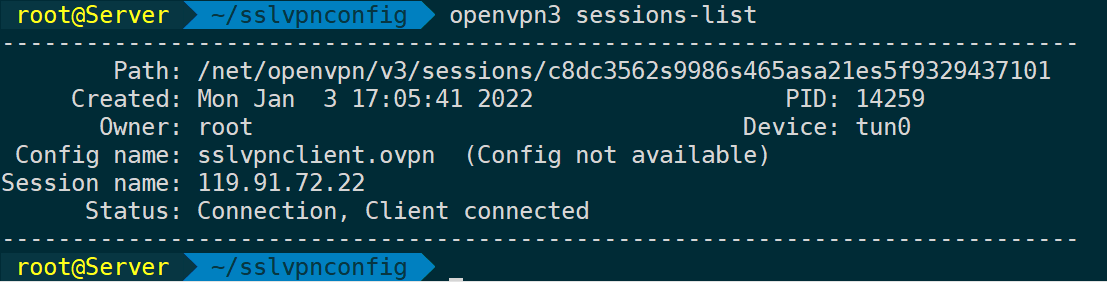
Restart a session:
openvpn3 session-manage --config ${CONFIGURATION_PROFILE_NAME} --restart
Disconnect a session:
openvpn3 session-manage --session-path /net/openvpn/v3/sessions/..... --disconnect
After disconnecting, traffic usage details will be tallied.
View session status:
openvpn3 session-stats --config ${CONFIGURATION_PROFILE_NAME}
openvpn3 session-stats --session-path /net/openvpn/v3/sessions/...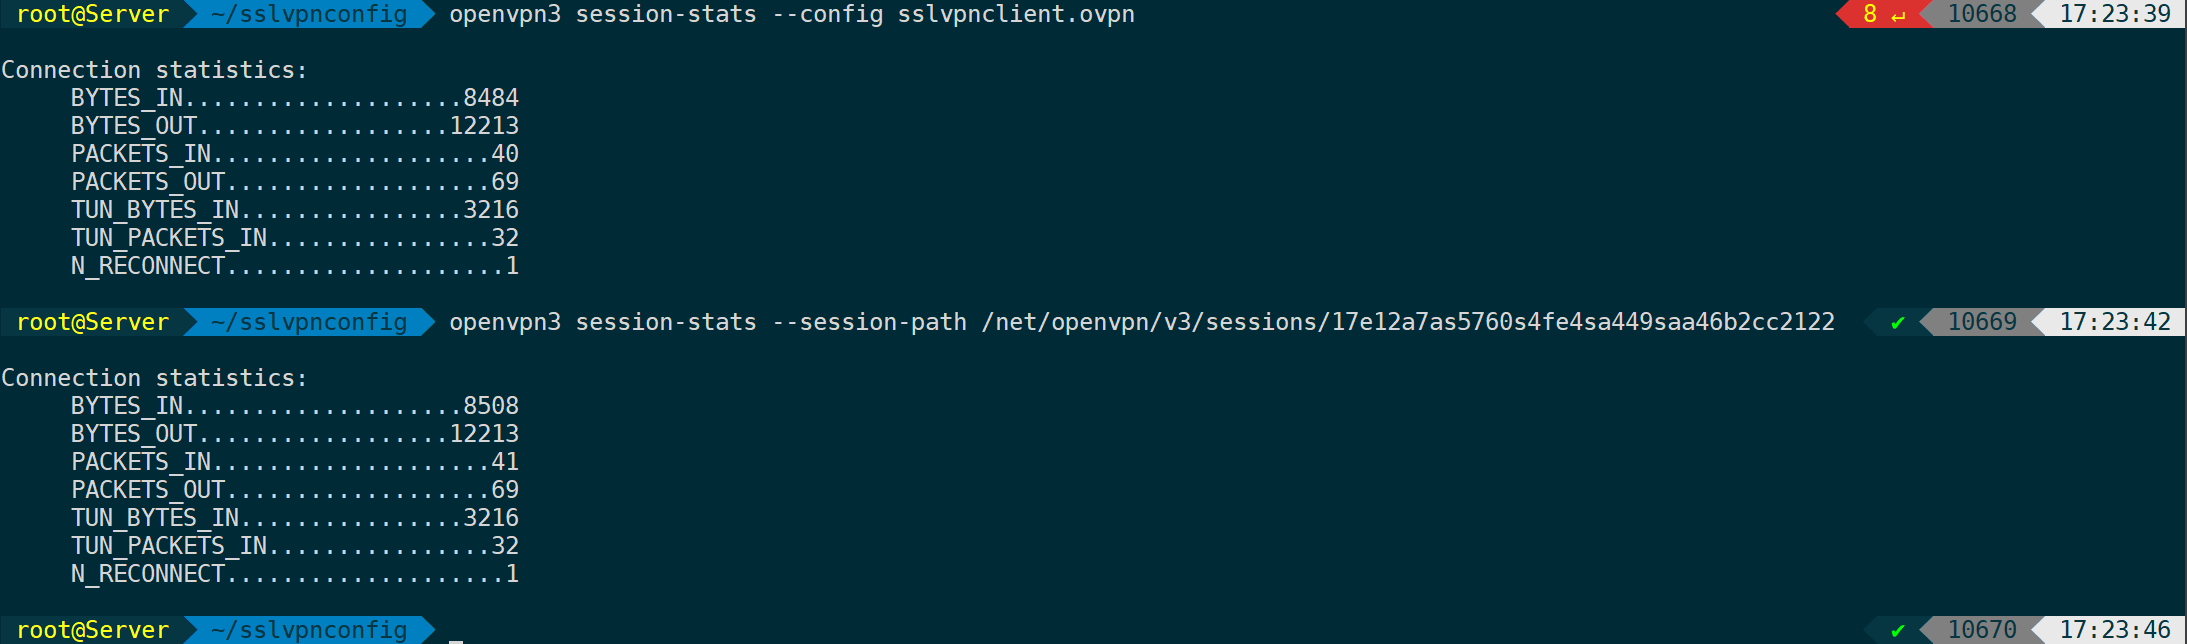
View session logs:
openvpn3 log --config ${CONFIGURATION_PROFILE_NAME}
Attached PDF versions:
SSLVPN Setup and Use.pdfSSLVPN Setup and Use OpenVPN – Light Theme.pdf