
1. Introduction to the Lab
1.1 Lab Overview
This lab primarily focuses on reviewing the structure and functionality of Metasploit modules, followed by an in-depth introduction to scanners. You’ll then develop your own Metasploit scanner.
Note: Due to the high cost of configuring the cloud platform, the number of experiments is limited. Each lab is allowed a maximum of 6 attempts.
1.2 Lab Learning Objectives
This lab will guide you through developing a personalized Metasploit scanner. Conducted within Lab Environment, the main learning objectives are as follows:
- Understanding the structure of Metasploit modules
- Roles of Metasploit scanners
- Crafting Metasploit scanners
- Basic Ruby programming knowledge
Since Metasploit scanner modules are written in Ruby, users familiar with other programming languages will find it easy to understand the code. Furthermore, key steps in the lab are annotated to help you complete the activity and successfully create your own Metasploit scanner.
1.3 Lab Environment
The lab setup includes two virtual machines: an attacker machine and a target machine.
– **Attacker Machine**: Kali Linux 2.0 virtual machine, hostname: `kali`, IP address: `192.168.122.101`, default username/password: `root/toor`
– **Target Machine**: Metasploitable2 virtual machine, hostname: `target`, IP address: `192.168.122.102`, default username/password: `msfadmin/msfadmin`
The lab environment is hosted on Lab Environment’s cloud infrastructure. Here is the configuration of the machines for this lab:
| Machine | Hostname | Username | Password |
|---|---|---|---|
| Attacker | Kali Linux 2.0 | root | toor |
| Target | Metasploitable2 | msfadmin | msfadmin |

2. Environment Setup
2.1 Starting the Lab Environment
In this lab, all tasks are conducted on Lab Environment’s Kali Linux installation, where the host OS is Ubuntu 14.04. Start by double-clicking the Xfce terminal icon on the desktop to open a terminal window.
Use the virsh list command to check the list and status of virtual machines in the current environment. Note that sudo permissions are required, and the --all parameter must be included to display powered-off VMs:
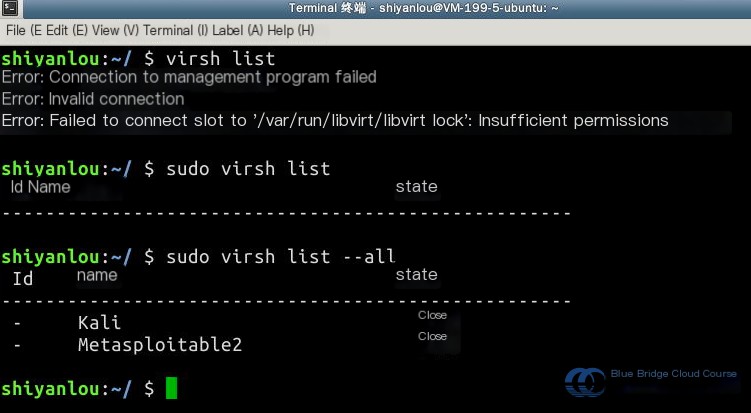
Next, use virsh start to start the virtual machines. Check their status again to confirm they are in the “running” state:
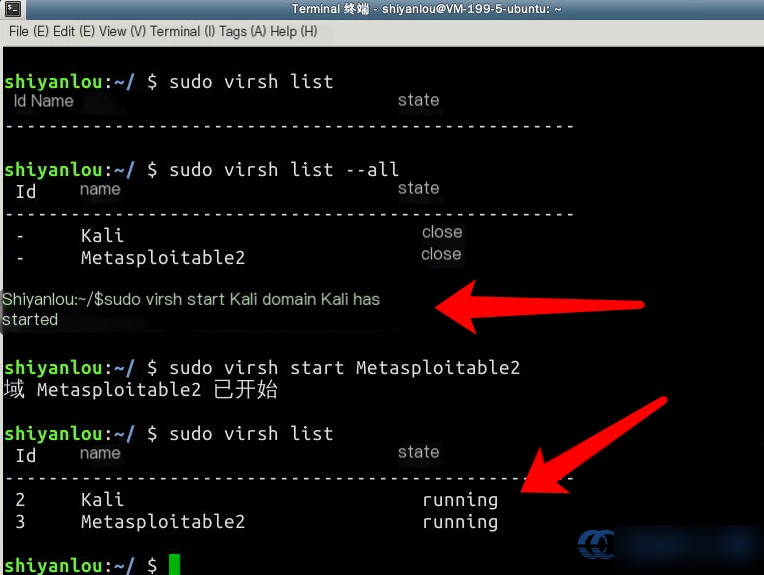
After allowing a few minutes for the VMs to boot up, you can SSH into both machines.
In the design of Metasploit, a modular concept is utilized as much as possible to enhance code reusability. The framework is developed in Ruby, although it includes scripts written in Perl, as well as components in C, Assembly, and Python. Initially, it was tailored for Linux operating systems, and its command structure closely resembles the Linux shell. However, it now supports all major operating systems, including Windows, Solaris, and Mac.
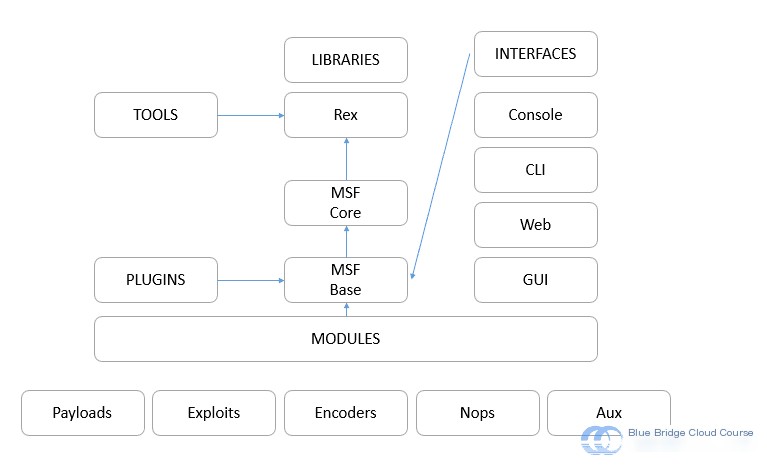
| English Name | Module Name | Specific Function |
|---|---|---|
Aux | Auxiliary Module | Provides numerous auxiliary modules for information gathering in penetration testing, including network service scanning, creating fake services to collect credentials, and password guessing modules. |
Exploits | Exploit Module | Exploits identified vulnerabilities or configuration weaknesses in remote target systems to inject and execute payloads, thereby gaining access control over the target system. |
Post | Post-Exploitation Module | Supports various actions after gaining remote control over the target system, such as extracting sensitive data, expanding access, or launching pivoting attacks. |
Payloads | Payload Module | Payloads are pieces of injected code executed on the target system after a successful attack, typically used to initiate control sessions for attackers. |
Encoders | Encoder Module | After assembling the payload with NOP (No-Operation) instructions, the Metasploit framework performs an essential encoding step before injecting the malicious data buffer into the target system. |
Nops | NOP (No-Operation) Module | NOP instructions are operations that do not affect the program’s state and are used as fillers or placeholders in shellcode. |
3.2 Various Vulnerability Scanning Components in Metasploit
3.2.1 Nmap Scanner
Nmap is compatible with Windows, Linux, Mac, and other operating systems. It is used for host discovery, port enumeration, service identification, operating system and hardware detection, software version discovery, and vulnerability identification. The Metasploit Framework integrates the Nmap component. Typically, necessary information gathering, such as identifying active hosts and open ports, is conducted before launching an attack on the target system.
3.2.2 NeXpose Scanner
NeXpose performs network scanning to identify devices running on the network, detect their operating systems and application vulnerabilities, and analyze the findings to generate vulnerability reports.
3.2.3 Nessus Scanner
Nessus is one of the most widely used vulnerability scanning tools. It employs a client/server architecture, where the server handles security checks, and the client is used to configure and manage the server. Additionally, the server supports plugin-based functionality, allowing users to add specific plugins for faster and more complex security checks.
4. Writing a Metasploit Scanner
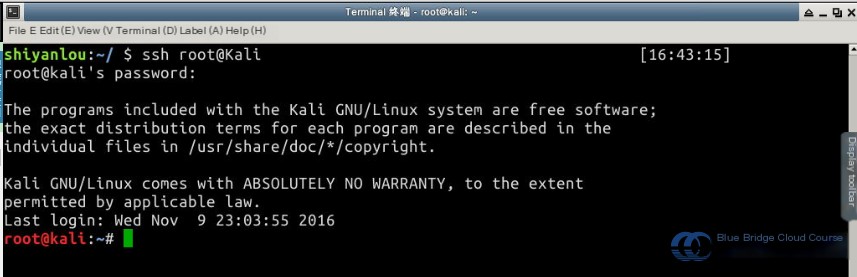
Ensure you have logged into the Shiyanlou Kali terminal:
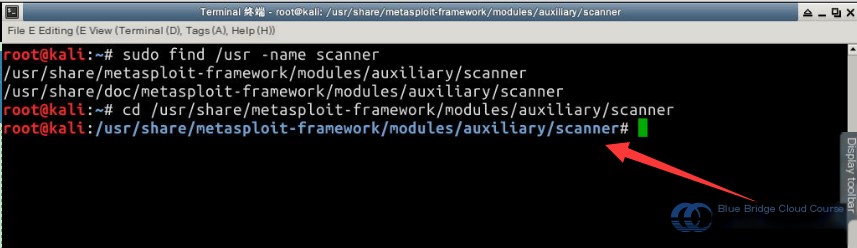
Start by searching for the Metasploit scanner module:
# Find the scanner module
sudo find /usr -name scanner
find Command Syntax:
# Syntax of the find command
find  -name

The first file listed should be the path to the file you are looking for. Navigate to the folder using the cd command. Here’s a quick tip: The shortcut for copy and paste in Kali Linux is Ctrl + Shift + C and Ctrl + Shift + V, respectively:
# Navigate to the scanner folder
cd /usr/share/metasploit-framework/modules/auxiliary/scanner
4.2 Creating the simple_tcp.rb File
Within this folder, create a file named simple_tcp.rb:
# Edit the simple_tcp.rb module
sudo vi simple_tcp.rb
And paste the following code into the file:
require 'msf/core'
class MetasploitModule < Msf::Auxiliary
    include Msf::Exploit::Remote::Tcp
    include Msf::Auxiliary::Scanner

    def initialize
        super(
            'Name'        =>  'Mr_Zhou Scanner',
            'Version'     =>  '$Revision
### Translation (WordPress Post Content)
—
Press esc and then input :wq to save and exit.
4.3 Code Explanation
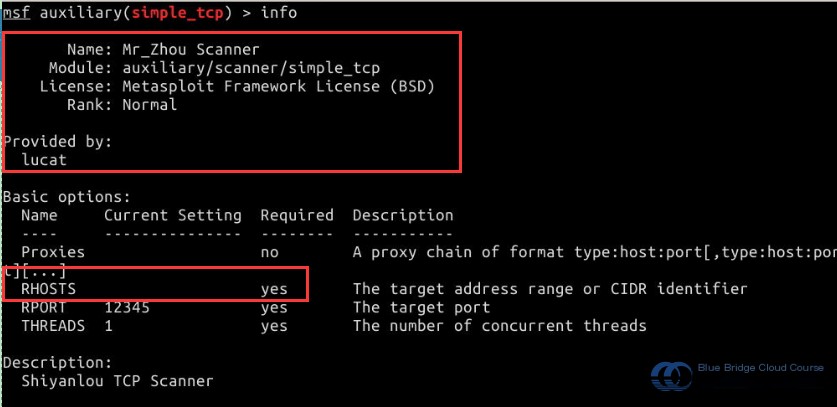
The code in this section is shown when we use this module in the MSF (Metasploit) terminal and input info to display its details.
    def initialize
        super(
            'Name'        =>  'Mr_Zhou Scanner',
            'Version'     =>  '$Revision
Port configuration is next. Here, we are configuring the listener on port 12345:
        register_options(
            [
                Opt::RPORT(12345)
            ], self.class)
Host connection:
    def run_host(ip)
        connect()
        sock.puts('HELLO SERVER')
        data = sock.recv(1024)
        print_status("Received: #{data} from #{ip}")
        disconnect()
    end
4.4 Creating a Listener Program
The purpose of creating the listener is so that when our simple_tcp.rb scanner scans the specified port, it can trigger and send back a response message.
In the Kali terminal, input the command to launch the Metasploit console:
# Launching terminal operations
sudo msfconsole
Note: It may take a few minutes for the console to fully start.
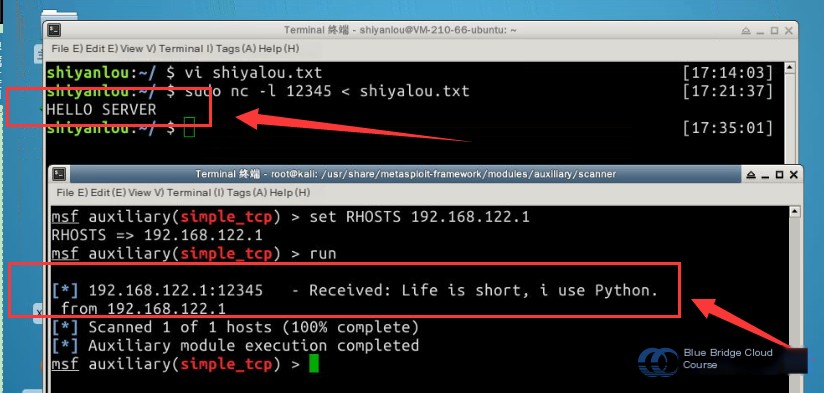
Next, open a new Xfce terminal in Shiyanlou, and create the file shiyanlou.txt:
# Edit the shiyanlou.txt file
vi shiyanlou.txt
Add any arbitrary code inside shiyanlou.txt that will serve as the response message when the scanner finds the port. For this example:
# Add any welcome message here
Life is short, I use Python.
Press esc and input :wq to save and exit.
In the Shiyanlou terminal, input the command to start listening:
# Start listening command
sudo nc -l 12345 < shiyanlou.txt
Press enter. At this point, the program will appear to hang. Don’t worry—this is expected behavior. The program has now started listening on port 12345. The command nc is the Linux command for listening on ports, and the -l option specifies the listening port number. The part < shiyanlou.txt specifies that when the scanner detects this port, the contents of shiyanlou.txt will be returned as a response.
4.5 Enabling Our simple_tcp Module in MSF:
Switch back to the Kali terminal. At this point, msfconsole should be fully loaded.
In the MSF terminal, input the following command to use the simple_tcp module:
# Using the 'simple_tcp' module we wrote earlier
use auxiliary/scanner/simple_tcp
Enter the command info in the terminal to view information about the simple_tcp module:
—
This translation adheres to maintaining the original content while preserving the HTML structure and formatting. The plain text has been translated to American English using precise terminology suited for cybersecurity contexts.
Next, configure the necessary parameters. Here, we set the target host for scanning, which is the IP address of the actual listening host:
 # Set RHOSTS
set RHOSTS 192.168.122.1
Note: It’s RHOSTS, not RHOST. The difference is the extra S. You can use show options to check when to use RHOSTS instead of RHOST. 
Then, enter the command run to initiate the scan. A successful scan is indicated when you receive feedback from the target host being scanned:
5. Summary
Through this tutorial and the provided explanations, we hope you now have a foundational understanding of how to use Metasploit. To develop more advanced scanners, continuous learning and exploration of Metasploit’s framework source code is essential.
After completing this experiment, you should now be familiar with the following concepts:
- The structure of a Metasploit module
- Commonly used Metasploit scanners
- The role of Metasploit scanners
- How to write a Metasploit scanner
6. Recommended Reading
For those who are enthusiastic about further enhancing your understanding of Metasploit scanners, reading English materials is highly encouraged:
https://www.offensive-security.com/metasploit-unleashed/vulnerability-scanning