Overview
Snort is an intrusion detection and prevention system. It can log detected network events and block them. Snort operates using detection signatures called rules. Snort rules can be custom-created by users, or several pre-packaged rule sets can be enabled and downloaded. The most commonly used are the rules from the Snort VRT (Vulnerability Research Team). Snort VRT rules are available in two forms: a free version for registered users, which requires registration at http://www.snort.org and only provides rules that are 30 days old, and a paid version with rules updated twice weekly. Below, I will introduce the installation and configuration of Snort on the pfSense 2.34 system.
Step 1: Register on www.snort.org and obtain the OinkCode.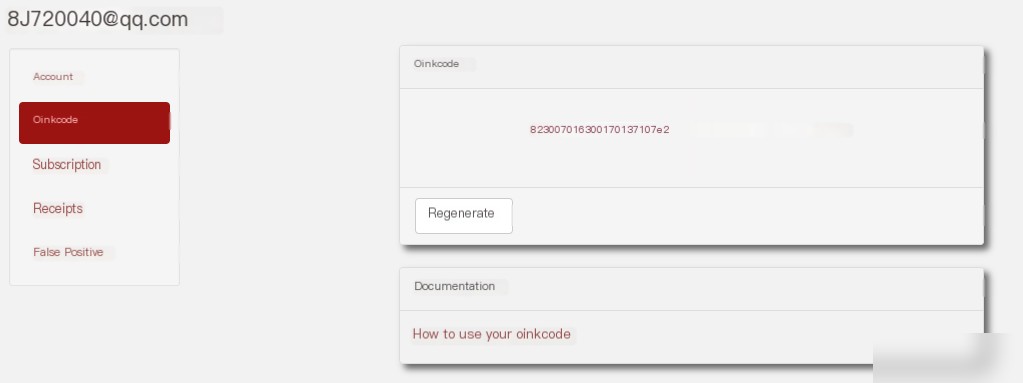
Create a free Snort.org account and obtain the OinkCode. After logging in, click your username and select Oinkcode from the left menu to find this information.
The OinkCode will be used for pfSense to automatically download Snort rule definitions.
Step 2: Install and run Snort
Navigate to System – Package Manager – Available Packages, and locate Snort.
Click the “+” button to install it.

Run Snort. Navigate to Services – Snort to access the Snort configuration interface.

Step 3: Configure Snort
Snort has many settings, which can be overwhelming at first. I will only cover the features necessary to get IDS/IPS running. This tutorial focuses on the most common settings. Any settings not mentioned should be left at their default values.
Step 4: Global Settings
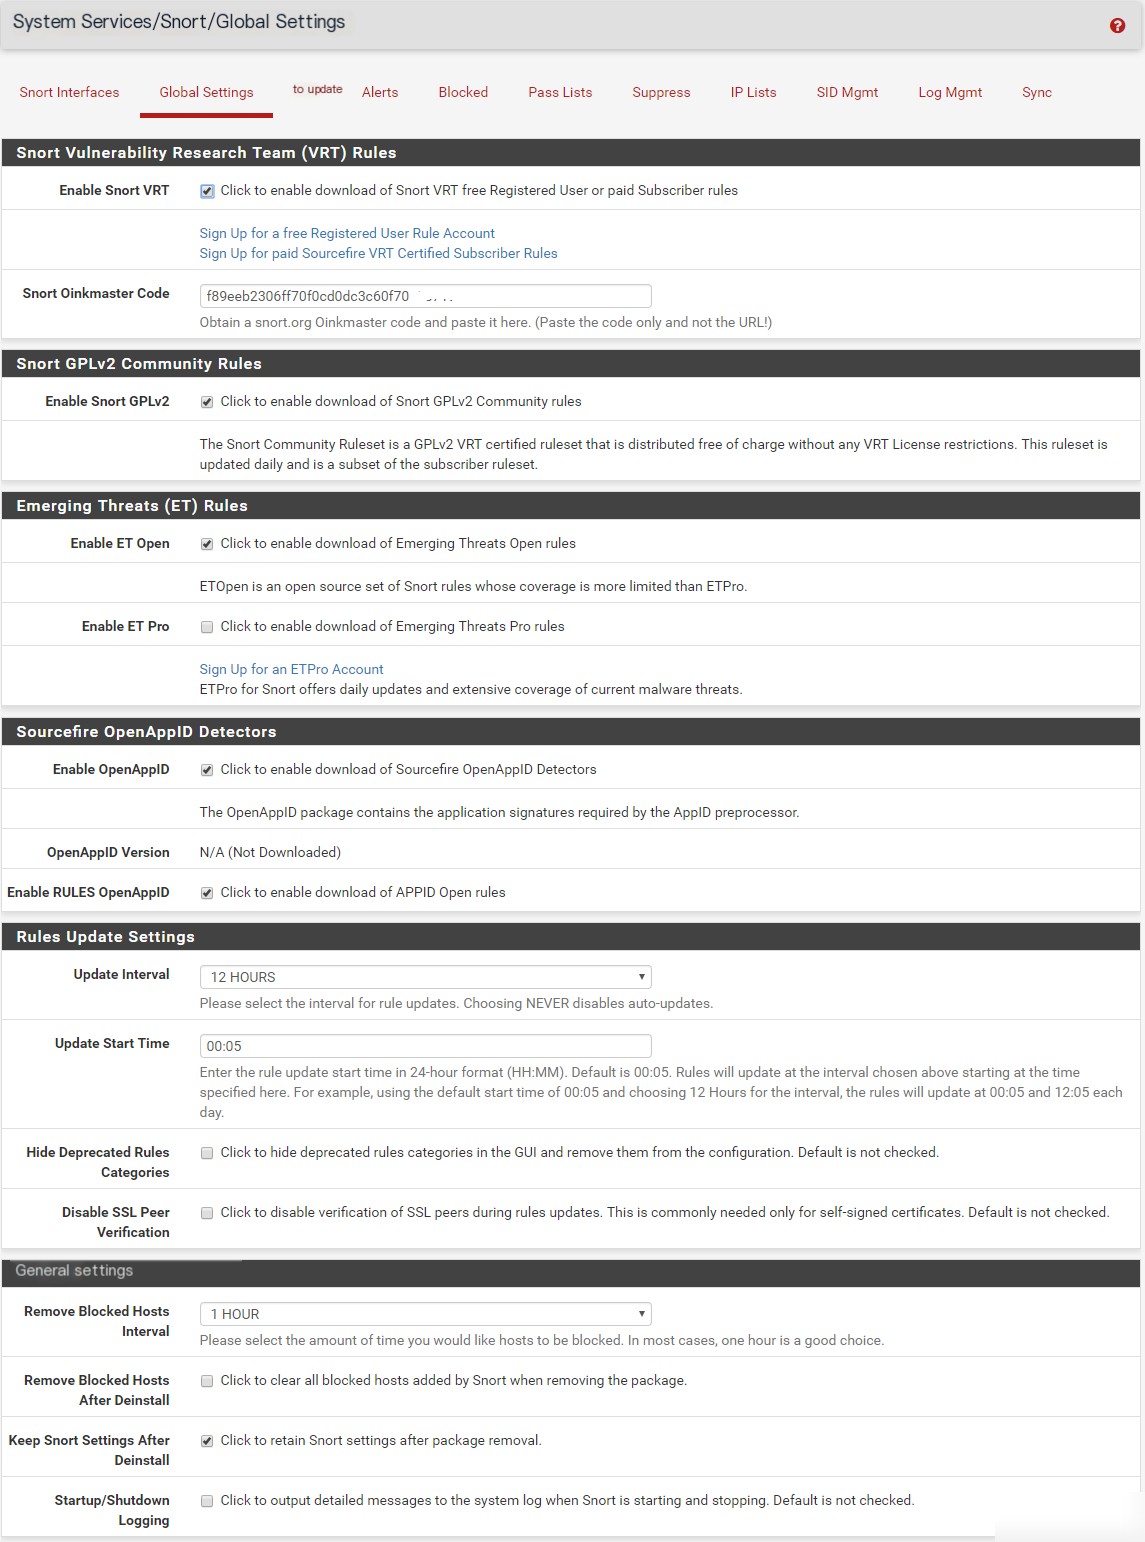
Enable Snort VRT – Check this option.
Snort Oinkmaster Code – Enter the OinkCode obtained from your Snort.org account.
Enable Snort GPLv2 – Check this option.
This option downloads additional Snort rules from the community. These rules are the same as those available to paid Snort VRT users but are delayed in release. Paid VRT users can access these rules immediately upon availability.
Enable ET Open – Check this option.
ET Open is an open-source Snort rule set with more limited coverage compared to ET Pro.
Enable ET Pro – Do not check this option, as it is paid.
Enable OpenAppID – Check this option.
The OpenAppID package contains application signatures required by the AppID preprocessor.
Enable RULES OpenAppID – Check this option.
Update Interval – Set to 12 hours.
Update Start Time – Set to 00:05.
Remove Blocked Hosts Interval – Set to 1 hour.
This determines how long hosts will remain blocked. Here, it is set to 1 hour.
Keep Snort Settings After Deinstall – Check this option.
Checking this option ensures that Snort settings are retained after uninstalling the package.
Leave other settings at their default values.
Step 5: Pass Lists
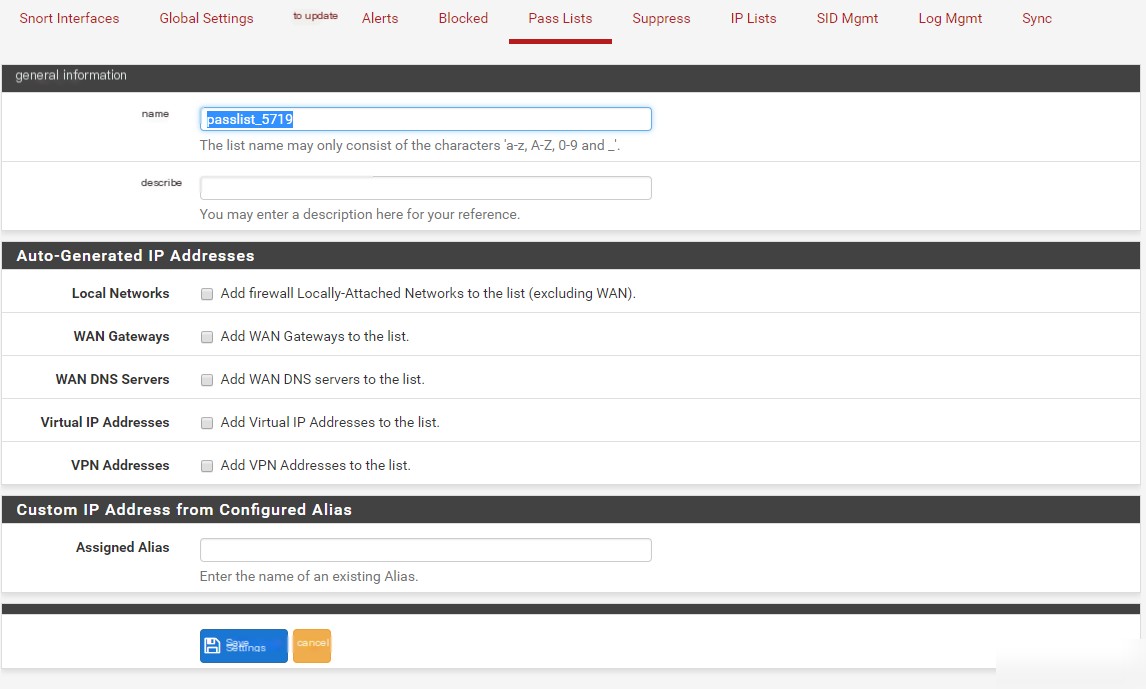
You can create custom files here to store IPs in the pass list. If you edit the pass list, there is a feature called Assigned Aliases at the bottom, which allows you to create aliases to include in the pass list. You can use aliases to add desired IPs to the pass list.
This step is optional and not the best method for open internet IPs (more suitable for management purposes). For first-time users, it is recommended to leave the default settings unchanged.
1. Navigate to Firewall – Alias Management.
2. Create an alias = passlist_5719.
3. Add IP addresses to this alias.
4. Return to the Pass Lists tab and add this alias to the pass list.
5. Navigate to System Services – Snort – Pass Lists – Edit – Assigned Aliases.
6. Add IPs to the alias and include them in the pass list.
Step 6: Suppress List

On the suppress list editing page, you can manually add or edit new suppress list entries. Click the “Add” button to add a suppress entry. Here, we give it a name (suppress_list) and a description. Later, we will reference this suppress list when configuring interfaces. Any suppressed rules will appear in the blank space at the bottom.
Step 7: Snort Interfaces
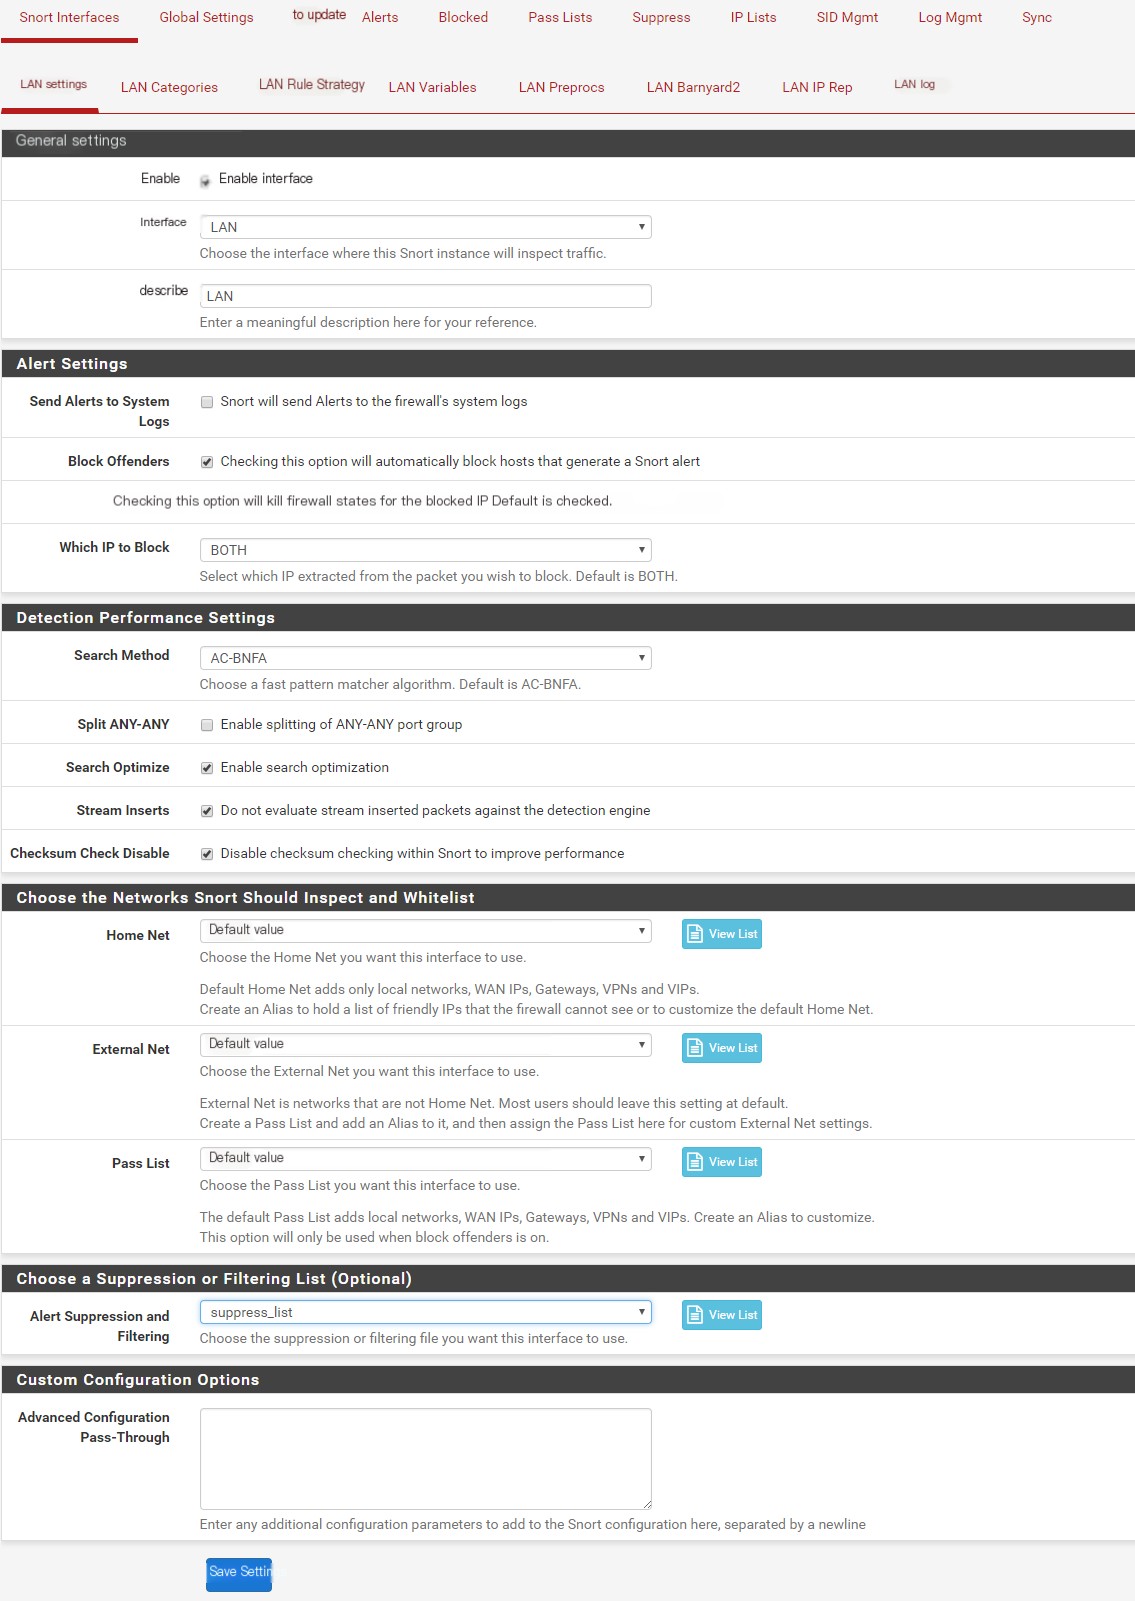
In this tab, we specify the interfaces that Snort will monitor. When we add an interface, sub-tabs will also be created simultaneously.
Click “Add” to add an interface.
_________________________________________________________
LAN Settings Sub-Tab
Enable = Check Interface = LAN
It is recommended to monitor WAN, but LAN is suggested for certain cases. The reason for choosing WAN is that monitoring a single interface is less resource-intensive for the device. If there are multiple local interfaces (e.g., LAN1, LAN2, Voice), monitoring WAN allows you to monitor all traffic at the cost of monitoring only one interface. The downside is that you cannot see which internal IPs are involved in the traffic; you will only see the violating external address and the WAN IP. To identify which internal devices are connecting to violating external addresses, choose LAN and create additional monitoring for any other internal interfaces as needed, such as in cases with two subnets (LAN1, LAN2).
Block Offenders = Check Kill States = Check Which IP to Block = Both (Your internal network is already in the pass list by default; this only blocks external addresses.) Search Method = AC-BNFA (This is the default and works fine on my system.) Search Optimize = Check Stream Inserts = Check Checksum Check Disable = Check
Home Net = Default External Net = Default Pass List = Default (If you created a custom pass list file, you can select it here.) Alert Suppression and Filtering = suppress_list (This is the suppress list file created earlier.)
Save settings (you must save each sub-tab’s settings before moving to the next).
_________________________________________________________
LAN Categories Sub-Tab
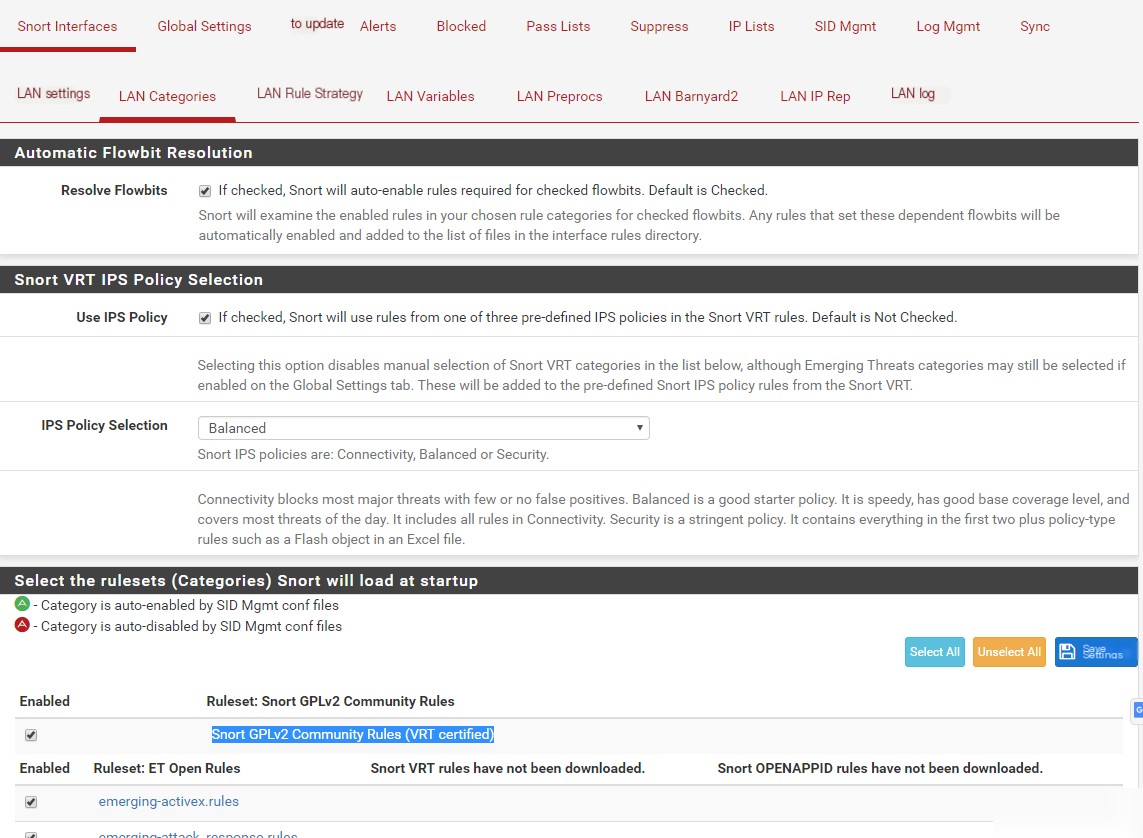
Resolve Flowbits = Check Use IPS Policy = Check
This option will display the “IPS Policy Selection” dropdown menu. If unchecked, you must manually select rule set categories from the list at the bottom of the page.
IPS Policy Selection = Balanced
This option selects associated categories. Options include Connectivity, Balanced, and Security, representing different policies.
Snort GPLv2 Community Rules (VRT certified) = Check
Select other rule sets as needed.
Scroll to the bottom of the page to save settings.
For other sub-tabs on the Snort interface, you can customize them similarly.
Step 8: Snort Configuration Management
With the above steps, Snort has been configured with basic settings. Next, we will perform detailed configurations.

Navigate to System Services – Snort – Snort Interfaces.
In this tab, you will see the Snort interfaces we created earlier. Click the run icon to start monitoring the interface, or click the stop icon to stop monitoring it.
The “Blocking” column indicates whether blocking is enabled. If blocking is disabled, all detected entries will appear in the “Alerts” tab. If blocking is enabled, blocked entries will appear in the “Blocked” tab.
If a suppress list is created, blocking should be disabled to prevent user impact. You can disable this feature by editing the Snort interface and unchecking the “Block Offenders” option.
Step 9: Updates
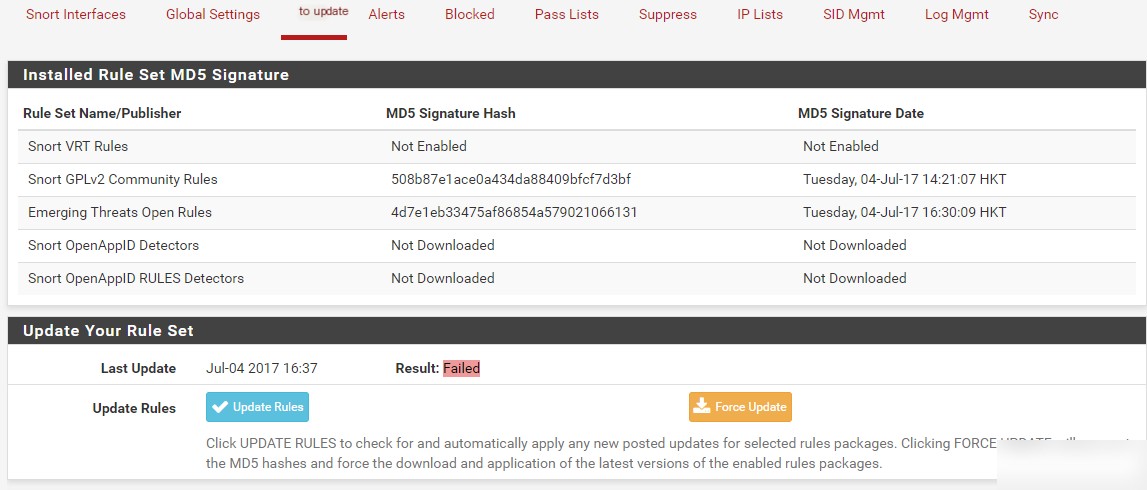
In this tab, you can update rules and view subscribed rules. If rules are not downloaded at certain times, you may need to force an update and check if there are issues with the OinkCode.
Step 10: Alerts
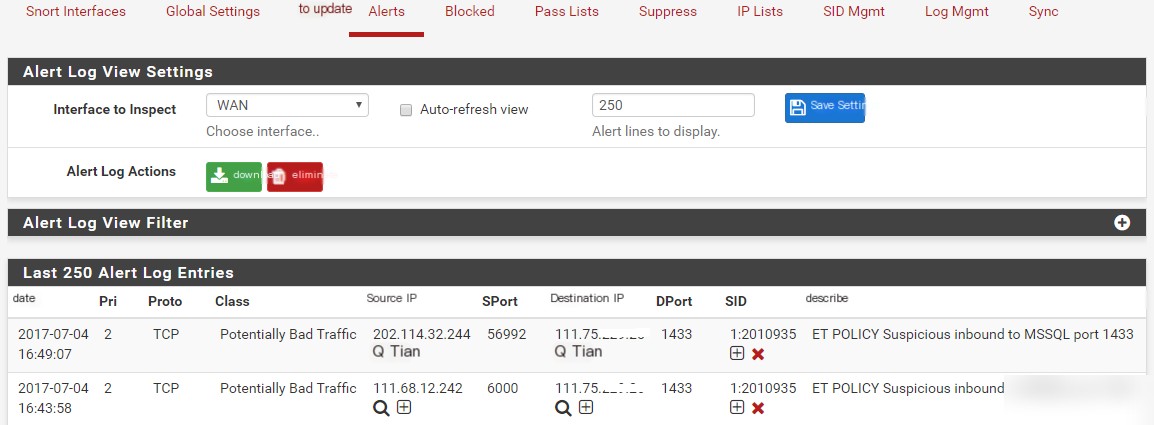
The list below shows alert log entries created by Snort, including source and destination addresses and the specific rule (SID column) that triggered the alert.
Source and Destination IP Columns:
The “ ” symbol will attempt to resolve the host for you. This is why I prefer LAN over WAN when setting up interfaces. If suspicious transmissions occur, we can identify the internal devices involved.
The “+” symbol will suppress this specific rule for the source or destination.
SID Column:
The “+” symbol will disable this rule, regardless of the source or destination.
The “x” symbol will disable the rule and remove it from the rule set.
Step 11: Blocked

When an alert is triggered, the offending IP will be blocked, and the alert description and event time will be displayed. Based on the earlier settings, entries here will be unblocked after 1 hour. You can also manually remove entries from this page.
When creating suppress lists, there may be some cluttered information between the “Alerts” and “Blocked” tabs, showing which alerts were triggered and which IPs were blocked. Study the suppress rules and reload the page to verify that they are correctly loaded without triggering rules.
Step 12: Suppress

When rules are suppressed, they will appear in the suppress file. You can see them in the white space. You can also manually delete or add rules directly. If you monitor multiple Snort interfaces, referencing the same suppress list for each interface can save significant effort.
Snort, combined with pfSense, is a powerful and highly customizable IDS/IPS solution. This tutorial only covers basic settings, and users can perform additional customizations based on their specific needs.


