

Introduction to Apple WWDC 16
At Apple WWDC 16, Apple announced that starting January 1, 2017 (with a recent postponement), all new app submissions involving HTTP network requests through system components must use HTTPS encryption. Otherwise, the requests will fail, and the app will not pass the review process.
The author has some understanding of the HTTPS verification process, but is less clear about implementing HTTPS verification in iOS. After finding an article written by classmate Li Qing on the intranet and reading it, I gained a lot and wanted to share it with everyone.
Main Text: Apple WWDC 16
The purpose of this article: First, to briefly analyze the complete handshake process of server identity verification; second, to explain certificate chain verification; third, to explore how the native libraries NSURLConnection or NSURLSession support implementing HTTPS in iOS.
1. Apple WWDC 16: HTTPS
HTTPS is the HTTP protocol layered over TLS/SSL. Compared to plain HTTP data transmission vulnerabilities, HTTPS offers advantages such as preventing eavesdropping, tampering, and hijacking, as well as providing encryption, integrity verification, and identity authentication. TLS/SSL is a secure transport layer protocol situated between TCP and HTTP. TLS 1.0 is based on the SSL 3.0 specification and can be considered an upgrade of SSL 3.0. The recommended version currently is TLS 1.2.
The TLS/SSL protocol is generally divided into two layers: the TLS Record Protocol and the TLS Handshake Protocol. The TLS Record Protocol builds on a reliable transport protocol (such as TCP) and provides support for data encapsulation, compression, encryption, etc., for upper-layer protocols. The TLS Handshake Protocol builds on the record protocol, used to authenticate the identities of parties, negotiate encryption algorithms, and exchange encryption keys before actual data transmission begins. Besides these two protocols, there are three other auxiliary protocols: Changecipher spec protocol, used to notify the peer to switch from handshake to record protocol (which has become redundant and has been removed in TLS 1.3); alert protocol, used for notifying various return codes; application data protocol, which transmits data streams of protocols like HTTP and SMTP into the record layer for processing and transmission.
Imagine a scenario: We commonly visit an HTTPS://xxx website. When you enter a URL supporting the HTTPS protocol in the browser’s address bar, the server returns data that displays on the page. For those who don’t understand the working principle of the HTTPS protocol, this process might seem simple: send request – server responds – results are returned and displayed. However, with HTTPS, the entire process also involves certificate verification, data encryption, data integrity verification, and more.
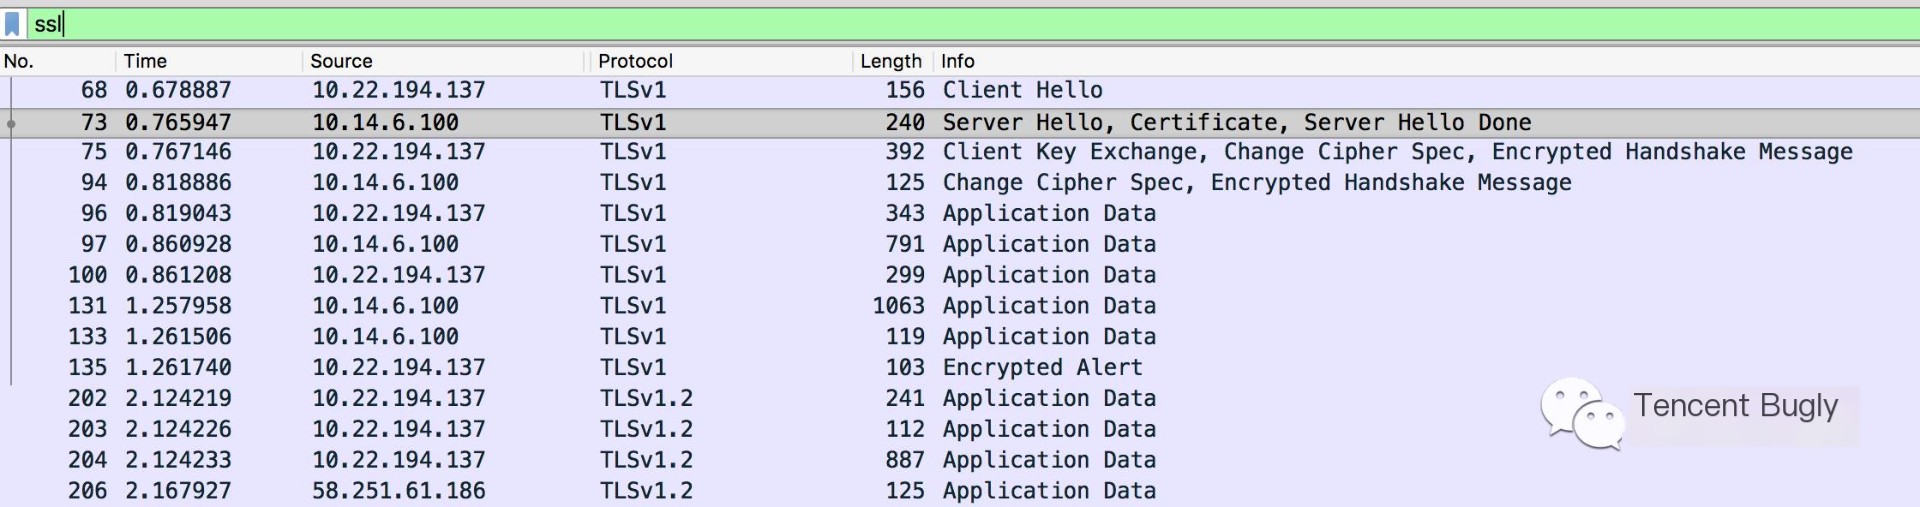
Take logging into QQ Mail as an example; through Wireshark packet capture, it can be seen as follows:
 >
>
Before the browser and server carry out the Application Data transmission, they undergo processes like Client Hello, Server Hello, Client Key Exchange, and Change Cipher Spec. These processes are dictated by the services provided by TLS/SSL:
- Authenticating the server’s identity to ensure data is sent to the correct server;
- Encrypting data to prevent interception during transmission;
- Maintaining data integrity to ensure data isn’t altered during transmission.
The summary of the complete unilateral handshake process is as follows:
 >
>
Phase One: ClientHello at Apple WWDC 16
The client initiates a request, transmitting request information in plaintext, including version information, a list of candidate cipher suites, a list of candidate compression algorithms, random number random_C, extension fields, and more.
Phase Two: ServerHello-ServerHelloDone at Apple WWDC 16
This phase, as shown in the figure, includes four processes (some servers send a single message, some merge them for transmission). The server returns the negotiated information, including the chosen protocol version, selected cipher suite, selected compression algorithm, the random number random_S, etc., where the random number is used for subsequent key negotiation. The server also configures and returns the corresponding certificate chain for identity verification and key exchange. It then sends the ServerHelloDone message to signify the end of the server’s information transmission.
Phase Three: Certificate Validation – Apple WWDC 16
Between steps 5-6 in the diagram, the client must also validate the certificate returned by the server. Only after the certificate passes validation can further communication occur. (Specific analysis can be referred to in the subsequent certificate validation process)
Phase Four: ClientKeyExchange-Finished at Apple WWDC 16
Once the server’s certificate is verified valid, the client computes a random number called the Pre-master, encrypts it with the server’s public key in the certificate, and sends it to the server. Simultaneously, the client uses the available three random numbers to generate a negotiation key. The client then notifies the server to use the negotiated communication key and encryption algorithm to encrypt communications and sends a Finished message to signify the end of client information transmission.
Phase Five: Server Side Generates Negotiated Key during Apple WWDC 16
The server also uses the three random numbers to generate a negotiated key using the corresponding algorithms and notifies the client to use the negotiated communication key and encryption algorithm to encrypt communications. It then sends a Finished message to signify the end of server information transmission.
Phase Six: Handshake Completion
Once the handshake phase is completed, the client and server begin using the negotiated key for encrypted communication to transmit data.
Summary
In simple terms, the HTTP request process mainly encompasses two parts. One is the handshake process for mutual authentication between the client and server and negotiating keys for future data transmission. The second is the data transmission process, using the negotiated encryption keys after authentication. During the handshake process, non-symmetric key exchange algorithms are used, which are complex and involve random number generation, modular exponentiation, padding, encryption, signature, and other operations. During data transmission, both the client and server employ symmetric encryption and decryption using the negotiated key.
2. Certificates
PKI (Public Key Infrastructure) is a set of standards under which technologies developed to provide fundamental security services are collectively known as PKI. The authoritative third-party institution, the Certification Authority (CA), is the core of PKI and is responsible for verifying the ownership information of public keys and issuing certification “certificates.” It also provides certificate validation services for users. X.509 is the most important standard within PKI, defining the basic structure of public key certificates.
Certificate Application Process
- The certificate applicant submits information related to the certificate application to a trusted third-party CA, including the applicant’s domain name, the applicant-generated public key (the private key is kept by the applicant), and the certificate request file .cer, etc.
- The CA verifies the legitimacy and authenticity of the information provided by the certificate applicant through various means, both online and offline.
- Once the information provided by the certificate applicant passes verification, the CA issues a certificate to the applicant. The certificate contains plaintext and signature information. The plaintext includes the issuing authority, validity period, domain name, applicant-related information, and the applicant’s public key, while signature information is encrypted plaintext using the CA’s private key. Once the applicant receives the certificate, they can verify the signature’s integrity by decrypting the signature information with the public key installed on the CA certificate and comparing it with the plaintext information.
Certificate Validation Process
- Verify the certificate’s legality (signature integrity, validity period, etc.)
- Verify the legitimacy of the certificate issuer (find and check the issuer’s certificate, a process that is recursive)
The recursive process of certificate validation will successfully terminate when it encounters an anchor certificate, typically an embedded root certificate within an operating system (self-signed certificates issued by authoritative certification bodies).
Reasons for Certificate Validation Failure
- Cannot find the certificate’s issuer
- Certificate has expired
- Encounter a self-signed certificate that isn’t an anchor certificate during the validation
- Unable to find the anchor certificate (i.e., a legitimate root certificate has not been found at the top of the certificate chain)
- The server’s DNS address differs from the address in the certificate
3. Implementing HTTPS Support in iOS
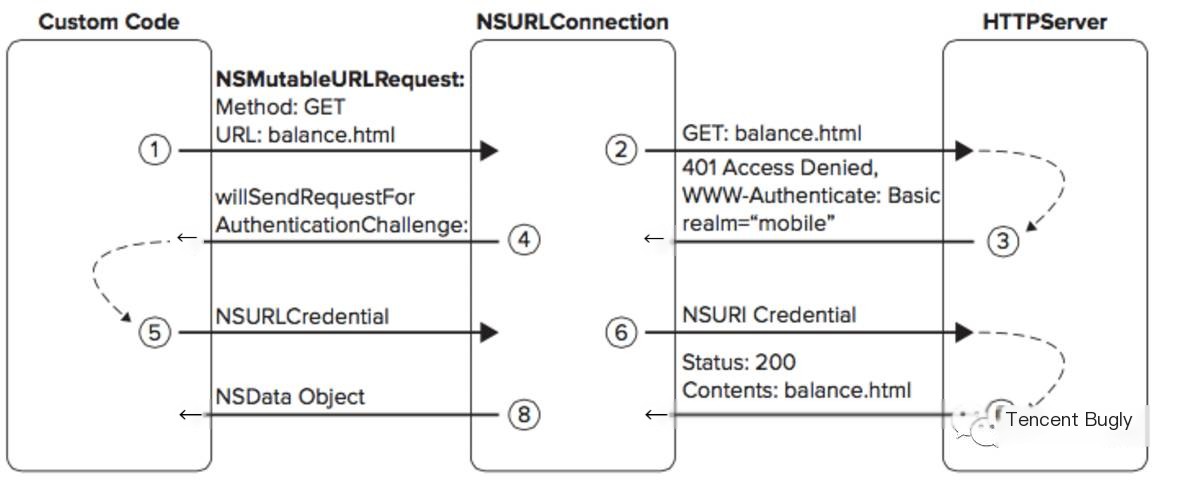
In Objective-C, when using NSURLConnection or NSURLSession to establish a URL and send an HTTPS request to a server to obtain resources, the server will respond with an HTTP status code 401 (i.e., access denied). At this point, NSURLConnection or NSURLSession will receive the server’s response requiring authorization, and only after client authorization is approved can data continue to be retrieved from the server, as shown in the following image:
Implementation for Non-Self-Signed Certificate Validation
Upon receiving a 401 status code response from the server, for NSURLSession, the delegate object needs to implement the URLSession:task:didReceiveChallenge:completionHandler: method. For NSURLConnection, the delegate object needs to implement the connection:willSendRequestForAuthenticationChallenge: method (OS X v10.7 and iOS 5 and above), or for earlier versions, the delegate objects need to implement connection:canAuthenticateAgainstProtectionSpace: and connection:didReceiveAuthenticationChallenge: methods. The code is as follows (refer to documentation):
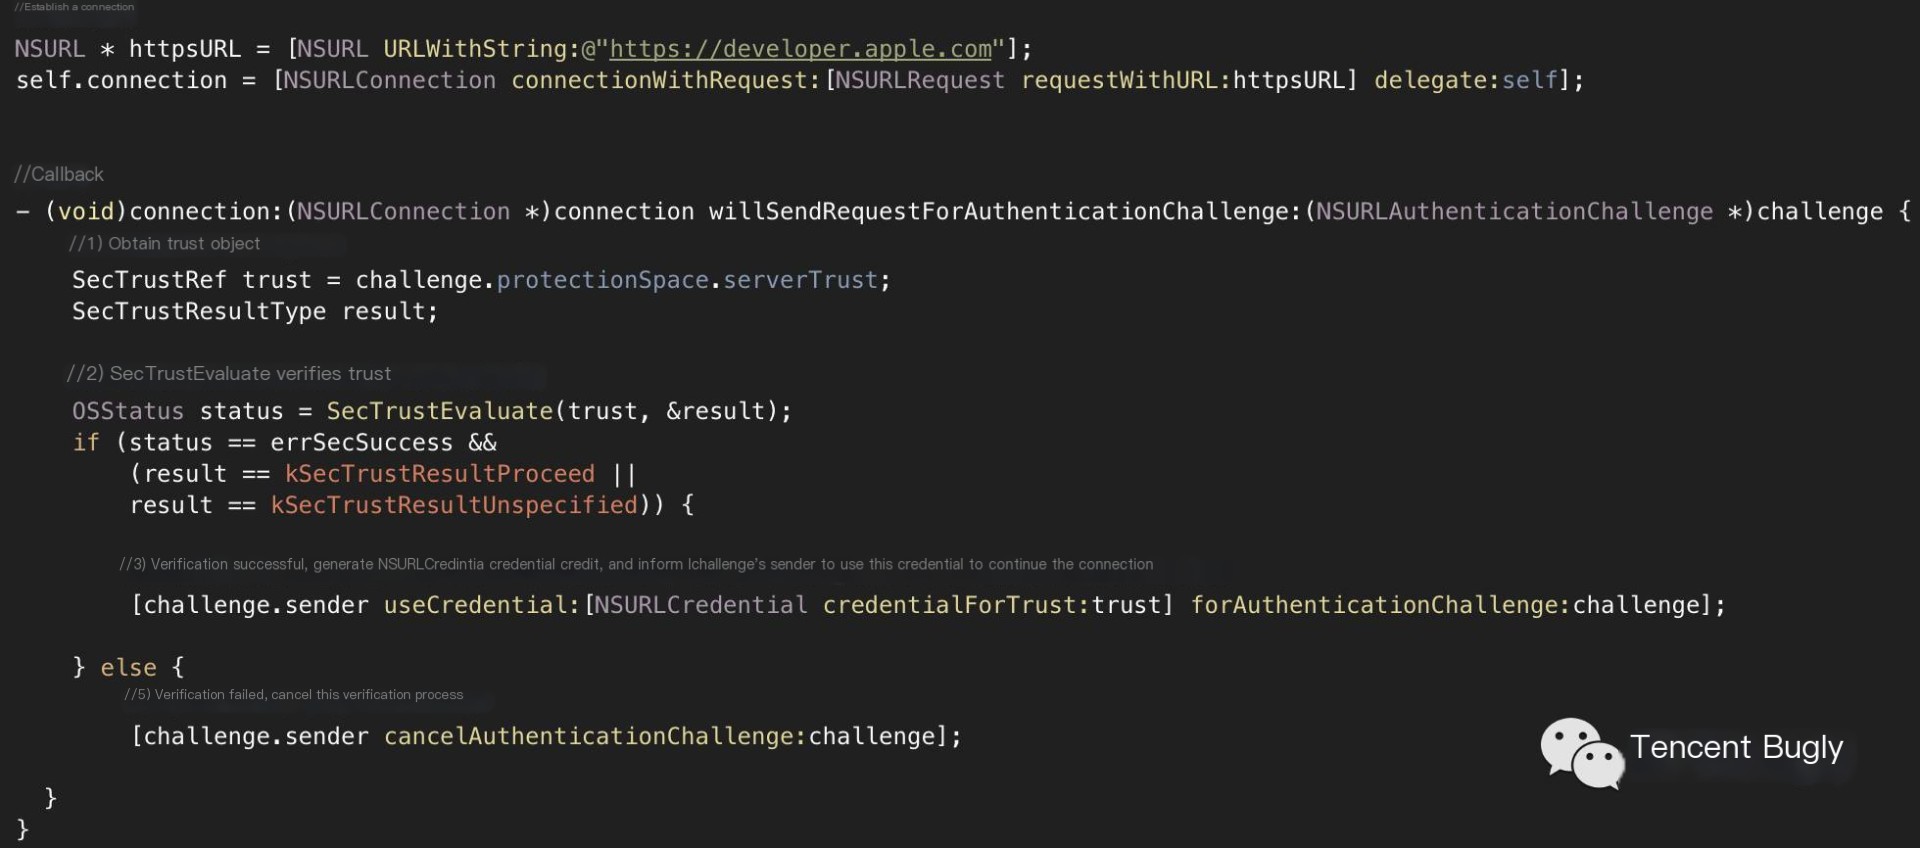
When the client sends an HTTPS request, the server will return authorization information, and the connection:willSendRequestForAuthenticationChallenge: method will be called. Based on the returned challenge information, the client first obtains the trust object to be verified and calls the SecTrustEvaluate method, using the system’s default verification method on the trust object. Once validated, the trust object is used to generate certificate credentials, allowing self.connection to continue using the credentials. Below are the details:
NSURLAuthenticationChallenge Contains the Following Information:
- Error: Error information from the last authorization failure
- FailureResponse: Error information from the last authorization failure
- PreviousFailureCount: Number of authorization failures
- ProposedCredential: Suggested certificate to use
- ProtectionSpace: NSURLProtectionSpace object representing a protected area on the server that requires authorization, including server address, port, etc. Here, it refers to challenge.protectionSpace. The Auth-scheme indicates the supported validation method for the protectionSpace, and NSURLAuthenticationMethodServerTrust indicates a certificate verification is performed on the protectionSpace.

- Sender: The sender, here referring to self.connection

SecTrustRef
Represents the trust object required for validation, in this case, referring to challenge.protectionSpace.serverTrust. It contains the certificate to be verified and supported verification methods.
SecTrustResultType
Indicates the result of the verification. kSecTrustResultProceed indicates serverTrust verification succeeded and was user-accepted (e.g., selecting always trust in a trust alert box). kSecTrustResultUnspecified indicates serverTrust verification succeeded and the certificate is implicitly trusted but not explicitly trusted by the user. Either can be considered a successful serverTrust verification.
SecTrustEvaluate
This function recursively verifies certificates from the leaf node to the root certificate. Using the system’s default verification method, it verifies the Trust Object as per the certificate chain verification process, where the system undergoes each level according to the Trust Object’s verification policy to check each certificate on the chain for validity.
NSURLCredential
Represents authentication certificates. URL Loading supports three types of certificates: password-based user credentials, certificate-based user credentials, and certificate-based server credentials (used when server identity verification is required). Thus, NSURLCredential can represent authentication information created by a username/password combination, client certificate, and server trust, suitable for most authentication requests. NSURLCredential also supports three types of persistence:
- NSURLCredentialPersistenceNone: Requires the URL loading system to “discard the appropriate credentials after use immediately.”
- NSURLCredentialPersistenceForSession: Requires the URL loading system to “discard the appropriate credentials when the application terminates.”
- NSURLCredentialPersistencePermanent: Requires the URL loading system to “store the appropriate credentials in the keychain, so other applications can use them too.”
For validated trust objects, the client can also choose not to provide certificate credentials.
- For NSURLSession, pass any of the following values to the completion handler callback:
- NSURLSessionAuthChallengePerformDefaultHandling to handle the request as if the delegate didn’t provide a method to handle authentication requests
- NSURLSessionAuthChallengeRejectProtectionSpace to reject the authentication request. Depending on the authentication type of the server’s response, the URL loading class might call this delegate method multiple times.
- For NSURLConnection and NSURLDownload, call the continueWithoutCredentialsForAuthenticationChallenge: method on [challenge sender]. Not providing certificates might lead to connection failure, triggering the connectionDidFailWithError: method, or return an alternative URL that requires no identity verification, as shown below:

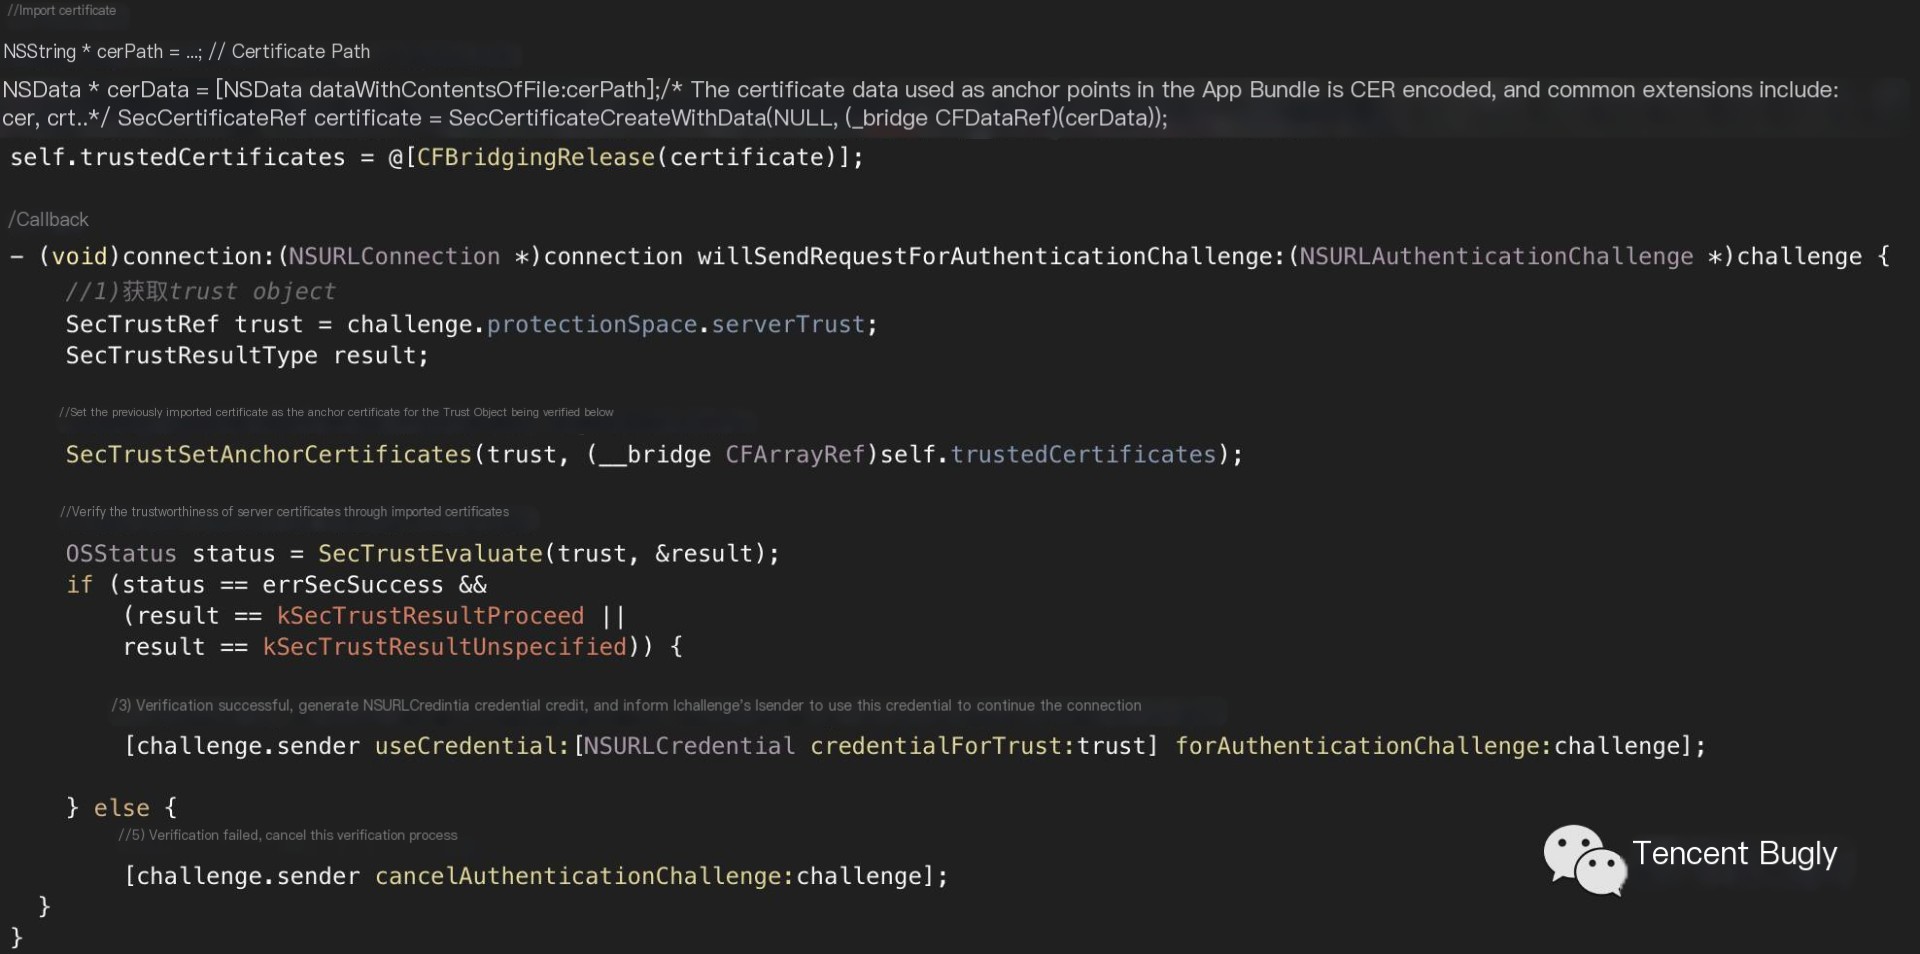
For non-self-signed certificates, even if the server returns a certificate issued by a trusted CA, to ensure that the returned certificate is precisely the one needed by the client, a certificate must be imported locally and set as the anchor certificate to be verified. Then SecTrustEvaluate is used to verify if the server certificate is one issued by that anchor certificate’s CA or sub-CA, or if the server certificate itself is the anchor certificate. If so, the certificate is deemed trusted. Example code (refer to documentation) is as follows:
Implementation for Self-Signed Certificate Validation
For self-signed certificates where the server certificate in the Trust Object is not issued by a trusted CA, directly using SecTrustEvaluate for verification will not succeed. The following simple code might be used to bypass the HTTPS verification:

Generally, this code is used when testing clients with servers using self-signed certificates to trust all self-signed certificates.
In conclusion, analyzing the validation process for both non-self-signed and self-signed certificates can be summarized as follows:
- Obtain the trust object to be verified. For NSURLConnection, this is obtained through the delegate method connection:willSendRequestForAuthenticationChallenge: callback’s parameter (challenge.protectionSpace.serverTrust).
- Use the system’s default verification method to validate the Trust Object. SecTrustEvaluate, based on the Trust Object’s verification policy, verifies each level incrementally, checking the validity of each digital signature in the certificate chain to assess the certificate’s validity.
- If step two passes, typically under standard security demands, the Trust Object is used to generate a certificate ([NSURLCredential credentialForTrust:serverTrust]), which is then passed into the [challenge.sender useCredential:cred forAuthenticationChallenge:challenge] to handle and establish the connection.
- If stronger security requirements exist, further stringent verification of the Trust Object can be conducted. A common approach involves importing a certificate locally and verifying its match against the Trust Object.
- If verification fails, cancel the Challenge-Response Authentication process and reject the connection request.
- If dealing with self-signed certificates, avoid using the system’s default verification method in the second step as the root CA of self-signed certificates isn’t listed in the operating system’s trust list.
Referenced Documents: Overriding TLS Chain Validation Correctly Making HTTP and HTTPS Request HTTPS Server Trust Evaluation NSURLConnection – HTTPS Server Trust Evaluation Glossary – HTTPS Server Trust Evaluation