
1. Cybersecurity Training Course Overview
This course is a hands-on lab tutorial. To explain some of the operations in the experiments, theoretical content will be included, along with recommended readings of the most valuable articles to strengthen your theoretical foundation while practicing.
Note: Since the cloud machine used for experiments involves high configuration costs, the usage will be limited to no more than 6 attempts per experiment.
2. Cybersecurity Training Study Method
The Kali series courses on Experiment Platform consist of five bootcamps. This bootcamp focuses on methods for web application penetration testing. The course includes 20 experiments, each providing detailed steps and screenshots. It is suitable for students who have a basic understanding of Linux systems and want a quick start with Kali penetration testing.
The learning method emphasizes practice and questions. After starting the experiment, follow the steps step-by-step and understand the details of each step.
If there are recommended reading materials at the beginning of the experiment, be sure to read them first before proceeding. Theoretical knowledge is a requisite foundation for practice.
3. Introduction to the Cybersecurity Training Section
In this experiment, we will initially get acquainted with the concept of Kali Linux and penetration testing. Complete the following tasks in sequence:
- Introduction to Kali Linux
- Introduction to web penetration
- Setup and deployment of Kali Linux
- Understanding the Metasploitable2 target machine
- Learn how to use the multi-machine experimental environment provided by Experiment Platform
- Try out simple command injections
4. Recommended Reading: Cybersecurity Training
The following readings are recommended for this section’s experiment:
5. Introduction to Kali: Cybersecurity Training
5.1 What is Kali Linux?
Kali Linux is a Debian-based Linux operating system designed for penetration testing and security auditing. It was developed in March 2013 from the BackTrack system, which had similar functionalities, and is supported by the Offensive Security team. To enable a variety of security auditing and penetration testing functionalities, Kali Linux is highly customized, including kernel, network services, and user settings.
Kali comes pre-installed with many security tools, such as the well-known Nmap port scanner, John the Ripper password cracker, and Metasploit Framework for remote exploitation. This bootcamp on Experiment Platform focuses on using Kali Linux tools for attacking vulnerable target machines and introduces the principles behind the attacks.
The latest version of Kali Linux, released in 2016, is 2.0-2016.2, which is also the version used in the Experiment Platform’s environment. It includes over 600 penetration testing tools and builds upon a kernel patched for security auditing.

Image from the official Kali website
5.2 Cybersecurity Training: Penetration Testing
Penetration Testing refers to the process of evaluating the security defense capability of a target server or network under authorized conditions. It involves various scanning and attack techniques to probe, attack, exploit, and even establish backdoors in the target’s defense systems. Penetration testing is a subset of information security assessments, aiming to ensure that the target systems meet expected network defense standards. Many companies and teams offer professional penetration testing services, and many internet companies are actively seeking professionals in this field.
5.3 Cybersecurity Training: Vulnerability Analysis
Vulnerability analysis involves using penetration testing tools to scan and probe potential vulnerabilities in a target system, assessing whether the system has implemented appropriate patches or security measures. If exploitable vulnerabilities still exist, their risks are evaluated based on factors such as difficulty of discovery and exploitation.
5.4 Cybersecurity Training: Social Engineering
In the context of information security, social engineering refers to the method of gaining privileged access or sensitive attack-worthy information through social or interpersonal connections.
For instance, phishing websites can trick users into providing their login information, bank details, or other sensitive data. Such methods rely on deception and impersonation to gather necessary information without users’ knowledge.
6. Introduction to Cybersecurity Training: Web Penetration
6.1 What is Web Penetration?
In today’s world, countless websites exist with an increasing number of commercial transactions occurring online. Web has gradually become an indispensable tool, and the flow of sensitive information and monetary assets on the internet has made web security critically important.
Web penetration is a branch of penetration testing, officially known as Web Application Penetration Testing. As the name suggests, it evaluates the security of web applications, helping engineers create a safer online environment.
*Note: For brevity/memory, parts of paragraph 6.2+ can continue accordingly on demand. HTML formatting, American English, and nuances preserved.*
Kali Installation Guide
It is recommended to use the VirtualBox virtualization management software, which can be installed on Ubuntu by executing the following commands:
sudo apt-get update
sudo apt-get install virtualbox
Once installed, the default configuration will automatically set up virtual networking. The next step is to download the virtual machine image from the official Offensive Security website:
Make sure to download the appropriate virtual machine image for the virtualization software you are using. If using VirtualBox, use the following link:
There are four versions of the virtual machine image, and it is recommended to download the 64-bit version, *Kali Linux 64bit VBox*. The downloaded file is an OVA, which can be directly imported into VirtualBox. Once imported, simply start the virtual machine to launch it.
After launching the Kali virtual environment, it will default to the desktop system. The default username is root, and the password is toor. By default, the SSH service is disabled, although it is enabled in the Lab environment. During the subsequent exercises, SSH allows you to connect to the Kali environment directly.
8. Launching the Lab Environment
8.1 Lab Environment Overview
The Lab environment consists of two virtual machines: an attack machine and a target machine:
- Attack Machine: A Kali Linux 2.0 virtual machine with the hostname
kali, IP address192.168.122.101, and default credentialsroot/toor. - Target Machine: A Metasploitable2 virtual machine with the hostname
target, IP address192.168.122.102, and default credentialsmsfadmin/msfadmin.
8.2 Virtual Machine Management
The two virtual machines described above have already been configured in the Lab’s virtual environment. You can manage and monitor them using the Libvirt series of commands.
Libvirt is a free, open-source C library that provides support for Linux-based virtualization tools. It aims to offer a unified and reliable programming interface for various virtualization tools, including Xen and others. It supports bindings with popular development languages such as C, C++, Ruby, and Python. Tools like virt-manager (GUI mode) and virt-install (command-line mode) are built on Libvirt and are commonly available on major Linux platforms.
The Libvirt library implements a Linux API for virtualization and supports several virtual machine monitors, including Xen, KVM, QEMU, and other virtualization products for various operating systems.
Simply put, Libvirt is a standardized virtualization management interface that can manage a variety of virtual resources. In addition to SDKs for multiple languages, Libvirt also offers a command-line tool called virsh. It is essential to become familiar with the virsh commands, as they are highly useful for debugging during later exercises:
# Start the libvirt-bin service
sudo service libvirt-bin start
# View the list of virtual machines on the system (default output is empty)
sudo virsh list
# View the list of virtual networks on the system (default network is displayed)
sudo virsh net-list --all
Common virsh commands:
Command               Description
help                  Displays help information for a command
quit                  Exits virsh and returns to the shell
connect               Connects to a specific virtualization server
create                Starts a new virtual machine
destroy               Deletes a virtual machine
start                 Starts a defined (but not running) virtual machine
define                Defines a virtual machine from an XML configuration
undefine              Un-defines a virtual machine
dumpxml               Exports a virtual machine's configuration settings
list                  Lists virtual machines
reboot                Reboots a virtual machine
save                  Saves the state of a virtual machine
restore               Restores the state of a virtual machine
suspend               Suspends a virtual machine
resume                Resumes a suspended virtual machine
dump                  Dumps the virtual machine’s kernel to a file for diagnostics
shutdown              Shuts down a virtual machine
setmem                Changes the memory size of a virtual machine
setmaxmem             Sets the maximum memory for a virtual machine
setvcpus              Modifies the number of virtual CPUs for a virtual machine
8.3 Viewing and Launching the Lab Environment
On the Lab desktop, open the Xfce terminal. All subsequent operations and commands will be run in this terminal.

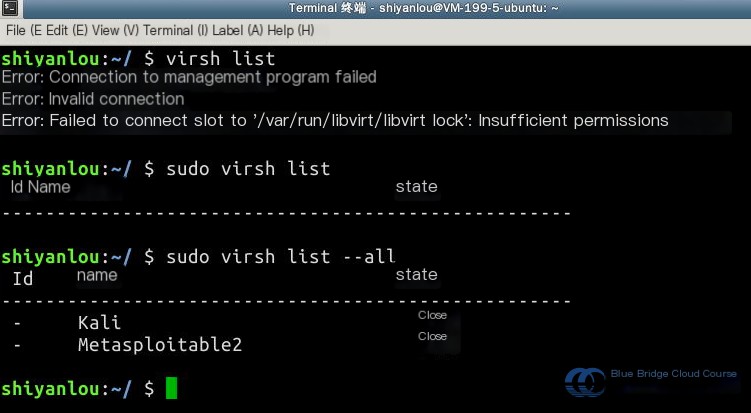
First, use the virsh list command to view the list and status of virtual machines. Note that you need to use sudo and include the --all parameter to display all virtual machines, including those that are powered off:
Next, use the virsh start command to launch the virtual machines. Make sure to differentiate between upper and lowercase letters when entering virtual machine names—they generally start with uppercase letters. After starting, you can run the status check again, and the virtual machines should display as being in a “running” state:
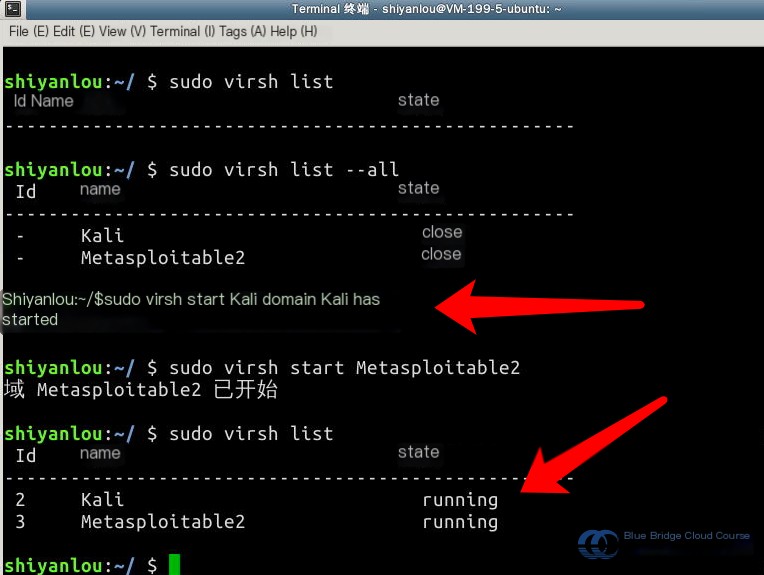
Note that it may take approximately four minutes for the virtual machines to be fully operational. Afterward, you can access both machines using SSH.
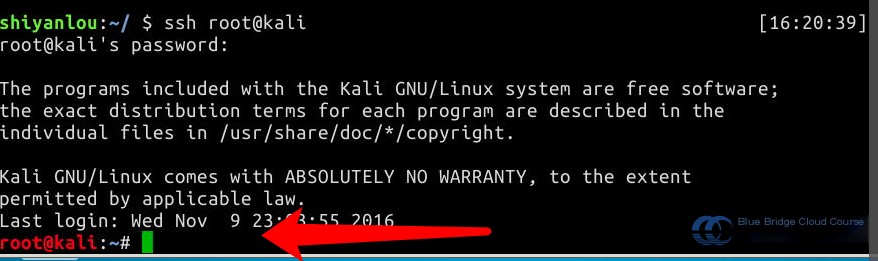
Begin by connecting to the Kali virtual machine via SSH. Most of the attack operations will take place within the Kali VM. Use the command ssh root@kali. The username is root and the password is toor. (Password input is hidden during entry.) Since the lab environment has already set the IP and hostname mapping in the /etc/hosts file, you do not need to use an IP address directly:

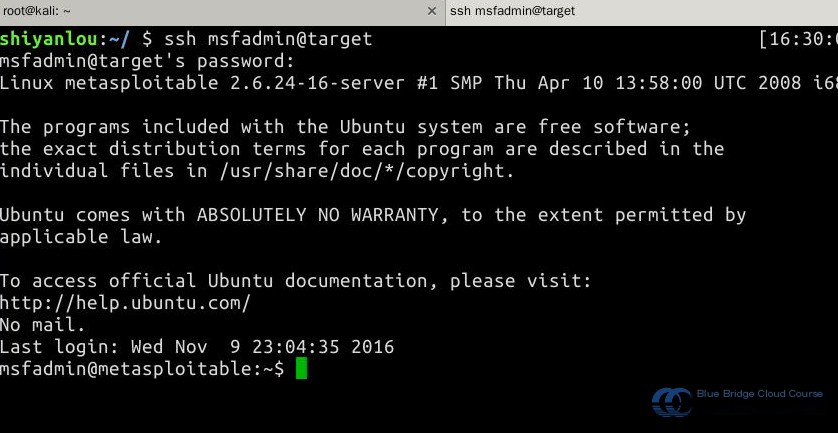
Open a new terminal tab and SSH into the Metasploitable2 system. Use the credentials msfadmin/msfadmin to log in:

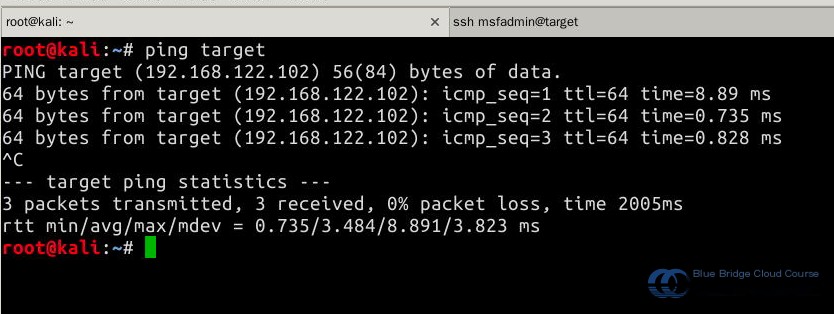
In the Kali virtual machine, use the ping target command to test the internal virtual network connection between the two virtual machines. Use Ctrl-C to stop the ping test:
With both experimental environments set up, we can now proceed with penetration testing.
9. Introduction to the Metasploitable2 Target Machine
9.1 Overview of Metasploitable2
Metasploitable2 is a vulnerable target machine system used in penetration testing training environments. It is essentially a customized Ubuntu operating system designed for penetration testing and vulnerability demonstrations. This system is deliberately exposed with common security issues, and in upcoming experiments, we will use Kali Linux to identify vulnerabilities and perform attacks on this target system.
Metasploitable2 is distributed as a virtual machine. In the training environment, the version provided is 2.0.0, which is the latest version available for download but has not been updated since 2012.
Thanks to the rapid setup capabilities of the experimental environment, you won’t need to worry about breaking the target system during penetration testing. Simply stop the environment and restart to receive a fresh target machine for testing.
Note: Portions of this section are sourced from the official Metasploitable2 documentation.
9.2 Installing Metasploitable2
Note: The experimental environment already has a pre-configured Metasploitable2 virtual machine, so the following instructions are for users who wish to set up the target machine locally.
First, download the latest version of the Metasploitable2 virtual machine image from the following link:
You can use the wget command to download the file. The downloaded file is a ZIP archive, which needs to be extracted using the following command:
unzip metasploitable-linux-2.0.0.zip
The extracted file is a virtual disk image in VMDK format. You can create a new virtual machine using VMware or VirtualBox software and select “use an existing disk” when prompted to select a disk. Once the new virtual machine is created, click “Start” to launch it.
The default username and password for the Metasploitable2 environment are both msfadmin. The SSH service is enabled by default, allowing you to log in using SSH.
9.3 Logging into Metasploitable2
Following the steps outlined in section 7.3, use SSH to log in to the Metasploitable2 system with the username and password set as msfadmin:
9.4 Viewing Open Services
To facilitate vulnerability tests across various services, the target system comes pre-configured with multiple open services. Use the netstat -tln command to view the current listening ports:
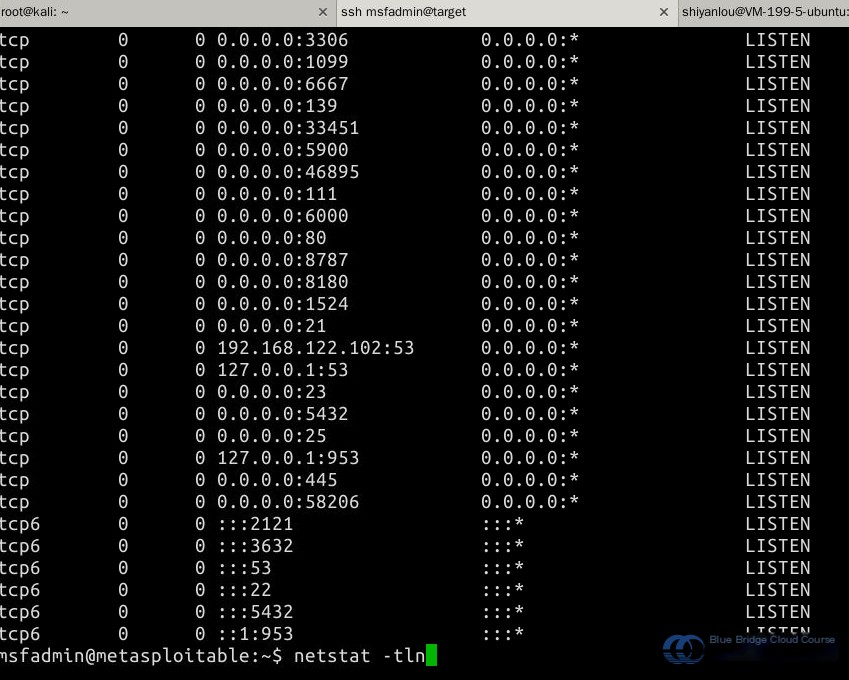
In the above list, you can observe a variety of active network services. For instance, port 21 is assigned to FTP, while port 22 is for SSH, both of which pose potential attack risks. In subsequent experiments, we will exploit vulnerabilities in these services to gain access to the Metasploitable2 system.
Additionally, use the rpcinfo command to examine available services:
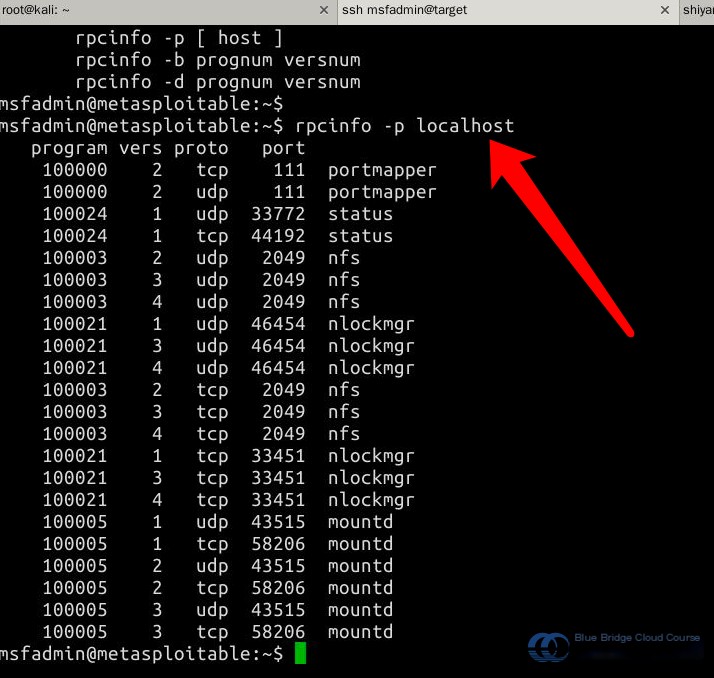
This list details the available services along with their respective port numbers.
9.5 Weak Passwords
The Metasploitable2 system is rife with weak passwords across its system and data accounts. Examples include but are not limited to:
- msfadmin:msfadmin
- user:user
- postgres:postgres
- sys:batman
- klog:123456789
- service:service
9.6 Backdoor Services
Many potential backdoor services are built into the system. For instance, the vsftpd FTP service contains a vulnerability that opens a shell on port 6200 if an FTP username with a smiley symbol ( :)) is received. You can test this vulnerability using telnet to connect to the vsftpd service and exploit it with the smiley symbol to obtain a shell.
This simple experiment is left as an exercise for readers to try independently. Discussion and methods can be shared in the forums.
9.7 Web Services
Several pre-installed web services with vulnerabilities are present in the Metasploitable2 system. To explore them, open the Firefox browser in the experimental environment and navigate to http://target:
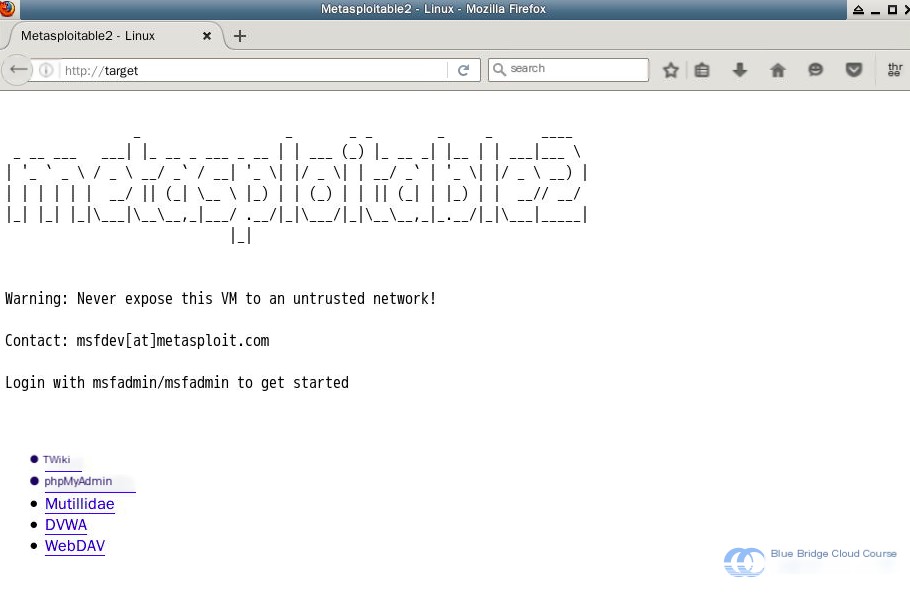
These web applications contain many exploitable web vulnerabilities. We will learn how to leverage these vulnerabilities to conduct web penetration testing in another workshop.
10. Scanning Operations in the Test Environment
10.1 Login to Kali
First, use SSH to connect to Kali. Most of our attack operations will take place on the Kali virtual machine. Note that the username is “root” and the password “toor” is not displayed. Use the command ssh root@kali to connect. In this test environment, the mapping between the IP address and hostname is already written into the /etc/hosts file, which eliminates the need to input difficult-to-remember IP addresses:
10.2 Scan Open Services on Target Host
We can use the Nmap tool on Kali to scan for open services on Metasploitable2. To save time, we will only scan ports 1-1000. It is important to note how to use Nmap parameters properly:
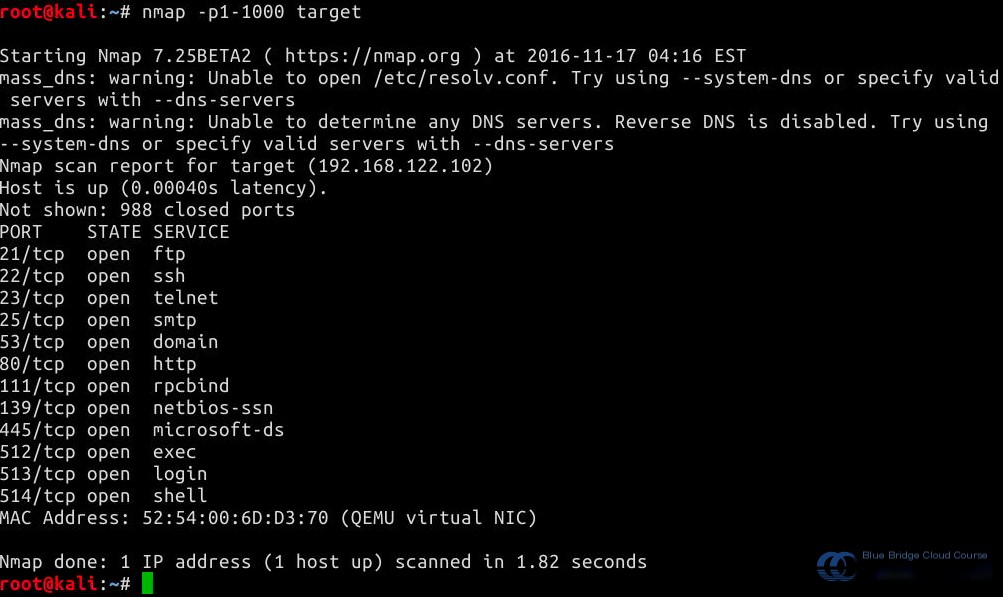
In subsequent experiments, we will delve into the detailed usage of Nmap. Here, we are briefly introducing how to use the tool for scanning between two virtual machines in the test environment.
11. Summary
In this lab, we covered the following topics. If you have any questions or need clarification, feel free to discuss with us on the Shiyanlou Q&A platform:
- Understand what Kali Linux is
- Learn how to install Kali Linux
- Get familiar with the Metasploitable2 target machine
- Learn how to use the multi-machine test environment provided by Shiyanlou
- Attempt basic vulnerability scanning from Kali to the target machine
Make sure that you can complete the entire lab hands-on. Just reading the text is easy, but when you perform the operations, you’ll encounter various challenges. Overcoming these challenges is where the true learning happens.
12. Homework
- Deploy a Kali VirtualBox virtual machine locally and perform a scan on the local operating system once it starts up.
- Start the target machine in the Shiyanlou environment and complete the task in Section 9.6 by gaining Shell access through sending a smiley-face symbol to the FTP service.