(1) Snort Working Principle: Snort is a pattern-matching based network intrusion detection system (NIDS). It can be basically divided into two modules: first, a sniffer based on libpcap, and second, a rule parsing engine and rule matching. When the network card operates in promiscuous mode, Snort’s sniffer based on libpcap can capture all packets within the current network segment. Only machines in an environment with a HUB can Snort sniff all the traffic passing through the network, allowing Snort to be connected in parallel with any machine on the network segment. However, modern networks often replace HUBs with switches, requiring Snort to be serially connected within the network it needs to serve to accept and process the data on that segment. If parallel connection is still desired, ARP spoofing can be used to receive and handle packets from other machines. Building a stable NIDS in an enterprise environment using HUB and ARP spoofing is impractical; a more reliable solution is to use traffic mirroring to “mirror” the traffic from the core switch to the IDS server and then start Snort to process the traffic.
(2) Snort Installation 1. Elevate to root privileges:
sudosu2. Update the sources
gedit /etc/apt/sources.list
Find a suitable domestic source for your version, replace it in the file, and save.
 apt-get update
 apt-get upgrade
3. Install the dependencies required for Snort (remember to use sudo su to elevate to root privileges first, or some packages might fail to install) (1) Install the required header file libraries:
 apt-get install gcc                   : Compiler, if it errors, use apt-get install g++
apt-get install flex                 : Parser required by DAQ
apt-get install bison                : Parser required by DAQ
apt-get install zlib1g-dev           : Compression library required by Snort
apt-get install libpcap-dev          : Network traffic capture header libraries required by Snort
apt-get install libdnet-dev          : Not mandatory, but provides simplified portable interfaces for some network routines by Snort
apt-get install luajit               : Lua header libraries
apt-get install liblua5.1-0-dev
apt-get install liblua5.1-0-dev liblua50-dev liblualib50-dev
apt-get install build-essential       : Provides tools for building compilation software
apt-get install libpcre3-dev          : pcre3 header files required by Snort
apt-get install libdumbnet-dev       : Same as libdnet
apt-get install openssl libssl-dev    : SSL encryption components providing SHA and MD5 file signatures
apt-cache search lua
(2) Install libpcap from source Change to the directory containing your libpcap package and run the following commands (the following source installation steps are generally the same. If it is a compressed file, extract it first)
 cd libpcap-1.9.0
 ./configure && make && make install
(3) Install nghttp2 from source
 cd nghttp2-1.35.0
 ./configure && make && make install
(4) Install LuaJIT from source
 cd LuaJIT-2.0.5
make && make install
(5) Install pcre from source
 cd pcre-8.42
 ./configure && make && make install
(6) Install daq from source
 cd daq-2.0.6
 ./configure && make && make install
(7) Install snort from source
 cd snort-2.9.12
 ./configure --enable-sourcefire
checking for a BSD-compatible install... /usr/bin/install -c

If you see the pig, the installation was successful
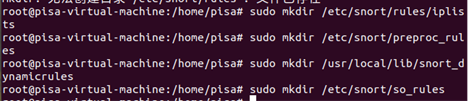
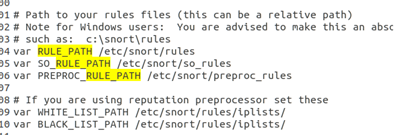
4. Configure Snort as NIDS (1) Create some necessary directories Installation directory:
 sudo mkdir /etc/snort
sudo mkdir /etc/snort/rules
sudo mkdir /etc/snort/rules/iplists
sudo mkdir /etc/snort/preproc_rules
sudo mkdir /usr/local/lib/snort_dynamicrules
sudo mkdir /etc/snort/so_rules
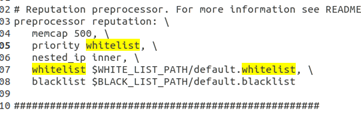
Store filter rules and server blacklists/whitelists:
sudo touch /etc/snort/rules/iplists/default.blacklist
sudo touch /etc/snort/rules/iplists/default.whitelist
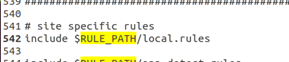
sudo touch /etc/snort/rules/local.rules

Create log directories:
 sudo mkdir /var/log/snort
sudo mkdir /var/log/snort/archived_logs

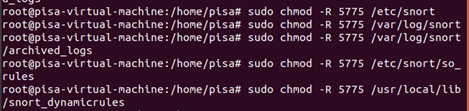
Adjust permissions:
 sudo chmod -R 5775 /etc/snort
sudo chmod -R 5775 /var/log/snort
sudo chmod -R 5775 /var/log/snort/archived_logs
sudo chmod -R 5775 /etc/snort/so_rules
sudo chmod -R 5775 /usr/local/lib/snort_dynamicrules
Change directory ownership: (use your host’s username with the -R flag)
 sudo chown -R snort:snort /etc/snort
sudo chown -R snort:snort /var/log/snort
sudo chown -R snort:snort /usr/local/lib/snort_dynamicrules

(2) Copy files to /etc/snort, ensure the paths are correct:
 sudo cp snort-2.9.12/etc/*.conf* /etc/snort
sudo cp snort-2.9.12/etc/*.map /etc/snort
sudo cp snort-2.9.12/etc/*.dtd /etc/snort
sudo cp snort-2.9.12/src/dynamic-preprocessors/build/usr/local/lib/snort_dynamicpreprocessor/* /usr/local/lib/snort_dynamicpreprocessor/

(3) Modify the default configuration
(3) Testing
sudo snort -T -c /etc/snort/snort.conf -i ens33 #ens33 represents the network interface, which can be checked using the ifconfig command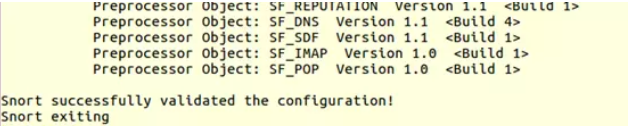
1. Detect ARP Spoofing Attack Open the file using the command gedit /etc/snort/snort.conf. (1) Search for ARP, remove the # in front of the two preprocessor lines, and change the IP and physical address after the host to the gateway IP and physical address.
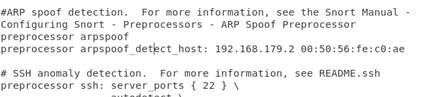
(2) Remove the # in front of include $PREPR0_RULE_PATH/preprocessor.rules, save the file, and exit.

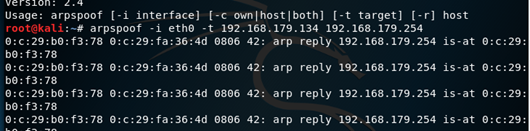
(3) Run snort -v to start detection, and use another virtual machine, kali, to perform ARP spoofing on the host where snort is installed.
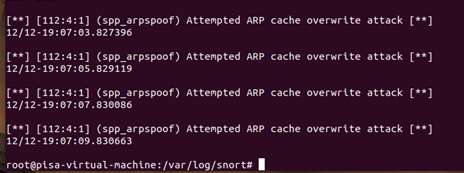
(4) View the results
 cd /etc/snort
snort -c snort.conf
cd /var/log/snort
cat alert
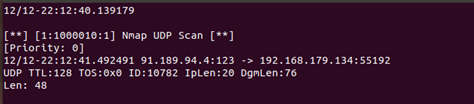
2. Snort detects nmap scan