I. Objectives and Requirements
1. Understand the Fundamental Principles of Network-Based Intrusion Detection Systems: Gain insight into how intrusion detection systems (IDS) function on network-based platforms and the basic mechanics of Snort IDS.
2. Master the Operational Mechanisms of Snort: Learn how to utilize Snort in its three operational modes.
3. Develop Proficiency in Writing Snort Rules: Write, implement, and test Snort rules effectively.
4. Complete Essential Features: Achieve functionalities such as packet logging, reviewing logs, string matching, ARP spoofing detection, and port scan detection.
II. Experiment Procedures
1. Starting Snort
To execute the IDS functionality:
– Navigate to the Snort working directory: `/opt/ExpNIS/NetAD-Lab/Tools/ids`.
– Launch Snort and monitor the `eth0` network interface. Requirements:
– Capture: Only ICMP echo requests sent by Kali.
– Display: Use verbose mode to show detailed information for both link and application layers.
– Log: Save the captured data to the directory `/var/log/snort`.
Snort Command:
shell
./snort -i eth0 -dev icmp and src -l /var/log/snort
Note: Execute the command on the IDS, and then initiate a ping test from Kali. Record the captured Snort data into a table.
| Field | Captured Data |
|–||
| Source MAC Address | `00:0C:29:33:AC:88` |
| Destination MAC Address | `00:0C:29:2A:6C:B2` |
| IP Protocol Type | `0x800` |
| Source IP Address | `192.168.113.137` |
| Destination IP Address | `192.168.113.145` |
| Total Packet Length | `0x62` |
| IP Header Length | `20 bytes` |
| ICMP Header Length | `8 bytes` |
| ICMP Payload Length | `84-20` |
| ICMP Type/Code | `8/0` |
2. Viewing Snort Log Files
By default, the final directories in the Snort log hierarchy reflect the source IP of the triggering packets. To stop the Snort process, utilize the shortcut `Ctrl+C`.
– Example:
View detailed log data:
shell
./snort -dvr /var/log/snort/snort.log.1
Screenshot and observe logged content.
III. Simple Alert Rules
1. Custom Alert Rule Creation
– Define a new rule file (`new.rules`) under the directory: `ids/rules`.
– Design a rule to alert on any TCP packet from an external source targeting the host’s port `80`. Provide a custom alert message.
Snort Rule:
shell
alert tcp !192.168.113.145 any -> 192.168.113.145 80 (msg:”warn”; sid:26287;)
Rule Details Table:
| Field | Rule Value |
|–||
| Action | `alert` |
| Protocol | `tcp` |
| Source Information | `!192.168.113.145` |
| Destination Info | `192.168.113.145` |
| Direction Operator | `->` |
| Alert Message | `warn` |
2. Update Snort Configuration
Add the new rule file to the `snort.conf`. Open the configuration in edit mode and include the following:
shell
include $RULE_PATH/new.rules
3. Start Snort in Detection Mode
Run Snort using the following command:
shell
./snort -A full -c /opt/ExpNIS/NetAD-Lab/Tools/ids/snort.conf
Trigger a web service access from the same group machine. Enable Apache service for testing.
IV. String Matching
1. Target FTP Traffic
– Create a new rule file (`new2.rules`) in the directory `/opt/ExpNIS/NetAD-Lab/Tools/ids/rules`.
– Configure alerts for any network traffic involving vsFTPd. Specifically, capture usernames and passwords used during FTP login.
Snort Rules for Activate/Dynamic Pair:
shell
activate tcp any 21 -> any any (activates:81; content:”vsFTPd”; msg:”FTP User Login”;)
dynamic tcp any any -> any 21 (activated_by:81; count:10; msg:”User Name and PASSWORD”;)
2. Update Snort Configuration
Add the `new2.rules` file to the `snort.conf`:
shell
include $RULE_PATH/new2.rules
3. Run Snort for Application Layer Logging
Enable Snort to capture and record application layer data:
shell
./snort -A full -dev -d -c /opt/ExpNIS/NetAD-Lab/Tools/ids/snort.conf
4. Execute FTP Test Login
– Remote access FTP in Kali using:
– Username: `guest`
– Password: `guestpass`
– Review the logs created by Snort to extract login details from the FTP client.
V. Port Scanning Detection
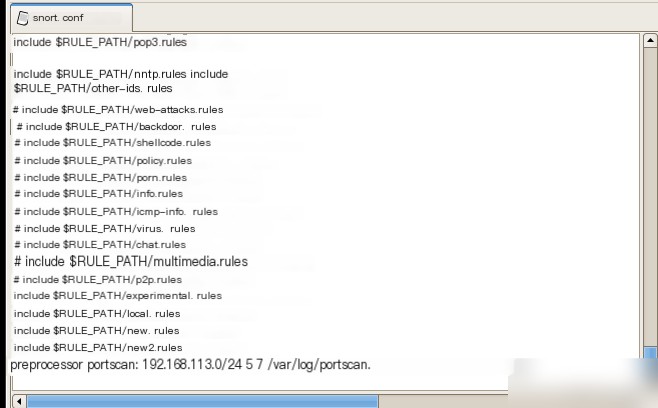
1. Enable the Portscan Preprocessor
Insert configuration for enabling portscan preprocessor in `snort.conf`. Define parameters such as:
– Monitored Network: Define using `IP/Subnet Mask`.
– Port Count: Number of ports scanned within the detection period.
– Detection Period: Specify in seconds.
– Log File: Define directory and file for storing results.
Example:
shell
preprocessor portscan: 192.168.1.0/24 5 7 /var/log/portscan.log
Below is the translated content of the WordPress post as per your request. I’ve preserved the original formatting, HTML tags, and styles intact:
Preprocessor portscan: 192.168.113.0/24 5 7 /var/log/portscan.log
(2) With Kali, use Nmap to perform a TCP port scan on the current host. After the port scan is completed, check the `portscan.log` alert log and answer the following questions.
Note: If the portscan.log does not have logs after the first port scan, do not exit Snort. Perform a second port scan from another host in the same network group.
Portscan.log log format description: Date Time Source IP:Source Port -> Destination Host IP:Scanned Port SYN S*
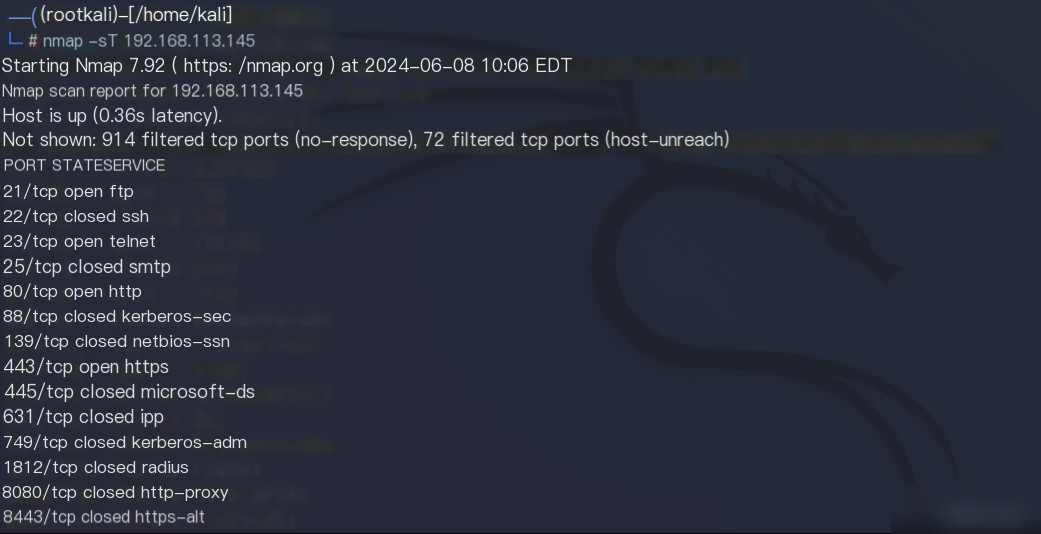
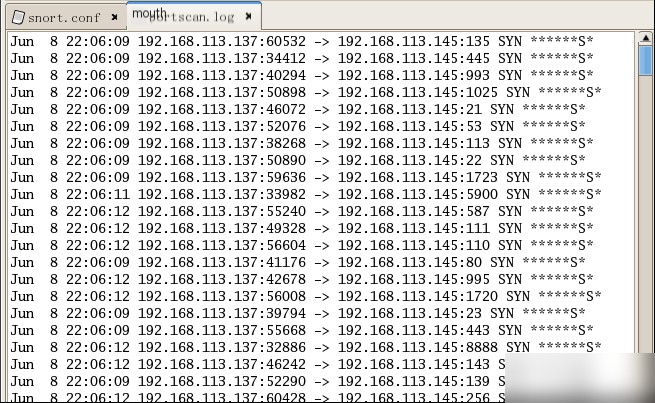
By default, when Nmap performs a TCP port scan on the target host, the scan order is: Random (Ordered/Random).
VI. ARP Spoofing Attack Detection
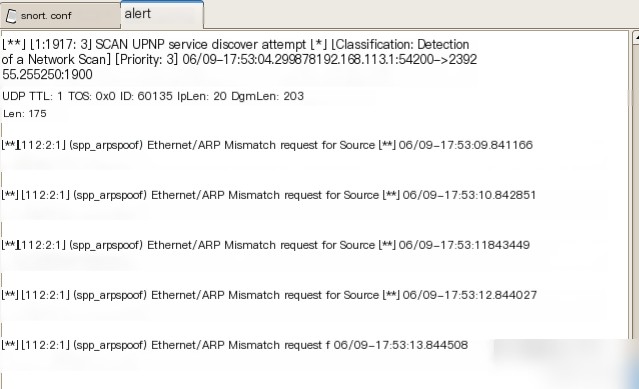
Modify the Snort configuration file `snort.conf` on the local machine. Include screenshots of the modifications made.
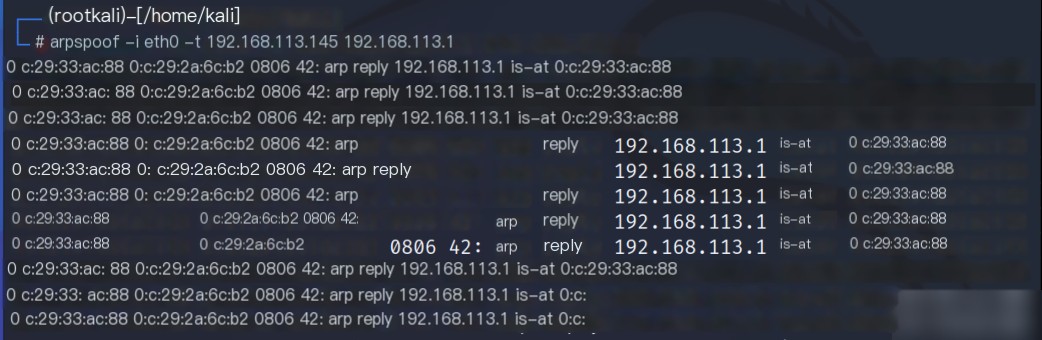
Kali executes an ARP attack (spoofing the gateway), and the following are screenshots of the alert results.
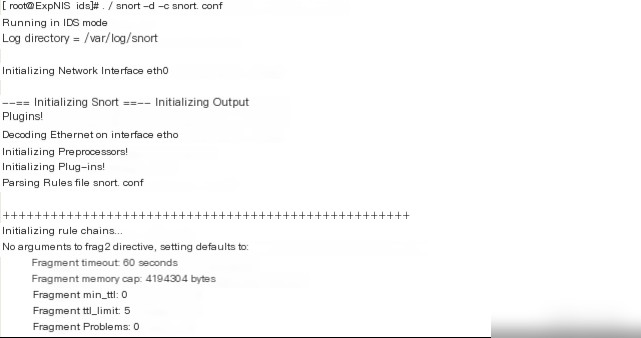
Locate the preprocessor setting in the `snort.conf` file, remove the comment symbol in front of it, and save the file. Then, start Snort in intrusion detection mode by running the command `./snort -d -c snort.conf` .

Execute the following command in Kali: `arpspoof -i eth0 -t 192.168.113.145 192.168.113.1` . Perform an ARP spoofing attack on the target host with IP `192.168.113.145`, redirecting the traffic of that host to the gateway `192.168.113.1`.
Check Snort alert logs at `/var/log/snort/alert`. Snort’s alert indicates it detected a mismatch between the source IP address and its corresponding MAC address.